|
|
| (26 intermediate revisions by 2 users not shown) |
| Line 3: |
Line 3: |
| __TOC__ | | __TOC__ |
|
| |
|
| =Resumen:=
| |
|
| |
|
| Para crear una nueva encuesta presione el botón "Anadir” que se encuentra al lado derecho de la barra de "Botones de Administración”. Aparecerá una nueva ventana llamada "Crear Nueva Encuesta”. La mayoría de las preferencias se pueden editar más adelante presionando "Editar Opciones de la Encuesta” en el menú de "Propiedades de la Encuesta” de la "Barra de la Encuesta”.
| | {{Alert|title=Attention|text=Please note that this tutorial uses explanations and screenshots that are applicable to LimeSurvey 3.xx. Small differences exist between LimeSurvey 3.xx and LimeSurvey 2.xx, especially in terms of design.}} |
| | {{Box|Click on the following link to access the survey settings wiki section for the [[Survey settings version 2|version 2.xx]].}} |
|
| |
|
| =Preferencias:=
| |
|
| |
|
| Todas las preferencias y funciones están organizadas en pestañas. A continuación, una descripción de cada pestaña y campo.
| | =Introduction= |
|
| |
|
| ==General==
| |
| *1. '''Idioma base''': Establece el idioma base de la encuesta. Una vez grabado no se puede cambiar. Este idioma es la base para posibles traducciones de la encuesta. Durante la creación de la encuesta no se pueden añadir idiomas, pero esto se puede hacer editando las propiedades de la encuesta una vez finalizada.
| |
| *2. '''Título''': Es un nombre breve y descriptivo para la encuesta. Este título estará presente en todas las páginas de la encuesta.
| |
| *3. '''Descripción''': Permite añadir una descripción de la encuesta. Se pueden incorporar elementos HTML como imágenes o videos en esta sección utilizando el editor WYSIWYG. La descripción es incluida en el correo electrónico de invitación.
| |
| *4. '''Mensaje de Bienvenida''': Permite crear un mensaje que será visible cuando el participante entre por primera vez a su encuesta. Se pueden incorporar elementos HTML como imágenes o videos en esta sección utilizando el editor WYSIWYG.
| |
| *5. '''Mensaje Final''': Permite crear un mensaje que será visible cuando el participante finalice su encuesta. Se pueden incorporar elementos HTML como imágenes o videos en esta sección utilizando el editor WYSIWYG.
| |
| *6. '''URL Final''': Este URL estará presente como un enlace al final de la encuesta, lo cual permite redirigir al participante a cualquier página en la web. Debe ser entrado con "http://” al principio. Puede usar {SAVEDID}, {TOKEN}, {SID} y {LANG} en el URL.
| |
| **SAVEDID es la identificación de una encuesta en particular, TOKEN es utilizado para identificar a un participante en particular, SID es la identificación de la encuesta como tal y LANG es el lenguaje del código.
| |
| **Ejemplo: http://www.limesurvey.org/test.php?var1={SAVEDID}&var2;={TOKEN}&var3;={SID}⟨={LANG}
| |
| **De la versión 1.82 en adelante se pueden usar campos URL como por ejemplo {INSERTANS:SGQA} en este URL Final. Esto permite añadir la respuesta a una pregunta específica al URL Final.
| |
| **Esto puede ser útil para enviar una respuesta particular a un "External Script”. También puede usar el nombre de un campo y relacionarlo a un valor en el URL. En algunos casos usted podría querer pasar un valor en el principio de la encuesta y después utilizarlo en una "External Script” al final. En este caso usted empezaría la encuesta con el URL "index.php?sid=12345&passthru;=subsid&subsid;=9999”. Luego utilizaría {PASSTHRULABEL} y {PASSTHRUVALUE} para reusar esos valores al final de la encuesta. Un URL como "http://www.limesurvey.org/test.php?{PASSTHRULABEL}={PASSTHRUVALUE}" se convertiría en "http://www.limesurvey.org/test.php?subsid=9999".
| |
| *11. '''Descripción del URL''': Una descripción para el enlace del URL final.
| |
| *12. '''Administrador''': Este es el nombre de la persona contacto quien administra la encuesta, será incluido en correos electrónicos enviados para invitar a los participantes.
| |
| *13. '''Correo Electrónico del Administrador''': Este es la dirección de correo electrónico del administrador previamente definido. Cualquier respuesta a correos electrónicos enviados llegara a esta dirección. Pueden ser varias direcciones separadas por punto y coma (;).
| |
| *14. '''Correo Electrónico de Rebote''': Esta es la dirección a la cual de haber un error de envío un mensaje es mandado. Usualmente es la misma dirección que la del administrador.
| |
| *15. '''Fax''': Este campo se utiliza para dar un número de fax en la versión impresa de la encuesta.
| |
|
| |
|
| <div class="simplebox">Precaución: El editor HTML WYSIWYG no permite subir archivos durante la creación de la encuesta. Si usted necesita subir láminas u otros recursos lo deben hacer después de la creación de la encuesta editando la misma.</div>
| | The survey settings menu allows users to edit different survey-related settings. The following survey settings are available by default: |
|
| |
|
| ==Presentación y Navegación==
| |
| *1. '''Formato''': Seleccione entre “Preguntas por Preguntas”, “Grupo por Grupo” o “Todas en una”
| |
| **a. Preguntas por Preguntas: Presentara una pregunta por página.
| |
| **b. Grupo por Grupo: Presentara un grupo de preguntas por página. Tienen una página de “Bienvenida” y “Envío” separadas.
| |
| **c. Todas en una: Presentara todas las preguntas en la misma página. NO tienen una página de “Bienvenida” y “Envío” separadas.
| |
| *2. '''Plantilla''': Seleccione una de las plantillas (templates) instaladas en su sistema.
| |
| *3. '''Enseñar Ventana de Bienvenida''': Seleccione Si o No para presentar el mensaje definido de Bienvenida.
| |
| *4. '''Retraso de Navegación''': Selecciones la cantidad de segundos que el participante debe esperar para que los botones “Anterior” y “Próximo” sean activados.
| |
| *5. '''Enseñar el Botón “Anterior”''': Seleccione Si o No para darle la opción al participante a moverse a páginas anteriores mientras completa la encuesta.
| |
| *6. '''Enseñar el número de pregunta/Permitir brincar''': Seleccione Si o No para presentar a la derecha los números de las preguntas y permitir cambiar de una a otra.
| |
| *7. '''Operación sin teclado''': Seleccione Si o No para activar un teclado virtual cuando sea necesario.
| |
| *8. '''Enseñar la barra de progreso''': Seleccione Si o No para enseñar la barra de progreso
| |
| *9. '''Participantes pueden imprimir las respuestas''': Seleccione Si o No para permitir que el usuario imprima un resumen de sus respuestas al finalizar la misma.
| |
| *10. '''Estadísticas Públicas''': Seleccione Si o No para que al finalizar la encuesta halla un enlace a las estadísticas de la encuesta. Se pueden escoger que preguntas incluir.
| |
| *11. '''Presentar graficas en estadísticas públicas (versión 1.80+)''': Seleccione Si o NO para determinar si las estadísticas presentan gráficas.
| |
| *12. '''Automáticamente acceder URL cuando la encuesta finalice''': Seleccione Si o No para automáticamente llevar al usuario al URl Final establecido.
| |
| *13. '''Enseñar “Hay X preguntas en la encuesta”''': Seleccione Si o No para enseñar este mensaje en la Bienvenida.
| |
| *14. '''Enseñar los nombres/descripción de los grupos''': Seleccione entre Enseñar Ambos, Enseñar Nombres Solamente, Enseñar Descripción Solamente, o Esconder Ambos.
| |
| *15. '''Enseñar los números/códigos de las preguntas''': Seleccione entre Enseñar Ambos, Enseñar Números Solamente, Enseñar Códigos Solamente, o Esconder Ambos.
| |
| *16. '''Enseñar “No respuesta”''': Seleccione Si o No para permitir que el usuario no conteste preguntas opcionales.
| |
|
| |
|
| ==Publicación y Control de Acceso==
| | <center>[[File:Settings Menu screen.png]]</center> |
| *1. '''Enlistar la encuesta públicamente''': Seleccione Si o No para enlistar la encuesta como "Disponible”
| |
| *2. '''Fecha de comienzo''': Seleccione la fecha y hora, si desea, en la que empezara la encuesta.
| |
| *3. '''Fecha de expiración''': Seleccione la fecha y hora, si desea, en la que expirará la encuesta.
| |
| *4. '''Prevenir múltiples participaciones''': Selecciones Si para prevenir que desde una misma computadora se hagan múltiples encuestas.
| |
| *5. '''Usar CAPTHCHA para''': Con esta opción usted escoge cuando quiere se use un CAPTHCA.
| |
|
| |
|
| ==Notificaciones y Manejo de data==
| |
| *1. '''Correo Electrónico para enviar la notificación básica y Correo Electrónico para enviar la notificación detallada''': Estos campos permiten enviar notificaciones a direcciones adicionales una vez la encuesta está finalizada. Las plantillas (templates) de estos correos electrónicos se pueden editar. Múltiples direcciones se separan con punto y coma (;). Hay tres formas de entrar direcciones:
| |
| **a. Una dirección de correo electrónico
| |
| **b. Un código SGQA para enviar el correo electrónico a una dirección entrada como respuesta a una pregunta.
| |
| **c. Un código TOKEN (solo si la encuesta no es anónima) para enviar a una dirección encontrada en un campo TOKEN con el formato {TOKEN:EMAIL} o {TOKEN:ATTRIBUTE'''1}.
| |
| *2. '''Estampilla de Fecha''': Seleccione Si o No para que todas las respuestas indiquen la fecha y hora en la que fueron contestadas.
| |
| *3. '''Guardar "IPaddress”''': Seleccione Si o No para que todas las respuestas indiquen el "IPaddress” del participante.
| |
| *4. '''Guardar URL del cual fue referido''': Seleccione Si o No para que todas las respuestas indiquen el URL del cual el participante acceso la encuesta.
| |
| *5. '''Activar Evaluaciones''': Seleccione si activar o desactivar las evaluaciones para la encuesta.
| |
| *6. '''Guardar Tiempos''': Activar para crear una tabla con la cantidad de tiempo que el participante se tomó para contestar cada pregunta.
| |
| *7. '''Participante puede guardar y continuar después''': Seleccione Si o No para que el usuario pueda guardar sus respuestas y continuar después, es más recomendable que se utilice en encuestas anónimas.
| |
|
| |
|
| '''Google API howto''':
| | *[[Survey settings#Overview|Overview]] |
| # Register/login on Google Analytics (GA): [http://www.google.com/analytics/ www.google.com/analytics/] | | *[[Survey settings#General settings|General settings]] |
| # Create a key (the site should not point to the survey, but to the part before 'index.php?') The key should be UA-xxxxx. | | *[[Survey settings#Survey texts|Text elements]] |
| # Go to your survey's global settings in LimeSurvey. | | *[[Survey settings#Data policy settings|Data policy settings]] |
| # Put the key in appropriate field (Google Analytics API Key). It's probably the best to set GA Style to track all pages as you can have more info. | | *[[Survey settings#Theme options|Theme options]] |
| # You don't need to do anything in shipped templates, as the {GOOGLE_ANALYTICS_JAVASCRIPT} part is already there. | | *[[Survey settings#Presentation|Presentation]] |
| # Activate the survey. | | *[[Survey settings#Participant settings|Participant settings]] |
| # Do the survey. | | *[[Survey settings#Notifications & data|Notifications & data]] |
| # Go to GA panel mainsite. (select appropriate account in left-hand upper corner if you have more than one). You should see some graphs with the statistics. Beware of the dates in upper right corner. | | *[[Survey settings#Publication & access|Publication & access]] |
|
| |
|
| ==TOKENS==
| |
| *1. '''Respuestas anónimas''': Esto permite escoger entre recopilar información de los participantes (utilizar TOKENS) o mantener la encuesta anónima.
| |
| *2. '''Permitir editar respuestas después de completar''': Esto permite que el usuario pueda re-acceder la encuesta mediante la invitación y cambiar sus respuestas (solo funciona con encuestas no anónimas).
| |
| *3. '''Activar persistencia de respuestas basadas en TOKENS''': Esto permite que cada vez que el participante conteste una pregunta se grabe la encuesta automáticamente (solo funciona si la encuesta tiene TOKENS y no es anónima).
| |
| *4. '''Permitir registración pública''': Si usted utiliza TOKENS en su encuesta las únicas personas que pueden acceder la misma son las que tienen un TOKEN único de la tabla de TOKENS. Si usted quiere utilizar TOKENS y permitir registración publica seleccione esta opción. Esto permite que un visitante se registre con su nombre y correo electrónico; se creará un TOKEN nuevo para esta persona y luego se le enviará la invitación.
| |
| *5. '''Usar formato HTML para correos electrónicos con TOKENS''': Seleccione Si o No para que todos los correos electrónicos enviados por la administración de TOKENS (invitación, recordatorio, confirmación) sean formateados con HTML.
| |
| *6. '''Definir el largo de un TOKEN''': El número definido debe ser mayor que 5 y menor que 99.
| |
|
| |
|
| ==Importar==
| | In the screenshot above, two buttons are emphasized. They can be used by users to rearrange the survey settings menu dimensions. If you wish to rearrange the main survey settings menu, drag the right side of the menu to the left or to the right by clicking the '''three-dots'''. If you click the '''left arrowhead''', the menu collapses and is minimized until the only a side menu with icons is left. To go back to the default view of the survey settings menu, click the '''right arrowhead''' located above the survey settings menu. Hover the mouse over each option to see what each icon does. |
|
| |
|
| Alternativamente usted puede importar una estructura de encuesta desde esta pestaña en "Creación de Encuestas”. Usted tiene la opción de permitir que LimeSurvey automáticamente convierta URLs relativos a imágenes/media local y INSERTANS (recomendado).
| | <div class="simplebox">[[File:help.png]] '''Note''': The menu can be changed/edited from the [[Menu configuration]] and [[Menu entries configuration]] pages. They can be accessed from the LimeSurvey configuration dialog. '''We recommend that only advanced users edit menus.'''</div> |
|
| |
|
| ==Copiar==
| |
|
| |
|
| Alternativamente usted puede copiar una encuesta existente desde esta pestaña en "Creación de Encuestas”. Usted tiene la opción de permitir que LimeSurvey automáticamente convierta URLs relativos a imágenes/media local y INSERTANS (recomendado).
| | {{Note|The survey menu (located below the survey settings) is described [[Survey menu|here]].}} |
|
| |
|
| ==Panel integration (URL parameters)== | | =Overview= |
|
| |
|
| <div class="simplebox"> Please note that this tab is currently not visible on survey creation but only when you edit the survey settings after saving them for the first time.</div>
| |
|
| |
|
| On this tab you can set which additional URL parameters will be accepted by your survey. If you like you can also save the value as a response of a "Short text question" or "Multiple short text question" type (you will be able to select any short text question to save it to). Even if you do NOT save the value of the URL parameter you will be able to use this parameter in the end URL. Please have a look at the documentation of the End-URL for further information.
| | The overview page offers an overview of your survey. It is divided in two parts: |
| | *'''Overview toolbar:''' The functions from the toolbar allow you to start/stop the survey, check its logic, save & export it, add survey participants, and manually introduce survey participants' data (in the case in which you conduct an offline survey); |
|
| |
|
| ==Recursos==
| | *'''Survey summary:''' A short summary of your survey. |
|
| |
|
| Esta pestaña permite manejar archivos (fotos, media) que han sido subidos en el Editor HTML. Es visible solo al editar la encuesta no en su creación.
| |
|
| |
|
| Usted puede:
| | For a complete description, check the [[Overview|Overview panel]] wiki page. |
| *1. Navegar los archivos disponibles
| |
| *2. Exportar archivos como ZIP
| |
| *3. Importar archivos como ZIP
| |
|
| |
|
| Importante:
| | =General settings= |
| *1. Extensiones de archivos autorizados son definidas en config-degaults.php
| |
| *2. Los archivos para la encuesta están en el subdirectorio upload/surveys/<sid>
| |
| *3. Los archivos subidos solo se podrán ver mientras se navega por los recursos de una encuesta en particular no desde otras encuestas u objetos.
| |
| *4. No se puede esperar que esta visibilidad limitada asegure la confidencialidad de los recursos ya que estos son accesibles con un navegador de la web para cualquier persona que sepa el URL al archivo.
| |
| *5. No se pueden importar archivos ZIP que contengan subdirectorios.
| |
|
| |
|
| =Idiomas Adicionales=
| |
|
| |
|
| Para añadir idiomas adicionales a una encuesta, esta debe ser creada y grabada para luego editarla. Una vez haga esto usted puede añadir y eliminar idiomas. Si usted elimina un idioma de una encuesta todo el contenido relacionado a dicho idioma será permanentemente borrado.
| | The general settings of a survey allow the user to edit basic survey information, such as the survey owner, administrator's email, and the template used in the survey. |
|
| |
|
| Al presionar "Grabar y continuar” en la primera página en las opciones de la encuesta usted será enviado a una página específica para manejar idiomas. Esta página permite cambiar todo el texto de cada idioma como el Nombre de la Encuesta, Bienvenida, Texto, etc. Usted también puede editar el formato de la fecha a utilizarse en cada idioma.
| | For further details, please continue reading [[General settings|the following wiki]] page. |
|
| |
|
| Previous [[Creating surveys - Introduction]]
| | =Text elements= |
|
| |
|
| Next [[Importing a survey structure]]
| | |
| | From the '''Survey text elements''' panel, you can edit the title of the survey and its description, welcome and end messages, end URL, and the format of the decimal mark and date. |
| | |
| | For more details, access the [[Text elements|Survey text elements]] section. |
| | |
| | |
| | =Data policy settings= |
| | |
| | |
| | The set of options displayed under this option are related to the security text/policy settings. These are the settings that survey participants need to be aware of before completing the survey. |
| | |
| | For more details, access our wiki section on [[Data policy settings|data policy settings]]. |
| | |
| | =Theme options= |
| | |
| | |
| | This panel is for users who would like to enhance their templates by using the inheritance function and the bootswatch themes. |
| | |
| | For more details, access our wiki section on [[Theme options|theme options]]. |
| | |
| | |
| | =Presentation= |
| | |
| | In this panel you can edit presentation- and navigation-related settings. These changes impact how the survey is presented to survey participants. You can choose to show the number of the questions at the beginning of the survey, a progress bar or the current statistics of the survey once it is completed, and so on. |
| | |
| | For a complete description, access the following [[Presentation|link]]. |
| | |
| | =Participant settings= |
| | |
| | |
| | From this menu you can edit different survey participants table settings. For example, you can choose to anonymize all the responses you get from a survey or allow public survey registration. |
| | |
| | For a complete description of the options, access our wiki section on [[Participant settings|survey participants handling]]. |
| | |
| | =Notifications & data= |
| | |
| | |
| | If you would like to save response-related details into the responses tables, access this panel. You can save the referrer URL, IP address, timings, etc. that can help you produce more in-depth analyses. Moreover, LimeSurvey allows you to use the tracking ID from Google Analytics. |
| | |
| | For more explanations, read about [[Notifications & data|notifications and data management settings]]. |
| | |
| | |
| | =Publication & access= |
| | |
| | |
| | This setting allows the survey administrator to choose the way in which the survey can be accessed by the survey participants (e.g., CAPTCHA codes can be used to increase the security of your survey). Moreover, you can also set up from here a start/expiry date/time. |
| | |
| | For more details on each option, read from our manual about [[Publication & access|Publication & access]]. |
 Attention :
 Please note that this tutorial uses explanations and screenshots that are applicable to LimeSurvey 3.xx. Small differences exist between LimeSurvey 3.xx and LimeSurvey 2.xx, especially in terms of design.
Click on the following link to access the survey settings wiki section for the
version 2.xx.
Introduction
The survey settings menu allows users to edit different survey-related settings. The following survey settings are available by default:
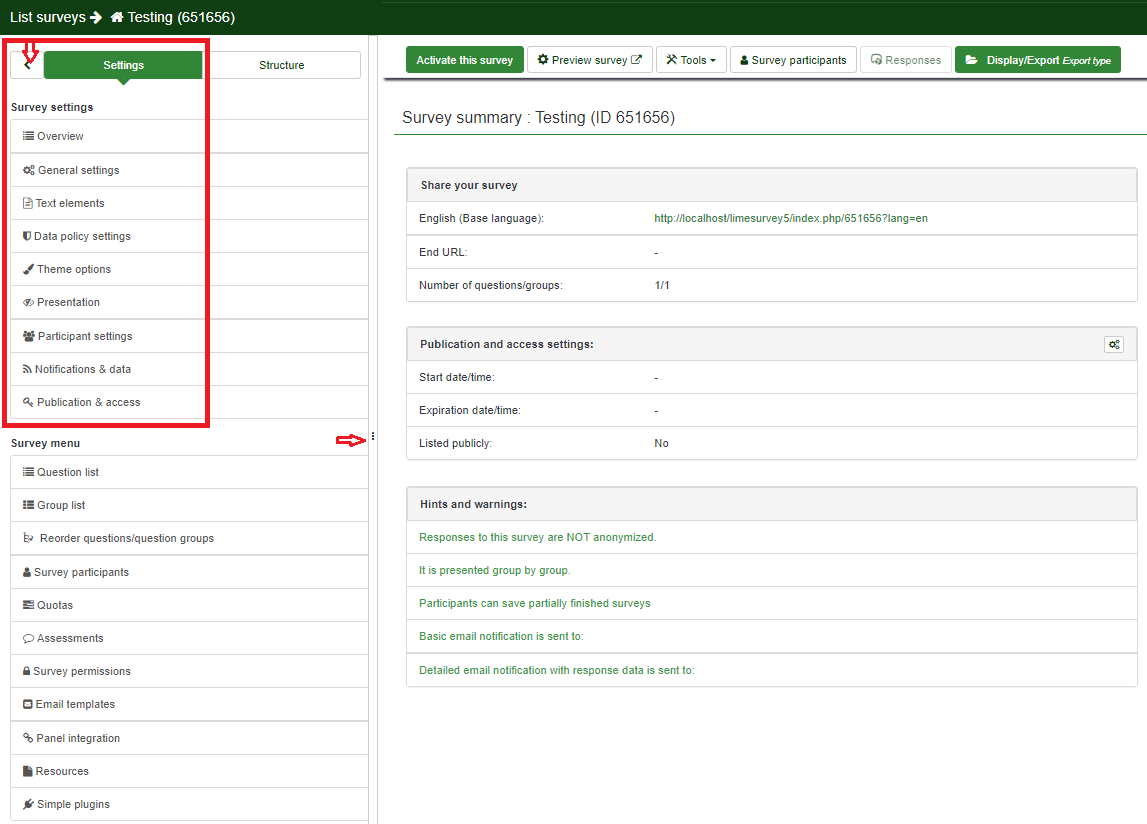
In the screenshot above, two buttons are emphasized. They can be used by users to rearrange the survey settings menu dimensions. If you wish to rearrange the main survey settings menu, drag the right side of the menu to the left or to the right by clicking the three-dots. If you click the left arrowhead, the menu collapses and is minimized until the only a side menu with icons is left. To go back to the default view of the survey settings menu, click the right arrowhead located above the survey settings menu. Hover the mouse over each option to see what each icon does.

The survey menu (located below the survey settings) is described
here.
Overview
The overview page offers an overview of your survey. It is divided in two parts:
- Overview toolbar: The functions from the toolbar allow you to start/stop the survey, check its logic, save & export it, add survey participants, and manually introduce survey participants' data (in the case in which you conduct an offline survey);
- Survey summary: A short summary of your survey.
For a complete description, check the Overview panel wiki page.
General settings
The general settings of a survey allow the user to edit basic survey information, such as the survey owner, administrator's email, and the template used in the survey.
For further details, please continue reading the following wiki page.
Text elements
From the Survey text elements panel, you can edit the title of the survey and its description, welcome and end messages, end URL, and the format of the decimal mark and date.
For more details, access the Survey text elements section.
Data policy settings
The set of options displayed under this option are related to the security text/policy settings. These are the settings that survey participants need to be aware of before completing the survey.
For more details, access our wiki section on data policy settings.
Theme options
This panel is for users who would like to enhance their templates by using the inheritance function and the bootswatch themes.
For more details, access our wiki section on theme options.
Presentation
In this panel you can edit presentation- and navigation-related settings. These changes impact how the survey is presented to survey participants. You can choose to show the number of the questions at the beginning of the survey, a progress bar or the current statistics of the survey once it is completed, and so on.
For a complete description, access the following link.
Participant settings
From this menu you can edit different survey participants table settings. For example, you can choose to anonymize all the responses you get from a survey or allow public survey registration.
For a complete description of the options, access our wiki section on survey participants handling.
Notifications & data
If you would like to save response-related details into the responses tables, access this panel. You can save the referrer URL, IP address, timings, etc. that can help you produce more in-depth analyses. Moreover, LimeSurvey allows you to use the tracking ID from Google Analytics.
For more explanations, read about notifications and data management settings.
Publication & access
This setting allows the survey administrator to choose the way in which the survey can be accessed by the survey participants (e.g., CAPTCHA codes can be used to increase the security of your survey). Moreover, you can also set up from here a start/expiry date/time.
For more details on each option, read from our manual about Publication & access.
