|
|
| Line 2: |
Line 2: |
|
| |
|
| __TOC__ | | __TOC__ |
| | |
| | |
| | |
| | {{Alert|title=Attention|text=Please note that this tutorial uses explanations and screenshots that are applicable to LimeSurvey 3.xx. Small differences exist between LimeSurvey 3.xx and LimeSurvey 2.xx, especially in terms of design.}} |
| | {{Box|Click on the following link to access the survey settings wiki section for the [[Special:PermanentLink/76584|early versions of LimeSurvey]] (e.g. 2.5X, 2.6X, 2.7X).}} |
| | |
| | =Introduction= |
| | |
| | The survey settings menu permits users to customize and enhance their surveys. By default, the following options are available: |
| | |
| | |
| | <center>[[File:Settings Menu screen.png]]</center> |
| | |
| | |
| | *[[Survey settings#Overview|Overview]] |
| | *[[Survey settings#General settings|General settings]] |
| | *[[Survey settings#Survey texts|Survey texts]] |
| | *[[Survey settings#Theme options|Theme options]] |
| | *[[Survey settings#Survey participants|Survey participants]] |
| | *[[Survey settings#Presentation|Presentation]] |
| | *[[Survey settings#Publication & access|Publication & access]] |
| | *[[Survey settings#Survey permissions|Survey permissions]] |
| | *[[Survey settings#Participant settings|Participant settings]] |
| | *[[Survey settings#Survey quotas|Survey quotas]] |
| | *[[Survey settings#Assessments|Assessments]] |
| | *[[Survey settings#Data management|Data management]] |
| | *[[Survey settings#Email templates|Email templates]] |
| | *[[Survey settings#Panel integration|Panel integration]] |
| | *[[Survey settings#Resources|Resources]] |
| | |
| | In the screenshot from above, two buttons are emphasized. They can be used by the users to rearrange the survey settings menu dimensions as they wish. If you wish to rearrange the main survey settings menu, drag the right side of the menu to the left or to the right by clicking on the '''three-dots''' button. If you click on the '''left arrowhead''', the menu collapses, getting minimized until the moment in which only a sidemenu with icons is left. To go back to the default view of the survey settings menu, click on the '''right arrowhead''' button located above the survey settings menu. |
| | |
| | Hover the mouse over each option to see what each icon does. |
| | |
| | <div class="simplebox">[[File:help.png]] '''Note''': The menu can be changed/edited from the [[Menu configuration]] and [[Menu entries configuration]] pages. They can be accessed from the LimeSurvey configuration dialog. '''We recommend the edit of the menus only to advanced users.'''</div> |
|
| |
|
| =Overview= | | =Overview= |
|
| |
|
| Some of these settings can be set when creating a new survey. Click on the Add quick-button [[File:Btn_create_survey.png|100px]] or choose Survey/Create a new survey from the dropdown menu on the top-right and a "Create new survey" screen will appear.
| | The overview page offers a general perspective on your survey. It is divided in three parts: |
| | *'''Overview toolbar:''' The functions from the toolbar allow you to start/stop the survey, check its logic, save & export it, add survey participants, and manually introduce survey participants' data (in the case in which you conduct an offline survey); |
| | |
| | *'''Survey quick actions:''' There are four boxes that allow to quickly add questions and question groups, edit text elements and general settings, and see the statistics of the survey. The format option (situated over the boxes) allows you to select the way in which the questions will be displayed to the survey participants; |
| | |
| | *'''Survey summary:''' It comes with a short set of information about your survey. |
| | |
| | For a complete description of the three parts, check the [[Overview|Overview panel]] wiki page. |
| | |
| | =General settings= |
| | |
| | The general settings of a survey allows the user to edit basic information about the survey such as the survey owner, administrator's email, and the template employed in his survey. |
| | |
| | For further details, please continue reading [[General settings|the following wiki]] page. |
| | |
| | =Survey texts= |
| | |
| | From the '''Survey texts''' panel, you can edit the title of the survey and its description, welcome and end messages, end URL of your survey, and the format of the decimal mark and date. |
| | |
| | For more details, access the [[Survey texts]] section. |
| | |
| | =Theme options= |
|
| |
|
| You can edit all of these settings later again by choosing your survey and clicking General settings & texts in the 'Survey properties' dropdown menu of the survey toolbar.
| | This panel is for those users that would like to enhance their templates by using the inheritance function and the bootswatch themes. |
|
| |
|
| =Settings=
| | For more details, access our wiki section on [[Theme options|theme options]]. |
|
| |
|
| All survey settings and functions are organized in tabs. The following is a description of each tab and field.
| | =Survey participants= |
|
| |
|
| ==General==
| | You may want to invite only a specific group of people to participate in your survey to better keep track of who has completed the survey and who hasn't, and ensure that each person can participate only once. To do this, click on '''Survey participants''' and start to add only those persons that you wish to answer to your survey. |
| #'''Base language''': This sets the base language for the survey. Once saved, you cannot change it later. The language-set is the base language for possible translations of the survey. That way you can have multilingual surveys. During survey creation you cannot add additional languages. You will be able do that if you edit the survey properties again, later.
| |
| #'''Additional languages''': To choose addintinal language. <span class="alert">Only available when survey is created.</span>
| |
| #'''Title''': This is the brief descriptive name of the survey (ie: "Enterprise Bargaining Survey 2003", or "Views on Ice Cream"). This title will be displayed on every page of the public survey.<span class="alert">Only available at survey creation. After available in Edit survey text elements</span>
| |
| #'''Description''': This allows you to enter a description of the survey. (ie: "A survey to collect your ideas on the next round of enterprise bargaining" or "A survey to find out the popularity of chocolate ice cream"). You can incorporate HTML elements such as images or videos in this section using the WYSIWYG editor. By default, description is used on invitation email.<span class="alert">Only available at survey creation. After available in Edit survey text elements</span>
| |
| #'''Welcome message''': This allows you to enter a message that will display when a participant first logs into your survey. (ie: "Thank you for taking the time to participate in this survey..") You can incorporate HTML elements such as images or videos in this section using the WYSIWYG editor.<span class="alert">Only available at survey creation. After available in Edit survey text elements</span>
| |
| #'''End message''': This allows you to enter a message that will display when a participant completes your survey. (ie: "Thank you for completing our survey. We will publish results soon."). You can incorporate HTML elements such as images or videos in this section using the WYSIWYG editor.<span class="alert">Only available at survey creation. After available in Edit survey text elements</span>
| |
| #'''End URL''': This URL will be presented as a link at the end of the survey, and allows you to direct your participants back to your home page (or, in fact, anywhere). The End URL has to be entered with "http://" at the beginning, eg. http://www.limesurvey.org. <br />You can use they placeholder {SAVEDID}, {TOKEN}, {SID} and {LANG} in this URL.<br />SAVEDID is the id assigned to this particular submission, TOKEN is the token used to participate in the survey, SID is the survey ID and LANG is the language code<br />eg. http://www.limesurvey.org/test.php?var1={SAVEDID}&var2;={TOKEN}&var3;={SID}⟨={LANG} <br />From version 1.82+ you can use [[URL fields]] with this field to pass parameters from the start URL to then end URL. <br />You can also use {INSERTANS:SGQA} in this URL (since 1.82+). This allows adding the response to a specific question in the survey to the final url. This can be useful for sending a response to an external script (ie an email address collected during the survey). eg: "http://www.limesurvey.org/test.php?email={INSERTANS:1234X56X7}".<span class="alert">Only available at survey creation. After available in Edit survey text elements</span>
| |
| #'''URL description''': The description for the link using the End URL.<span class="alert">Only available at survey creation. After available in Edit survey text elements</span>
| |
| #'''Administrator''': This is the name of the contact person who administers the survey. It will be included in emails sent out inviting participants to respond.
| |
| #'''Admin email''': This is the email address of the administrator (as above) and is used as the 'From:' address on any emails sent.<br />NOTE: many hosting providers' SMTP servers will only accept emails whose 'From:' address is on a local domain, with the added difficulty that any emails that do not conform to this rule are discarded silently, without any visible error message. If this happens to you, ensure that you are using a provider-based email address in the 'Admin email' field. You usually can, if you so desire, set up email forwarding on the provider's side, so that any messages sent there are relayed to your preferred address.
| |
| #'''Bounce email''': This is the email address where a delivery error notification email should be sent. By default, this is the same as the administrator's email address. If you want to use a custom script to parse delivery error emails, then use a special Bounce Email address here and automatically process emails reaching this address with your script. This script could then update the Email Status field of the token line corresponding to this email address (see tokens).
| |
| #'''Fax to''': This field is used to give a fax number on the "printable survey" - ie: when you want to send someone a hard copy because they cannot use the online survey.
| |
|
| |
|
| <div class="simplebox">'''Caution''': the HTML WYSIWYG editor doesn't allow you to upload files during the survey creation process. Trying to do so will end up with an error message like: "''This file uploader is disabled''". If you need to upload pictures or any other ressources, please do so after survey creation, by editing the newly created survey.</div>
| | For a more in-depth presentation of this functionality, access the [[Survey participants|following link]]. |
|
| |
|
| ==Presentation & navigation==
| | =Presentation= |
|
| |
|
| [[File:Survey-settings_presentation-navigation_tab.png]]
| | You can edit in this panel presentation- and navigation-related settings of your survey. These changes impact how the respondent sees your survey. You can choose to show the number of the questions at the beginning of the survey, a progress bar or the current statistics of the survey once it is completed, and so on. |
|
| |
|
| #'''Format''': Choose from "Question by question", "Group by group" or "All in one".
| | For a complete description, access the following [[Presentation|link]]. |
| #*'''Question by Question''': Public survey will display one question per page.
| |
| #*'''Group by Group''': Public survey will display all questions in a group per page. Group at a time surveys still have a separate "welcome" page and "submit" page, like "Question by Question" surveys.
| |
| #*'''All in one''': Public survey will display all questions in one single page. Activated All in one surveys do not have a "welcome" page or "submit" page - the welcome message and submit button all appear on the same page.
| |
| #'''Template''': Choose from the installed templates in your system. The default template is rather dull, but functional. More information on creating your own templates is available [[The template editor|here]].
| |
| #'''Show welcome screen''': Yes/No. If Yes, then the welcome message defined in Text Elements section will be displayed. Default is Yes.
| |
| #'''Navigation delay''': Number of seconds before Previous and Next buttons are enabled. Default 0 seconds
| |
| #'''Show <nowiki>[</nowiki><< Prev] button''': This option defaults to yes, however if you set it to "No" then users will not have the option of moving to a previous page while completing the survey.
| |
| #'''Show question index / allow jumping''': Yes/No. Default No. When Yes, an index will be displayed on the right side. Users can jump to any section in the survey. In 2.05 the options have changed to Disabled / Incremental / Full. Disabled and Incremental represent the current No and Yes options. Full always shows all groups / questions, this allows the user to freely navigate through the survey. This might not work for all kinds of conditions.
| |
| #'''Keyboard-less operation''': By activating this setting there will be a virtual keyboard available for certain question types.
| |
| #'''Show progress bar''': Yes/No. Default Yes. Allow the administrator to turn off the Progress bar
| |
| #'''Participants may print answers?''': This option defaults to no. When it is set to yes, a participant can print a summary of responses at submit time.
| |
| #'''Public statistics''': Yes/No. Default No. If set to "Yes" users who have submitted the survey will be presented a link to statistics of the current survey. The admin can set which questions should be included at these statistics by [[Advanced question settings#public_statistics|applying the according question attribute]].
| |
| #'''Show graphs in public statistics''': (''since 1.80'') Determines if public statistics for this survey include graphs or only show a tabular overview. Creating graphs for huge surveys with lots of answers takes some time and server resources so this is the switch to turn them on/off (default setting: ''off'').
| |
| #'''Automatically load URL when survey complete''': Yes/No. Default No. If yes, when the survey is submitted, it will automatically redirect to the End URL. The end URL can be defined in the Text Elements Section. Please note that this only works on an active survey.
| |
| #'''Show "There are X questions in this survey"''': Yes/No. Default Yes. If Yes, the message will be displayed on the Welcome Screen. This option will not affect the print version.
| |
| #'''Show group name and/or group description''': Will control the display of Group Names and Descriptions. This option will not affect the print version. Four Options:
| |
| #*'''Show Both''' - Default
| |
| #*'''Show Group Names Only'''
| |
| #*'''Show group description Only'''
| |
| #*'''Hide Both'''
| |
| #'''Show question number and/or code''':
| |
| #*'''Show Both''' - Default
| |
| #*'''Show Question Number Only'''
| |
| #*'''Show Question Code Only'''
| |
| #*'''Hide Both'''
| |
| #'''Show "No answer"''': Yes/No. Default Yes. When Yes, the No Answer will be displayed as the default option for non-mandatory single-select questions. Be aware that if you switch this off, the participant won't be able to unselect a chosen answer option in a non-mandatory question.
| |
|
| |
|
| ==Publication & access control==
| | =Publication & access= |
| #'''List survey publicly''': Yes/No. Default No. When it is set to yes, your survey will be listed in the 'available surveys' portal
| |
| # '''Start date/time''': Set this to some date if you want your survey to start on a certain date. The survey will start on midnight of that day and only then will people be able to answer to it. To disable this just clear the date from the input field.
| |
| #'''Expiry date/time''': Set this to some date if you want your survey to expire on a special date. This is the last date on which the public survey script will let people participate. (Example: If you set it for the 31st of December, then people will no longer be able to use the survey script on the 1st of January). To disable this just clear the date from the input field.
| |
| #'''Set cookie to prevent repeated participation?''': If you set this to 'Yes', and your survey does not use a tokens table to control participant access, then a cookie will be saved to the client computer of each survey participant once they have submitted a survey. This cookie will stop the same user on that computer from accessing the survey more than once. There are inherent limitations in the 'security' strength of such a system, but, in general, it allows you to retain some control over multiple entries on public surveys.
| |
| #'''Use CAPTCHA for''': With this option you can decide when you want a CAPTCHA to be used. Default is to enable CAPTCHA only for the public Registration page, but you can also enable it before accessing the survey, and before Load/Saving partial answers.
| |
|
| |
|
| ==Notification & data management==
| | This setting allows the survey administrator to choose the way in which the survey can be accessed by the survey participants (e.g. CAPTCHA codes can be used to increase the security of your survey). Moreover, you can also set up from here a start/expiry date/time. |
|
| |
|
| [[File:Survey-settings_notifications-tab.png]] | | For more details on each option, read from our manual about [[Publication & access|Publication & access]]. |
|
| |
|
| #'''Send basic admin notification email to:''' and '''Send detailed admin notification email to:''' These fields allow you to send notifications or survey responses to any email addresses once the survey is submitted. You can edit the templates for these emails under 'Email templates'. Multiple recipients can be set by separating the entries with a semicolon (;) - eg "yourname@test.com; myname@test.com;hisname@test.com" OR when using placeholders "yourname@test.com;{INSERTANS:82733X12X73};{TOKEN:EMAIL}". To sedn an email to the administrator email of the survey : you must use {ADMINEMAIL}. There are different ways for entering an address:
| | =Survey permissions= |
| ##Enter a specific ''email address'' (ie: yourname@test.com)
| |
| ##Enter a ''SGQA code'' and the response will be sent to an email address entered as an answer to that particular question (use the format {INSERTANS:9999X88X12}, in the same way you would [[Adding a question#Information from previous answers|Re-use information from previous answers]])
| |
| ##Enter a ''Token code'' (only possible if your survey is ''not'' anonymous) and the response will be sent to an email address retrieved from a token field (use the format {TOKEN:EMAIL} or {TOKEN:ATTRIBUTE_1} in the same way you would [[Adding a question#Information from tokens table|Re-use Information from the Tokens Table]])
| |
| ##''As of Version 1.92:'' Enter a valid expression conforming to [[Expression Manager|Expression Manager]] syntax. This lets you use question code instead of SGQA syntax (for easier readability), plus conditional logic (e.g. route the notifications to different people depending upon the data entered into the survey).
| |
| #'''Date stamp?''': This field allows you to determine whether the survey will datestamp all responses. If you choose "Yes", then when a response is submitted, a field will be included in that response indicating the time and date that the response was made. (See configuration settings for $timeadjust setting.)
| |
| #'''Save IP address?''': This field allows you to determine whether the survey will save an IP-address for all responses. If you choose "Yes", then when a response is submitted, a field will be included in that response indicating the ip-address of the participant.
| |
| #'''Save referrer URL?''': This field allows you to determine whether the survey will save the referrer URL for all responses. If you choose "Yes", then when a response is submitted, a field will be included in that response where this URL is saved. A referrer URL is the URL from which the user was led to your survey URL.
| |
| #'''Enable assessment mode?''': With this setting you can enable/disable [[Assessments|assessments]] for this survey.
| |
| #'''Save timings''': If activate then on survey activation a separate table will be created where timings for your questions will be saved, e.g. how long a user stays on one page during taking the survey.
| |
| #'''Participant may save and resume later?''': This setting allows a participant to save his responses and resume to answer the survey at a later time. Please note that this makes most sense with open surveys or surveys with anonymized answer. If you are using tokens and the survey is not anonymous in most cases it is better to activate 'Token-based response persistence' in the token tab.
| |
| #'''Google Analytics Tracking ID for this survey''': Allows for integration with Google Analytics. The tracking ID can be inserted into templates using {GOOGLE_ANALYTICS_API_KEY}. The full JavaScript that Google Analytics expects (including the key) can be included in templates via {GOOGLE_ANALYTICS_JAVASCRIPT}
| |
| #'''Google Analytics Style for this Survey''': Choices are:
| |
| ##'''Do not use Google Analytics''' - so {GOOGLE_ANALYTICS_JAVASCRIPT} is an empty string
| |
| ##'''Default Google Analytics''' - {GOOGLE_ANALYTICS_JAVASCRIPT} uses the standard Google Analytics code, inserting the proper Google Analytics Key
| |
| ##'''SurveyName-<nowiki>[</nowiki>SID]/GroupName''' - {GOOGLE_ANALYTICS_JAVASCRIPT} contains customized Google Analytics code to log the URL as {SURVEYNAME}-<nowiki>[</nowiki>{SID}]/{GROUPNAME}. This can be helpful if you want to analyze navigation paths through your survey, time spent per page, and drop-off rates per page.
| |
|
| |
|
| '''Google API howto''':
| | In some cases, the administrator might not want to give to a user (e.g. a translator) global permissions with which he can have access to more than one survey. That is why the survey permissions panel was created - to facilitate the allocation of permissions to different users without the need of using the [[Manage users|global system of permissions]]. If you want to learn more about global permissions and survey permissions, access the following [[Manage users|wiki section]]. |
| # Register/login on Google Analytics (GA): [http://www.google.com/analytics/ www.google.com/analytics/]
| |
| # Create a tracking ID (the site should not point to the survey, but to the part before 'index.php?') The tracking ID should be UA-xxxxx.
| |
| # Go to your survey's global settings in LimeSurvey.
| |
| # Put the tracking ID in appropriate field (Google Analytics tracking ID). It's probably the best to set GA style to track all pages as you can have more info.
| |
| # You don't need to do anything in shipped templates, as the {GOOGLE_ANALYTICS_JAVASCRIPT} part is already there.
| |
| # Activate the survey.
| |
| # Do the survey.
| |
| # Go to GA panel mainsite. (select appropriate account in left-hand upper corner if you have more than one). You should see some graphs with the statistics. Beware of the dates in upper right corner.
| |
|
| |
|
| ==Tokens==
| | For more details on survey permissions and their usage, access the following [[Survey permissions|link]]. |
|
| |
|
| *'''Anonymized responses?''': This allows you to determine whether responses to your survey are matched up with information from your surveys tokens table, or kept 'anonymous'. The default is 'No'. If you choose 'Yes' then your survey is set to radically anonymize responses - there is really no way to connect answers and participants. Even the admin can't link response data and participant/token data. However you will always be able to specifically view each response entered by your participants in the survey. Thus individual, but anonymous, statistics is still possible to do. '''''Attention:''''': If this feature is activated the response submission date and the token completed date are always set to 1980-01-01 00:00, no matter of other settings. Why? Invalidating the submission date ensures no match with webserver logs where the token key might show up when a survey is started. Invalidating the token completed date makes sure that you can't align the order of submitted responses to the order of the token date/time.
| | =Participant settings= |
|
| |
|
| *'''Enable token-based response persistence''': If your survey uses tokens and your responses are not anonymized, you may want to enable this feature. If you turn this on, your participants will be able to leave the survey and resume later at any time without using the 'Resume later' function - for example if they get distracted or their browser crashes. Upon clicking the invitation link again, they will find their survey answers still in place when they return to the survey, and will even find themselves on the same page where they were before leaving.
| | You can edit from this menu tokens-related settings. For example, you can choose to anonymize all the responses you get from a survey or allow public survey registration. |
|
| |
|
| *'''Allow multiple responses or update responses with one token?''': Default: No. If you activate this setting, participants will be able to return to their survey by clicking the invitation link, even if they have already submitted the survey. If the survey is anonymous or "Enable token-based response persistence" is set to NO, this will add a new response. If the survey is not anonymous and "Enable token-based response persistence" is Yes, the user will update the existing responses.
| | For a complete description of the options, access our wiki section on [[Participant settings|survey participants handling]]. |
|
| |
|
| *'''Allow public registration''': If you use tokens to control access to your survey, the only people who can use the survey are those who have an entry and a unique token from the token table. If you would like to use tokens, but also allow public registration, set this to "Yes". The "Yes" setting will allow a visitor to register his name and email address. The script will create a new entry in your tokens table for this person, then send them an invitation email. The script will ensure that only one person per email address can complete your survey.
| | =Survey quotas= |
|
| |
|
| *'''Use HTML format for token emails?''': When set to yes, all emails sent by the token management interface (invite, reminder, confirmation) will be formatted as HTML. You'll then be able to use rich formatting for this emails. Default is Yes at survey creation. Caution, when you switch on/off this feature, you'll have to double check that your email templates are still displayed as you want.
| | A quota is used to set a limit on responses from defined groups of people on an active survey. Some common attributes used in defining quotas are things like gender, age, race, province/state. A quota can be added by clicking on the '''Add new quota button''' located in the right part of the window. |
|
| |
|
| *'''Set token length to''': Usually you don't need to change this, the default setting of 15 digits (max. supported value: 35) is fine. If changing this setting please enter a number (X) which should be greater than 5 (if the number entered is <5 it will be converted to the default value of 15). When generating tokens all tokens will use a length of X digits.
| | For further details, access the following link on [[Survey quotas|quotas and their usage]]. |
|
| |
|
| ==Import== | | =Assessments= |
|
| |
|
| Alternatively you can [[Importing a survey structure|import a survey structure]] from this tab on survey creation. You have the option to let LimeSurvey automatically convert relative URLs to local images/media files and INSERTANS tags (recommended).
| | LimeSurvey contains a feature that allows the survey administrator to create survey "assessments" for his or her respondents - even for multilingual surveys. Assessments are rules which evaluate the responses to a survey immediately after it is submitted, displaying text blocks to the survey participant (based on that evaluation). |
|
| |
|
| ==Copy==
| | For further details on its usage, check our [[Assessments|wiki page about it]]. |
|
| |
|
| Alternatively you can copy an existing survey from this tab on survey creation. You have the option to let LimeSurvey automatically convert relative URLs to local images/media files and INSERTANS tags (recommended). The other options are pretty self-explaining. Please note that when copying a survey the start date and the end date of a survey cleared.
| | =Data management= |
|
| |
|
| ==Panel integration (URL parameters)==
| | If you would like to save response-related details into the responses tables, access this panel. You can save the referrer URL, IP address, timings, etc. that can help you produce more in-depth analyses. Moreover, LimeSurvey allows you to use the tracking ID from Google Analytics. |
|
| |
|
| <div class="simplebox"> Please note that this tab is currently not visible on survey creation but only when you edit the survey settings after saving them for the first time.</div>
| | For more explanations, read about [[Data management|notifications and data management settings]]. |
|
| |
|
| On this tab you can set which additional URL parameters will be accepted by your survey (these parameters would be attached to the general survey start URL). This is important if you integrate with a professional survey panel provider that provides the participants for your survey. They usually hand over a unqiue ID with every participant and you will need to save/handle this unique ID for reference. Also with some providers the unique ID of the participant (bdropping out due to quota or finishing the survey) needs to be sent back to the panel provider in the survey end URL.
| | =Email templates= |
|
| |
|
| If you like you can also save the value as a response of a "Short text question" or "Multiple short text question" type (you will be able to select any short text question to save it to). Even if you do NOT save the value of the URL parameter you will be able to use this parameter in the end URL. Please have a look at the documentation of the [[URL_fields#Passthrough_fields_.28LimeSurvey_2.x_or_later.29|End-URL]] for further information.
| | The email templates are used to quickly send personalized invitations, reminders, confirmations, and registrations emails to your respondents (from the survey participants table). You can also edit the standard basic (or detailed) admin notifications that are sent to the survey administrator. |
|
| |
|
| ==Resources==
| | For more information, access [[Email templates|Email templates]]. |
|
| |
|
| This tab lets you manage files (pictures, media files) that were uploaded in the HTML Editor and it is only visible if you edit a survey - not during survey creation.
| | =Panel integration= |
|
| |
|
| You can: | | You can set up from this tab which additional URL parameters will be accepted by your survey (these parameters would be attached to the start URL of the survey). |
| * Browse available files
| |
| * Export files as a ZIP archive
| |
| * Import a ZIP archive of files
| |
|
| |
|
| Important hints:
| | For further details, see the wiki section on [[Panel integration|panel integration]]. |
| * Authorized files extensions are defined in config-defaults.php.
| |
| * Files for the survey are in the upload/surveys/<sid> subdirectory.
| |
| * Uploaded files will only been seen while browsing resources on this survey (groups, questions, answers) not in other surveys or objects (labels).
| |
| * Do not expect this limited visibility to ensure confidentiality of the resources as they are reachable with a simple browser to anyone who know the URL to the file.
| |
| * You can't import a ZIP file containing subdirectories.
| |
|
| |
|
| =Additional languages= | | =Resources= |
|
| |
|
| To add more language to a survey you have to create and save it - then edit it again. Now you can add and remove additional languages to the survey. If you remove a language from a survey the complete contents of that language in that survey is deleted permanently so be careful what you are doing.
| | This panel lets you manage files (pictures and media files) that were uploaded in the HTML Editor. |
|
| |
|
| By clicking on the button 'Save and continue' on the first page in the survey settings you will be taken to the language-specific page which lets you change all texts for each language like ''Survey name'', ''Welcome Text'', etc. You can also edit the date format which should be used for a certain language.
| | For further details, check our wiki section on [[Resources|how to use external resources]] in your survey. |
 Attention :
 Please note that this tutorial uses explanations and screenshots that are applicable to LimeSurvey 3.xx. Small differences exist between LimeSurvey 3.xx and LimeSurvey 2.xx, especially in terms of design.
Introduction
The survey settings menu permits users to customize and enhance their surveys. By default, the following options are available:
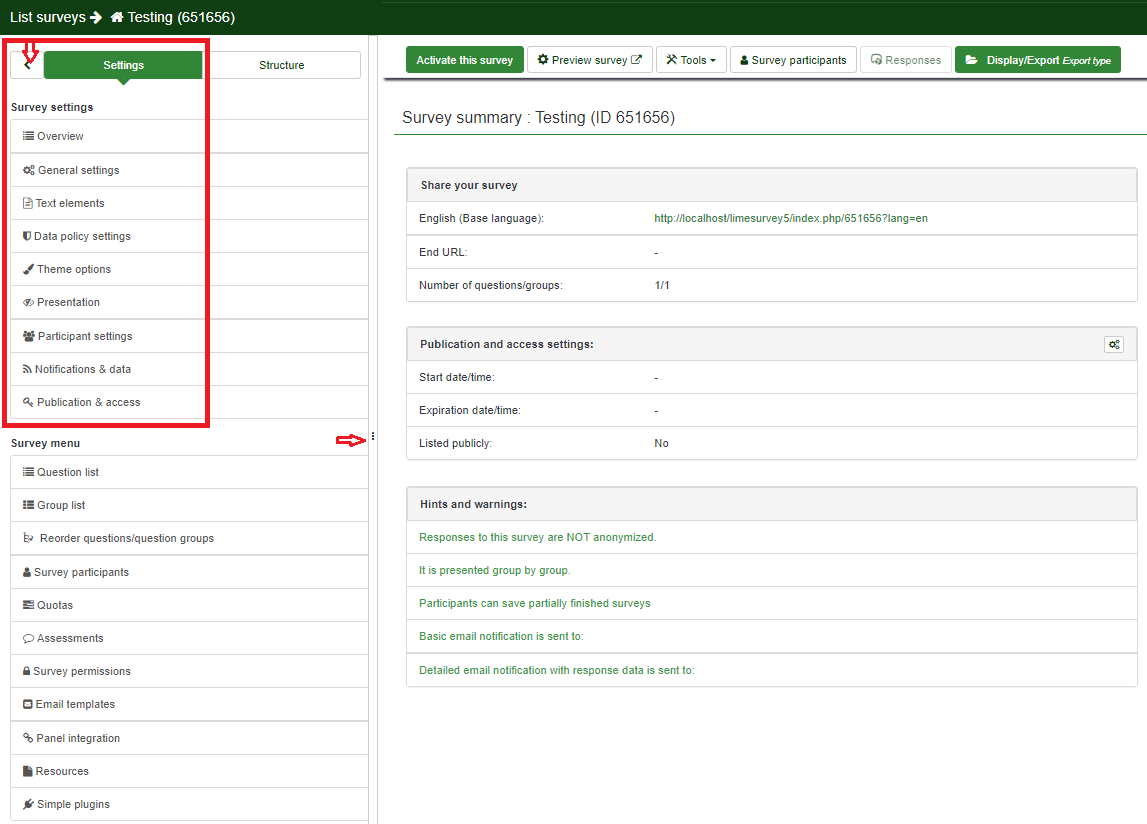
In the screenshot from above, two buttons are emphasized. They can be used by the users to rearrange the survey settings menu dimensions as they wish. If you wish to rearrange the main survey settings menu, drag the right side of the menu to the left or to the right by clicking on the three-dots button. If you click on the left arrowhead, the menu collapses, getting minimized until the moment in which only a sidemenu with icons is left. To go back to the default view of the survey settings menu, click on the right arrowhead button located above the survey settings menu.
Hover the mouse over each option to see what each icon does.
 Note
Note: The menu can be changed/edited from the
Menu configuration and
Menu entries configuration pages. They can be accessed from the LimeSurvey configuration dialog.
We recommend the edit of the menus only to advanced users.Overview
The overview page offers a general perspective on your survey. It is divided in three parts:
- Overview toolbar: The functions from the toolbar allow you to start/stop the survey, check its logic, save & export it, add survey participants, and manually introduce survey participants' data (in the case in which you conduct an offline survey);
- Survey quick actions: There are four boxes that allow to quickly add questions and question groups, edit text elements and general settings, and see the statistics of the survey. The format option (situated over the boxes) allows you to select the way in which the questions will be displayed to the survey participants;
- Survey summary: It comes with a short set of information about your survey.
For a complete description of the three parts, check the Overview panel wiki page.
General settings
The general settings of a survey allows the user to edit basic information about the survey such as the survey owner, administrator's email, and the template employed in his survey.
For further details, please continue reading the following wiki page.
Survey texts
From the Survey texts panel, you can edit the title of the survey and its description, welcome and end messages, end URL of your survey, and the format of the decimal mark and date.
For more details, access the Survey texts section.
Theme options
This panel is for those users that would like to enhance their templates by using the inheritance function and the bootswatch themes.
For more details, access our wiki section on theme options.
Survey participants
You may want to invite only a specific group of people to participate in your survey to better keep track of who has completed the survey and who hasn't, and ensure that each person can participate only once. To do this, click on Survey participants and start to add only those persons that you wish to answer to your survey.
For a more in-depth presentation of this functionality, access the following link.
Presentation
You can edit in this panel presentation- and navigation-related settings of your survey. These changes impact how the respondent sees your survey. You can choose to show the number of the questions at the beginning of the survey, a progress bar or the current statistics of the survey once it is completed, and so on.
For a complete description, access the following link.
Publication & access
This setting allows the survey administrator to choose the way in which the survey can be accessed by the survey participants (e.g. CAPTCHA codes can be used to increase the security of your survey). Moreover, you can also set up from here a start/expiry date/time.
For more details on each option, read from our manual about Publication & access.
Survey permissions
In some cases, the administrator might not want to give to a user (e.g. a translator) global permissions with which he can have access to more than one survey. That is why the survey permissions panel was created - to facilitate the allocation of permissions to different users without the need of using the global system of permissions. If you want to learn more about global permissions and survey permissions, access the following wiki section.
For more details on survey permissions and their usage, access the following link.
Participant settings
You can edit from this menu tokens-related settings. For example, you can choose to anonymize all the responses you get from a survey or allow public survey registration.
For a complete description of the options, access our wiki section on survey participants handling.
Survey quotas
A quota is used to set a limit on responses from defined groups of people on an active survey. Some common attributes used in defining quotas are things like gender, age, race, province/state. A quota can be added by clicking on the Add new quota button located in the right part of the window.
For further details, access the following link on quotas and their usage.
Assessments
LimeSurvey contains a feature that allows the survey administrator to create survey "assessments" for his or her respondents - even for multilingual surveys. Assessments are rules which evaluate the responses to a survey immediately after it is submitted, displaying text blocks to the survey participant (based on that evaluation).
For further details on its usage, check our wiki page about it.
Data management
If you would like to save response-related details into the responses tables, access this panel. You can save the referrer URL, IP address, timings, etc. that can help you produce more in-depth analyses. Moreover, LimeSurvey allows you to use the tracking ID from Google Analytics.
For more explanations, read about notifications and data management settings.
Email templates
The email templates are used to quickly send personalized invitations, reminders, confirmations, and registrations emails to your respondents (from the survey participants table). You can also edit the standard basic (or detailed) admin notifications that are sent to the survey administrator.
For more information, access Email templates.
Panel integration
You can set up from this tab which additional URL parameters will be accepted by your survey (these parameters would be attached to the start URL of the survey).
For further details, see the wiki section on panel integration.
Resources
This panel lets you manage files (pictures and media files) that were uploaded in the HTML Editor.
For further details, check our wiki section on how to use external resources in your survey.
