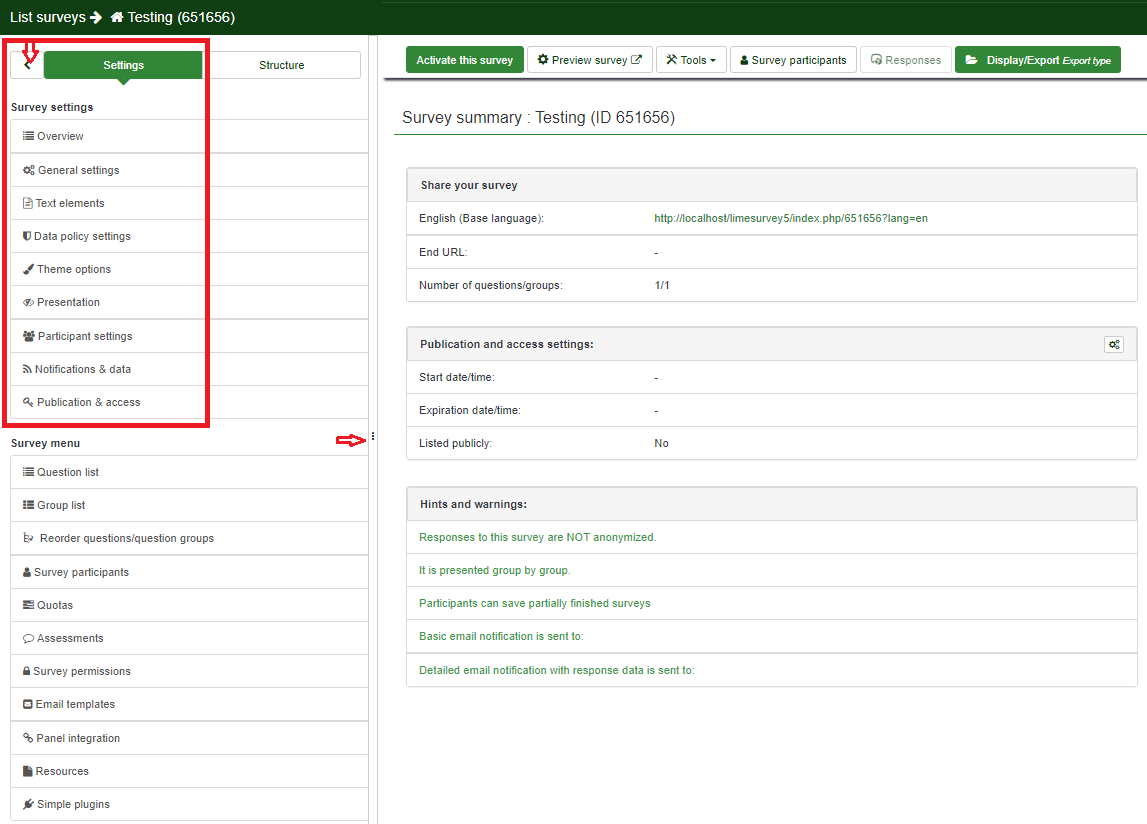
Umfrage-Einstellungen
From LimeSurvey Manual
Einführung
Über das Menü können Benutzer verschiedene umfragebezogene Einstellungen bearbeiten. Die folgenden Einstellungen sind verfügbar:

- Übersicht
- Allgemeine Einstellungen
- Textelemente
- Einstellungen zur Datenschutzrichtlinie
- Designvorlage-Optionen
- Präsentation
- Teilnehmereinstellungen
- Benachrichtigungen & Daten
- Veröffentlichung & Zugriff
Übersicht
Die Übersichtsseite bietet einen allgemeinen Überblick über Ihre Umfrage. Es ist in zwei Teile unterteilt:
- Symbolleiste: Mit den Funktionen der Symbolleiste können Sie die Umfrage starten und stoppen, die Umfrage-Logik überprüfen, die Umfrage speichern und exportieren, Umfrageteilnehmer hinzufügen und manuell Umfragedaten eingeben, sofern sie sich entschieden haben, die Umfrage in gedruckter Form auszugeben;
- Survey summary: It comes with a short set of information about your survey.
For a complete description, check the Overview panel wiki page.
General settings
The general settings of a survey allows the user to edit basic information about the survey such as the survey owner, administrator's email, and the template employed in his survey.
For further details, please continue reading the following wiki page.
Text elements
From the Survey text elements panel, you can edit the title of the survey and its description, welcome and end messages, end URL of your survey, and the format of the decimal mark and date.
For more details, access the Survey text elements section.
Data policy settings
The set of options displayed under this option are related to the security text/policy settings about which your respondents have to be aware of before continuing filling in the survey.
For more details, access our wiki section on data policy settings.
Theme options
This panel is for those users that would like to enhance their templates by using the inheritance function and the bootswatch themes.
For more details, access our wiki section on theme options.
Presentation
You can edit in this panel presentation- and navigation-related settings of your survey. These changes impact how the respondent sees your survey. You can choose to show the number of the questions at the beginning of the survey, a progress bar or the current statistics of the survey once it is completed, and so on.
For a complete description, access the following link.
Participant settings
You can edit from this menu different survey participants table settings. For example, you can choose to anonymize all the responses you get from a survey or allow public survey registration.
For a complete description of the options, access our wiki section on survey participants handling.
Notifications & data
If you would like to save response-related details into the responses tables, access this panel. You can save the referrer URL, IP address, timings, etc. that can help you produce more in-depth analyses. Moreover, LimeSurvey allows you to use the tracking ID from Google Analytics.
For more explanations, read about notifications and data management settings.
Publication & access
This setting allows the survey administrator to choose the way in which the survey can be accessed by the survey participants (e.g., CAPTCHA codes can be used to increase the security of your survey). Moreover, you can also set up from here a start/expiry date/time.
For more details on each option, read from our manual about Publication & access.