Uczestnicy ankiety
From LimeSurvey Manual
Wprowadzenie
Funkcjonalność Uczestnicy ankiety pozwala zaprosić grupę osób do wzięcia udziału w ankiecie, śledzić, kto wypełnił ankietę i zapewnić, że każda osoba może wziąć udział tylko raz. Funkcja tabeli uczestników ankiety umożliwia wykonanie następujących czynności:
- Importowanie listy nazwisk i adresów e-mail uczestników z pliku CSV lub zapytanie LDAP;
- Wygeneruj unikalny kod tokena dla każdego uczestnika (kod zaproszenia);
- Wyślij zaproszenie e-mailem do każdej osoby z Twojej listy (grupowo lub indywidualnie);! N!*Wyślij e-mail z przypomnieniem do każdej osoby na Twojej liście, która jeszcze nie odpowiedziała (grupowo lub indywidualnie);
- Śledź, kto odpowiedział na liście uczestników ankiety;
- Ogranicz dostęp dla osób, które jeszcze tego nie zrobiły otrzymali token oraz osoby posiadające token, które już odpowiedziały;
- Edytuj/zmień dowolne szczegóły na swojej liście;
- Twórz szablony wiadomości e-mail dla zaproszeń i przypomnień.
Kiedy aktywujesz tokeny dla danego badania, jedynymi osobami, które będą miały do niego dostęp będą Ci, którzy otrzymali numer token.
Jeżeli w panelu Tabela uczestników ankiety włączysz opcję Zezwól na rejestrację publiczną, uczestnicy ankiety będą mogli zarejestrować się do Twojej ankiety po otrzymaniu automatycznie wygenerowanego kodu tokena.
Jak utworzyć tabelę uczestników ankiety
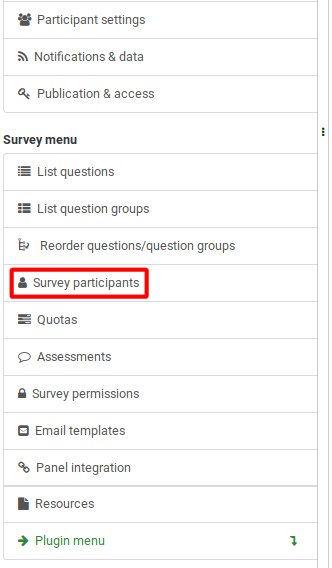
aby zainicjować tabelę uczestników ankiety: Ustawienia > Menu ankiety > Uczestnicy ankiety:
Wyświetli się następujący komunikat:

Jeśli „zainicjujesz tabelę uczestników”, ankieta będzie dostępna tylko dla tych uczestników, którzy podają kod tokena w procesie rejestracji (ręcznie lub poprzez adres URL). W ten sposób ankieta zostanie przełączona w tryb dostępu zamkniętego.
Po inicjalizacji wyświetli się okno potwierdzające utworzenie tabeli uczestników ankiety.
Aktywuj ponownie tabelę uczestników ankiety
Po usunięciu tabeli uczestników ankiety tworzona jest kopia zapasowa. Można ją później ponownie aktywować, jeśli chcesz użyć tej tabeli uczestników ankiety w innej ankiecie.
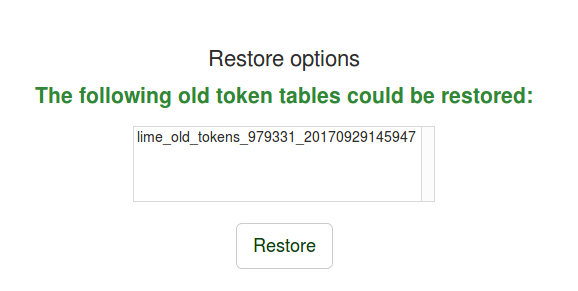
Narzędzia do zarządzania tabelami uczestników ankiety
Jeśli wcześniej utworzono tabelę uczestników ankiety, wyświetli się podsumowanie uczestników ankiety. To jest domyślny ekran:
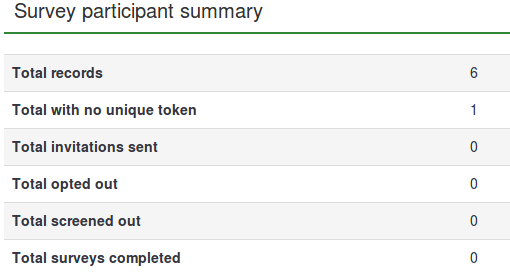
- Rekordy ogółem: Liczba uczestników ankiety z tabeli uczestników ankiety;
- Suma bez unikalnego tokena: Wyświetla liczbę użytkowników bez przypisanego kodu tokena;!N !*Łączna liczba wysłanych zaproszeń: Pokazuje liczbę zaproszeń wysłanych do uczestników ankiety z tabeli „Uczestnicy ankiety” za pomocą opcji Zaproszenia z menu Zaproszenia i przypomnienia menu;
- Całkowita rezygnacja: Wyświetla całkowitą liczbę uczestników ankiety, którzy zdecydowali się na zrezygnować z ankiety;
- Łącznie screened out: Służy do sprawdzania i wykluczania potencjalnych uczestników, którzy nie spełniają określonych kryteriów.
- Łączna liczba wypełnionych ankiet: Pokazuje liczbę ankiet, które wypełnili użytkownicy, którzy zostali przydzielony kod tokena.
Nad tabelą „Podsumowanie uczestników ankiety” znajdziesz „narzędzia do zarządzania tabelą uczestników ankiety”:
- Wyświetl uczestników: Wyświetla tabelę uczestników ankiety zawierającą wszystkich bieżących uczestników. Na ekranie przeglądania możesz edytować lub usuwać poszczególne wpisy z tabeli, a także wykonywać szereg innych przydatnych funkcji (więcej szczegółów znajdziesz w sekcji Wyświetl wiki uczestników poniżej);
*Utwórz...: Umożliwia administratorowi ankiety dodanie respondentów do tabeli uczestników ankiety za pomocą opcji „Dodaj uczestnika” lub opcji „Importuj uczestników” Funkcja ;
- Zarządzaj atrybutami: Umożliwia administratorowi ankiety dodanie dodatkowych pól do tabeli uczestników ankiety w celu przechowywania niestandardowych danych uczestników;
- Eksportuj: Aby wyeksportować tabele tokenów i wykorzystać je w innych ankietach, użyj tej funkcji. Plik zostanie zapisany w formacie .CSV;
- Uczestnicy ankiety: Umożliwia zaproszenie lub przypomnienie uczestnikom z tabeli uczestników ankiety o wypełnieniu ankiety online;! N!*Generuj tokeny: Umożliwia administratorowi ankiety szybkie przydzielenie losowego, unikalnego kodu tokena każdemu użytkownikowi z tabeli uczestników ankiety, która go nie posiada;
- Wyświetl w CPDB: Zapewnia szybki dostęp do instalacji LimeSurvey centralna baza danych uczestników (CPDB). Stamtąd możesz przydzielać użytkowników CPDB jako uczestników dowolnej ankiety.
Wyświetl uczestników
Wyświetla listę wpisów z tabeli uczestników ankiety i umożliwia użytkownikowi:
- sortuj uczestników ankiety;
- filtruj uczestników ankiety;
- wykonaj określone akcje na pojedynczym wpisie;
- wykonaj określone działania na więcej niż jednym wpisie.

Sortuj uczestników ankiety
Drugi wiersz tabeli zawiera różne kryteria, które mogą pomóc administratorowi ankiety w sortowaniu wpisów. Kliknięcie w którąkolwiek kolumnę/kryteria z tabeli spowoduje odświeżenie ekranu i pokazanie uczestników ankiety uporządkowanych według klikniętego przed chwilą kryterium. Kliknij dwukrotnie, aby wyświetlić wyniki w kolejności malejącej.

Filtruj uczestników ankiety
Aby filtrować uczestników ankiety, wybierz kolumnę, którą chcesz filtrować. Następnie wpisz wartości/ciągi, według których chcesz filtrować, w pustym polu pod żądaną kolumną.

Na przykład wpisz „OK” w polu statusu adresu e-mail, aby zwrócić tylko tych uczestników, którzy mają prawidłowy adres e-mail.
Wykonaj określoną akcję na pojedynczym wpisie
W kolumnie „Akcja” znajdują się wszystkie akcje dostępne dla każdego wpisu z tabeli uczestników ankiety. Możliwe działania, które można wykonać to:

- Wyświetl szczegóły odpowiedzi: Jeśli ankieta jest ankietą „śledzoną” (tzn. nie anonimową), pojawi się kolejny przycisk umożliwiający wyświetlenie odpowiedzi z tego pojedynczego wpisu;
- Uruchom ankietę za pomocą tego tokena: Służy do przeprowadzenia ankiety przy użyciu wygenerowanego kodu tokena;
- Wyślij zaproszenie e-mailem: Użyj tej opcji, aby wysłać e-mail z zaproszeniem do odpowiedniego uczestnika w celu wypełnienia ankiety;
- Edytuj uczestnika ankiety: Kliknij, aby zmienić ankietę dane uczestnika;
- Usuń uczestnika ankiety: Kliknij, aby usunąć ten konkretny wpis;
- Wyświetl tę osobę w centralnej bazie danych uczestników: Ikona zostanie wyświetlona, jeśli odpowiedni wpis można także znaleźć w centralnej bazie danych uczestników.
Wykonaj określoną akcję na więcej niż jednym wpisie
W lewym dolnym rogu tabeli znajduje się przycisk „Wybrani uczestnicy…”, który umożliwia wykonanie określonych działań na poziomie makro:

- Wyślij zaproszenia e-mailem: Wyślij zaproszenia e-mailem do wybranych uczestników ankiety;
- Wyślij przypomnienie e-mailem: Wyślij przypomnienia e-mailem do wybranych uczestników ankiety;
- Dodaj uczestników do centralnej bazy danych: Aby wykorzystać część wpisów tokenów w innej ankiecie, dodaj wybranych uczestników do centralna baza danych uczestników. Stamtąd możesz dodać uczestników do dowolnej ankiety. Aby uzyskać więcej informacji, czytaj dalej stronę wiki Udostępnij tego uczestnika.
Utwórz...
Aby w tabeli uczestników ankiety znalazło się więcej uczestników, możesz dodać nowych lub zaimportować ich z pliku CSV lub zapytania LDAP.

Dodaj uczestnika
Typowy wpis tokena zawiera następujące pola:
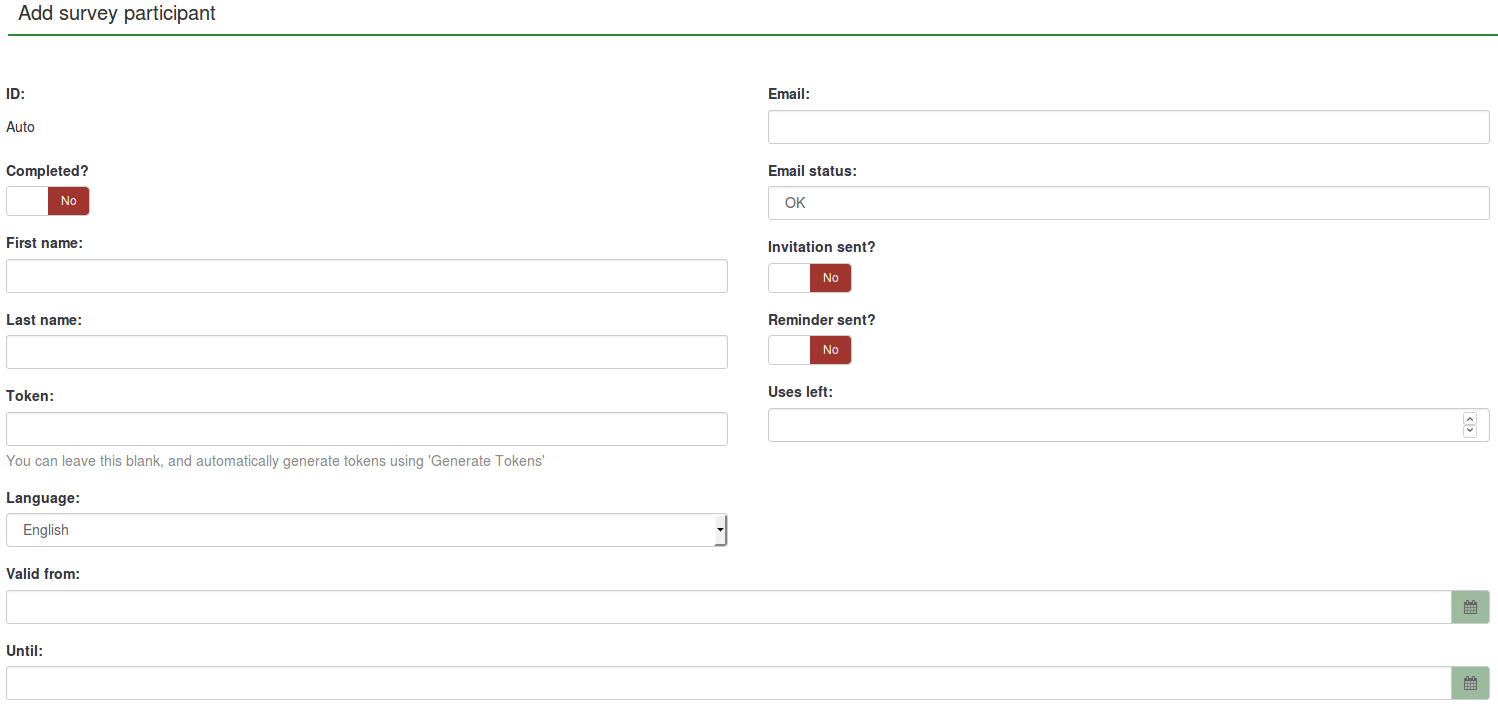
- ID: An integer that is automatically assigned to each survey participant;
- Completed?: Disabled by default. If enabled, it would contain the date when the survey was completed. No invitations or reminders are sent to the respective users if this is enabled. It is automatically enabled if the respective survey participant completed the survey using his or her assigned token code;
- First name: The first name of the survey participant;
- Last name: The last name of the survey participant;
- Token: This is the invitation code. It can be manually or automatically generated (via the Generate tokens button);
- Language: Here you can select the default language of the survey for the respective participant;
- Email: The email address of the participant;
- Email status: This field helps you track invalid email addresses. For instance, if the survey administrator received email error notifications from this email, then they can set this field to anything other than "OK" (for instance "user unknown" or "mailbox quota exceeded"). Marking this field with an email status other than "OK" will help skip this entry when sending invitation or reminder emails. Note that this is completely manual, unless you decide to implement a script which updates this field automatically;
- Invitation sent?: If enabled, contains the date when the invitation email was sent;
- Reminder sent?: If enabled, contains the date when the reminder email was sent;
- Uses left: Counts the number of times the token can be used. Note: When increasing this value (default = 1) for a user who has already filled out the survey (which sets uses left to 0), you also have to switch the Completed field from "Yes" to "No";
- Valid from: & Until:You can set a date/time range for when this token can be used. You can leave these empty if you don't want to limit the participation time frame for certain users. If the user is answering the survey and the participation time ends, then the user is locked out immediately and won't be able to finish the survey.
Note that the Add survey participant panel has two tabs: the General tab and the Additional attributes tab. The additional attributes tab offers you access to your custom attributes - read the following wiki section for more details.
Create dummy participants
A dummy participant can be used when you do not want to send tokens by email to survey participants, but give them token codes by other means. For example, students doing class evaluations could be given a paper with an invitation code to be entered at the beginning of the online survey. This way, the likelihood of receiving more responses and feedback increases.
Click Create dummy participants and the following page will be displayed:

The Number of participants field allows you to enter the number of dummy participants you want to add to your survey participants table. The explanation of the other fields can be found in the Add participant wiki subsection.
After completing the fields, press Save located in the upper-right part of the screen.
To check whether they were added or not, check the Survey participants table:

Import participants from a CSV file
The import function allows you to import information from a CSV file or LDAP query.
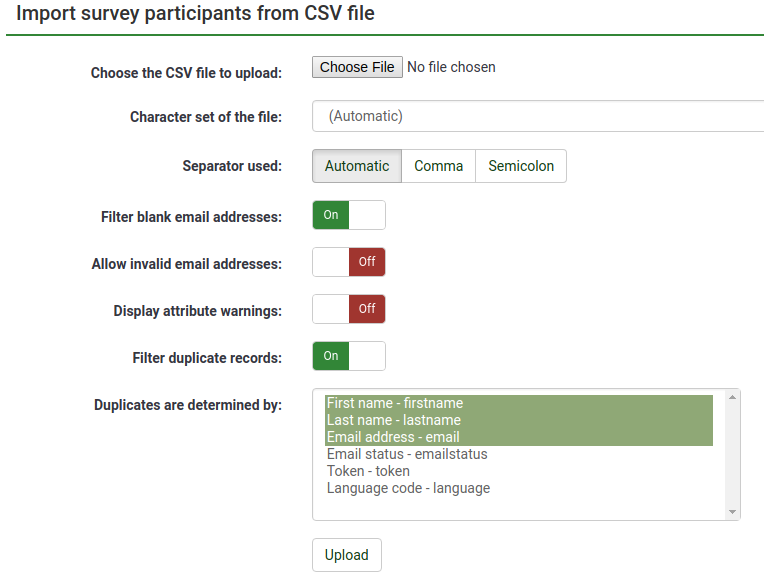
- Choose the CSV file to upload: Pick the CSV file you wish to import. To eliminate any possible errors, we recommend that you import a standard CSV (comma delimited) file with optional double quotes around values (default for OpenOffice and Excel).
The first line must contain the field names. It must also contain the following fields: firstname, lastname, email.
They have to contain at least one character. Simply adding double quotes and no characters between them will not work!
The other fields are optional: emailstatus, token, language, validfrom, validuntil, attribute_1, attribute_2, attribute_3, usesleft, ... .


- Character set of the file: Select the option that fits the characters used in the CSV file;
- Separator used: You can let LimeSurvey automatically discover the used separator in your CSV or select either the comma separator or the semicolon one;
- Filter blank email addresses: If enabled, the survey participants without an email address will not be imported into your survey participants table;
- Allow invalid email addresses: If disabled, this function will look into the email addresses fields and check whether the addresses have the structure of an email or not (e.g.: a@a.net);
- Display attribute warnings: If enabled, after the importing process warnings will be displayed in case there is something wrong with the fields. For example. you might get an attribute warning if nothing is provided in any of the mandatory fields or if an email is incorrectly introduced in the CSV file.
- Filter duplicate records: If enabled, you can set which fields are used to identify duplicates. By default First name, Last name & Email-address are preselected. If a duplicate is found while importing, the related line is omitted.
- Duplicates are determined by: Select the fields that you want to filter on for duplicates.
You can also import customized attributes when importing a CSV file. You will have to define what attributes will be added. You can do it like this:
email,attribute_1 <Casenr>, token, attribute_2 <Title>, attribute_3 <destination>, lastname,firstname,attribute_4 <Sender>
Once you are done choosing the desired importing settings, do not forget to click on the Upload button.
Troubleshooting the import of survey participants
A common error when users try to import tokens is an invalid CSV file. This is often caused by Microsoft Excel. Many users have a list of email addresses saved as an XLS document. A file can be saved as CSV in Excel. However, depending on the locale of the OS, Microsoft Excel may use semi-colons (;) as comma separator, while a standard CSV file uses commas (,) as separators. If you do not know which one you use, open the file with a standard text editor and verify which separator was used.
Recommended free raw text editors are: PSPad, NotePad2 or Notepad++ for Windows, and TextWrangler for Macintosh.
Import participants from a LDAP query
This import function allows you to import information from a LDAP query (tested on openLdap, but should work in any LDAP compliant directory including ActiveDirectory). The following options are available on the Import survey participants from LDAP page:

- Queries are manually defined by the system administrator in the config-ldap.php file.
- Duplicates are identified by First Name, Last Name & Email-Address. If a duplicate is found while importing, the related line is omitted (unless you have unchecked the Filter Duplicates checkbox).
Manage attributes
This option allows you to add/edit the additional fields of your survey participants table. The extra fields are used to store custom survey participants data.
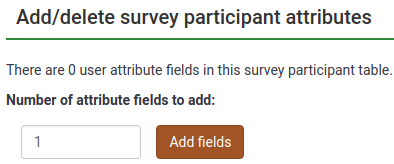
Type in the number of new attribute fields you want to add to your survey participants table. Click the Add fields button. The following page will be displayed:
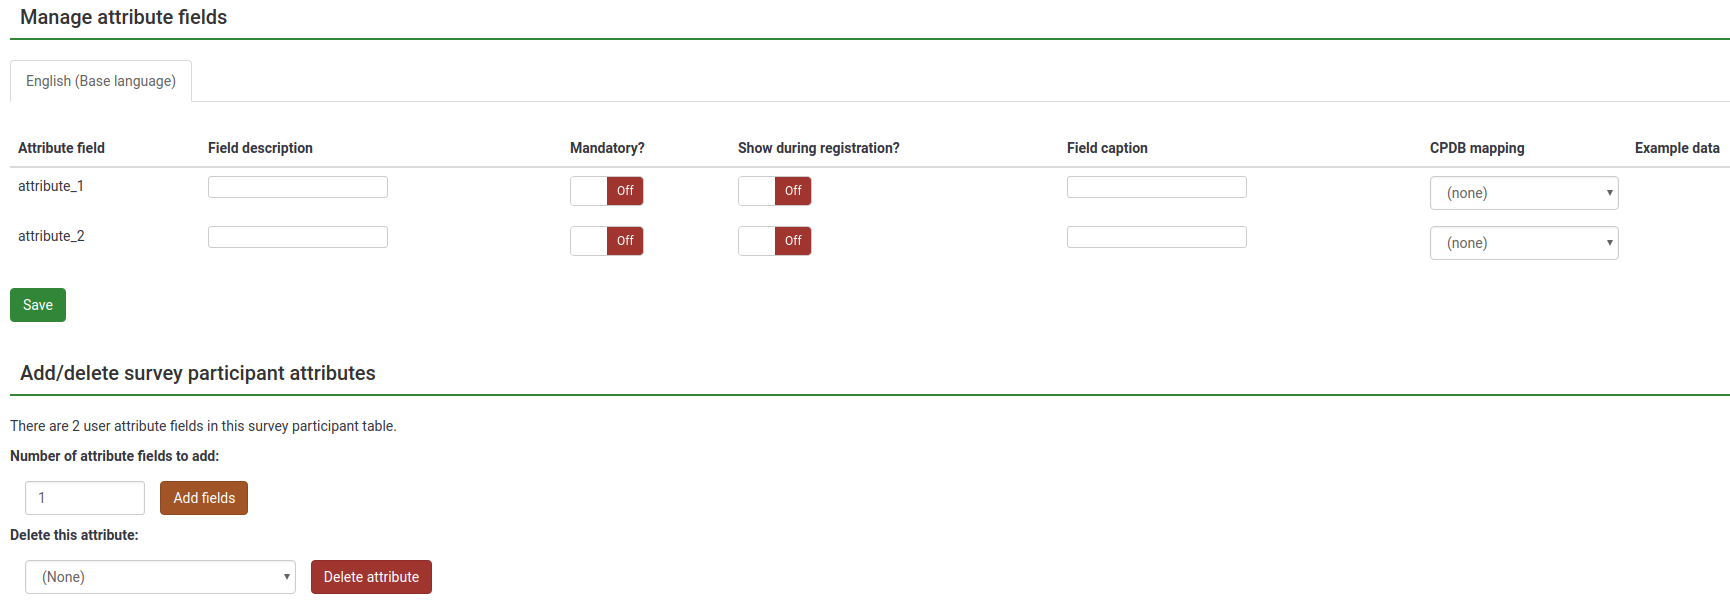
The attribute fields table contains the following fields:
- Attribute field: The value typed here can be used when you want to perform different operations with the respective custom attribute field such as applying conditions based on attribute fields or when exporting results for non-anonymous surveys.
- Field description: Used to replace the attribute field name. By giving a custom name to each attribute field, they will look nicer in the administration panel, when you browse tokens, when creating conditions based on attribute fields or when you export results for non-anonymous surveys.
- Mandatory?: If enabled, the respective attribute field must be filled in by the survey administrator. Otherwise, the respondent cannot be registered into the survey participants table.
- Show during registration?: If the survey participants have to register before completing a survey, certain details will be requested from them. If disabled, the respective attribute field won't appear on the survey registration page.
- Field caption: Use this fields to add more details about the role/usage of the respective attribute field.
- CPDB mapping: Maps the attribute in order to connect it to its corresponding attribute from the central participant database.
- Example data: Contains string examples from different fields. For example, if you want to ask for the gender of the survey participant, then you will see in the Example data field examples such as male, female, no answer etc.
Once you have finished filling in the boxes, do not forget to click the Save button located in the bottom-left part of the screen.
To add more fields, go to the bottom of the page, and type in the Number of attribute fields to add box the desired number and click the Add fields button.
If you want to delete a custom attribute, go to the bottom of the page and select from the drop-down list situated under the Delete this attribute field the attribute you want to delete. Once selected, click Delete attribute and confirm the deletion.
Export
To export a survey participants table, click the "Export" button located on the token management tools toolbar. Before exporting the survey participants list, select the desired export options.
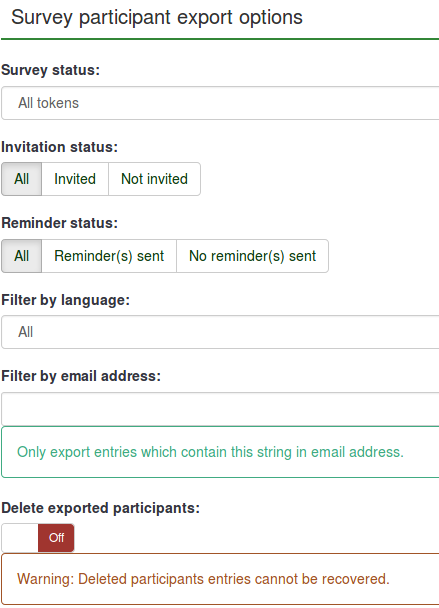
- Survey status:
- All tokens: Exports all survey participants from the survey participants table;
- Completed: Exports only those survey participants that have completed the survey;
- Not completed: Exports survey participants that have not yet completed the survey;
- Not started: Exports the survey participants that have not yet started the survey;
- Started but not yet completed: Exports survey participants that have already started the survey, but have not completed it.
- Invitation status: Exports participants according to the invitation status: all, invited, and not invited;
- Reminder status: Exports participants according to the reminder status: all, Reminder(s) sent, No reminder(s) sent;
- Filter by language: When you create a survey, you can add additional languages besides the base language. Those additional languages can be used to export survey participants according to the language they are assigned to;
- Filter by email address: Exports entries which contain the string in the respective email address. For example, you can use it if some of your survey participants use the work email addresses from "Company A". Type @companya.com and export only the users that have received a work email address from the respective company;
- Delete exported participants: If enabled, the exported users will be deleted from your survey participants table.
Once you have selected the exporting options, click the Download CSV file button located in the upper right part of the screen.
When you export your survey participants, the fields are exported in the following order:
tid,firstname,lastname,email,emailstatus,token,language code,attribute_1,attribute_2,...Invitations & reminders
Invitations & Reminders allows you to manage the LimeSurvey invitations system. You can send invitations or reminders to participants displayed in your survey participants table. An email bounce tracking system can be used to help you track and mark the emails that were not delivered to the recipients (survey participants).
Send email invitation
From the survey participants table you can send email invitations in bulk to all participants who have not been sent one.

You can skip survey participants who have an email status that is not "OK" by enabling the Bypass token with failing email addresses option.
To overcome the validity settings of all of your entries, enable the Bypass date control before sending email function. This way, the LimeSurvey email function will not take into account the date/time range when a token would be allowed to be used.
Resending invitations
Use this functionality to send invitations again to certain survey participants. When you use the send invitations function, only an email address that has not previously received an invitation will get one. This means that if you add new email addresses to the survey participants list after the first invitations are sent, only these new addresses will receive an invitation the second time you send invitations.
This means that you can also edit an email address in a particular table entry that you received a bounced email from and then send it only to this edited address. Do this by turning off the Invitation sent field and then click send invitations again.
Send email reminder
Sends bulk email reminders to all participants from the survey participants table who have not yet responded, but have been sent their first invitation.
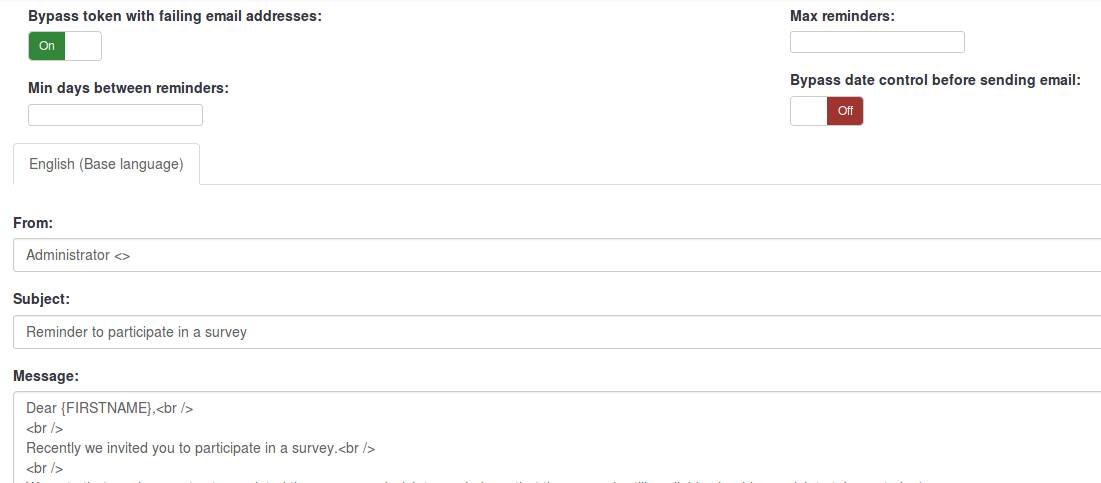
When sending reminders you can:
- Bypass tokens with failing email addresses: those entries with a failing email address will be skipped - they will not receive an email;
- Min days between reminders: skip tokens if a reminder has been "recently" sent;
- Max reminders: skip tokens if a given number of reminders have already been sent;
- Bypass date control before sending email: skip those entries that are not within the time-frame that they can be used.
Sending emails by batch
When sending a large number of emails at the same time, LimeSurvey will only send the first batch of N emails (this threshold is set by the administrator from the email settings, located in the global settings of your LimeSurvey installation).
Confirmation email
If you are using tokens and a participant fills out the survey, a confirmation email is sent to their email address.
If you do not want this message sent, deactivate this functionality from the general settings of your survey.
Start bounce processing
When sending an email, the LimeSurvey email bounce tracking system automatically adds a survey-id and token-id to the mail header. These "custom headers" are added to each invitation email that is sent through your LimeSurvey installation to survey participants. When the email is bounced back, the original header along with the "Delivery notification" header is received. The system then checks for new emails and parses the emails that have these custom headers and marks the wrong email address in the survey participants table.
Bounce settings
Bounce settings options:
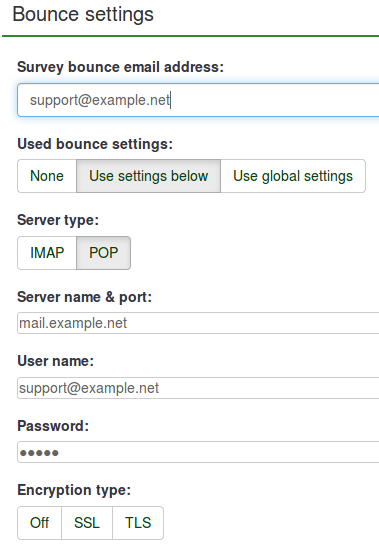
For a short description of each field, check the following wiki section. To use the LimeSurvey installation Global settings, go to Used bounce settings and select the Use global settings option.
Click the following link for more information on how to correctly configure this feature.
Edit email templates
To find out more about what placeholders you can use or how you can edit the LimeSurvey email templates, read our wiki section on email templates.
Generate tokens
With the help of this function, unique tokens can be created for all the individual entries from the survey participants table that have not yet received a token code.

View in CPDB
The last option on the tokens management toolbar is the View in CPDB option. This allows the survey administrator to see the participants that exist in both the central participant database and the survey participants list.
In the following example, we have the following survey participants list:

The users with ID 1 and 2 have been shared from the central participant database. To check this, go to the survey participants table management toolbar and click View in CPDB

As you can see, the View in CPDB function basically applies a filter to determine which users from the CPDB are present in the respective survey.
Delete table
To delete your survey participants table, click the Display participants button and look for the Delete participants table button located in the upper-right part of the screen.

A window will pop up, asking for the final confirmation.

Please note that this will not delete the table from your LimeSurvey installation. A backup will be created. In order to access it, you need system administrator rights.
If you do wish to completely remove it, use the check data integrity option that is located in the Configuration dialog.
Additional hints & tips
Feel free to add any hints and tips to the list below. The ones listed were posted by members of our community:
- Allowing public registration
- Captchas in public registration
- Can a survey using tokens ensure anonymous responses?
- A tip for generating a large number of fake e-mail addresses
- Spam problems
- Pseudonymised participation
Zezwolenie na publiczną rejestrację
Możesz ustawić swoje badanie jako ogólnodostępne i jednocześnie stosować pewien rodzaj kontroli uczestników używając tokenów. To jest możliwe: jeśli zainicjujesz swoją tabelę tokenów i wybierzesz, w głównych ustawieniach badania, opcję "Zezwól na publiczną rejestrację", osoby, które odwiedzą twoje badanie (adres URL) i nie będą miały swojego tokenu, będą miały możliwość zarejestrowania się. Jeśli podadzą adres email, który nie występuje już w tabeli tokenów badania, zostanie stworzony nowy wpis w tabeli. Osoby te otrzymają natomiast email z zaproszeniem zawierający ich unikatowy token. Wszystkie tokeny udostępniane samodzielnie się rejestrującym uczestnikom będą zaczynały się od litery "R".
If a participant provides an email address that is not already in the current database, an entry in the survey participants table will be created and they will be emailed an invitation containing their unique token code. All tokens provided to "registering" visitors will begin with the letter "R".
Zabezpieczenie Captcha w publicznej rejestracji
Dla zabezpieczenia twojego badania przed rejestracją robotów internetowych, we wszystkich formularzach zapisu i wczytywania wykorzystywany jest filtr captcha. (począwszy od wersji 1.48)
Ta funkcja jest dostępna tylko w przypadku, gdy masz włączoną opcję "GD-support" w konfiguracji PHP. (Zobacz wymagania instalacyjne)
Can a survey using tokens ensure anonymous responses?
Yes, tokens can be used both for anonymous and non-anonymous surveys. This is determined when creating a survey. If a survey is not anonymous (or 'tracked') then the token list can be used to find the responses that an individual has made to the survey. If the survey is anonymous, then no link (technically: foreign key relationship) is available between the respondents from the survey participants table and their corresponding answers.
To enable or disable anonymized responses, check the participant settings wiki section.
A Tip for generating a large number of fake e-mail addresses
Sometimes you may need a large number of fake e-mail addresses and tokens. You can use functions in a spreadsheet (e.g. OpenOffice Calc) to generate them. Let's assume you want thousands of addresses in a form: 1@test.com, 2@test.com, 3@test.com, and so on. Type "1" in A1. Insert function =A1+1 in A2, then copy A2 down as many times as you need so that you obtain a list of consecutive numbers. In B1 use the concatenation function to join A1 and "@test.com", which is =CONCATENATE(A1;"@test.com"). Then copy B1 down so that each A cell has a correspondent (you can also generate similarly fake names). Finally, save the file as CSV in order to import it to LimeSurvey.
With the launch of LimeSurvey 1.91, you can use the "Generate dummy token" functionality. However, the dummy entries do not contain any email address.
Spam problems
Users often complain about not receiving invitations or reminder emails because their email spam filters identified the message from LimeSurvey as spam.
The fact that an email is treated as spam depends mostly on the spam filter being used and its settings. A spam filter usually checks the sender address, and the email subject and content. Changing its settings could solve the way in which the users' email providers treat the messages from LimeSurvey.
Some possible issues and solutions are listed in the following Limesurvey Consulting blog post.
LimeSurvey automatically tries to determine the URL for the invitation link by looking at the URL that you logged into the LimeSurvey administration with. However, with some server (mis)configurations this might not work properly and you will have to set this manually.
You can edit "application/config/config.php" to change the default base URL value. Add a hostInfo property, as shown below, to the existing 'components' array.
    'components' => array(
       ...
       'config' => array(
           .......
           'publicurl' => 'http://www.example.com',
           ........
       ),
   )
Regarding the source of the problem, LimeSurvey tried to determine the domain from the server PHP variable: $_SERVER['HTTP_HOST'] or $_SERVER['SERVER_NAME'].
Some web server software do not properly seem to provide this information or are misconfigured.
Pseudonymised participation
With the dummy tokens, you may create a form of pseudonymised participation by exporting the created dummy tokens and then combining them with your participant list externally. That way, LimeSurvey can be used as a survey platform without putting personal information of your participants into the system.
The only downside is that you will have to distribute the participation tokens yourself.