Enquête deelnemers
From LimeSurvey Manual
Inleiding
Vaak wil je een groep mensen uitnodigen om je enquête in te vullen. Je wilt bijhouden wie de enquête heeft ingevuld en er voor zorgen dat iedereen maar een keer de enquête kan invullen. Met tokens kun je het volgende doen:
- Importeren van een lijst met namen en e-mailadressen van deelnemers (invoer is een CSV bestand of een LDAP query)
- Genereren van een unieke toegangscode voor elke gewenste deelnemer
- Een e-mail versturen naar elke gewenste deelnemer met de uitnodiging om deel te nemen (per groep of individueel).
- Een herinnering e-mailen aan elke deelnemer die de enquête nog niet ingevuld heeft.
- Bijhouden wie de enquête ingevuld heeft.
- Voorkomen dat niet uitgenodigde mensen de enquête invullen, en zorgen dat de uitgenodigde deelnemers dat maar een keer doen.
- Wijzigen details in je lijst.
- Sjablonen aanmaken voor de e-mails (uitnodiging / herinnering)
Nadat je van je enquête een besloten enquête hebt gemaakt, (je hebt tokens ingeschakeld voor je enquête), dan kunnen alleen de mensen met een geldige toegangscode (token) die nog niet gebruikt is, de enquête invullen.
Als je Openbare aanmeldingen toestaat in de enquête instellingen, dan kunnen deelnemers zichzelf als deelnemer aanmelden, er wordt dan automatisch een token aangemaakt.

Hoe maak je een deelnemerstabel aan?
To activate the tokens functionality of LimeSurvey, access the survey and click on the Survey Participants button from the Settings menu. You will be prompted by the following message:

If you initialize a participant table, the survey will be accessible only to those users that provide in the survey registration process a token code (either manually or by URL). In this way, the survey will be switched to the closed-access mode.
Once initialized, a window will load up with the confirmation of the participant/token table creation.
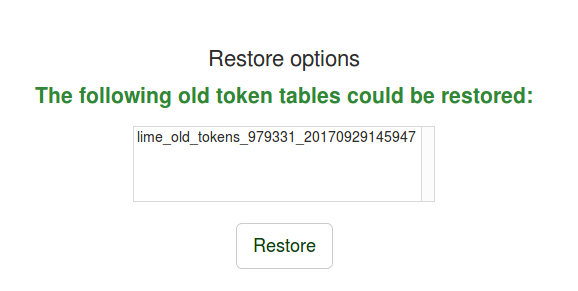
Tokentabel reactiveren
When you delete a survey participants table, a backup is created. It can be later reactivated if you wish to use that specific survey participants table in another survey:
Beheer toegangscodes
A survey participant summary will load up if the token/participant table was previously created. This is the default screen:
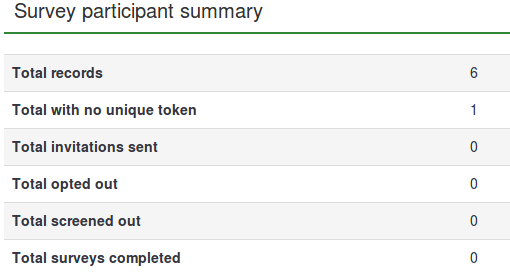
- Total records: The number of survey participants from the survey participants table;
- Total with no unique token: It displays the number of users without an assigned token code;
- Total invitations sent: It shows the number of invitations that have been sent to your survey participants from the Survey participants table by using the Invitations option from the Invitations & reminders menu;
- Total opted out: It displays the total number of survey participants that have decided to opt out from the survey;
- Total screened out:
- Total surveys completed: It shows the number of the surveys that have been completed by those users who have been allocated a token code.
Above the Survey participant summary table, you may find the token management tools:
- Display participants: If clicked, a survey participants table with all the current participants will load up. From the browse screen you can edit or delete individual entries from the table as well as perform a number of other useful functions (see the Display participants wiki section below for more details);
- Create...: This option allows the survey administrator to add respondents into the survey participants table either via the Add participant option or via the Import participants function;
- Manage attributes: It allows the survey administrator to add additional fields to the survey participants table to store custom participant data;
- Export: If you wish to export the token tables and use them in other surveys, use this function. The file will be saved in the .CSV format;
- Survey participants: Use this option in order to quickly invite or remind your participants from the survey participants table to fill out your online survey;
- Generate tokens: It is a LimeSurvey functionality that allows the survey adminstrator to quickly allocate a random unique token code to each user from the survey participants table that does not have one;
- View in CPDB: It's a button that offers quick access to your LimeSurvey installation central participant database (CPDB). You can allocate from there CPDB users as survey participants to any survey you wish.
Deelnemers tonen
Het overzicht toont alle toegangscodes in een lijstvorm. Er zijn een aantal knoppen met een 'actie' die op een specifieke toegangscode kan worden uitgevoerd.

Enquête deelnemers sorteren
De volgende regel (zie onderstaand plaatje) geeft verschillende criteria om de tokens te sorteren. Je kunt op een groene pijl klikken om op het bijbehorende veld te sorteren.

Enquête deelnemers filteren
If you wish to filter the survey participants, choose the column according to which you want to filter the participant. Type in below the first row the values/strings according to which the filtering should be done:

For example, type in the email status field "OK" in order to let LimeSurvey return only those users that use a good email address.
Specifieke actie op een deelnemer
The second column is the Action column where you can find all the actions that are available for each individual entry from the survey participants table. The possible actions that can be performed are:

- Invullen van de enquête
- Wijzigen
- verwijderen
- Verstuur een uitnodiging/herinnering
- Bij een niet anonieme enquête is er ook een knop om de respons te bekijken.
Alle acties zijn dus voor een specifieke toegangscode.
Specifieke acties op meerdere deelnemers
On the bottom-left part of the table, you may find the Selected participant(s)... button that allows you to perform certain actions at a macro level:

- Send email invitations: Send email invitations to the selected survey participants;
- Send email reminder: Send email reminders to the selected survey participants;
- Add participants to central database: In the case in which you would like to use some of the token entries into another survey, add the selected participants to the central participants database. From there, you have the option to add the participants to any survey you wish. For more details, continue reading the Share this participant wiki page.
Toevoegen...
To have more participants listed in the survey participants table, you can either add new ones or import them from a CSV file or LDAP query.

Deelnemer toevoegen
Je krijgt ongeveer het onderstaande scherm:
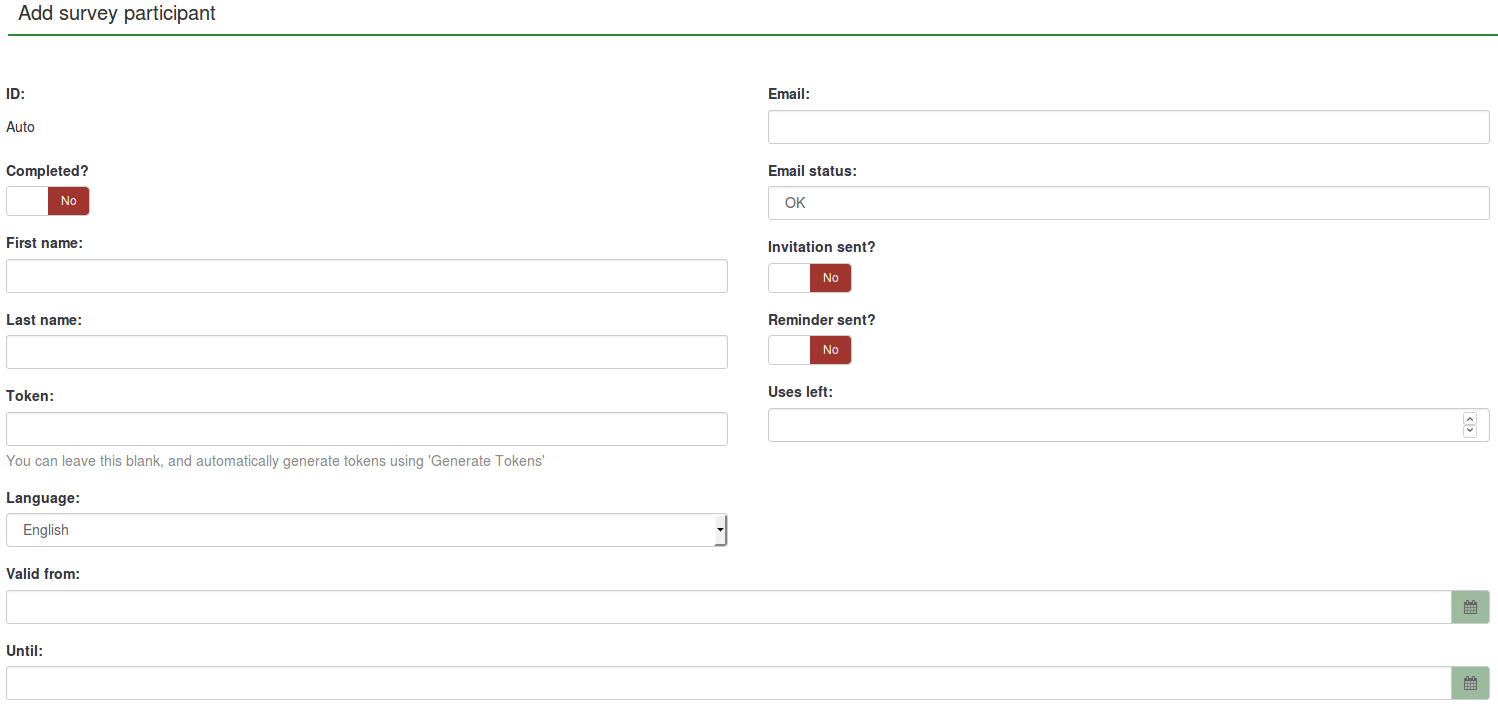
- ID: It represents an integer that is automatically assigned to each survey participant;
- Completed?: It is disabled by default. If enabled, it would contain the date when the survey was completed. No invitations or reminders will be sent to the respective users if this is enabled. It gets automatically enabled if the respective survey participant completed the survey by using his or her assigned token code;
- First name: The first name of the survey participant;
- Last name: The last name of the survey participant;
- Token: This is the invitation code. It can be manually or automatically generated (via the Generate tokens button);
- Language: You can select here the default language of the survey for the respective participant;
- Email: the email address of the participant;
- Email status: This field helps you track the bad email addresses. For instance, if the survey administrator received email error notifications from this email, then he can set this field to anything other than "OK" (for instance "user unknown" or "mailbox quota exceeded"). Marking this field with an email status other than "OK" will help skip this entry when sending invitation or reminder emails. Note that this is completely manual, unless you decide to implement a script which updates this field automatically;
- Invitation sent?: If enabled, it would contain the date when the invitation email was sent;
- Reminder sent?: If enabled. it would contain the date when the reminder email was sent;
- Uses left: A counter of number of times the token can be used. Note: When increasing this value (default = 1) for a user who has already filled out the survey (which sets uses left to 0), you also have to switch the Completed field from "Yes" to "No";
- Valid from: & Until: You can set a date/time range when this token would be allowed to use. You can leave these empty if you don't want to limit participation time frame for certain users. If the user is answering the survey and the participation time ends then the user is locked out immediately and won't be able to finish the survey.

- Voornaam en Achternaam: van de deelnemer (kan gebruikt worden in e-mails en enquête)
- E-mail: e-mailadres van deelnemer
- E-mail status: Gebruikt voor blokkeren foute e-mailadressen. Als de beheerder een bounce ontvangt van een naar deze deelnemer gestuurde e-mail, dan kan de status gewijzigd worden in iets ongelijk 'OK' (bijvoorbeeld: 'gebruiker onbekend' of 'mailbox vol'). Door iets anders dan 'OK' hier in te zetten, wordt deze deelnemer overgeslagen bij het sturen van herinneringen en uitnodigingen. NB. dit is dus een handmatig actie, behalve als je een script hebt gemaakt die dit doet.
- Toegangscodes: de uitnodigingscode, aangemaakt bij het genereren van de toegangscodes.
- Taal: je kunt de standaardtaal per deelnemer instellen.
- Uitnodiging verzonden?: standaard een 'N', anders de datum waarop de uitnodiging is verzonden.
- Herinnering verzonden?: standaard een N, anders de datum waarop de herinnering is verzonden.
- Voltooid?: standaard een 'N', anders de datum waarop de enquête is ingezonden (niet anoniem) of 'Y' (anoniem)
- Resterend aantal pogingen: Aantal keren dat de toegangscode nog gebruikt kan worden. NB.: Als je dit verhoogd na het afronden van de eerste keer invullen door de deelnemer, dan moet je ook "Voltooid?" op "N"zetten. (standaard 1).
- Geldig van & tot : Je kunt de periode dat de toegangscode gebruikt mag worden beperken tot deze periode. Laat deze velden leeg, als je de deelnemers niet in de periode dat ze de enquête inzenden wilt beperken. NB.: Als de periode eindigt terwijl de deelnemer bezig is met invullen, dan is het verder invullen niet meer mogelijk.
- Attribuut1 tot Attribuut x: Optionele velden die door de beheerder van de enquête zijn toegevoegd (zie een volgende paragraaf).
Dummy deelnemers toevoegen
A dummy participant can be used when you do not want to send emails with the token code to each participant, but to give him or her the token code by other means. For example, students receive during class evaluations a paper with an invitation code to be introduced at the beginning of the online survey. In this way, the likelihood to receive more responses and feedback increases.
If you click on the button, the following page will load up:

The Number of participants field allows you to introduce a number of dummy variables you wish to add to your survey participants table. The explanation of the other fields can be found in the Add participant wiki subsection.
After completing the fields, press the Save button located in the upper-right part of the screen to save the dummy variables.
To check whether they were added or not, visit again the Survey participants table:

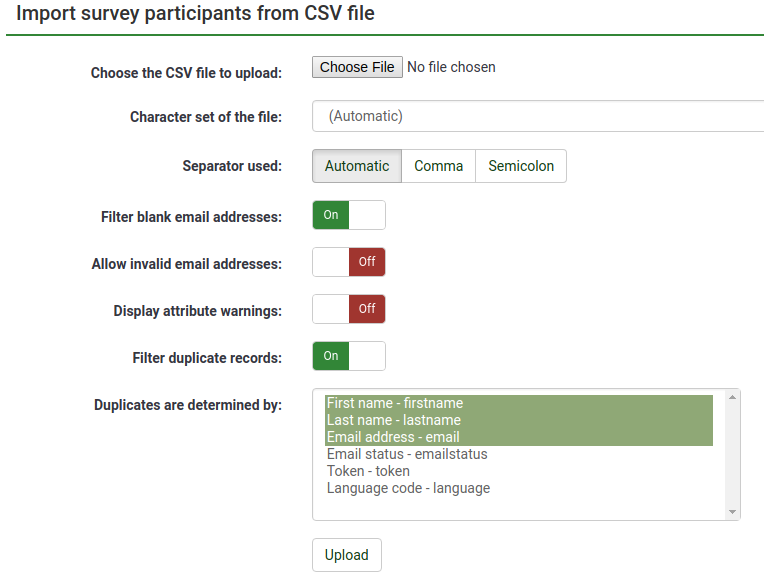
Deelnemers uit een CSV-bestand importeren
The import function permits you to import information from a CSV file or LDAP query.
- Choose the CSV file to upload: Pick the CSV file you wish to import. To eliminate any possible errors, it is recommended to import a standard CSV (comma delimited) file with optional double quotes around values (default for OpenOffice and Excel).
The first line must contain the field names. It must also contain the following fields: firstname, lastname, email.
They have to contain at least one character. Simply adding double quotes and no characters between them will not work!
The other fields are optional: emailstatus, token, language, validfrom, validuntil, attribute_1, attribute_2, attribute_3, usesleft, ... .
Om een volledige lijst met veldnamen te krijgen, kun je een bestaande toegangscodetabel exporteren.
Het datumformaat voor de begin geldigheid en de eind geldigheid in het invoerbestand is "YYYY-MM-DD HH:MM", voorbeeld:
- Character set of the file: Select the option that fits the characters used in the CSV file;
- Separator used: You can let LimeSurvey automatically discover the used separator in your CSV or select either the comma separator or the semicolon one;
- Filter blank email addresses: If enabled, the survey participants without an email addresses will not be imported into your survey participants table;
- Allow invalid email addresses: If disabled, this function will look into the email addresses fields and check whether the addresses have the structure of an email or not (e.g.: a@a.net);
- Display attribute warnings: If enabled, after the importing process warnings will be displayed in the case in which something is wrong with the fields. For example. you might get an attribute warning if nothing is provided in any of the mandatory fields or if an email is wrongly introduced in the CSV file.
Als je de optie om dubbele deelnemers te filteren aanzet, dan kun je ook bepalen hoe zo een duplicaat wordt bepaald. Standaard : voornaam, achternaam, e-mailadres. Een duplicaat wordt bij het importeren overgeslagen.
- Duplicates are determined by: Select the fields according to which you would like to see the filtering process happening.
Extra attributen toevoegen bij importeren Je kunt ook nieuwe aangepaste attributen toevoegen bij het importeren van het csv-bestand. Je moet ze dan wel gedefinieerd hebben. Dat gaat als volgt:
e-mail, attribuut_1 <Casenr>; token; attribuut_2 <Title>; attribuut_3 <destination>, achternaam; voornaam; attribuut_4 <Sender>
Once you are done choosing the desired importing settings, do not forget to click on the Upload button.
Probleemoplossing
Een vaak voorkomende fout bij het importeren van toegangscodes is een ongeldig CSV-bestand. Dit kan komen als je in Excel een lijst van e-mailadressen opslaat als XLS-bestand. Excel kan een bestand opslaan als CSV, maar gebruikt dan een puntkomma (dit is een instelling van het besturingssysteem per land) als scheidingsteken. Standaard is dit in CSV een komma. Als je het niet weet, controleer het scheidingsteken dan door het bestand met een standaard editor te openen. Je kunt bij het importeren (vanaf versie 2.00) het scheidingsteken kiezen.
Als u het invoerbestand eerst nog wil bewerken, dan kunt een zogenaamde free raw text editor gebruiken, bijvoorbeeld: PSPad, NotePad2 of Notepad++ voor Windows, en TextWrangler voor Macintosh.
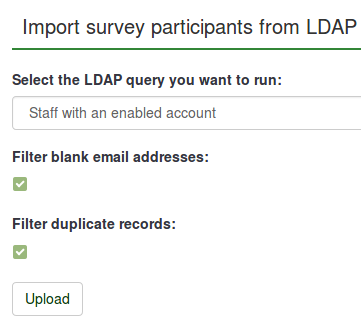
Deelnemers uit een LDAP-query importeren
This import function allows you to import information from an LDAP query (tested on openLdap, but should work in any LDAP compliant directory including ActiveDirectory). Once accessed, the following options are available:

- Een query wordt handmatig door de beheerder gedefinieerd in het bestand config-ldap.php.
- Duplicaten worden bepaald op voornaam, achternaam en e-mailadres. Als je het "Filter dubbele records" aangevinkt hebt gelaten, dan wordt elk dubbel record overgeslagen bij het importeren.
Attributen beheren
This option allows you to add/edit the additional fields of your survey participantst table. The extra fields are used to store custom survey participants data:
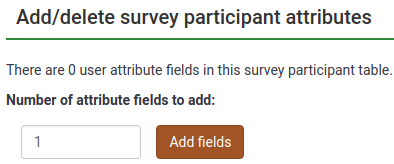
Type in the number of new attribute fields you wish to add to your survey participants table. Click on the Add fields button. The following page will load up:
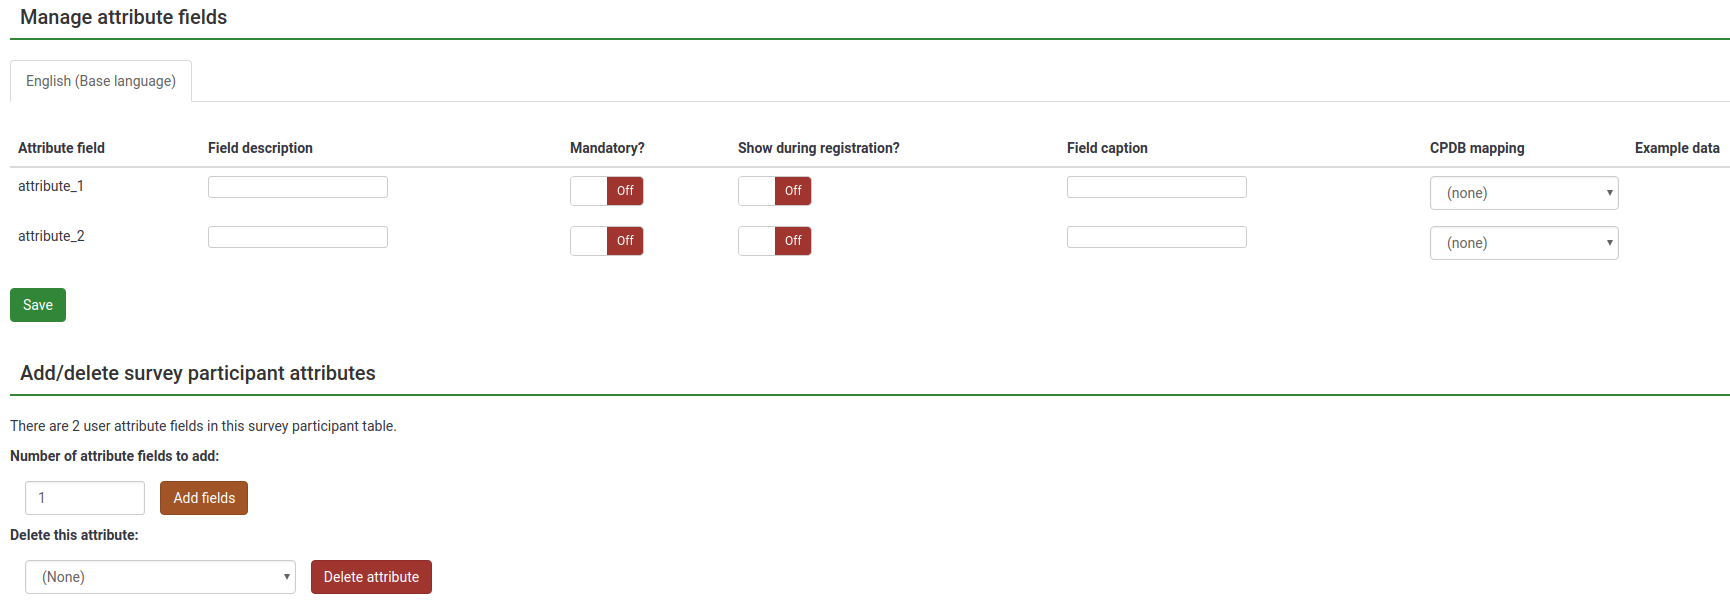
The attribute fields table contain the following fields:
- Attribute field: the value that will be typed in here can be used when you wish to do different operations with the respective custom attribute field such as: applying conditions based on attribute fields or when exporting results for non-anonymous surveys;
- Field description: Used to replace the attribute field name. By giving a custom name to each attribute field, they will look nicer in the administration panel, when you browse tokens, when creating conditions based on attribute fields or when you export results for non-anonymous surveys;
- Mandatory?: If enabled, the respective attribute field will have to be filled in by the survey administrator. Otherwise, the respondent cannot be registered into the survey participants table;
- Show during registration?: If the survey participants have to register before completing a survey, certain details will be requested from them. If disabled, the respective attribute field won't appear in the survey registration page;
- Field caption: Use this fields to add further explanations about the role/usage of the respective attribute field.
- CPDB mapping:; Maps the attribute in order to connect it to its correspondent attribute from the central participants database;
- Example data: It contains string examples from different fields. For example, if you wish to ask for the gender of the survey participant, then you will observe in the Example data field examples such as male, female, no answer etc.
Once you finish filling in the boxes, do not forget to click on the Save button that is located in the bottom-left part of the screen.
Een beschrijving hoe je extra attributen toevoegt en daarop condities kunt gebruiken, staat hier: Conditions based on token attributes.
To add more fields, go to the bottom of the page, and type in the Number of attribute fields to add box the desired number and click on the Add fields button.
If you wish to delete a custom attribute, go to the bottom of the page and select from the drop-down list situated under the Delete this attribute field the attribute you wish to delete. Once selected, click on Delete attribute and confirm the deletion.
Exporteren
If you wish to export a survey participants table, click on the "Export" button located on the token management tools toolbar. Before exporting the survey participants list, select the desired export options:
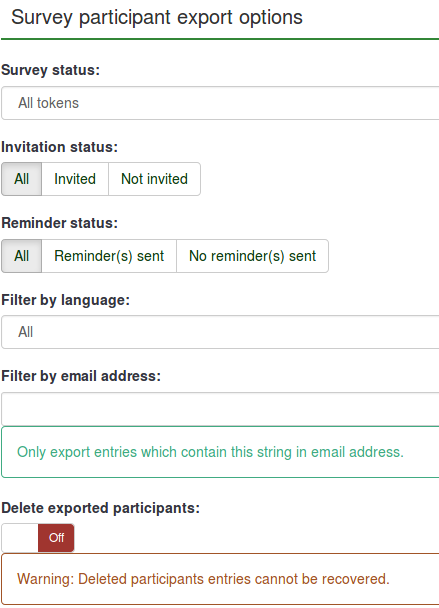
- Survey status:
- All tokens: It exports all the survey participants from the survey participants table;
- Completed: It exports only those survey participants that completed the survey;
- Not completed: It exports the survey participants that have not yet completed the survey;
- Not started: It exports the survey participants that have not yet started the survey;
- Started but not yet completed: It exports the survey participants that have already started the survey, but did not complete it.
- Invitation status: It helps export the users according to the invitation status: all, invited, and not invited;
- Reminder status: It helps export the users according to the reminder status: all, Reminder(s) sent, No reminder(s) sent;
- Filter by language: When you create a survey, you can add additional languages beside the base language. Those additional languages can be used to export tokens according to the language they are assigned to;
- Filter by email address: It exports entries which contain the string in the respective email address. For example, you can use it if some of your survey participants use the work email addresses from "Company A". Type @companya.com and export only the users that have received a work email address from the respective company;
- Delete exported participants: If enabled, the exported users will be deleted from your survey participants table.
Once you have selected the exporting options, click on the Download CSV file button located in the upper right part of the screen.
Als je tokens exporteert dan is de volgorde van de velden:
Uitnodigingen en herinneringen
This functionality allows you to manage the LimeSurvey invitations system. You can send invitations or reminders to those participants that are displayed in your survey participants table. An email bounce tracking system can be used in order to help you track down and mark the emails that were not delivered to the recipients (survey participants).
Uitnodiging e-mailen
You can send through this option email invitations in bulk to all the respondents from the survey participants table who have not been already sent an invitation.
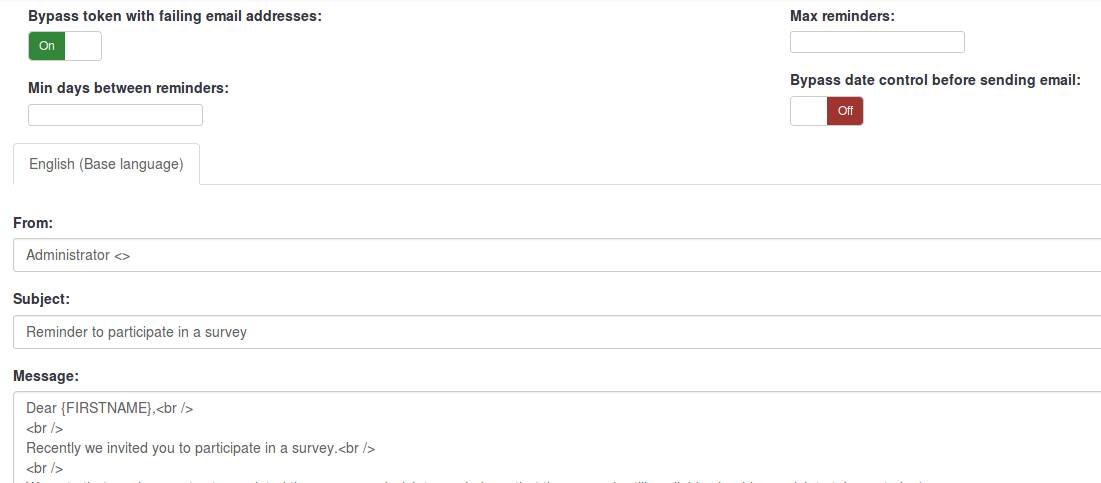
Je kunt tokens overslaan als de e-mailstatus ongelijk 'OK' is, door bij de optie 'Overslaan verkeerde e-mailadressen' te kiezen voor 'Ja'.
If you wish to overcome the validity settings of all of your entries, enable the Bypass date control before sending email function. In this way, the LimeSurvey email function will not take into account the date/time range when a token would be allowed to be used.
Opnieuw versturen uitnodigingen
Soms wil je aan bepaalde personen de uitnodigingen opnieuw versturen. Als je de functie verstuur uitnodiging gebruikt krijgen alleen deelnemers die nog niet eerder een uitnodiging hebben gekregen, een uitnodiging. Je kunt dus je e-mails verspreid versturen als je nog niet alle deelnemers compleet hebt.
Je kunt dus ook als er een e-mail niet afgeleverd kan worden (bounce), het bijbehorende token opzoeken en het e-mailadres wijzigen en dan de functie opnieuw kiezen. Dan krijgt immers alleen deze deelnemer de e-mail. Pas wel eerst de datum in Uitnodiging verzonden? aan in een N.
Herinnering versturen
Sends bulk email reminders to all the participants from the survey participants table who have not yet responded, but have been sent their first invitation.
Bij het versturen van herinneringen kun je:
- tokens overslaan die een verkeerd e-mailadres hebben
- tokens overslaan waarvoor recent al een e-mail is verstuurd
- tokens overslaan waarvoor al een bepaald aantal e-mails is verstuurd
NB. Een herinnering wordt alleen verstuurd naar deelnemers die de enquête nog niet afgerond hebben ("Voltooid?" is ongelijk "N").
Versturen e-mails in een batch
Als het aantal te versturen e-mails groot is, dan zal LimeSurvey in een eerste batch het aantal van N e-mails versturen. Dit aantal (threshold) is bepaald door de beheerder in de instellingen met de "E-mail batch grootte".
Versturen bevestiging
Als de deelnemer een enquête afgerond heeft en er worden tokens gebruikt, dan wordt er een bevestiging verstuurd naar zijn/haar e-mailadres.
Als je niet wil dat dit bericht wordt gestuurd, schakel dit dan uit in de instellingen van de enquête.
Bounce verwerking starten
When sending an email, the LimeSurvey email bounce tracking system automatically adds a survey-id and token-id to the mail header without the notice of the survey administrator. These "custom headers" are added to each invitation email that is sent through your LimeSurvey installation to the survey participants. When the email is bounced back, the original header along with the "Delivery notification" header is received. Then, the system checks for new emails and parses the emails that have these custom headers and mark the wrong email address in the survey participants table.
Bounce instellingen
The following options are available:
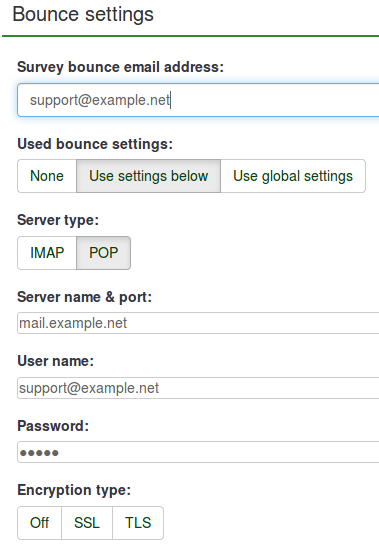
For a short description of each field, check the following wiki section. If you wish to use the LimeSurvey installation global settings, go to the Used bounce settings and select the Use global settings option.
Lees (deze pagina voor meer informatie) voor het instellen van deze functie.
E-mail sjablonen wijzigen
To find out more about what placeholders you can use or how you can edit the LimeSurvey email templates, read our wiki section on email templates.
Tokens genereren
With the help of this function, unique tokens can be created for all the individual entries from the survey participants table that have not yet received a token code:

Tonen in deelnemersdatabase
The last option located on the tokens management toolbar is the View in CPDB option. This allows the survey administrator to see the common users that exist in both central participants database and survey participants list.
For example, we have the following survey participants list:

The users with ID 1 and 2 have been shared from the central participants database. To check this, go to the tokens management toolbar and click on View in CPDB

As you can see, the View in CPDB function basically applies a filter in order to determine which users from the CPDB are present in the respective survey.
Tabel verwijderen
If you would like to delete your survey participants table, click on the Display participants button and look for the Delete participants table button located in the upper-right part of the screen.

A window will pop up, asking for the final confirmation:

Please note that this will not delete the table from your LimeSurvey installation. A backup will be created. In order to access it, you need system administrator rights.
If you do wish to completely remove it, use the check data integrity option that is located in the Configuration dialog.
Aanvullende tips
Feel free to add any hints and tips below. The ones below were posted by the members of our community:
- Allowing public registration
- Captchas in public registration
- Can a survey using tokens ensure anonymous responses?
- A tip for generating a large number of fake e-mail addresses
- Spam problems
Toestaan openbare registratie
Als je je enquête openbaar wilt maken maar wel controle over de deelnemers wilt houden dan kun je tokens gebruiken. Je moet dan bij de instelling van de enquête kiezen voor "Openbare aanmelding toestaan". Mensen die de enquête bezoeken zonder token, kunnen zich dan aanmelden met een e-mailadres dat voor die enquête nog niet gebruikt is. Er wordt dan een token aangemaakt en ze krijgen een uitnodiging waarmee ze de enquête kunnen invullen. Alle tokens die op verzoek van deze bezoekers zijn aangemaakt krijgen een token beginnend met een "R".
If they provide an email address that is not already in the current database, an entry in the survey participants table will be created and they will be emailed an invitation containing their unique token code. All tokens provided to "registering" visitors will begin with the letter "R".
Captcha in openbare aanmelding
Om je enquête te beschermen tegen registratie door robots kun je de captcha functie gebruiken op alle registratie, bewaar en laad schermen. (vanaf versie 1.48) Deze functie is alleen beschikbaar als GD-support geactiveerd is in je PHP configuratie. (lees de Installatie eisen)
Is de enquête anoniem?
Ja, je kunt ook met het gebruik van toegangscodes de enquête anoniem houden. Je bepaalt bij het aanmaken van de enquête of die anoniem is of niet anoniem. Als de enquête niet anoniem is worden de toegangscodes gebruikt om de respons te koppelen aan de deelnemer. Bij een anonieme enquête met toegangscodes, wordt deze link (foreign key relatie) niet gelegd.
To enable or disable anonymized responses, check the participant tokens wiki section.
TIP: veel nep e-mailadressen aanmaken
Soms heb je een aantal nep e-mailadressen met tokens nodig. Je kunt in een programma als Calc of Excel functies gebruiken om ze aan te maken. Stel je wilt 1000 e-mailadressen aanmaken op het werkblad : 1@test.com, 2@test.com, 3@test.com... Zet dan de oplopende nummers in de kolom A: 1 in the A1, voeg de functie =A1+1 in A2 toe, en kopieer A2 naar beneden, zo ver als je nodig hebt. In B1 gebruik je de functie om A1 en "@test.com" samen te voegen, =CONCATENATE(A1;"@test.com") of =TEKST.SAMENVOEGEN(A1;"@test.nl"). Kopieer vervolgens B1 naar beneden, net zo ver als je dat bij A hebt gedaan. Je kunt de namen op dezelfde manier maken. Sla vervolgens je werk op als CSV-bestand.
Vanaf versie 1.91 kun je dummy toegangscodes genereren.
Spam problemen
Vaak klagen gebruikers over het niet hebben ontvangen van een uitnodiging of herinnering, doordat het spam filter van de gebruiker de e-mail ziet als spam (ongewenste e-mail).
Waarom een spam filter een e-mail als spam ziet, is afhankelijk van de instellingen van het filter. Het filter bekijkt van de e-mail het e-mailadres van de afzender, het onderwerp en de inhoud, dus je kunt er als enquête-beheerder wel wat aandoen.
Op limesurvey-consulting.com staan in deze blog een aantal mogelijke problemen en oplossingen.
LimeSurvey probeert automatisch de URL voor de link in een e-mail te bepalen uit de URL waarmee je als beheerder bent ingelogd. Het kan voorkomen dat dit bij een foutieve instelling van de server niet goed werkt, je moet de URL voor de link dan handmatig instellen.
Wijzig in application/config/config.php de standaard base URL. Voeg de hostInfo property toe aan het bestaande array 'components'.
    'components' => array(
       ...
       'config' => array(
           'publicurl' => 'http://www.example.com',
       ),
   )
De oorzaak van het probleem: LimeSurvey probeert het domein te bepalen uit de PHP variabelen $_SERVER['HTTP_HOST'] en $_SERVER['SERVER_NAME'].
Sommige webservers vullen deze informatie niet of op een eigen manier.
