アンケート参加者
From LimeSurvey Manual
はじめに
アンケートの案内を一定のグループの人に送付したり、誰がアンケートに回答したかを確認したり、回答をひとり一回だけに制限したり、といったことがしたくなるときがあるでしょう。トークンを用いると、次のようなことができます:
- 参加者の名前・メールアドレスのリストをインポート(CSV形式、または、LDAPクエリ)
- 参加者ひとりひとりを識別できる一意なトークン(招待コード)を付与する
- アンケートの案内状を、参加者に一括で/個別に送信する
- アンケートの催促状を、まだ回答していない参加者に一括で/個別に送信する
- 特定の参加者の回答を追跡する
- トークンを持たない人や、すでに回答を終えた人がアンケートにアクセスすることを制限する
- 参加者のリストを編集する
- 案内のメールや回答の催促について、メール文面のテンプレートを編集する
アンケートをクローズド・アクセスモードにすると(つまりトークンを有効にすると)、有効な(未使用の)トークンコードを持つ人だけがアンケートにアクセスできます。
アンケートの設定で自動登録を有効にしておくと、参加者は個人用のトークンコードを登録画面から取得できるようになります。

トークンを使うと、アンケート回答が匿名化できる?
この問いへの答えはYESです。トークンは匿名用と非匿名用に使えます。これはアンケートの設定で決まります。アンケートが非匿名(追跡可)な場合は、個々人の回答を知るためにトークンリストと見比べることができます。アンケートが匿名な場合は、トークンリストと回答は互いにリンクされません(技術的には、データベース間にリレーションを張りません)。
トークンを有効化する方法
トークンを有効化する方法は二通りです:
トークン管理ツール
トークンテーブルを作ったのちに、トークンアイコンをクリックして管理画面に入ります。下がそれぞれの機能概要です。
- Admin: 管理者ホーム画面に戻ります。
- Summary: トークンの数、招待メールを送った数、回答のあった数、などの概要を表示します。後述のようなデータベースの操作機能もあります。
- Browse: トークンの完全なリストを見ます。ウェブブラウザから個々のトークンを変更したり削除したりできます。
- Add new token entry: トークンテーブルに追加します。
- Add dummy token: 複数のトークンをいちどにテーブルに追加します。
- Manage additional field attributes: トークンテーブルに属性を追加して、参加者のデータをカスタム化できます。
- Import from CSV: CSVからインポートします。
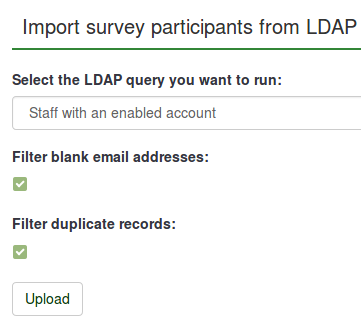
- Import from LDAP: LDAPからインポートします。openLDAPでテストしましたが、ActiveDirectoryのように、LDAPの仕様に従った他のディレクトリシステムも大丈夫でしょう。
- Export tokens to CSV file: 標準的なCSV(コンマ区切りファイル)で、すべての参加者トークンデータをエクスポートします。
- Edit email templates: アンケートの案内、アンケート回答の催促、登録メールの文面テンプレートを編集できます。
- Send email invitation: まだ案内メールを送っていない参加者に、案内メールを一斉送信します。
- Send email reminder: 案内メールを送ったのに回答がまだである参加者に、催促のメールを一斉送信します。
- Generate tokens: トークンをまだ割り当てていない参加者データについて、トークンを生成します。
- Drop token table: トークンテーブルを削除し、アンケートをオープンモードにします。
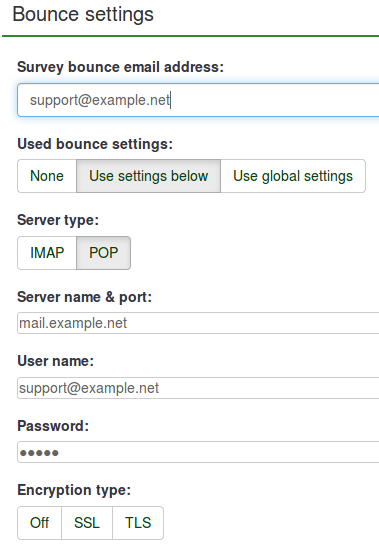
- Bounce settings: バウンス(送信失敗通知)についての設定です。バージョン1.91より。これはシステムレベルの設定です。
トークンの編集/追加
典型的なトークンは次の属性を持ちます。
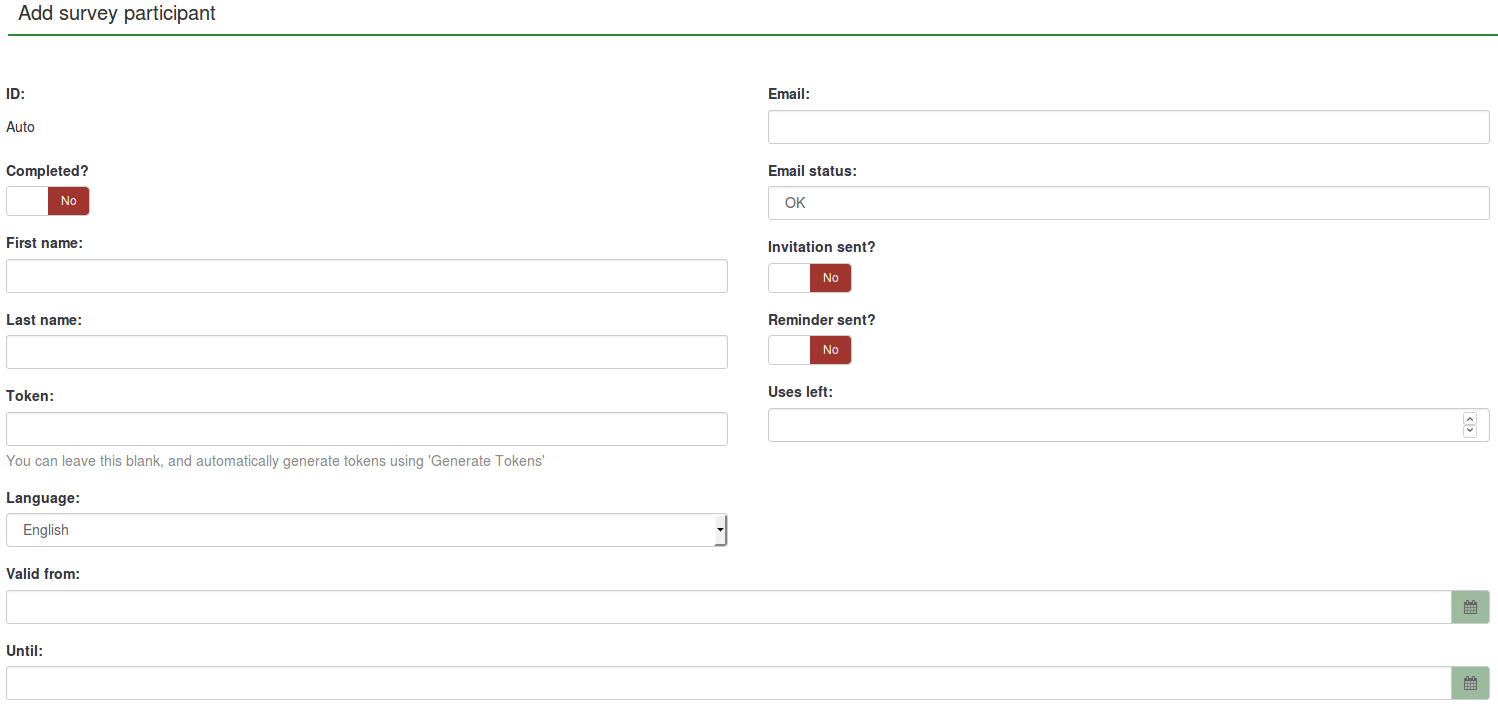
- 姓・名: .. 回答者のものです。電子メールやアンケート内で使えます
- メールアドレス: .. 回答者の電子メールアドレスです。
- メール状態: .. 失敗したメールの記録用です。たとえば、この回答者に出したメールのエラーを管理者が受け取った場合、OK以外(不明、メール容量オーバーなど)の状態に手動でセットします。OK以外にしておくと、アンケート案内や催促のメールが出されなくなります。この属性は手動設定なことに注意してください。何か自動設定のための外部的なスクリプトでも書くことはできるでしょうが。
- トークン: これが招待のためのコードです。通常は「トークン生成」ボタンで自動生成されます。
- 言語: この回答者が使うデフォルト言語です。必要なときに使います。
- 招待済: 初期値は 'N' です。招待メールを出した後は、その日付が入ります。
- 催促済: 初期値は 'N' です。催促メールを出した後は、その日付が入ります。
- 完了: 初期値は 'N' です。非匿名アンケートのときは回答完了時の日付が入ります。匿名アンケートのときは、完了時には 'Y' とのみ入ります。
- 残り回数: トークンがあと何回使えるかが入ります。 注: これを回数切れになったあとで増やすときは、完了フィールドを改めて 'N' に直しておく必要があります。
- 有効期限: このトークンが使える有効期限を、開始日時と終了日時という形でセットします。期限設定をしないばあいは、空のままよいです。注: 実際の回答中に回答期限が来てしまった場合は、その時点でアンケートの続行はできなくなり、もう回答完了できません。
- Attribute1 to Attribute x: ユーザー定義属性です。後段参照。
ダミートークン
ダミートークンはバージョン1.91から使えるようになりました。画面例:
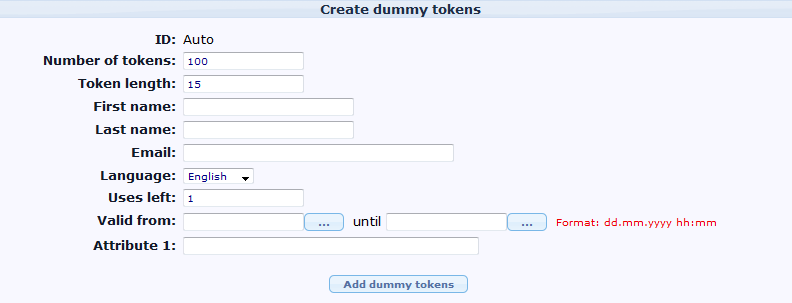
- トークン数: 追加するトークンの数です。初期値は100。
- トークンの長さ: トークンの文字長です。初期値は15。
- 姓・名: (ダミー)回答者の名前です。
- E-mail: (ダミー)回答者の電子メールアドレスです。
- 言語: デフォルト言語です。
- 残りの回数: トークンが使える残り回数です。
- 有効期限: このトークンが使える有効期限を、開始日時と終了日時という形でセットします。
- Attribute1 to Attribute x: ユーザー定義属性です。後段参照。
姓名、メールアドレス、デフォルト言語は、全部のダミートークンで同じ値になることに注意してください。
バウンス設定 (New in 1.91 )
正しくこの機能を設定して使うために、Email bounce tracking system のページも読んでおいてください。
- 既定のサイトバウンス(エラー)メールアドレス: メールの返信先
- 適用するバウンス設定: 三つから(なし・下の設定・システム全体の設定)を選びます。「下の設定」のときのみ以下の設定が有効です。
- サーバータイプ:なし、IMAP、POP から選びます。
- サーバー名、ポート: ホスト名とポート番号を設定します。例:mail.example.net:25 、 imap.gmail.com:995
- ユーザ名: メールアカウントにアクセスするときのユーザーID
- パスワード: パスワード
- 暗号化タイプ: なし、SSL、TLS から選びます。
User-defined attribute fields
It is possible to add a number of additional fields to the tokens table to save additional data for a participant. By clicking on the 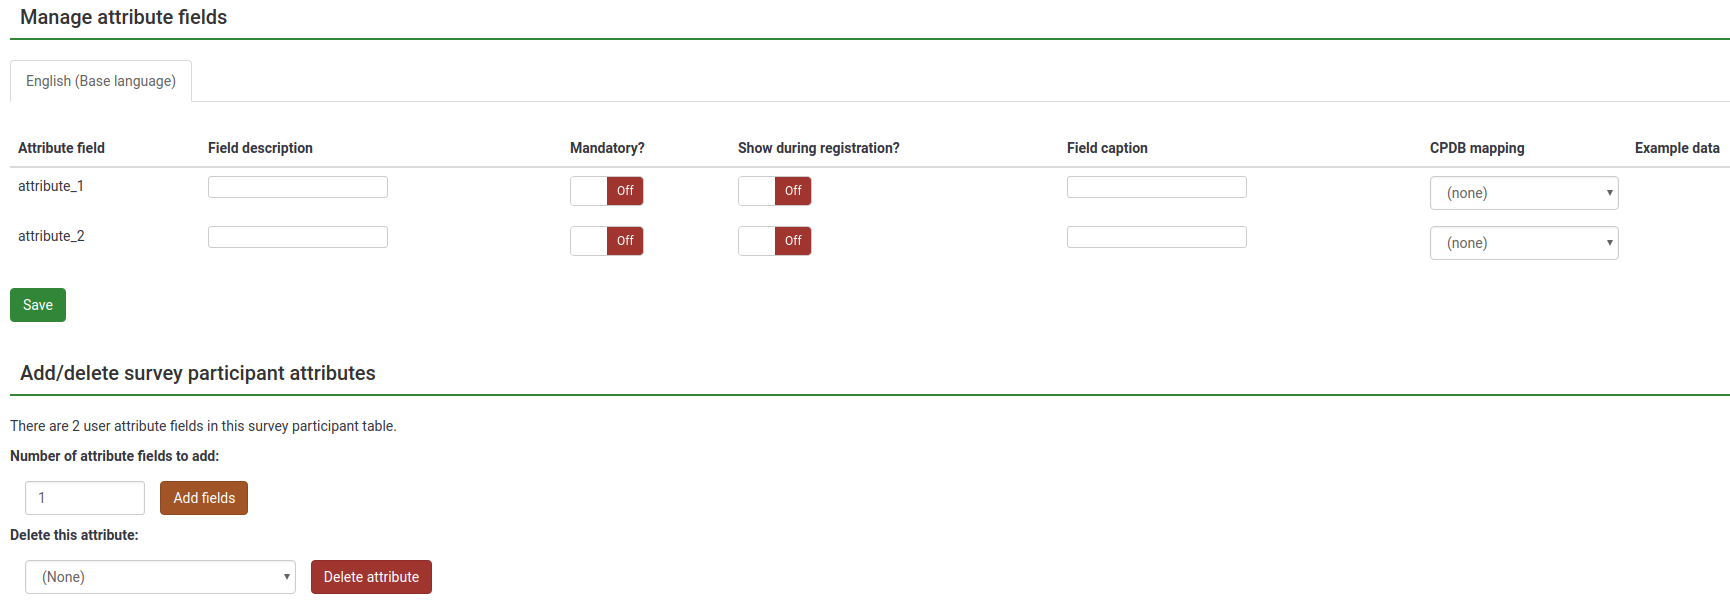 icon you can manage these fields. You can add more attribute fields (by default they have a a length of 255 chars) and also set descriptions for each field - so they look nicer in the administration, when you browse tokens, when creating conditions based on attribute fields or even when you export results for non-anonymous surveys.
Detailed instructions on how to add additional attribute fields and use conditions based on these values can be found at this blog post: "Conditions based on token attributes"
Using the browse screen and editing tokens
The browse screen will show you a list of all entries in the tokens table, as well as giving you some 'action' buttons that can perform specific tasks for that individual entry.
The top row of the table has three columns: The dialogue on the right gives options for displaying a number of records, and a starting point. In the middle is a search bar and the symbols on the left let you move backwards or forwards through your list.
The second row of the table (see image below) includes various criteria to sort the entries and for each a green arrow that - if clicked - will refresh the screen showing the tokens ordered by that criterion.
The "Actions" column gives a list of specific tasks that can be performed on that individual entry:
- Do the survey using the unique token of this entry
- Edit this entry
- Delete this entry
- Send a invitation/reminder to this individual entry
- If the survey is a 'tracked' (ie: not anonymous) survey, another button will appear, allowing you to view the response from this individual entry.
Database Admin
While the summary screen shows a brief summary of tokens in the table, it also provides access to the "Database Admin" features which include:
- Clear invites: Sets all records that an invitation has been sent out to 'N'. Obviously shouldn't normally be used.
- Clear tokens: Clears all tokens. Similarly shouldn't normally be used.
- Drop tokens: Allows you to remove the tokens feature from your script. Deletes the entire table and all records, and allows the survey to be accessed by anybody who knows the URL.
Importing/exporting tokens
CSV import
When you click the icon to import tokens you will be presented with the following screen:
Your CSV file must be a standard CSV (Comma Separated Value) file. The first line of text is always the header information and will be used to identify the field data. Possible data fields are:
firstname,lastname,email,emailstatus,token,language code,tid,attribute_1,attribute_2, attribute_...
To obtain a full list of token field names, export an existing token table.
The fields can be in any order but firstname, lastname and email are mandatory, and they must contain at least one character. Empty data (such as "") is not sufficient. If you would like to import data for attribute fields, you must add the desired attribute fields to the token table prior to importing token data.
A bare minimum CSV file could look like this:
   firstname,lastname,email
   John,Doe,john@doe.net
Date format for token import
The date format for the "validfrom" and "validuntil" fields in the CSV token inport file is "YYYY-MM-DD HH:MM", e.g.:
2012-01-01 00:00
--would correspond to 1st January, 2012, at 12:00 AM.
Filtering duplicates
If you activate the option to filter for duplicates you can set which fields are used to identify duplicates. By default First name, Last name & Email-address are pre-selected. If a duplicate is found while importing the related line is omitted.
Troubleshooting the token import
A common error when users try to import tokens is an invalid CSV file. This is often caused by Microsoft Excel. Many users have a list of e-mail addresses saved as an XLS document. A file can be saved as CSV in Excel, however, depending on the locale of the OS Microsoft may use semi-colon (;) as the comma separator, while a standard CSV file uses comma (,) as the separator. If not sure just open the file with a standard text editor and check what separator was used. Starting in version 2.00 can you select the used separator during import.
Recommended free raw text editors are: PSPad, NotePad2 or Notepad++ for Windows, and TextWrangler for Macintosh.
You can use LibreOffice Calc to export import your xls file and export your csv file.
Add additional attributes at import It is also possible to add new custom attributes when import a CSV file. It is still needed to define what attributes will be added. The way to do this is:
   firstname,lastname,email
   attribute_1 <Casenr>; token; attribute_2 <Title>; attribute_3 <destination>; lastname; firstname; attribute_4 <Sender>;
Creating CSV file with Excel on the Mac
When you create a CSV file with Excel 2011 on the MAC and use the standard "save as" option, you loose special characters such as ü, ë, é etc. when importing into LimeSurvey Token Table.
To make this work properly choose to save the file as a Windows text CSV file (tested on the Dutch version of Excel, saved as "Door lijstscheidingstekens gescheiden Windows tekst (.CSV)").
Then when importing the file in the LimeSurvey token table, under "character set of file" choose "Mac West European". The special characters will be imported correctly.
Tested on LimeSurvey 2.0 only.
CSV export
When you export your tokens the following fieldorder is exported:
tid,firstname,lastname,email,emailstatus,token,language code,attribute_1,attribute_2,...
LDAP import
- Queries are manually defined by the system administrator in the config-ldap.php file
- Duplicates are identified by First Name, Last Name & Email-Address. If a duplicate is found while importing the related line is omitted, unless you have unchecked the Filter Duplicates checkbox.
A tip for generating a large number of fake e-mail addresses
Sometimes you may need a large number of fake e-mail addresses and tokens. You can use functions in a spreadsheet (e.g. OpenOffice Calc) to generate them. Let's assume you want thousands addresses in a form: 1@test.com, 2@test.com, 3@test.com... Put consecutive numbers in column A: 1 in the A1, then insert function =A1+1 in A2, then copy A2 down as many times as you need. In B1 use concatenation function to join A1 and "@test.com", which is =CONCATENATE(A1;"@test.com"). Then copy B1 down for each copied A. You may generate fake names in a similar way. Finally, save the file as CSV for import in LS.
With the 1.91, you can use "Generate dummy token" functionnality
A tip for generating a large number of individual links which include the token already
The structure of the survey link is the following:
Limesurvey 1.x: http://url-to-your-limesurvey-installation/index.php?sid=XXXX&lang=en&token={TOKEN}
Limesurvey 2.x: http://url-to-your-limesurvey-installation/index.php/survey/index/sid/xxxx/newtest/Y/lang/EN/token/{TOKEN}
So you proceed similar to the example above for generating email adresses.
- First column: http://url-to-your-limesurvey-installation/index.php?sid=XXXX&lang=en&token= (for version 1.x) OR http://url-to-your-limesurvey-installation/index.php/survey/index/sid/xxxx/newtest/Y/lang/EN/token/ (for version 2.x) (same URL for all, as long as the language is the same!)
- Second column: {TOKEN} (put your tokens here, of course they must be individual)
- Third column: use the CONCATENATE function to join the first column with the second column.
Emailing
Email placeholders
アンケートの設定画面で、案内メールや催促メールのテンプレートを作成できます。テンプレート作成時には次のフィールド名が使用できます。メールのプレビューでは、これらのフィールド名は実際のデータと置き換えられます。
{ADMINEMAIL} アンケート管理者のメールアドレス
{ADMINNAME} アンケート管理者の名前
{SURVEYNAME} アンケートの題名
{SURVEYDESCRIPTION} アンケートの摘要
次のフィールド名は、実際にメールを送信するときに置き換えられます。
{EMAIL} 受信者のメールアドレス
{FIRSTNAME} 名(First Name)
{LASTNAME} 姓(Last Name)
{SURVEYURL} アンケート開始時のURL
{TOKEN} このアンケートへのアクセスに必要なトークン
{ATTRIBUTE_1} 属性 1
{ATTRIBUTE_2} 属性 2
If your survey is NOT anonymous, the following field names are available to insert token data in survey text and javascript. You can use these fields in confirmation and notification email template, too.
Additional hints
- If your survey is using anonymized responses then token-related placeholders will not work in notification email templates.
- You can use Expression Manager to use expressions for tailoring an email (New in 1.92 ). Please have a look at the Expression Manager HowTos for an example.
Also have a look at the examples on using information from tokens table.
Emails settings
- Invitation Email Subject: The subject line for the invitation email that gets sent out when tokens are used with your survey.
- Invitation Email: This is the text for the invitation email that gets sent out when tokens are used with your survey. This is initially filled by the default invitation message (from the language files) but you can modify it to suit yourself. If you are using English as your base language, the default invitation and reminder text can be found in the limesurvey/tokens.php file. Of course if you don't plan to use tokens on your survey, whatever is in this field is irrelevant. You can use the following "form" fields to insert individualized information in each email:
- {FIRSTNAME} - gets replaced with the token table's "firstname" value
- {LASTNAME} - gets replaced with the token table's "lastname" value
- {SURVEYNAME} - gets replaced with your surveys name
- {SURVEYDESCRIPTION} - gets replaced with your surveys description
- {ATTRIBUTE_1} - gets replaced with the token table's "attribute_1" value
- {ATTRIBUTE_2} - gets replaced with the token table's "attribute_2" value and so on
- {SURVEYURL} - gets replaced with the fully qualified URL to this particular survey - in HTML emails this is a fully linked HTML link
- @@SURVEYURL@@ - Gets replaced with the survey barebone link. Use this if you want to integrate the link in your custom email HTML (available in v1.90 and later)
- {OPTOUTURL} - gets replaced with the URL for a respondent to opt-out of this particular survey
Note that these "form fields" apply to the following email fields.
- Email Reminder Subject: The subject line for the reminder email that gets sent out from the tokens tool
- Email Reminder: This is the text for the reminder email that gets sent out when tokens are used with your survey. See "invitation email" for specific details on how this field is used.
- Confirmation Email Subject: When tokens are used, this is the subject line of the email that gets automatically sent to participants after completion of the survey
- Confirmation Email: This is the text of the email that gets sent to users after completion of the survey. Delete/blank this text remove the confirmation email sending.
- Public Registration Email Subject: This is the subject line for the invitation email sent to members of the public who register for a survey.
- Public Registration Email: This is the text for the invitation email sent to members of the public who register for a survey. The same "form fields" apply in this email as in the earlier ones.
Sending emails
Send invitations
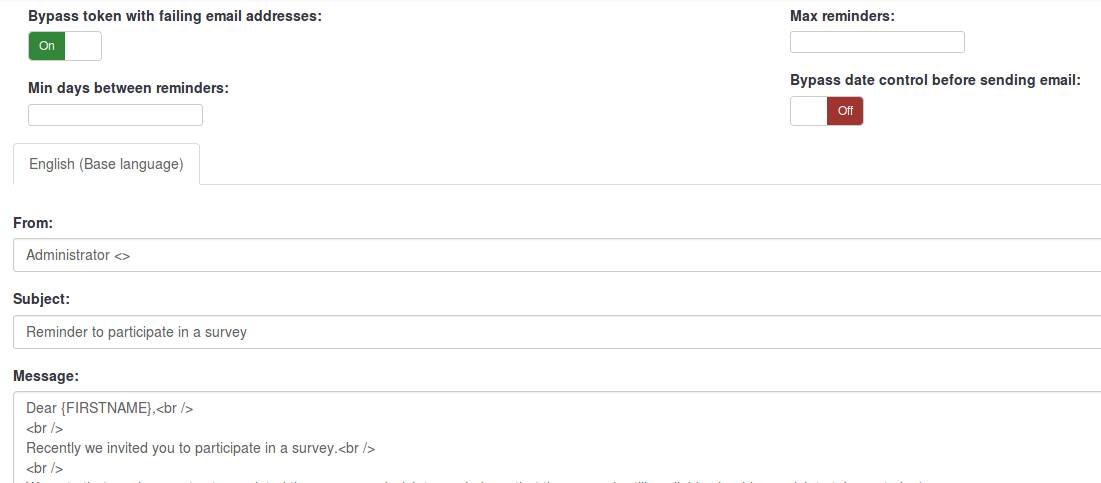
You can skip tokens for which the email status field is different from 'OK', by choosing the 'Bypass token with failing email addresses' option.
Resending invitations
Sometimes you might want to send invitations again to certain token entries / persons. When you use the send invitations-function only e-mail addresses that has not previously received an invitation will get one. This means that if you add new addresses to the token list after the first time you sent invitations, only these new addresses will receive an invitation the second time you send invitations.
This means that you can also edit/change an e-mail in a particular token entry that you got a bounce from and then send to only this edited address. Just substitute the date Invite sent? for a capital N (no) and click send invitations again.
Participant opt-out
When you use the {OPTOUTURL} tag in your invitation/reminder email, your participants have the possibility to opt out of this particular survey by just clicking on the related URL in the email - so you don't harrass them with reminder emails. A participant that opted out of your survey will have the email status 'OptOut' set in the token.
Send reminders
When sending reminders you can:
- bypass tokens with failing email addresses
- skip tokens for which an email has been 'recently' sent
- skip tokens for which a given number of emails have already been sent
Note: A reminder will only be send to tokens where the "completed" field is not "N" (this means the respondent has either not taken or has not completed the survey).
Sending emails by batch
When you have to send a lot of emails at the same time, LimeSurvey will only send a first batch of N emails (this threshold is set by the administrator in the Global Settings).
You'll then need to click "Next" to send the next batch, and so on untill all emails have been sent.
Confirmation email
If you are using tokens and a participant fills out the survey, a confirmation email is sent to his/her email address.
If you don't want this message to be sent, just deactivate this in the General survey settings.
Spam problems
Often users complain not having received an invitation/reminder email because the user’s spam filter treated the email as spam.
If an email is treated as spam mostly depends on the spam filter being used and its settings. A spam filter usually checks the sender address and the email subject and content, so there are ways and means to influence how they treat your LimeSurvey invitation and reminder emails.
At this blog post on limesurvey-consulting.com a lot of possible issues and solutions are listed.
Wrong domain in invitation/reminder email link
LimeSurvey automatically tries to determine the URL for the invitation link by looking at the URL by which you logged in to the LimeSurvey administration. However with some server (mis-)configurations this might not work properly and you will have to set this manually.
You can edit application/config/config.php to change the default base URL value. Add hostInfo property like this to the existing 'components' array.
    'components' => array(
       ...
       'request' => array(
           'hostInfo' => 'http://www.example.com',
       ),
   )
Regarding the source of the problem: LimeSurvey tried to determine the domain from the server PHP variable $_SERVER['HTTP_HOST'] or $_SERVER['SERVER_NAME'].
Some web server software do not properly seem to provide this information or are mis-configured.
登録画面の公開
公開登録の許可
一般にアンケートへの回答を求めたいが、トークンを使った制御もしたいということがあるでしょう。できます。トークンテーブルを初期化して、公開登録を設定しておけばよいです。アンケートのURLにトークンを持たずにアクセスしてくると、まず登録画面が表示されます。そこで入力した内容をもとにトークンが作られ、案内メールが送られつという仕組みです。この機能を使った参加者は、「R」ではじまるトークンコードを持ちます。
キャプチャ(CAPTCHA)
登録画面を守るために、バージョン1.48からキャプチャ機能を使うことができます。お使いのPHPにGDライブラリが入っている必要があります。(see Installation Requirements)
