Participants à l'enquête
From LimeSurvey Manual
Introduction
Assez fréquemment, il est nécessaire d'inviter un groupe de personnes pour participer à votre sondage, garder la trace des répondants qui ont complété toutes les réponses, et vous assurer que chaque personne ne peut participer qu'une seule fois. Le système des invitations vous permet d'effectuer les opérations suivantes:
- Créer manuellement des invitations (nom, adresse email, ...) ;
- Importer une liste de noms et d'adresses email pour les participants (à partir d'un fichier CSV ou d'une requête LDAP) ;
- Générer un jeton à numéro unique pour chaque participant (code d'invitation) ;
- Envoyer une invitation par courriel à chaque personne de votre liste, par groupe ou individuellement ;
- Envoyer un courriel de rappel à chaque personne de votre liste qui n'a pas encore répondu, par groupe ou individuellement ;
- Suivre les participants de votre liste qui ont répondu ;
- Interdire l'accès aux personnes qui n'ont pas de code d'invitation, et à celles qui ont déjà répondu ;
- Modifier / changer tous les détails dans votre liste d'invitation ;
- Créer des modèles de messages pour les invitations et les rappels.
Une fois le questionnaire en accès restreint (vous avez activé les invitations pour ce questionnaire), alors seules les personnes avec une invitation valide (pas encore utilisée) peuvent accéder au questionnaire.
Si vous activez l'option Autoriser l'enregistrement public à partir du panneau Table des participants, les participants recevront un jeton généré automatiquement pour s'inscrire à votre enquête.
How to create a survey participants table?
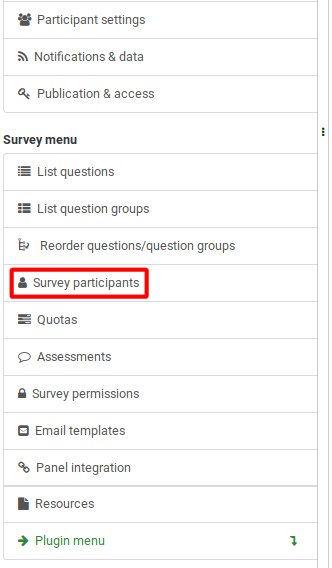
To activate a survey participants table, access the survey and click on the Survey Participants button from the Settings menu:
You will be prompted by the following message:

If you initialize a participant table, the survey will be accessible only to those users that provide in the survey registration process a token code (either manually or by URL). In this way, the survey will be switched to the closed-access mode.
Once initialized, a window will load up confirming the creation of the survey participants table.
Reactivate a survey participants table
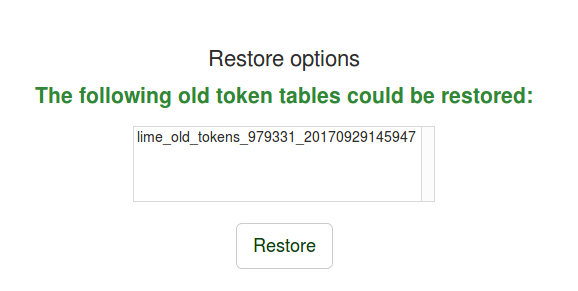
When you delete a survey participants table, a backup is created. It can be later reactivated if you wish to use that specific survey participants table in another survey:
Les outils de contrôle des invitations
A survey participant summary will load up if the survey participants table was previously created. This is the default screen:
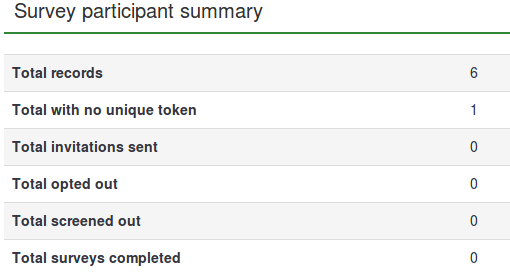
- Total records: The number of survey participants from the survey participants table;
- Total with no unique token: It displays the number of users without an assigned token code;
- Total invitations sent: It shows the number of invitations that have been sent to your survey participants from the Survey participants table by using the Invitations option from the Invitations & reminders menu;
- Total opted out: It displays the total number of survey participants that have decided to opt out from the survey;
- Total screened out:
- Total surveys completed: It shows the number of the surveys that have been completed by those users who have been allocated a token code.
Above the Survey participant summary table, you may find the survey participants table management tools:
- Display participants: If clicked, a survey participants table with all the current participants will load up. From the browse screen you can edit or delete individual entries from the table as well as perform a number of other useful functions (see the Display participants wiki section below for more details);
- Create...: This option allows the survey administrator to add respondents into the survey participants table either via the Add participant option or via the Import participants function;
- Manage attributes: It allows the survey administrator to add additional fields to the survey participants table to store custom participant data;
- Export: If you wish to export the token tables and use them in other surveys, use this function. The file will be saved in the .CSV format;
- Survey participants: Use this option in order to quickly invite or remind your participants from the survey participants table to fill out your online survey;
- Generate tokens: It is a LimeSurvey functionality that allows the survey administrator to quickly allocate a random unique token code to each user from the survey participants table that does not have one;
- View in CPDB: It's a button that offers quick access to your LimeSurvey installation central participant database (CPDB). You can allocate from there CPDB users as survey participants to any survey you wish.
Display participants
L'écran d'affichage montre une liste de toutes les entrées de la table des invitations, ainsi que des boutons d'action pour effectuer des tâches spécifiques sur une entrée individuelle.

Sort the survey participants
La deuxième ligne de la table comprend le nom du champ, et une flèche verte qui - s'il est cliqué - permet de trier par rapport à ce champs.

Filter the survey participants
If you wish to filter the survey participants, choose the column according to which you want to filter the participant. Type in below the first row the values/strings according to which the filtering should be done:

For example, type in the email status field "OK" in order to let LimeSurvey return only those users that use a good email address.
Perform a specific action to an individual entry
The second column is the Action column where you can find all the actions that are available for each individual entry from the survey participants table. The possible actions that can be performed are:

- Lancer le questionnaire pour cette invitation
- Éditer cette invitation
- Supprimer cette invitation
- Envoyer un courriel d'invitation ou de rappel à cette netrée
- Si le questionnaire est non-anonyme, un bouton supplémentaire apparait pour visualiser la réponse correspondante.
Perform a specific actions to more than one entry
On the bottom-left part of the table, you may find the Selected participant(s)... button that allows you to perform certain actions at a macro level:

- Send email invitations: Send email invitations to the selected survey participants;
- Send email reminder: Send email reminders to the selected survey participants;
- Add participants to central database: In the case in which you would like to use some of the token entries into another survey, add the selected participants to the central participant database. From there, you have the option to add the participants to any survey you wish. For more details, continue reading the Share this participant wiki page.
Create...
To have more participants listed in the survey participants table, you can either add new ones or import them from a CSV file or LDAP query.

Add participant
Une entrée typique d'invitation contient les champs suivants:
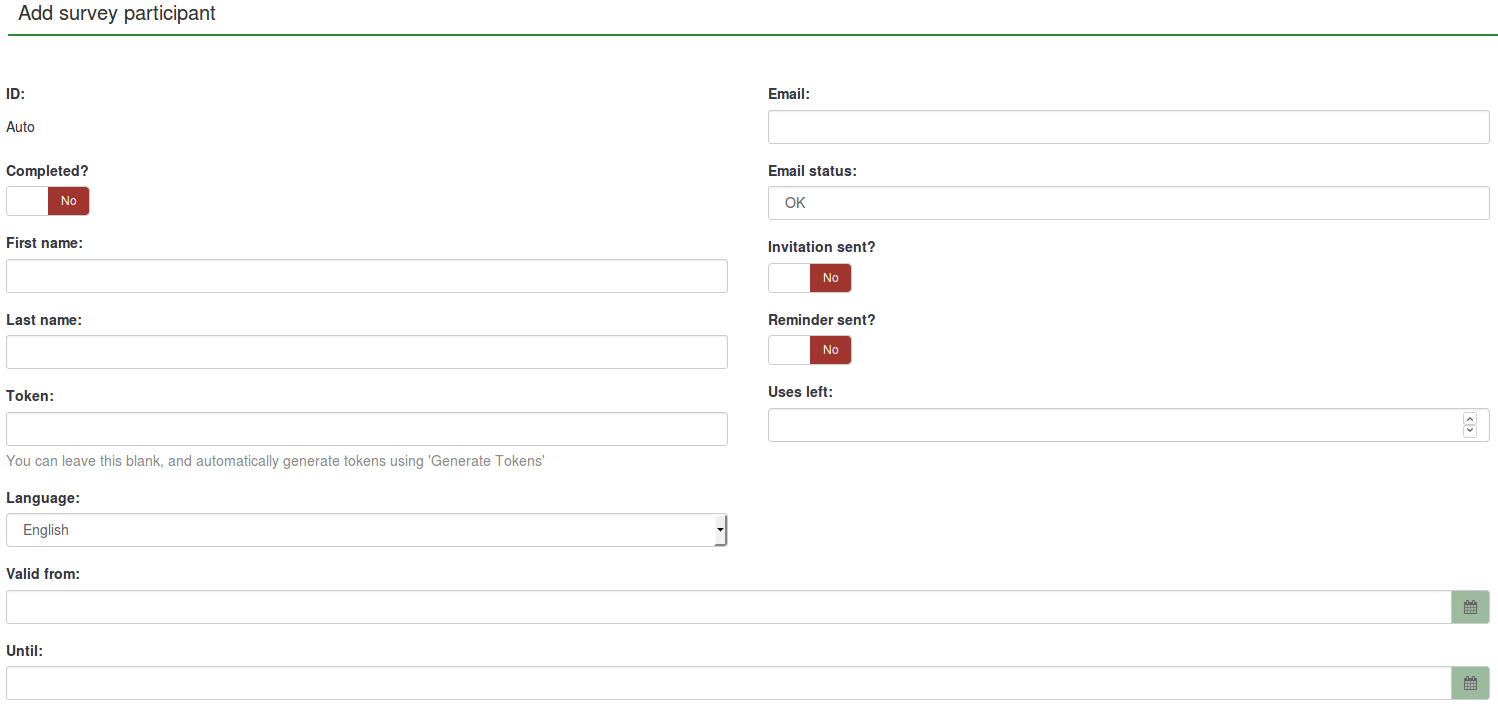
- ID: It represents an integer that is automatically assigned to each survey participant;
- Completed?: It is disabled by default. If enabled, it would contain the date when the survey was completed. No invitations or reminders will be sent to the respective users if this is enabled. It gets automatically enabled if the respective survey participant completed the survey by using his or her assigned token code;
- First name: The first name of the survey participant;
- Last name: The last name of the survey participant;
- Token: This is the invitation code. It can be manually or automatically generated (via the Generate tokens button);
- Language: You can select here the default language of the survey for the respective participant;
- Email: the email address of the participant;
- Email status: This field helps you track the bad email addresses. For instance, if the survey administrator received email error notifications from this email, then he can set this field to anything other than "OK" (for instance "user unknown" or "mailbox quota exceeded"). Marking this field with an email status other than "OK" will help skip this entry when sending invitation or reminder emails. Note that this is completely manual, unless you decide to implement a script which updates this field automatically;
- Invitation sent?: If enabled, it would contain the date when the invitation email was sent;
- Reminder sent?: If enabled. it would contain the date when the reminder email was sent;
- Uses left: A counter of the number of times the token can be used. Note: When increasing this value (default = 1) for a user who has already filled out the survey (which sets uses left to 0), you also have to switch the Completed field from "Yes" to "No";
- Valid from: & Until: You can set a date/time range when this token would be allowed to use. You can leave these empty if you don't want to limit participation time frame for certain users. If the user is answering the survey and the participation time ends then the user is locked out immediately and won't be able to finish the survey.
{IMG(attId="83",imalign="center")}
- Prénom et Nom : ... du participant (peut être utilisé dans les courriels et les questionnaires).
- Courriel: l'adresse courriel du participant
- Statut du courriel: un champ pour conserver une trace des mauvaises adresses de courriels. Par exemple, si l'administrateur du sondage ont reçu des notifications d'erreur par courriel à partir de ce courriel, ce qu'il peut définir ce champ à autre chose que 'OK' (par exemple 'utilisateur inconnu', ou 'quota dépassé'). Le marquage cette invitation avec un autre statut que 'OK', permettra d'ignorer cette entrée lors de l'envoi d'invitation ou de couriel de rappel. Notez que ceci est entièrement manuel à moins vous décidez de mettre en place un script qui met à jour ce champ automatiquement.
- Code: c'est le code de l'invitation. Il est généralement généré automatiquement avec le bouton 'Générer les codes d'invitations'.
- Langue: pour configurer la langue par défaut pour ce participant.
- Invitation envoyée?: par défaut a 'N', sinon contient la date à laquelle l'invitation a été envoyée par courriel.
- Rappel envoyé?: par défaut a 'N', sinon contient la date à laquelle le rappel a été envoyée par courriel.
- Complété?: par défaut a 'N', sinon contient la date à laquelle le questionnaire a était validé pour les questionnaire non anonyme ou Y pour les questionnaires anonyme.
- Utilisations restantes: compteur du nombre de fois que le code d'invitation peut être utilisé.
- Valable à partir de & Valide jusqu'à : Vous pouvez définir une plage de date/heure durant laquelle ce code d'invitation pourra être utilisé. Vous pouvez laisser ces champs vides si vous ne souhaitez pas limiter les dates pour certains utilisateurs. Remarque: Si l'utilisateur répond au questionnaire au moment ou la date arrive à échéance, l'invitation est verrouillé immédiatement, le répondant ne pourra pas terminer le sondage.
- Attribute 1 to Attribute X: Ce sont les champs d'attribut définissables par administrateur - voir ci dessous.
Create dummy participants
A dummy participant can be used when you do not want to send emails with the token code to each participant, but to give him or her the token code by other means. For example, students receive during class evaluations of a paper with an invitation code to be introduced at the beginning of the online survey. In this way, the likelihood to receive more responses and feedback increases.
If you click on the button, the following page will load up:

The Number of participants field allows you to introduce a number of dummy variables you wish to add to your survey participants table. The explanation of the other fields can be found in the Add participant wiki subsection.
After completing the fields, press the Save button located in the upper-right part of the screen to save the dummy variables.
To check whether they were added or not, visit again the Survey participants table:

Importer des participants depuis un fichier CSV
La fonction d'importation vous permet d'importer des informations à partir d'un Fichier CSV ou d'une Requête LDAP.
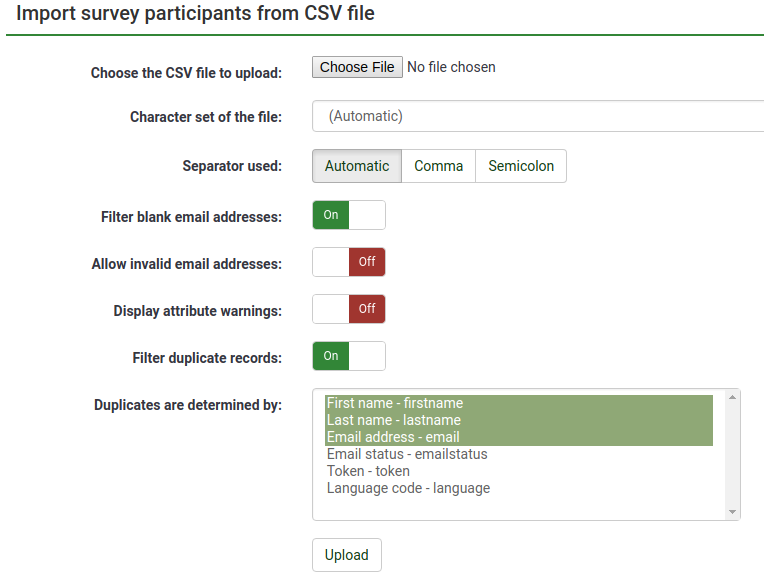
- Choisissez le fichier CSV à télécharger: Choisissez le fichier CSV que vous souhaitez importer. Pour éliminer les erreurs éventuelles, il est recommandé d'importer un fichier CSV standard (séparé par des virgules) avec des guillemets facultatifs autour des valeurs (par défaut pour OpenOffice et Excel).
La première ligne doit contenir les noms de champs. Elle doit en outre contenir les champs suivants: firstname, lastname, email.
Ceux-ci doivent contenir au moins un caractère. Les guillemets doubles (") sont interdits : aucun caractère entre eux ne fonctionnera !
Les autres champs sont facultatifs: emailstatus, token, language, validfrom, validuntil, attribut_1, attribut_2, attribut_3, useleft, ....
Pour obtenir une liste complète des noms de champs de la table d'invitation, vous pouvez exporter une table existante.

- Jeu de caractères du fichier: Sélectionnez l'option qui correspond aux caractères utilisés dans le fichier CSV ;
- Séparateur utilisé: Vous pouvez laisser LimeSurvey découvrir automatiquement le séparateur utilisé dans votre fichier CSV ou choisir vous-même entre virgule ou point-virgule ;
- Filtrer les adresses électroniques vierges: Si cette option est activée, les participants ne disposant pas d'adresse électronique ne seront pas importés dans votre table ;
- Autoriser les adresses électroniques non valides: Si cette option est désactivée, cette fonction examine les adresses électroniques et vérifie si elles ont une structure correcte (par exemple: a@a.net) ;
- Afficher les erreurs pour les attributs: Si cette option est activée, les avertissements seront affichés après le processus d'importation dans le cas où certains champs poseraient des problèmes. Par exemple. vous recevrez un avertissement si rien n'est indiqué dans l'un des champs obligatoires ou si un email est mal configuré dans le fichier CSV.
En activant l'option pour filtrer les doublons, vous pouvez définir les champs qui sont utilisés pour identifier les doublons. Par défaut le 'Nom, Prénom et Adresse de Courriel' sont présélectionnés. Si un doublon est trouvé lors de l'importation de la ligne liée est omise.
- Les doublons sont déterminés par: Sélectionnez les champs sur lesquels vous souhaitez appliquer le filtrage des doublons.
Vous pouvez également importer des attributs personnalisés lors de l'importation d'un fichier CSV. Il vous suffira de définir quels attributs seront ajoutés. Vous pouvez le faire comme ceci :
email,attribute_1 <Casenr>, token, attribute_2 <Title>, attribute_3 <destination>, lastname,firstname,attribute_4 <Sender>
Une fois que vous avez choisi les paramètres d'importation, n'oubliez pas de cliquer sur le bouton Télécharger.
Dépannage pour l'import des invitations
Une erreur commune est de tenter d'importer un fichier CSV invalide. Cela est souvent du à Microsoft Excel. Les utilisateurs ont souvent des fichier de type xls contenant les adresses de courriel, excel indique qu'il est possible de l'exporter au format csv. Mais Microsoft Excel ne donne pas un vrai fichier CSV, il sépare les éléments avec un points virgule (;). Une solution est d'enregistrer votre fichier avec excel et ensuite de remplacer les ; par des , avec un éditeur de texte. Par exemple avec PSPad, NotePad2 ou Notepad++.
Vous pouvez aussi utiliser Libre Office Calc pour importer votre fichier xls et exporter un fichier CSV au bon format.
Importer des participants à partir d'une requête LDAP
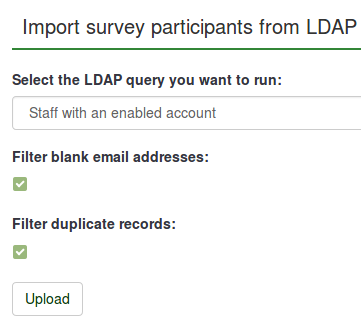
Cette fonction d'importation vous permet d'importer des informations à partir d'une requête LDAP (testée sur openLdap, mais doit fonctionner dans tout répertoire compatible LDAP, y compris ActiveDirectory). Après connexion, les options suivantes sont disponibles :

- Les requêtes sont définies manuellement par administrateur du système dans le fichier config-ldap.php
- Les doublons sont identifiés par le prénom, le nom et l'adresse de courriel. Si un doublon est trouvé, lors de l'importation la ligne concernée est omise, sauf si vous avez décoché la case de filtre des doublons.
Gérer les attributs
Cette option vous permet d’ajouter ou de modifier les champs supplémentaires de votre table des participants. Les champs supplémentaires servent à stocker des données personnalisées des participants :
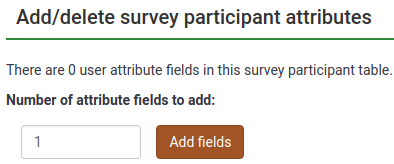
Tapez le nombre de nouveaux attributs que vous souhaitez ajouter à votre table des participants. Cliquez sur le bouton Ajouter des champs pour afficher la page suivante :
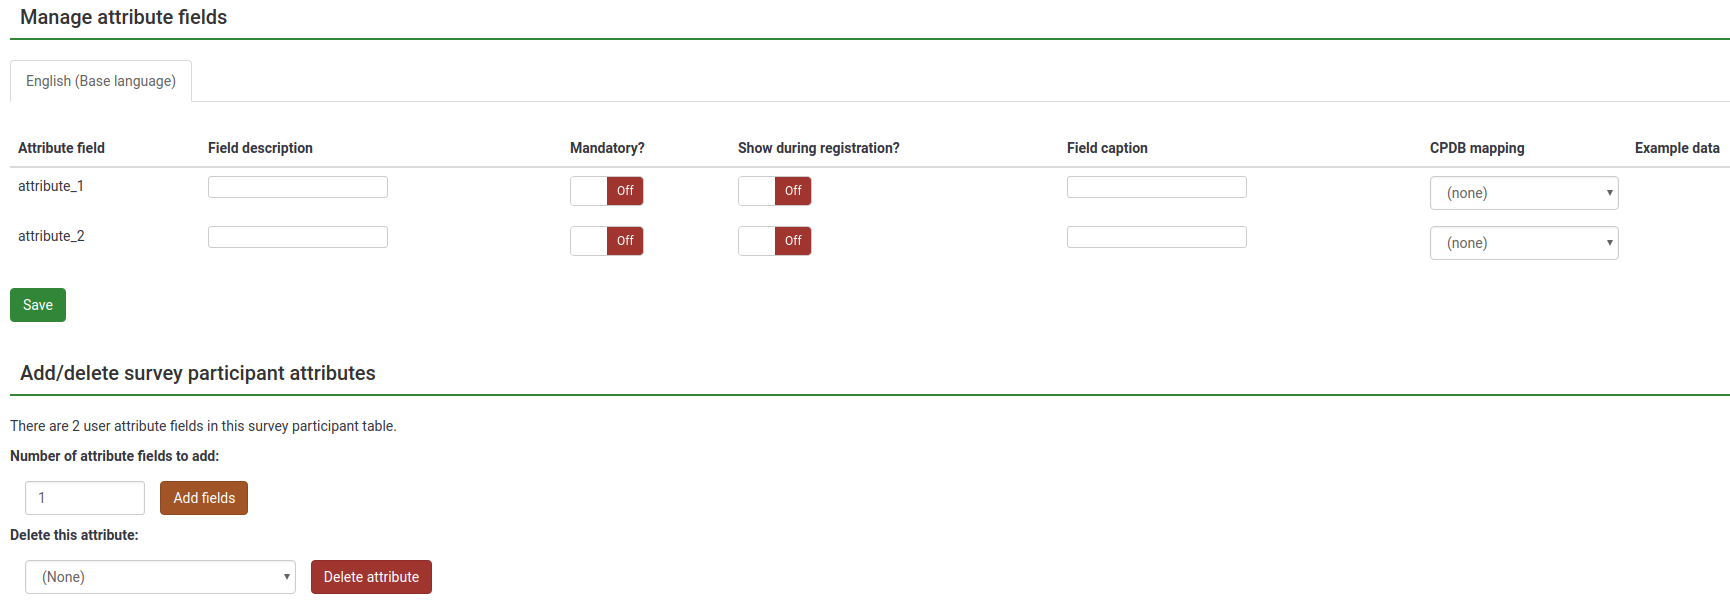
La table des attributs contient les champs suivants :
- Champ d'attribut : la valeur à saisir ici peut être utilisée lorsque vous souhaitez effectuer des opérations spécifiques avec les attributs personnalisés, comme appliquer des conditions selon les attributs ou lors de l'exportation des résultats d'enquêtes non anonymes ;
- Description du champ : est utilisé pour remplacer le nom de l'attribut. En attribuant un nom personnalisé à chaque attribut, vous améliorerez la lisibilité du panneau d'administration, lorsque vous parcourrez les jetons, lors de la création de conditions fondées sur les attributs ou lors de l'exportation des résultats d'enquêtes non anonymes;
- Obligatoire ? : Si cette option est activée, l'administrateur de l'enquête devra renseigner l'attribut correspondant. Sinon, le participant ne peut pas être inscrit dans la table ;
- Afficher lors de l’enregistrement ? : Si les participants doivent s’inscrire avant de répondre à l’enquête, certains détails leur seront demandés. Si cette option est désactivée, l'attribut correspondant n'apparaîtra pas dans la page d'enregistrement de l'enquête ;
- Légende de champ: Utilisez ce champ pour ajouter des explications supplémentaires sur le rôle / l'utilisation de l'attribut correspondant.
- Mappage CPDB:; Vérifie l'attribut afin de le connecter à l’attribut correspondant dans la base de données centrale des participants ;
- Exemple de données: Il contient des exemples de chaînes de différents champs. Par exemple, si vous souhaitez demander le sexe du participant à l’enquête, vous indiquerez dans le champ Exemple de données des possibilités comme homme, femme, pas de réponse, etc.
Quand vous avez terminé, n'oubliez pas de cliquer sur le bouton Enregistrer situé en bas à gauche de l'écran.
Il est possible d'ajouter un certains nombre de champs supplémentaires à la table des invitations pour enregistrer des données supplémentaires concernant les participants. En cliquant sur l'icône  , vous pouvez gérer ces champs. Vous pouvez ajouter des champs d'attributs (par défaut, ils ont une longueur de 255 caractères) et des descriptions pour chaque champ - pour qu'ils soient plus explicite dans l'interface d'administration, lorsque vous consultez la tables des invitations, ou loirs de conditions basées sur des attributs ou lorsque vous exportez un questionnaire non anonyme.
Pour ajouter davantage d'attributs, allez en bas de la page, indiquez le nombre souhaité dans la case Nombre d'attributs à ajouter et cliquez sur le bouton Ajouter des champs.
Si vous souhaitez supprimer un attribut personnalisé, allez en bas de la page et sélectionnez l'attribut que vous souhaitez supprimer dans la liste déroulante située sous le champ Supprimer cet attribut. Ensuite, cliquez sur Supprimer l'attribut et confirmez la suppression.
Export
If you wish to export a survey participants table, click on the "Export" button located on the token management tools toolbar. Before exporting the survey participants list, select the desired export options:
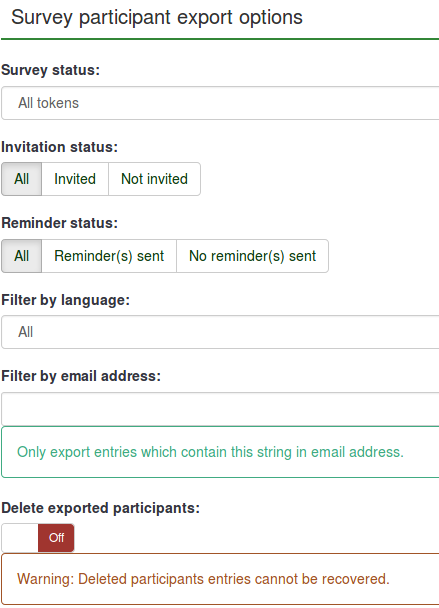
- Survey status:
- All tokens: It exports all the survey participants from the survey participants table;
- Completed: It exports only those survey participants that completed the survey;
- Not completed: It exports the survey participants that have not yet completed the survey;
- Not started: It exports the survey participants that have not yet started the survey;
- Started but not yet completed: It exports the survey participants that have already started the survey, but did not complete it.
- Invitation status: It helps export the users according to the invitation status: all, invited, and not invited;
- Reminder status: It helps export the users according to the reminder status: all, Reminder(s) sent, No reminder(s) sent;
- Filter by language: When you create a survey, you can add additional languages besides the base language. Those additional languages can be used to export survey participants according to the language they are assigned to;
- Filter by email address: It exports entries which contain the string in the respective email address. For example, you can use it if some of your survey participants use the work email addresses from "Company A". Type @companya.com and export only the users that have received a work email address from the respective company;
- Delete exported participants: If enabled, the exported users will be deleted from your survey participants table.
Once you have selected the exporting options, click on the Download CSV file button located in the upper right part of the screen.
Quand vous exporter votre table au format CSV, les champs sont exportés dans l'ordre suivant:
Invitations & reminders
This functionality allows you to manage the LimeSurvey invitations system. You can send invitations or reminders to those participants that are displayed in your survey participants table. An email bounce tracking system can be used in order to help you track down and mark the emails that were not delivered to the recipients (survey participants).
Send email invitation
You can send through this option email invitations in bulk to all the respondents from the survey participants table who have not been already sent an invitation.
{IMG(attId="88",imalign="center")}
Vous pouvez ignorer les invitations pour lesquelles le statut du courriel est différent de "OK", en choisissant "Sauter les invitations avec une adresse de courriel invalide"
If you wish to overcome the validity settings of all of your entries, enable the Bypass date control before sending email function. In this way, the LimeSurvey email function will not take into account the date/time range when a token would be allowed to be used.
Renvoyez une invitation
Quelquefois vous voulez renvoyer des courriels d'invitation à certaines personnes. Quand vous utilisez Envoyer les courriels d'invitation seules les personnes auxquelles vous n'avez pas encore envoyé d'invitation vont recevoir un courriel.
Vous pouvez donc renvoyer aussi des invitations à des utilisateurs en particulier en éditant leur invitation et en indiquant N dans la case Invitation envoyée?, en remplaçant la date existante.
Send email reminder
Sends bulk email reminders to all the participants from the survey participants table who have not yet responded, but have been sent their first invitation.
{IMG(attId="92",imalign="center")}
Quand vous envoyez des rappels, vous pouvez:
- Passer les invitations avec une adresse invalide
- Passer les invitations pour laquelle un courriel a été 'récemment' envoyé.
- Passer les invitations pour lequel un nombre donné de courriels ont déjà été envoyés.
Envoi groupé de courriel
Quand vous avez un grand nombre de courriel à envoyer en même temps, LimeSurvey va limiter les envois par groupe de N courriel ( ceci est paramétrable dans les options générales, par défaut à 50)
Courriel de confirmations
Quand vous utiliser les invitations, un courriel de confirmation lui est envoyé à la validation du questionnaire.
Si vous ne voulez pas de ce message de confirmation, supprimer tous le contenu de l'objet du courriel de confirmation et du courriel de confirmation - voir ces instructions.
Start bounce processing
When sending an email, the LimeSurvey email bounce tracking system automatically adds a survey-id and token-id to the mail header without the notice of the survey administrator. These "custom headers" are added to each invitation email that is sent through your LimeSurvey installation to the survey participants. When the email is bounced back, the original header along with the "Delivery notification" header is received. Then, the system checks for new emails and parses the emails that have these custom headers and mark the wrong email address in the survey participants table.
Bounce settings
The following options are available:
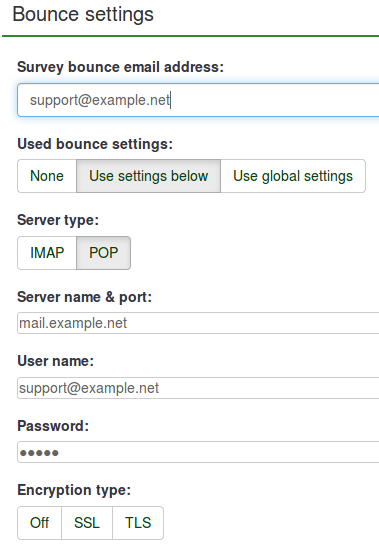
For a short description of each field, check the following wiki section. If you wish to use the LimeSurvey installation global settings, go to the Used bounce settings and select the Use global settings option.
Les paramètres de rejet ont été ajoutés à partir de la version 1.91
Edit email templates
To find out more about what placeholders you can use or how you can edit the LimeSurvey email templates, read our wiki section on email templates.
Generate tokens
With the help of this function, unique tokens can be created for all the individual entries from the survey participants table that have not yet received a token code:

View in CPDB
The last option located on the tokens management toolbar is the View in CPDB option. This allows the survey administrator to see the common users that exist in both the central participant database and survey participants list.
For example, we have the following survey participants list:

The users with ID 1 and 2 have been shared from the central participant database. To check this, go to the survey participants table management toolbar and click on View in CPDB

As you can see, the View in CPDB function basically applies a filter in order to determine which users from the CPDB are present in the respective survey.
Delete table
If you would like to delete your survey participants table, click on the Display participants button and look for the Delete participants table button located in the upper-right part of the screen.

A window will pop up, asking for the final confirmation:

Please note that this will not delete the table from your LimeSurvey installation. A backup will be created. In order to access it, you need system administrator rights.
If you do wish to completely remove it, use the check data integrity option that is located in the Configuration dialog.
Additional hints & tips
Feel free to add any hints and tips below. The ones below were posted by the members of our community:
- Allowing public registration
- Captchas in public registration
- Can a survey using tokens ensure anonymous responses?
- A tip for generating a large number of fake e-mail addresses
- Spam problems
- Pseudonymised participation
Permettre l'enregistrement public
Vous pouvez vouloir ouvrir votre questionnaire à tous mais avoir le système de contrôle utilisable avec les invitations. Ceci est possible : si vous initialiser la table des invitations et que vous choisissez OUI à Permettre l'enregistrement public? dans les paramètres du questionnaire alors les répondants vont pouvoir s'inscrire avant de répondre à votre questionnaire. Aprèsn s'éêtre inscrit, il recevront une adresse URL pour remplir le questionnaire.
Tous les codes d'invitations provenant d'un enregistrement public commence par la lettre R.
If they provide an email address that is not already in the current database, an entry in the survey participants table will be created and they will be emailed an invitation containing their unique token code. All tokens provided to "registering" visitors will begin with the letter "R".
Les 'captchas' dans l'enregistrement public
Pour protéger votre sondage d'inscription par des robits, il y a une fonction de 'captcha' pour l'enregistrement, la sauvegardez et le chargelent des questionnaires (à partir de la version 1.48). Cette fonctionnalité n'est disponible que si vous avez le support GD d'activé dans votre configuration de PHP (voir Prérequis d'Installation ).
Est-ce qu'une sondage utilisant les invitations peut assurer des réponses anonymes?
La réponse à cette question est Oui. Les invitations peuvent être utilisées tant pour les sondages anonymes que non anonymes. Ceci est déterminé lors de la création du questionnaire. Si un questionnaire n'est pas anonyme (ou 'suivi') alors le code d'invitation peut être utilisé pour trouver les réponses que le répondant a faites au questionnaire. Si le sondage est anonyme, alors aucun lien n'est disponible entre la table des invitations et la table des réponses (techniquement: pas de relation de clé étrangère).
To enable or disable anonymized responses, check the participant settings wiki section.
Un truc pour générer un nombre important de fausses adresses de courriels
Quelquefois, vous pouvez avoir besoin d'un grand nombre d'adresses de courriel et d'invitations. Vous pouvez utiliser les fonctions de votre tableur ( par exemple OpenOffice Calc) pour les fabriquer. Supposons que vous souhaitiez des milliers d'adresses de courriel de la forme : 1@test.com, 2@test.com,3@test.com,... Vous aller entrer une liste consécutive de nombres dans la colonne A en indiquant à partir de la ligne 2 : =A1+1, ensuite copier/coller A2 autant de fois que vous le souhaitez. Dans la colonne B, en entête, vous indiquez email et à partir de B2: =A2&"@example.org". Vous pouvez ensuite enregistrer ce fichier au format CSV et l'importer dans votre table d'invitation.
Depuis la version 1.91, vous pouvez directement utiliser la génération automatique de code factices.
Spam problems
Users often complain about not receiving invitations or reminder emails because their email spam filters treated the message from LimeSurvey as spam.
The fact that an email is treated as spam depends mostly on the spam filter being used and its settings. A spam filter usually checks the sender address, and the email subject and content. Changing its settings could solve the way in which the users' email providers treat the messages from LimeSurvey.
Some possible issues and solutions are listed in the following limesurvey-consulting.com blog post.
LimeSurvey automatically tries to determine the URL for the invitation link by looking at the URL by which you logged in to the LimeSurvey administration. However, with some server (mis)configurations this might not work properly and you will have to set this manually.
You can edit "application/config/config.php" to change the default base URL value. Add a hostInfo property like this to the existing 'components' array.
    'components' => array(
       ...
       'config' => array(
           .......
           'publicurl' => 'http://www.example.com',
           ........
       ),
   )
Regarding the source of the problem, LimeSurvey tried to determine the domain from the server PHP variable: $_SERVER['HTTP_HOST'] or $_SERVER['SERVER_NAME'].
Some web server software do not properly seem to provide this information or are misconfigured.
Pseudonymised participation
With the dummy tokens you may create a form of pseudonymised participation by exporting the created dummy tokens and then combining them with your participant list externally. That way, LimeSurvey can be used as a survey platform without putting personal information of your participants into the system.
The only downside is, that you will have to distribute the participation tokens yourself.
