Participantes de la encuesta
From LimeSurvey Manual
Introducción
En muchas ocasiones quieres invitar a un grupo de gente a participar en una encuesta, llevar un seguimiento de quien la ha completado y asegurarte de que cada persona sólo pueda participar una vez. Las fichas te permiten hacer lo siguiente:
- Crear invitaciones manualmente (nombre, correo electrónico, ...)
- Importar una lista de nombres y direcciones de correo para los participantes (desde un archivo CSV o un rastreo LDAP)
- Añadir/eliminar invitaciones
- Generar un número de ficha por cada participante (código de invitación)
- Enviar una invitación por correo electrónico a cada persona de tu ista, por grupos o individualmente
- Enviar un recordatorio por correo electrónico a las personas de tu lista que aún no han respondido, por grupo o individualmente.
- Rastrear quien de tu lista ha respondido.
- Restringir el acceso a la gente que no tiene una ficha y a gente con ficha que ya ha respondido
- Editar/cambiar cualquier detalle de tu lista
Una vez que el acceso a la encuesta esté cerrado(has activado fichas para esta encuesta) sólo las personas con un código de ficha válido (que no haya sido usado) podrán acceder a la encuesta.
Si has activado el Auto-registro en las propiedades de ficha, los participantes podrán registrarse para tu encuesta para obtener un código de ficha generado automáticamente.
¿Puede una encuesta garantizar el anonimato de las preguntas utilizando las fichas?
la respuesta a esto es Si. Las fichas pueden usarse tanto para encuestas anónimas como para encuestas no anónimas, esto se elige al crear la encuesta, si la encuesta no es anónima(o "rastreada") la lista de fichas podrá usarse para contactar con los encuestados, si la encuesta es anónima no se vincularán las respuestas y los encuestados.
Cómo activar las fichas?
Hay dos formas de activar las fichas:
- Tras activar la encuesta se te preguntará si quieres que se te activen las fichas :

- O puedes pulsar sobre el ícono
 - incluso antes de activar la encuesta.
Herramientas para la gestión de las fichas
Tras crear la tabla de fichas puedes pulsar sobre el ícono de ficha para acceder a la administración de la ficha. Lo siguiente es una breve descripción del menú de opciones en la pantalla de fichas:
- Administrador: Vuelve a la pantalla principal del administrador de encuestas
- Sumario: Muestra un breve sumario de las fichas de la tabla (número de de fichas, cuantos han mandado una invitación y cuántos han respondido).
- Buscador: Muestra la lista completa de participantes en la tabla de fichas, desde la pantalla del buscador puedes editar o eliminar entradas individuales en la tabla de fichas así como realizar un número de útiles funciones (ver la sección del buscador más abajo)
- Añadir una nueva entrada: Te permite añadir una entrada extra en la tabla de fichas.
- Añadir ficha: Te permite añadir 1 o más fichas a la tabla de fichas
- Administrar otros atributos de campo: Te permite añadir campos adicionales a la tabla de fichas para guardar datos personalizados de cada participante.
- Importar desde CSV: Te permite importar información desde un archivo CSV
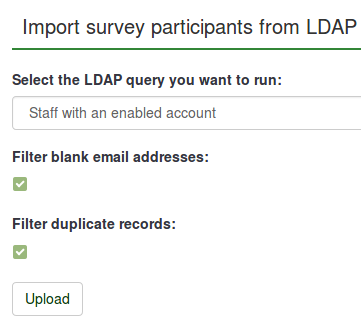
- Importar desde LDAP: Te permite importar información desde un rastreo LDAP (probado en openLdao pero debería funcionar desde cualquier compilador LDAP incluido ActiveDirectory)
- Exportar fichas a un archivo CSV: Crea un archivo CSV estándar (delimitado por comas) con una lista completa de los participantes de la tabla de fichas.
- Editar plantilla de correo: Permite personalizar las plantillas de correo usadas para las invitaciones, recordatorios, confirmaciones y registros
- Enviar invitaciones por correo electrónico: Envía correos de invitación en masa a todos los participantes a los que no se les ha enviado una invitación.
- Enviar recordatorio por correo electrónico: Envía recordatorios por correo a todos los participantes que no han respondido a la invitación.
- Generar fichas: Crea fichas individuales para todas las entradas en la tabla de fichas que aun no tengan una
- Arrastrar tabla de fichas: Elimina la tabla de fichas y fija la encuesta en modo de acceso abierto.
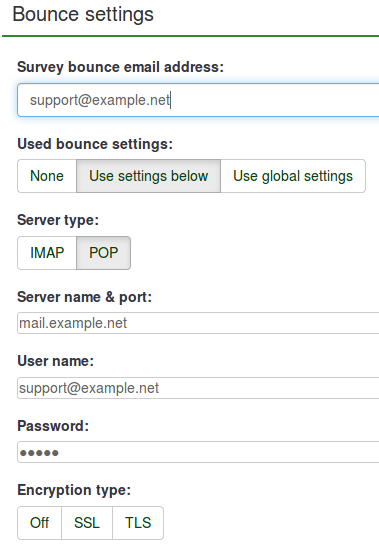
- Ajustes de rebote: Ajustes de rebote de emails. Los ajustes de rebote de mails pueden fijarse a nivel de la encuesta o a nivel del sistema. Esta característica fue añadida en la versión 1.91.
Editar/Crear una ficha
Una entrada típica de una ficha contiene los siguientes campos:
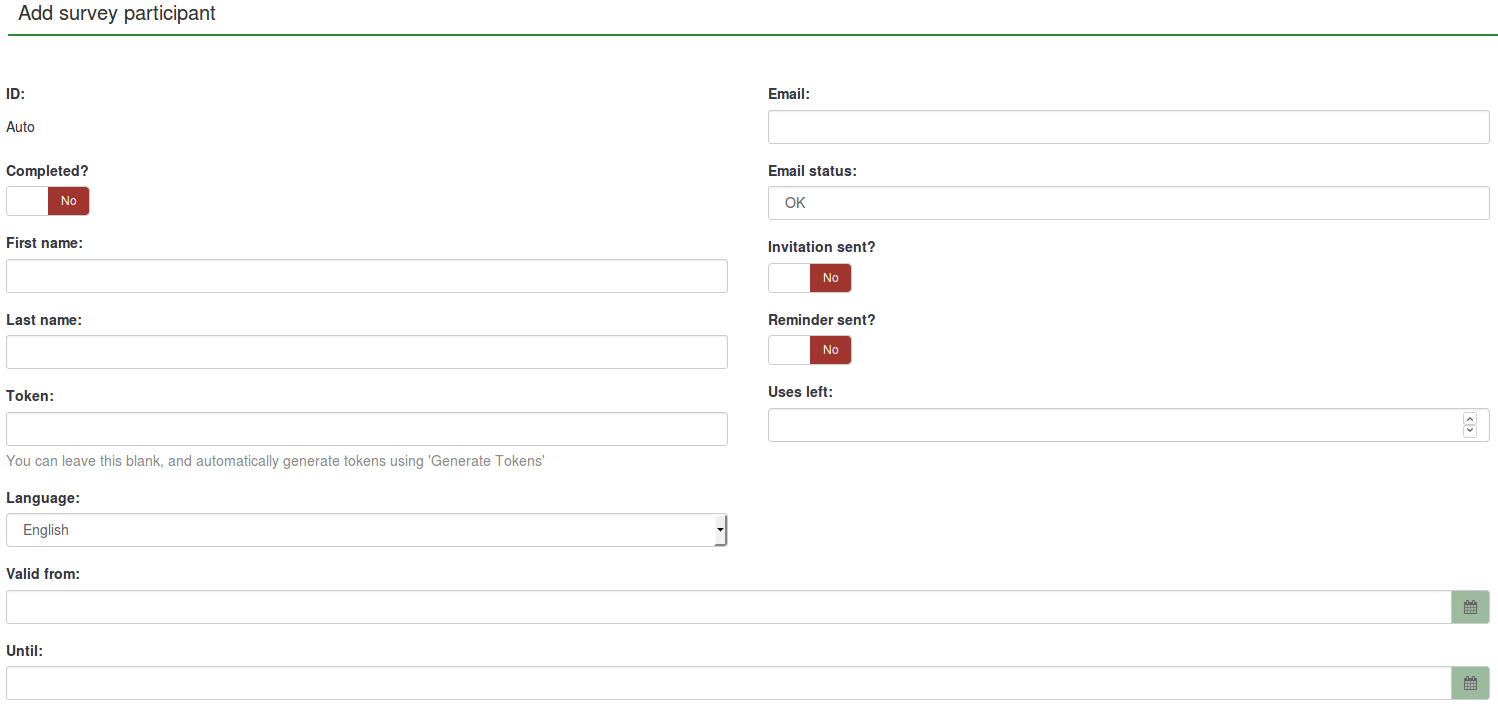
- Nombre y Apellido: ..De cada participante (Puede ser usado en los correos elctrónicos y en la encuesta)
- Correo electrónico: La dirección de correo electrónico del participante
- Estado del correo: Un campo para rastrear correos incorrectos. Por ejemplo, si el administrador de la encuesta recibe una notificación de correo incorrecto para ese correo, que puede fijar ese campo o cualquier otro como "ok" (por ejemplo "usuario desconocido, o bandeja de entrada lleno).Marcando esta muestra con un estado de mail diferente Marking this token with an email status other than 'OK', will help skip this entry when sending invitation or reminder emails. Note that this is completely manual, unless you decide to implement a script which does update this field automatically.
- ficha: Es el código de invitación. Suele generarse automáticamente con el botón "generar fichas"
- Idioma: Puedes fijar un idioma predeterminado para este participante
- Invitación enviada: Por defecto en "N", contiene la fecha en que el correo electrónico de invitación fue enviado
- Completo_: por defecto en "N", puede contener la fecha de cuando la encuesta ha sido respondida.
- Usos restantes: Un contador del número de veces que puede usarse la ficha.
- Valido desde & Valido hasta : Permite fijar un tiempo en el que esa ficha pueda usarse, puedes dejar este campo vacío si no quieres la limitación por tiempo Nota: Si el participante esta contestando la encuesta y el tiempo de participación termina el usuario es bloqueado y no se le permite acabar la encuesta.
- Propiedad1 a propiedad x: Son campos de propiedades definibles por el usuario -ver el siguiente párrafo.
Fichas objeto
Las fichas objeto fueron añadidas en la versión 1.91. Aquí está la pantalla típica:
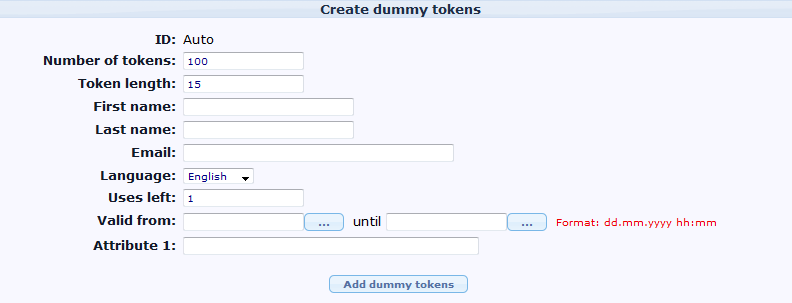
- Numero de fichas: Numero de fichas a ser añadidas, por defecto son 100.
- Token length: Número de caracteres o longitud de la ficha. Por defecto 15
- Nombre y apellido: .. del participante.
- Correo Electronico: La dirección de correo electrónico del participante.
- 'Idioma: Puedes fijar un idioma predeterminado para este participante
- Usos restantes: Un contador del número de veces que puede usarse la ficha.
- Valido desde & Valido hasta : Permite fijar un tiempo en el que esa ficha pueda usarse, puedes dejar este campo vacío si no quieres la limitación por tiempo Nota: Si el participante esta contestando la encuesta y el tiempo de participación termina el usuario es bloqueado y no se le permite acabar la encuesta.
- 'Propiedad1 a propiedad x: Son campos de propiedades definibles por el usuario -ver el siguiente párrafo.
Tenga en cuenta que nombre, correo electrónico y el idioma se establecerá en el mismo valor para todas las fichas objeto.
Bounce Settings
Email bounce back processing was added in 1.91.
- Survey bounce email: A valid email address for return mail. For faster bounce back processing, this email box should be limited to bounce back only.
- Bounce settings to be used: There are three options: 1) None (default) - no bounce back processing, 2) Use settings below - Will set bounce back processing at the survey level, or 3) Use global settings -- Settings based on the system level.
- Server type: Three options: 1) Off, 2) IMAP or 3) POP
- Server name & port: Host name and port number. Port number isn't typically needed unless the email host uses a non-standard port. Example: mail.example.net:25 or imap.gmail.com:995
- User name: User Name or User ID of the email account
- Password: password of the email account
- Encryption type: Three options: 1) None (default), 2) SSL, or 3) TLS
User-defined attribute fields
It is possible to add a number of additional fields to the tokens table to save additional data for a participant. By clicking on the 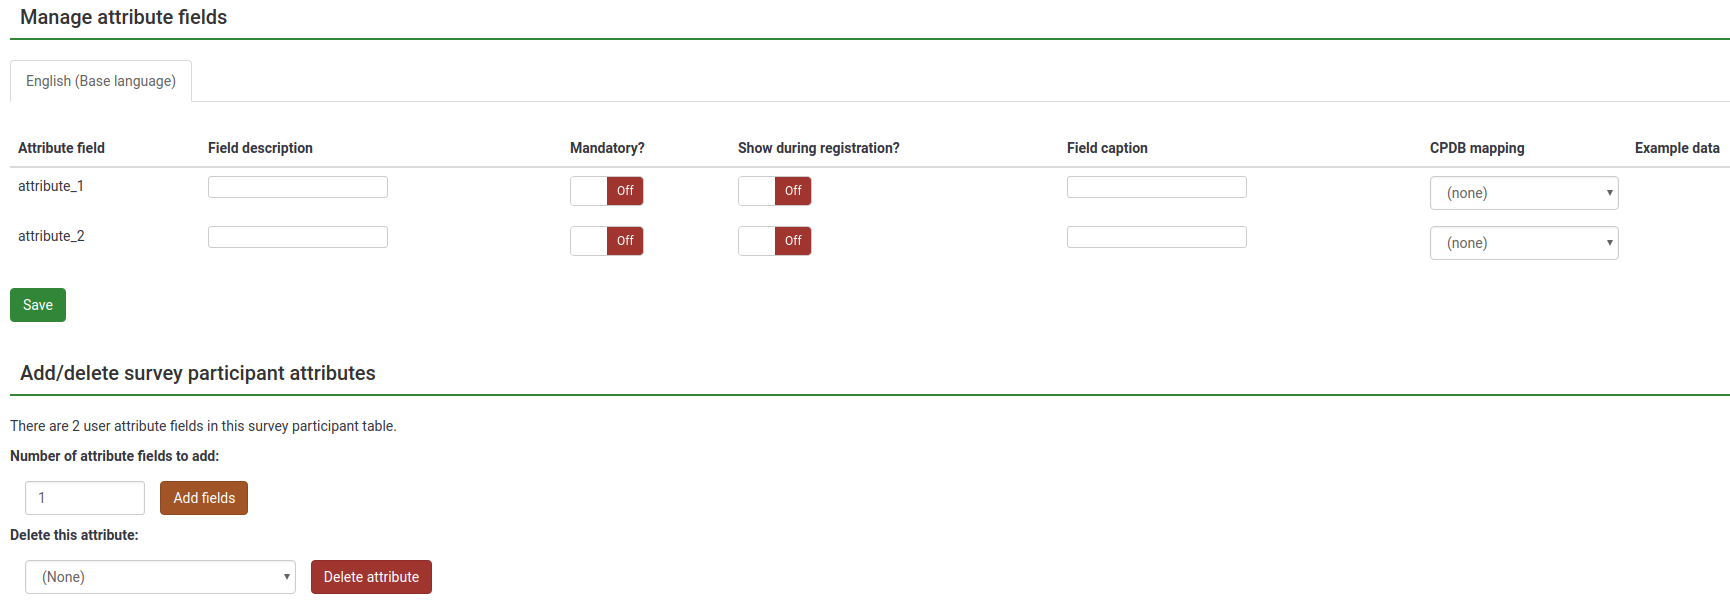 icon you can manage these fields. You can add more attribute fields (by default they have a a length of 255 chars) and also set descriptions for each field - so they look nicer in the administration, when you browse tokens, when creating conditions based on attribute fields or even when you export results for non-anonymous surveys.
Detailed instructions on how to add additional attribute fields and use conditions based on these values can be found at this blog post: "Conditions based on token attributes"
Using the browse screen and editing tokens
The browse screen will show you a list of all entries in the tokens table, as well as giving you some 'action' buttons that can perform specific tasks for that individual entry.
The top row of the table has three columns: The dialogue on the right gives options for displaying a number of records, and a starting point. In the middle is a search bar and the symbols on the left let you move backwards or forwards through your list.
The second row of the table (see image below) includes various criteria to sort the entries and for each a green arrow that - if clicked - will refresh the screen showing the tokens ordered by that criterion.
The "Actions" column gives a list of specific tasks that can be performed on that individual entry:
- Do the survey using the unique token of this entry
- Edit this entry
- Delete this entry
- Send a invitation/reminder to this individual entry
- If the survey is a 'tracked' (ie: not anonymous) survey, another button will appear, allowing you to view the response from this individual entry.
Database Admin
While the summary screen shows a brief summary of tokens in the table, it also provides access to the "Database Admin" features which include:
- Clear invites: Sets all records that an invitation has been sent out to 'N'. Obviously shouldn't normally be used.
- Clear tokens: Clears all tokens. Similarly shouldn't normally be used.
- Drop tokens: Allows you to remove the tokens feature from your script. Deletes the entire table and all records, and allows the survey to be accessed by anybody who knows the URL.
Importing/exporting tokens
CSV import
When you click the icon to import tokens you will be presented with the following screen:
Your CSV file must be a standard CSV (Comma Separated Value) file. The first line of text is always the header information and will be used to identify the field data. Possible data fields are:
firstname,lastname,email,emailstatus,token,language code,tid,attribute_1,attribute_2, attribute_...
To obtain a full list of token field names, export an existing token table.
The fields can be in any order but firstname, lastname and email are mandatory, and they must contain at least one character. Empty data (such as "") is not sufficient. If you would like to import data for attribute fields, you must add the desired attribute fields to the token table prior to importing token data.
A bare minimum CSV file could look like this:
firstname,lastname,email

John,Doe,john@doe.net
Date format for token import
The date format for the "validfrom" and "validuntil" fields in the CSV token inport file is "YYYY-MM-DD HH:MM", e.g.:
2012-01-01 00:00
--would correspond to 1st January, 2012, at 12:00 AM.
Filtering duplicates
If you activate the option to filter for duplicates you can set which fields are used to identify duplicates. By default First name, Last name & Email-address are pre-selected. If a duplicate is found while importing the related line is omitted.
Troubleshooting the token import
A common error when users try to import tokens is an invalid CSV file. This is often caused by Microsoft Excel. Many users have a list of e-mail addresses saved as an XLS document. A file can be saved as CSV in Excel, however, Microsoft uses semi-colon (;) as the comma separator, while a standard CSV file uses comma (,) as the separator. If you try to import an Excel saved CSV file you will get an error message. A simple solution is to save your XLS document as a CSV file in Excel and then open the file in a raw text editor and replace all semi-colon characters with commas.
Recommended free raw text editors are: PSPad, NotePad2 or Notepad++ for Windows, and TextWrangler for Macintosh.
You can use LibreOffice Calc to export import your xls file and export your csv file.
Creating CSV file with Excel on the Mac
When you create a CSV file with Excel 2011 on the MAC and use the standard "save as" option, you loose special characters such as ü, ë, é etc. when importing into LimeSurvey Token Table.
To make this work properly choose to save the file as a Windows text CSV file (tested on the Dutch version of Excel, saved as "Door lijstscheidingstekens gescheiden Windows tekst (.CSV)").
Then when importing the file in the LimeSurvey token table, under "character set of file" choose "Mac West European". The special characters will be imported correctly.
Tested on LimeSurvey 2.0 only.
CSV export
When you export your tokens the following fieldorder is exported:
tid,firstname,lastname,email,emailstatus,token,language code,attribute_1,attribute_2,etc..
LDAP import
- Queries are manually defined by the system administrator in the config-ldap.php file
- Duplicates are identified by First Name, Last Name & Email-Address. If a duplicate is found while importing the related line is omitted, unless you have unchecked the Filter Duplicates checkbox.
A tip for generating a large number of fake e-mail addresses
Sometimes you may need a large number of fake e-mail addresses and tokens. You can use functions in a spreadsheet (e.g. OpenOffice Calc) to generate them. Let's assume you want thousands addresses in a form: 1@test.com, 2@test.com, 3@test.com... Put consecutive numbers in column A: 1 in the A1, then insert function =A1+1 in A2, then copy A2 down as many times as you need. In B1 use concatenation function to join A1 and "@test.com", which is =CONCATENATE(A1;"@test.com"). Then copy B1 down for each copied A. You may generate fake names in a similar way. Finally, save the file as CSV for import in LS.
With the 1.91, you can use "Generate dummy token" functionnality
A tip for generating a large number of individual links which include the token already
The structure of the survey link is the following:
http://url-to-your-limesurvey-installation/index.php?sid=XXXX⟨=en&token;={TOKEN}
So you proceed similar to the example above for generating email adresses.
- First column: http://url-to-your-limesurvey-installation/index.php?sid=XXXX⟨=en&token;= (the same for all, as long as the language is the same!)
- Second column: {TOKEN} (put your tokens here, of course they must be individual)
- Third column: use the CONCATENATE funtion to joint the first column with the second column.
Emailing
Email placeholders
The following field names are allowed in invitation/reminder email templates and must be entered in the survey properties. When sending out the emails these field names will be already replaced in the preview of your invitation/reminder email.
| {ADMINEMAIL} | Email of the Survey admin |
| {ADMINNAME} | Name of Survey Admin |
| {SURVEYNAME} | Title of your survey |
| {SURVEYDESCRIPTION} | Description of your survey |
The following field names are allowed in invitation/reminder emails (subject and/or body) and will be replaced while sending out the mails:
| {EMAIL} | Email of the recipient |
| {FIRSTNAME} | First Name |
| {LASTNAME} | Last Name |
| {SURVEYURL} | The URL pointing to the survey start - if you are sending HTML emails this will be a fully linked HTML version |
| @@SURVEYURL@@ | The URL pointing to the survey start - this is the barebone link. Use this if you want to integrate the link in your custom HTML elements somewhere (available in v1.90 and later) |
| {OPTOUTURL} | The URL to deactivate sending of mail for this survey - this will be a fully linked HTML version |
| {TOKEN} | Token to access the survey |
| {ATTRIBUTE_1} | Attribute 1 |
| {ATTRIBUTE_2} | Attribute 2 (...and so on for more attribute fields) |
If your survey is NOT anonymous, the following field names are available to insert token data in survey text and javascript:
| {TOKEN:EMAIL} | Email of the recipient |
| {TOKEN:FIRSTNAME} | First Name |
| {TOKEN:LASTNAME} | Last Name |
| {TOKEN} | Token to access the survey |
| {TOKEN:ATTRIBUTE_1} | Attribute 1 |
| {TOKEN:ATTRIBUTE_2} | Attribute 2 (and so on for more attribute fields) |
See examples on using information from tokens table.
Emails settings
- Invitation Email Subject: The subject line for the invitation email that gets sent out when tokens are used with your survey.
- Invitation Email: This is the text for the invitation email that gets sent out when tokens are used with your survey. This is initially filled by the default invitation message (from the language files) but you can modify it to suit yourself. If you are using English as your base language, the default invitation and reminder text can be found in the limesurvey/tokens.php file. Of course if you don't plan to use tokens on your survey, whatever is in this field is irrelevant. You can use the following "form" fields to insert individualized information in each email:
- {FIRSTNAME} - gets replaced with the token table's "firstname" value
- {LASTNAME} - gets replaced with the token table's "lastname" value
- {SURVEYNAME} - gets replaced with your surveys name
- {SURVEYDESCRIPTION} - gets replaced with your surveys description
- {ATTRIBUTE_1} - gets replaced with the token table's "attribute_1" value
- {ATTRIBUTE_2} - gets replaced with the token table's "attribute_2" value and so on
- {SURVEYURL} - gets replaced with the fully qualified URL to this particular survey - in HTML emails this is a fully linked HTML link
- @@SURVEYURL@@ - Gets replaced with the survey barebone link. Use this if you want to integrate the link in your custom email HTML (available in v1.90 and later)
- {OPTOUTURL} - gets replaced with the URL for a respondent to opt-out of this particular survey
Note that these "form fields" apply to the following email fields.
- Email Reminder Subject: The subject line for the reminder email that gets sent out from the tokens tool
- Email Reminder: This is the text for the reminder email that gets sent out when tokens are used with your survey. See "invitation email" for specific details on how this field is used.
- Confirmation Email Subject: When tokens are used, this is the subject line of the email that gets automatically sent to participants after completion of the survey
- Confirmation Email: This is the text of the email that gets sent to users after completion of the survey. Delete/blank this text remove the confirmation email sending.
- Public Registration Email Subject: This is the subject line for the invitation email sent to members of the public who register for a survey.
- Public Registration Email: This is the text for the invitation email sent to members of the public who register for a survey. The same "form fields" apply in this email as in the earlier ones.
Sending emails
Send invitations
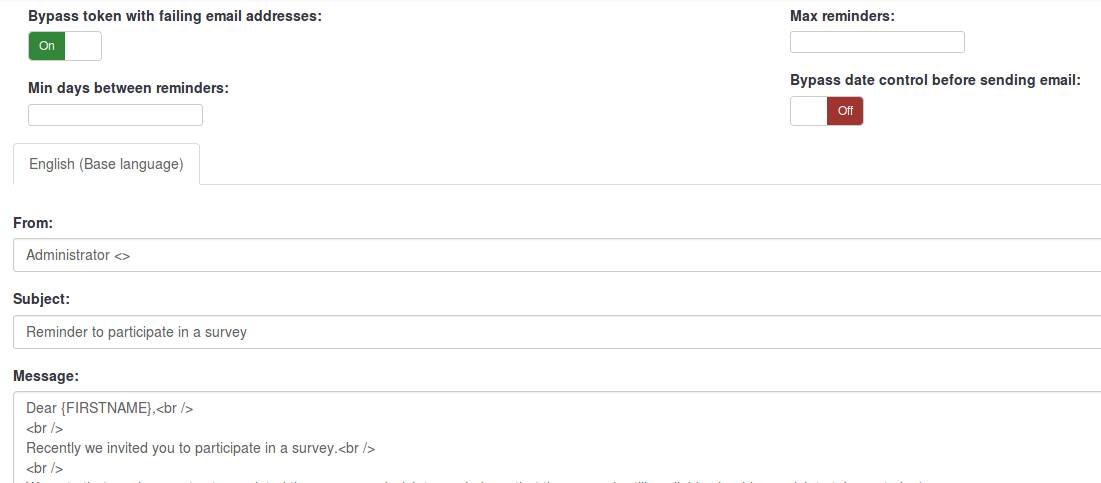
You can skip tokens for which the email status field is different from 'OK', by choosing the 'Bypass token with failing email addresses' option.
Resending invitations
Sometimes you might want to send invitations again to certain token entries / persons. When you use the send invitations-function only e-mail addresses that has not previously received an invitation will get one. This means that if you add new addresses to the token list after the first time you sent invitations, only these new addresses will receive an invitation the second time you send invitations.
This means that you can also edit/change an e-mail in a particular token entry that you got a bounce from and then send to only this edited address. Just substitute the date Invite sent? for a capital N (no) and click send invitations again.
Participant opt-out
When you use the {OPTOUTURL} tag in your invitation/reminder email, your participants have the possibility to opt out of this particular survey by just clicking on the related URL in the email - so you don't harrass them with reminder emails. A participant that opted out of your survey will have the email status 'OptOut' set in the token.
Send reminders
When sending reminders you can:
- bypass tokens with failing email addresses
- skip tokens for which an email has been 'recently' sent
- skip tokens for which a given number of emails have already been sent
Note: A reminder will only be send to tokens where the "completed" field is not "N" (this means the respondent has either not taken or has not completed the survey).
Sending emails by batch
When you have to send a lot of emails at the same time, LimeSurvey will only send a first batch of N emails (this threshold is set by the administrator in the Global Settings).
You'll then need to click "Next" to send the next batch, and so on untill all emails have been sent.
Confirmation email
If you are using tokens and a participant fills out the survey, a confirmation email is sent to his/her email address.
If you don't want this message to be sent, remove all content from the "Confirmation email subject" and "Confirmation email" fields - see these instructions.
Spam problems
Often users complain not having received an invitation/reminder email because the user’s spam filter treated the email as spam.
If an email is treated as spam mostly depends on the spam filter being used and its settings. A spam filter usually checks the sender address and the email subject and content, so there are ways and means to influence how they treat your Limesurvey invitation and reminder emails.
At this blog post on limesurvey-consulting.com a lot of possible issues and solutions are listed.
Wrong domain in invitation/reminder email link
LimeSurvey automatically tries to determine the URL for the invitation link by looking at the URL by which you logged in to the LimeSurvey administration. However with some server (mis-)configurations this might not work properly and you will have to set this manually.
You can edit /path/to/application/config/config.php to change the default base URL value. Add hostInfo property like this to the existing 'components' array.
    'components' => array(

       ...

       'request' => array(

           'hostInfo' => 'http://www.example.com',

       ),

   )
Regarding the source of the problem: LimeSurvey tried to determine the domain from the server PHP variable $_SERVER['HTTP_HOST']] or $_SERVER['SERVER_NAME']].
Some web server software do not properly seem to provide this information or are mis-configured.
Public registration
Allowing public registration
You may want to open your survey to the public, but utilize the sort of respondent control available when using tokens. This is possible: If you initialize your tokens table, and have chosen to Allow Public Registration in the main survey setup, people who visit your survey's URL without a token, will be given the opportunity to register. If they provide an email address that is not already in the current survey's tokens table, an entry in the tokens table will be created, and they will be emailed an invitation containing their unique Token. All tokens provided to "registering" visitors will begin with the letter "R".
Captchas in public registration
To protect your survey from robot registration there is a captcha feature on all Registration, Save and Load forms. (starting from version 1.48) This feature is only available if you have GD-support activated in your PHP configuration. (see Installation Requirements)
