Umfrageteilnehmer
From LimeSurvey Manual
Einleitung
Bei vielen Gelegenheiten möchten sie sicher stellen, dass z.B. nur eine bestimmte Gruppe von Leuten eine Einladung zu ihrer Umfrage erhält, dass sie einen Überblick behalten, wer alles ihre Umfrage vollständig ausgefüllt hat oder dass Personen wirklich nur einmal an ihrer Umfrage teilnehmen können.
Über Zugangsschlüssel können sie folgende Dinge steuern:
- Eine Liste mit Namen und E-Mail-Adressen der Umfrage-Teilnehmer importieren (aus einer .CSV-Datei oder über LDAP-Verbindung)
- Gesamte Liste der Umfrage-Teilnehmer bearbeiten sowie Teilnehmer hinzufügen und löschen
- Einen eindeutigen Zugangsschlüssel für jeden Teilnehmer automatisch erzeugen lassen
- Eine Einladungs-E-Mail an jede Person in der Liste verschicken (entweder alle auf einmal oder einzeln)
- Eine Erinnerungs-E-Mail an jede Person in der Liste verschicken, welche noch nicht geantwortet hat (entweder alle auf einmal oder einzeln)
- Überwachen, wer aus der Liste bereits die Umfrage ausgefüllt hat und wer nicht
- Den Zugang zur Umfrage limitieren, indem nur Personen teilnehmen können, welche einen passenden Zugangsschlüssel haben;
- Festlegen, dass pro Zugangsschlüssel nur einmal an einer Umfrage teilgenommen werden kann.
- Die Liste jederzeit bearbeiten oder ändern.
Sobald sie Zugangsschlüssel für ihre Umfrage aktiviert haben (closed-access mode), können nur mehr jene Personen an der Umfrage teilnehmen, welche auch wirklich über einen gültigen (ungenutzen) Zugangsschlüssel verfügen.
Wenn Sie Offene Registrierung erlauben? in den Umfrageeinstellungen aktivieren, können sich Teilnehmer für Ihre Umfrage registrieren, um einen eigenen automatisch generierten Zugangsschüssel zu erhalten.
Wie erstelle ich eine Umfrageteilnehmer-Tabelle?
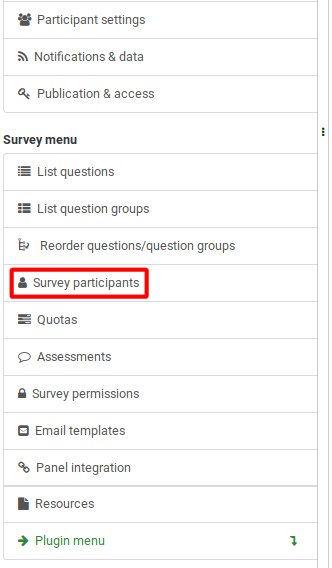
Um eine Umfrageteilnehmer-Tabelle zu aktivieren, rufen Sie die Umfrage auf und klicken Sie auf die Schaltfläche Umfrageteilnehmer vom Menü Einstellungen:
Sie werden folgende Meldung sehen:

Wenn Sie eine Teilnehmertabelle initialisieren, ist die Umfrage nur für die Benutzer zugänglich, die im Umfrageregistrierungsprozess einen Token-Code (Zugangschlüssel) entweder manuell oder per URL angeben. Auf diese Weise wird die Umfrage in den Modus "Closed-Access" umgeschaltet.
Nach der Initialisierung wird ein Fenster geöffnet, in dem die Erstellung der Umfrageteilnehmer-Tabelle bestätigt wird.
Reaktivieren einer Umfrageteilnehmer-Tabelle
Wenn Sie eine Umfrageteilnehmer-Tabelle löschen, wird eine Sicherung erstellt. Sie kann später wieder aktiviert werden, wenn Sie diese bestimmte Umfrageteilnehmer-Tabelle in einer anderen Umfrage verwenden möchten:
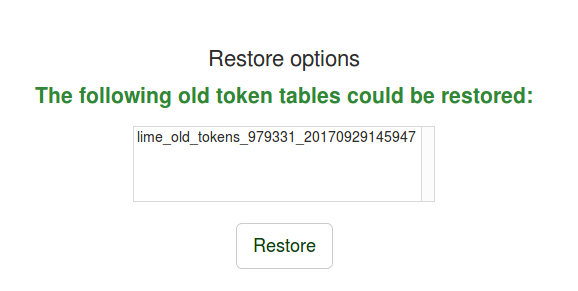
Verwaltungstools für Umfrageteilnehmer
Eine Umfrageteilnehmerzusammenfassung wird geladen, wenn die Umfrageteilnehmer-Tabelle zuvor erstellt wurde. Dies ist der Standardbildschirm:
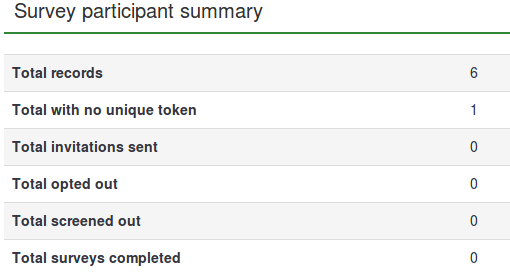
- Total records: The number of survey participants from the survey participants table;
- Total with no unique token: It displays the number of users without an assigned token code;
- Total invitations sent: It shows the number of invitations that have been sent to your survey participants from the Survey participants table by using the Invitations option from the Invitations & reminders menu;
- Total opted out: It displays the total number of survey participants that have decided to opt out from the survey;
- Total screened out:
- Total surveys completed: It shows the number of the surveys that have been completed by those users who have been allocated a token code.
Above the Survey participant summary table, you may find the survey participants table management tools:
- Display participants: If clicked, a survey participants table with all the current participants will load up. From the browse screen you can edit or delete individual entries from the table as well as perform a number of other useful functions (see the Display participants wiki section below for more details);
- Create...: This option allows the survey administrator to add respondents into the survey participants table either via the Add participant option or via the Import participants function;
- Manage attributes: It allows the survey administrator to add additional fields to the survey participants table to store custom participant data;
- Export: If you wish to export the token tables and use them in other surveys, use this function. The file will be saved in the .CSV format;
- Survey participants: Use this option in order to quickly invite or remind your participants from the survey participants table to fill out your online survey;
- Generate tokens: It is a LimeSurvey functionality that allows the survey administrator to quickly allocate a random unique token code to each user from the survey participants table that does not have one;
- View in CPDB: It's a button that offers quick access to your LimeSurvey installation central participant database (CPDB). You can allocate from there CPDB users as survey participants to any survey you wish.
Display participants
Die Zugangsschlüsselliste ist eine Liste aller Einträge in die Zugangsschlüsseltabelle und enthält einige Bearbeitungsmöglichkeiten für die einzelnen Einträge.

Sort the survey participants
Die zweite Zeile der Tabelle enthält verschiedene Sortierungsmöglichkeiten. Ein Klick auf den jeweiligen grünen Pfeil ordnet die Einträge nach diese Kriterium.

Filter the survey participants
If you wish to filter the survey participants, choose the column according to which you want to filter the participant. Type in below the first row the values/strings according to which the filtering should be done:

For example, type in the email status field "OK" in order to let LimeSurvey return only those users that use a good email address.
Perform a specific action to an individual entry
The second column is the Action column where you can find all the actions that are available for each individual entry from the survey participants table. The possible actions that can be performed are:

- Umfrage ausführen/testen (mit diesem Zugangsschlüssel)
- Zugangsschlüssel Eintrag bearbeiten
- Zugangsschlüssel Eintrag löschen
- Sende eine Einladungs-E-Mail für diesen Eintrag
- Falls die Umfrage nicht anonym ist wird ein weiterer Icon erscheinen, über den Sie die Ergebnisse dieses Probanden ansehen können.
Am Ende der Liste finden sich das "Löschen" und das "Einladung senden" Symbol, sowie ein Symbol zum Senden von Erinnerungen. Die Aktionen werden bei Klick auf Alle Einträge ausgeführt, die mit einem Häkchen markiert wurden.
Perform a specific actions to more than one entry
On the bottom-left part of the table, you may find the Selected participant(s)... button that allows you to perform certain actions at a macro level:

- Send email invitations: Send email invitations to the selected survey participants;
- Send email reminder: Send email reminders to the selected survey participants;
- Add participants to central database: In the case in which you would like to use some of the token entries into another survey, add the selected participants to the central participant database. From there, you have the option to add the participants to any survey you wish. For more details, continue reading the Share this participant wiki page.
Create...
To have more participants listed in the survey participants table, you can either add new ones or import them from a CSV file or LDAP query.

Teilnehmer hinzufügen
Ein typischer Teilnehmereintrag enthält die folgenden Felder:
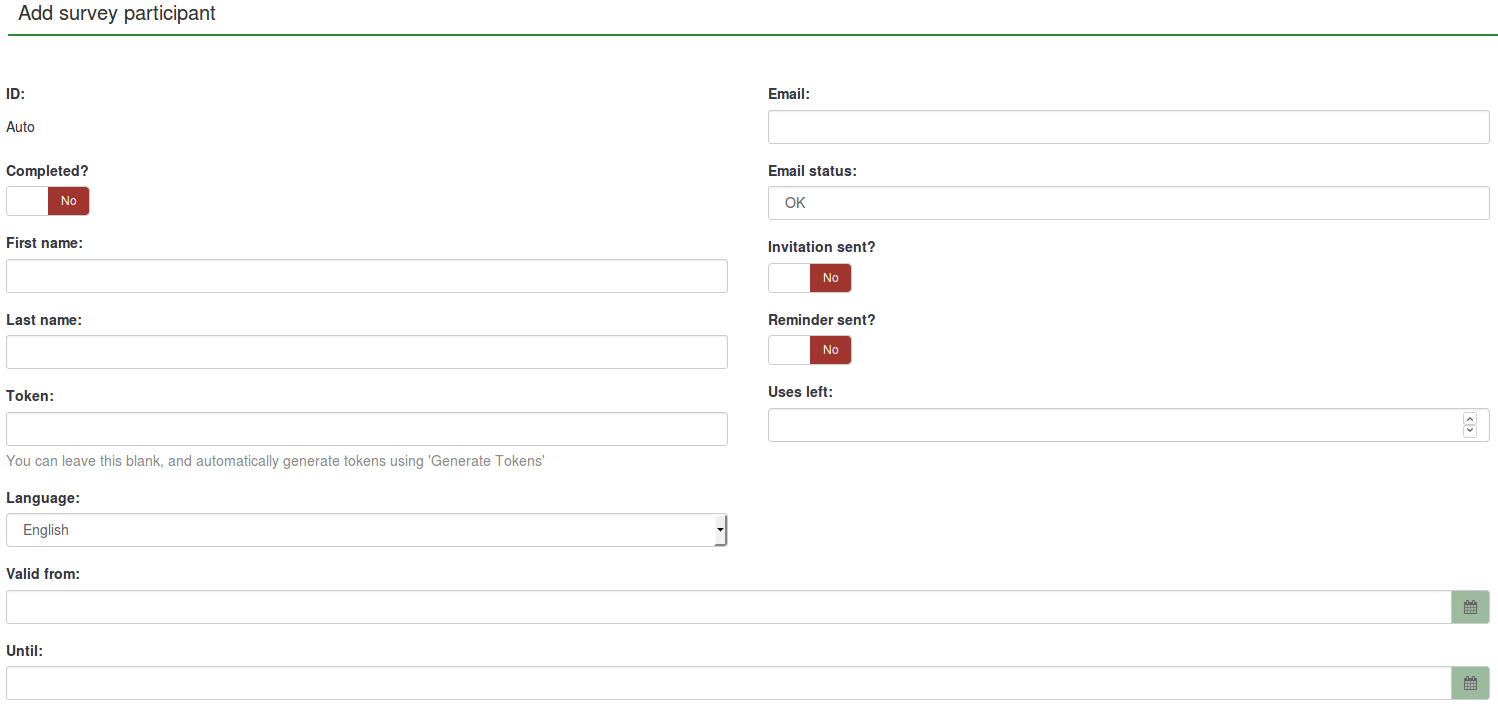
- ID: It represents an integer that is automatically assigned to each survey participant;
- Completed?: It is disabled by default. If enabled, it would contain the date when the survey was completed. No invitations or reminders will be sent to the respective users if this is enabled. It gets automatically enabled if the respective survey participant completed the survey by using his or her assigned token code;
- First name: The first name of the survey participant;
- Last name: The last name of the survey participant;
- Token: This is the invitation code. It can be manually or automatically generated (via the Generate tokens button);
- Language: You can select here the default language of the survey for the respective participant;
- Email: the email address of the participant;
- Email status: This field helps you track the bad email addresses. For instance, if the survey administrator received email error notifications from this email, then he can set this field to anything other than "OK" (for instance "user unknown" or "mailbox quota exceeded"). Marking this field with an email status other than "OK" will help skip this entry when sending invitation or reminder emails. Note that this is completely manual, unless you decide to implement a script which updates this field automatically;
- Invitation sent?: If enabled, it would contain the date when the invitation email was sent;
- Reminder sent?: If enabled. it would contain the date when the reminder email was sent;
- Uses left: A counter of the number of times the token can be used. Note: When increasing this value (default = 1) for a user who has already filled out the survey (which sets uses left to 0), you also have to switch the Completed field from "Yes" to "No";
- Valid from: & Until: You can set a date/time range when this token would be allowed to use. You can leave these empty if you don't want to limit participation time frame for certain users. If the user is answering the survey and the participation time ends then the user is locked out immediately and won't be able to finish the survey.
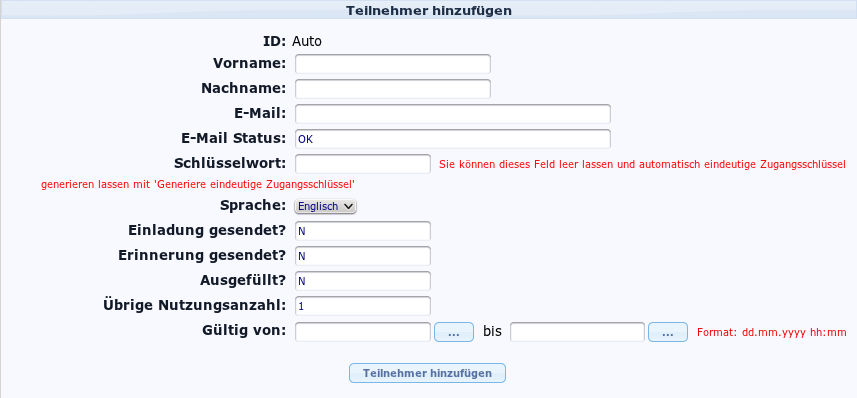
- Vorname/Nachname: Vor-, bzw. Nachname des Probanden (kann sowohl in E-Mails als auch in der Umfrage benutzt werden)
- E-Mail: Die E-Mail-Adresse des Probanden
- E-Mail Status: Der Status der E-Mail-Adresse. Falls eine Adresse aus irgendeinem Grund nicht funktioniert, können Sie diesen hier eintragen. (Zum Beispiel: Kapazität der Postfachs überschritten) Dadurch lassen sich beim Verfassen von E-Mails leicht alle Adressen aussortieren, die nicht wie im obigen Bild „OK" sind. Die Verwendung diese Feldes funktioniert komplett manuell, in Ausnahmen Sie schreiben ein entsprechendes Skript.
- Schlüsselwort: Der spezifische Zugangsschlüssel, er wird per Klick auf „Generate Tokens" automatisch generiert.
- Sprache: Ermöglicht die Auswahl einer Standard-Sprache für den gewählten Probanden.
- Einladung gesendet?: Nimmt automatisch den Wert „N" an, enthält ansonsten das Datum, an dem die Einladungs-Mail gesendet wurde.
- Erinnerung gesendet?: Nimmt automatisch den Wert "N" an, enthält ansonsten das Datum, an dem die Erinnerungs-Mail gesendet wurde.
- Ausgefüllt?: Nimmt ebenfalls automatisch den Wert „N" an, enthält sonst das Datum, an dem die Umfrage eingereicht wurde.
- Übrige Nutzungsanzahl: Dieser Zähler gibt an, wie oft der Zugangsschlüssel noch benutzt werden kann.
- Gültig von: … bis: Gibt den Zeitabschnitt an, in dem der Zugangsschlüssel benutzt werden kann. Falls keine individuelle Begrenzung gewünscht ist, können die Felder freigelassen werden. Hinweis: Falls ein Nutzer die Umfrage gerade ausfüllt wenn die Zeit abläuft, so hat er nicht die Möglichkeit sie zu beenden.
- Attribut1 (bis x): Falls eingestellt, befinden sich die Attributsfelder unten an den Standarddialog angeschlossen. Siehe Abschnitt Attributsfelder.
Dummy Teilnehmer erstellen
Ein Dummy-Teilnehmer kann verwendet werden, wenn Sie E-Mails mit dem Zugangsschlüssel-Code nicht an jeden Teilnehmer versenden wollen, sondern ihm den Zugangsschlüssel auf andere Weise geben wollen. Beispielsweise erhalten die Schülerinnen und Schüler während einer Lehrerbewertung einen Zettel mit einem Einladungscode, der zu Beginn der Online-Befragung abgefragt wird. Auf diese Weise steigt die Wahrscheinlichkeit, mehr Antworten und Feedback zu erhalten.
Wenn Sie auf die Schaltfläche klicken, wird die folgende Seite geladen:

Im Feld "Anzahl der Teilnehmer" können Sie eine Anzahl von Dummy-Variablen eingeben, die Sie der Tabelle Ihrer Umfrageteilnehmer hinzufügen möchten. Die Erklärung der anderen Felder finden Sie im Unterabschnitt Teilnehmer hinzufügen.
Nachdem Sie die Felder ausgefüllt haben, drücken Sie die Schaltfläche Speichern oben rechts auf dem Bildschirm, um die Dummy-Variablen zu speichern.
Um zu überprüfen, ob sie hinzugefügt wurden oder nicht, besuchen Sie erneut die Tabelle der Umfrageteilnehmer:

Teilnehmer aus einer CSV-Datei importieren
The import function permits you to import information from a CSV file or LDAP query.
- Choose the CSV file to upload: Pick the CSV file you wish to import. To eliminate any possible errors, it is recommended to import a standard CSV (comma delimited) file with optional double quotes around values (default for OpenOffice and Excel).
Die erste Zeile muss die Feldnamen enthalten. Es muss auch die folgenden Felder enthalten: firstname, lastname, email.
They have to contain at least one character. Simply adding double quotes and no characters between them will not work!
The other fields are optional: emailstatus, token, language, validfrom, validuntil, attribute_1, attribute_2, attribute_3, usesleft, ... .
Auf Deutsch: Nachname, E-Mail, E-Mail-Status, Zugangsschlüssel, Sprachecode, Zugangsschlüssel ID, Attribut_1. Attribut_...
Um eine vollständige Liste aller Felder zu erhalten, exportieren Sie eine existierende Tabelle.
Das Datumsformat für die "validfrom" und "validuntil" Felder in der CSV-Zugangsschlüssel Import-Datei ist "YYYY-MM-TT HH:MM", z.B.:
- Character set of the file: Select the option that fits the characters used in the CSV file;
- Separator used: You can let LimeSurvey automatically discover the used separator in your CSV or select either the comma separator or the semicolon one;
- Filter blank email addresses: If enabled, the survey participants without an email address will not be imported into your survey participants table;
- Allow invalid email addresses: If disabled, this function will look into the email addresses fields and check whether the addresses have the structure of an email or not (e.g.: a@a.net);
- Display attribute warnings: If enabled, after the importing process warnings will be displayed in the case in which something is wrong with the fields. For example. you might get an attribute warning if nothing is provided in any of the mandatory fields or if an email is wrongly introduced in the CSV file.
- Doppelte Datensätze filtern: Wenn diese Option aktiviert ist, können Sie festlegen, welche Felder zum Identifizieren von Duplikaten verwendet werden. Standardmäßig sind Vorname, Nachname und Email-Adresse vorausgewählt. Wenn beim Importieren ein Duplikat gefunden wird, wird die zugehörige Zeile weggelassen.
- Duplicates are determined by: Select the fields according to which you would like to see the filtering process happening.
You can also import customized attributes when importing a CSV file. You will just have to define what attributes will be added. You can do it like this:
email,attribute_1 <Casenr>, token, attribute_2 <Title>, attribute_3 <destination>, lastname,firstname,attribute_4 <Sender>
Once you are done choosing the desired importing settings, do not forget to click on the Upload button.
Empfohlene Texteditoren sind:
Ein häufiger Fehler beim Versuch, Teilnehmer zu importieren, ist eine ungültige CSV-Datei. Dies wird oft von Microsoft Excel verursacht. Viele Benutzer haben eine Liste mit E-Mail-Adressen, die als XLS-Dokument gespeichert sind. Eine Datei kann in Excel als CSV-Datei gespeichert werden. Abhängig vom Gebietsschema des Betriebssystems verwendet Microsoft Excel jedoch Semikolons (;) als Kommatrennzeichen, während eine Standard-CSV-Datei Kommas (,) als Trennzeichen verwendet. Wenn Sie nicht wissen, welche Sie verwenden, öffnen Sie die Datei mit einem Standard-Texteditor und prüfen Sie, welches Trennzeichen verwendet wurde.
Empfohlene Text-Editoren sind: PSPad, NotePad2 oder Notepad++ für Windows, und TextWrangler für Macintosh.
Import participants from a LDAP query
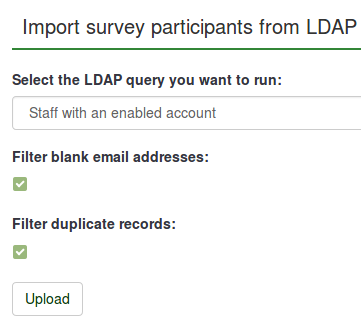
This import function allows you to import information from an LDAP query (tested on openLdap, but should work in any LDAP compliant directory including ActiveDirectory). Once accessed, the following options are available:

- LDAP-Abfragen werden durch den Administrator in der Datei: "config-ldap.php" definiert.
- Duplikate werden anhand von Vornamen, Nachnamen und E-Mail-Adresse erkannt. Falls ein Duplikat erkannt wird, wird die entsprechende Textzeile ausgelassen, falls das Häkchen "Filter Duplicates" wie standardmäßg gesetzt ist.
Manage attributes
This option allows you to add/edit the additional fields of your survey participantst table. The extra fields are used to store custom survey participants data:
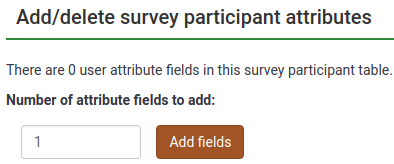
Type in the number of new attribute fields you wish to add to your survey participants table. Click on the Add fields button. The following page will load up:
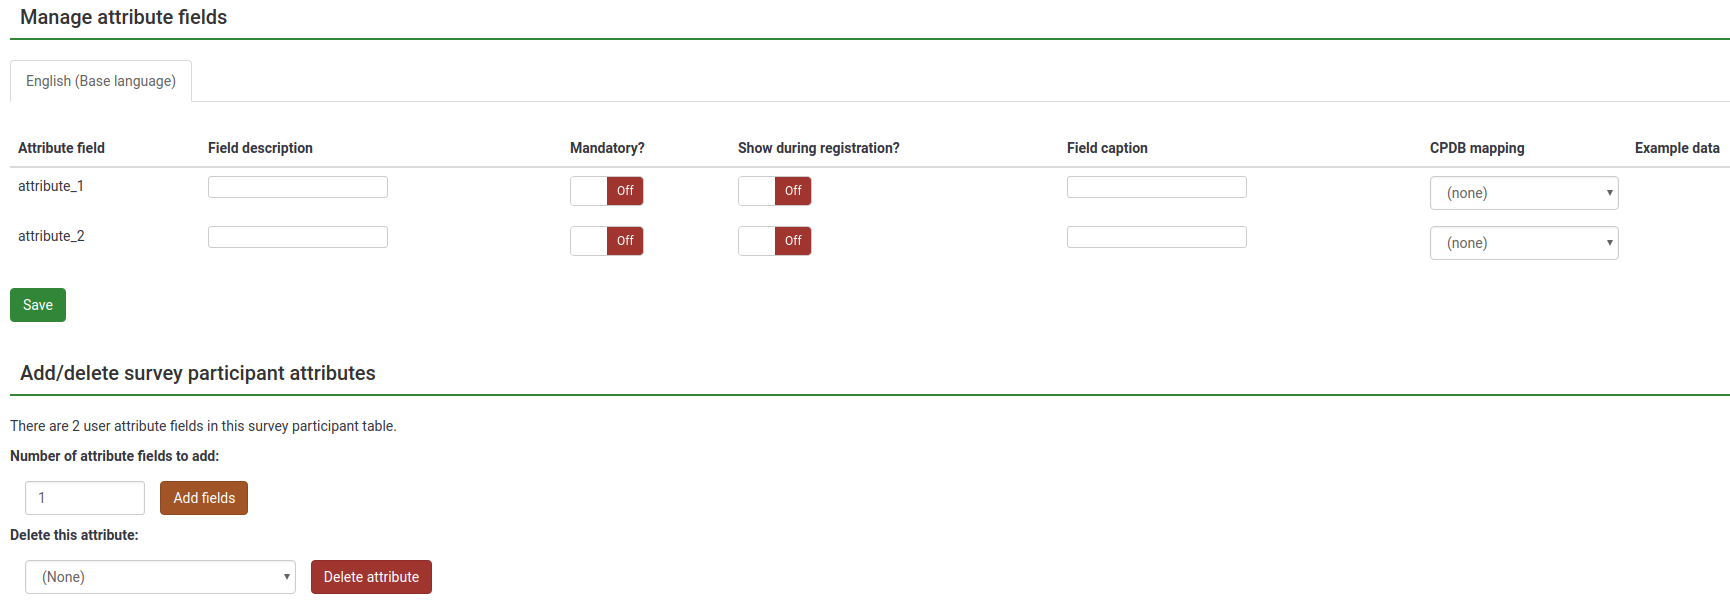
The attribute fields table contain the following fields:
- Attribute field: the value that will be typed in here can be used when you wish to do different operations with the respective custom attribute field such as: applying conditions based on attribute fields or when exporting results for non-anonymous surveys;
- Field description: Used to replace the attribute field name. By giving a custom name to each attribute field, they will look nicer in the administration panel, when you browse tokens, when creating conditions based on attribute fields or when you export results for non-anonymous surveys;
- Mandatory?: If enabled, the respective attribute field will have to be filled in by the survey administrator. Otherwise, the respondent cannot be registered into the survey participants table;
- Show during registration?: If the survey participants have to register before completing a survey, certain details will be requested from them. If disabled, the respective attribute field won't appear in the survey registration page;
- Field caption: Use this fields to add further explanations about the role/usage of the respective attribute field.
- CPDB mapping:; Maps the attribute in order to connect it to its correspondent attribute from the central participant database;
- Example data: It contains string examples from different fields. For example, if you wish to ask for the gender of the survey participant, then you will observe in the Example data field examples such as male, female, no answer etc.
Once you finish filling in the boxes, do not forget to click on the Save button that is located in the bottom-left part of the screen.
Detaillierte Anweisung wie man zusätzliche Attributfelder hinzufügt und Bedingungen auf diesen Werten basieren lässt, findet man auch in diesem Blog-Eintrag (nur auf Englisch):"Conditions based on token attributes"
To add more fields, go to the bottom of the page, and type in the Number of attribute fields to add box the desired number and click on the Add fields button.
If you wish to delete a custom attribute, go to the bottom of the page and select from the drop-down list situated under the Delete this attribute field the attribute you wish to delete. Once selected, click on Delete attribute and confirm the deletion.
Export
If you wish to export a survey participants table, click on the "Export" button located on the token management tools toolbar. Before exporting the survey participants list, select the desired export options:
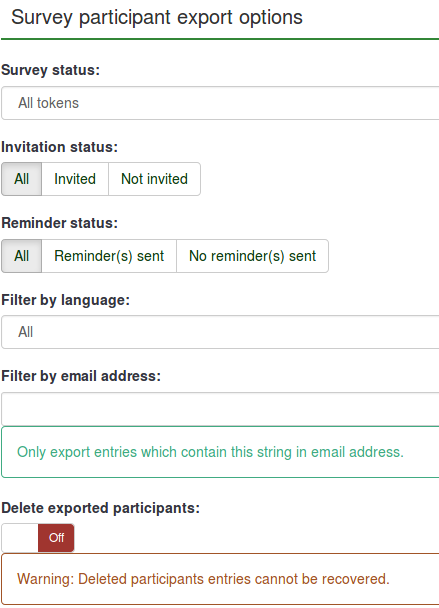
- Survey status:
- All tokens: It exports all the survey participants from the survey participants table;
- Completed: It exports only those survey participants that completed the survey;
- Not completed: It exports the survey participants that have not yet completed the survey;
- Not started: It exports the survey participants that have not yet started the survey;
- Started but not yet completed: It exports the survey participants that have already started the survey, but did not complete it.
- Invitation status: It helps export the users according to the invitation status: all, invited, and not invited;
- Reminder status: It helps export the users according to the reminder status: all, Reminder(s) sent, No reminder(s) sent;
- Filter by language: When you create a survey, you can add additional languages besides the base language. Those additional languages can be used to export survey participants according to the language they are assigned to;
- Filter by email address: It exports entries which contain the string in the respective email address. For example, you can use it if some of your survey participants use the work email addresses from "Company A". Type @companya.com and export only the users that have received a work email address from the respective company;
- Delete exported participants: If enabled, the exported users will be deleted from your survey participants table.
Once you have selected the exporting options, click on the Download CSV file button located in the upper right part of the screen.
Beim Export werden die Felder in folgender Ordnung exportiert:
Invitations & reminders
This functionality allows you to manage the LimeSurvey invitations system. You can send invitations or reminders to those participants that are displayed in your survey participants table. An email bounce tracking system can be used in order to help you track down and mark the emails that were not delivered to the recipients (survey participants).
Send email invitation
You can send through this option email invitations in bulk to all the respondents from the survey participants table who have not been already sent an invitation.
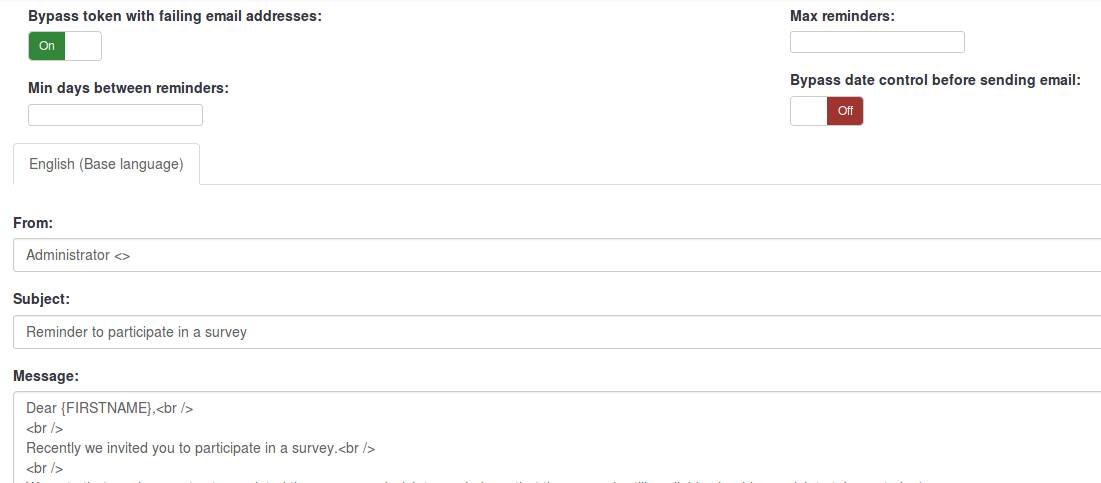
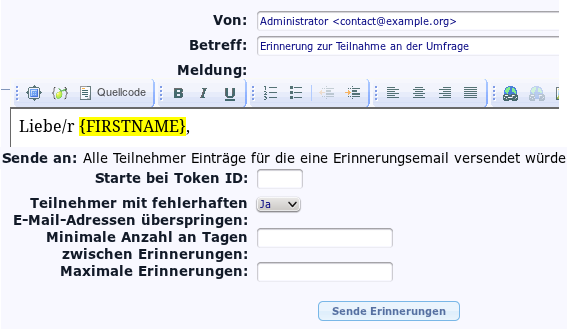
Sie können Zugangsschlüssel, deren E-Mail-Status-Feld einen anderen Wert als "OK" hat überspringen, indem sie "Teilnehmer mit fehlerhaften E-Mail-Adressen überspringen" auf "Ja" setzen.
If you wish to overcome the validity settings of all of your entries, enable the Bypass date control before sending email function. In this way, the LimeSurvey email function will not take into account the date/time range when a token would be allowed to be used.
Einladungen erneut senden
Manchmal kann es vorkommen, dass Sie einer Person eine Einladung erneut senden möchten. Die Sende E-Mail Einladungen-Funktion sendet nur E-Mail-Adressen eine Einladung, die vorher noch keine Einladung erhalten haben. Das bedeutet, nur neue Einträge in die Liste würden auch eine neue Einladung bekommen.
Darum muss, falls eine erneute Einladung gewünscht ist, vor der Anwendung von Sende E-Mail Einladungen das Feld Einladung gesendet? des jeweiligen Probanden auf "N" gesetzt werden.
Send email reminder
Sends bulk email reminders to all the participants from the survey participants table who have not yet responded, but have been sent their first invitation.
Beim Senden von Erinnerungs-Mails können Sie:
- Zugangsschlüssel mit nicht funktionierenden E-Mail-Adressen umgehen
- Zugangsschlüssel überspringen, die vor kurzem eine Erinnerung gesendet bekommen haben.
- Zugangsschlüssel überspringen, die bereits eine bestimmte Anzahl an Erinnerungen erhalten haben.
E-Mails in Ladungen verschicken
Wenn Sie viele E-Mails auf einmal versenden müssen, dann wird LimeSurvey nur eine bestimmte Menge von "N"-E-Mails versenden (Die Anzahl ist vom Administrator in der config.php Datei festgelegt).
Bestätigungs-E-Mails
Falls Sie Zuganggschlüssel benutzen und ein Proband die Umfrage abschließt, wird ihr/ihm eine Bestätigungs-E-Mail gesendet.
Falls Sie keine Bestätigungs-E-Mail senden wollen, deaktivieren Sie dies einfach in den Generellen Umfrageeinstellungen.
Start bounce processing
When sending an email, the LimeSurvey email bounce tracking system automatically adds a survey-id and token-id to the mail header without the notice of the survey administrator. These "custom headers" are added to each invitation email that is sent through your LimeSurvey installation to the survey participants. When the email is bounced back, the original header along with the "Delivery notification" header is received. Then, the system checks for new emails and parses the emails that have these custom headers and mark the wrong email address in the survey participants table.
Bounce settings
The following options are available:
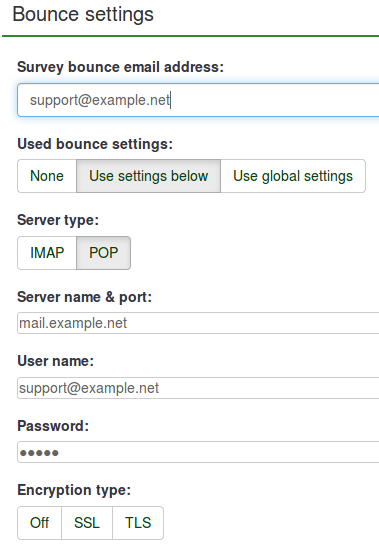
For a short description of each field, check the following wiki section. If you wish to use the LimeSurvey installation global settings, go to the Used bounce settings and select the Use global settings option.
Bitte werfen Sie auch einen Blick auf die Seite Email Bounce Tracking System, um mehr Informationen darüber zu erhalten, wie man dieses Feature richtig konfiguriert.
Edit email templates
To find out more about what placeholders you can use or how you can edit the LimeSurvey email templates, read our wiki section on email templates.
Generate tokens
With the help of this function, unique tokens can be created for all the individual entries from the survey participants table that have not yet received a token code:

View in CPDB
The last option located on the tokens management toolbar is the View in CPDB option. This allows the survey administrator to see the common users that exist in both the central participant database and survey participants list.
For example, we have the following survey participants list:

The users with ID 1 and 2 have been shared from the central participant database. To check this, go to the survey participants table management toolbar and click on View in CPDB

As you can see, the View in CPDB function basically applies a filter in order to determine which users from the CPDB are present in the respective survey.
Delete table
If you would like to delete your survey participants table, click on the Display participants button and look for the Delete participants table button located in the upper-right part of the screen.

A window will pop up, asking for the final confirmation:

Please note that this will not delete the table from your LimeSurvey installation. A backup will be created. In order to access it, you need system administrator rights.
If you do wish to completely remove it, use the check data integrity option that is located in the Configuration dialog.
Additional hints & tips
Feel free to add any hints and tips below. The ones below were posted by the members of our community:
- Allowing public registration
- Captchas in public registration
- Can a survey using tokens ensure anonymous responses?
- A tip for generating a large number of fake e-mail addresses
- Spam problems
- Pseudonymised participation
Öffentliche Registrierung erlauben
Falls sie ihre Umfrage öffentlich zugänglich machen wollen und dennoch die Kontrolle über die Umfrage-Teilnehmer behalten wollen, bietet sich die Möglichkeit an, dass sie "Offene Registrierungen" erlauben. Diese Einstellung müssen sie in den Umfrageeinstellungen im Tab 'Zugangsschlüssel' vornehmen. Im Falle der "Offenen Registrierung" müssen sich Besucher ihrer Umfrageseite ohne gültigen Zugangsschlüssel, bevor sie teilnehmen können, registrieren. Nach Angabe des Namen und einer E-Mail-Adresse, welche noch nicht in der Probandentabelle vorhanden ist, wird ein neuer Eintrag in der Probandentabelle erstellt und dem entsprechenden Benutzer wird eine E-Mail mit einem eindeutigen Zugangsschlüssel zugesendet. All jene Benutzer, welche über die Offene Registrierung teilnehmen, wird ein R beim Zugangsschlüssel vorangestellt.
If they provide an email address that is not already in the current database, an entry in the survey participants table will be created and they will be emailed an invitation containing their unique token code. All tokens provided to "registering" visitors will begin with the letter "R".
CAPTCHAs bei öffentlicher Registrierung
Damit die Laden- und Speichern-Funktion, sowie die öffentliche Registrierung nicht von automatisieren BOTs ausgenützt werden können werden sie seit Version v1.48 mit CAPTCHAs gesichert. Dieses Funktion ist jedoch nur verfügbar, wenn die GD-Unterstützung in der PHP-Konfiguration aktiviert ist - siehe Mindestvoraussetzungen Installationsanleitung
Kann Anonymität gewährleistet werden, wenn man Zugangsschlüssel benutzt?
Ja - eine Verbindung Probandenschlüssel <--> Antwortdaten kann nur bei Umfragen hergestellt werden, welche als "nicht anonym" angelegt wurden. Diese Einstellung wird beim Erstellen einer Umfrage festgelegt. Wenn nun eine Umfrage als nicht anonym angelegt wurde, kann man über die Probandenliste jede einzelne Antwort genau nachverfolgen. Ist eine Umfrage anonym, gibt es keine Verknüpfung zwischen der Probandenliste und den Umfrage-Antworten.
To enable or disable anonymized responses, check the participant settings wiki section.
Tipp zum generieren einer großen Anzahl von Fake-E-Mail-Adressen
Es kann vorkommen, dass Sie ein große Anzahl an falschen E-Mail-Adressen und Zugangsschlüsseln benötigen. Sie können dafür ein Tabellenkalkulationsprogramm wie OpenOffice Calc verwenden: Angenommen, Sie wollen tausende Adressen nach dem Schema: 1@test.de, 2@test.de, 3@test.de... Füllen Sie beliebig viele aufeinander folgende Nummern in Spalte A ein, indem Sie in A1 die "1" eintragen und in A2: '=A1+1'. Ziehen Sie nun das kleine Kästchen in der rechten, unteren Ecke des Kästchens so weit nach unten, wie Sie Adressen benötigen. In B1 benutzen Sie die Funktion "Verketten": '=VERKETTEN(A1;"@test.de")' und ziehen es ebenso wie in Spalte A nach unten. Auf ähnliche Weise lassen sich auch Namen generieren. Abschließend müssen Sie die Datei nur noch als .csv abspeichern.
With the launch of LimeSurvey 1.91, you can use the "Generate dummy token" functionality. However, the dummy entries do not contain any email address.
Spam problems
Häufig beschweren sich Umfrageteilnehmer über nicht empfangene Einladungs- oder Erinnerungsemails, da ihr Spamfilter diese als Spam markiert.
Ob eine Email als Spam eingeordnet wird, hängt vom genutzten Spamfilter und dessen spezifischen Einstellungen ab. Allgemein werden Absenderadresse, Betreff Inhalt der Email analysiert, so dass es mehrere Möglichkeiten gibt, auf die Einordnung der Emails Einfluss zu nehmen.
Der Blog-Post "How to prevent Limesurvey email invitations or reminders being treated as spam" auf Limesurvey-Consulting.com listet eine Vielzahl möglicher Ursachen von Spamproblemen und zeigt verschiedene Lösungsansätze auf.
Limesurvey versucht die URL für die Links in Einladungs- und Erinnerungsemails automatisch zu bestimmen auf Basis der URL, die beim Einloggen in Limesurvey genutzt wird. Bei einer falschen Serverkonfiguration kann es hier jedoch zu Fehlern kommen, so dass diese Links manuell angepasst werden müssen.
In der Datei application/config/config.php kann die Basis-URL manuell angepasst werden. Hierzu bitte die 'hostInfo'-Einstellungen im vorhandenen 'components'-Array wie folgt honzufügen:
    'components' => array(
       ...
       'request' => array(
           'hostInfo' => 'http://www.beispieldomain.de',
       ),
   )
Das Problem basiert darauf, dass Limesurvey die Domain auf Basis der PHP-Variable $_SERVER['HTTP_HOST'] oder $_SERVER['SERVER_NAME'] zu bestimmen versucht
Einige Webserver stellen diese Daten - z. B. bei falscher Konfiguration - nicht korrekt zur Verfügung.
Pseudonymised participation
With the dummy tokens you may create a form of pseudonymised participation by exporting the created dummy tokens and then combining them with your participant list externally. That way, LimeSurvey can be used as a survey platform without putting personal information of your participants into the system.
The only downside is, that you will have to distribute the participation tokens yourself.

