Setting conditions: Difference between revisions
From LimeSurvey Manual
No edit summary |
(Marked this version for translation) |
||
| (105 intermediate revisions by 6 users not shown) | |||
| Line 1: | Line 1: | ||
<languages /> <translate> | |||
<!--T:1--> | |||
__TOC__ | __TOC__ | ||
=Overview of Conditions in LimeSurvey= <!--T:8--> | |||
<!--T:9--> | |||
LimeSurvey has a very powerful logical branching feature. It can be accessed by clicking on the '''Set conditions''' button - [[File:conditions_icon.png]] - located on each [[Question toolbar options|question bar]]. | |||
LimeSurvey has a very powerful logical branching feature. [[File:conditions_icon.png]] | |||
<!--T:10--> | |||
In this chapter we will describe: | In this chapter we will describe: | ||
* what conditions | * what conditions you can find in LimeSurvey | ||
* what you can and can't do with conditions | * what you can and can't do with conditions | ||
* what steps you need to learn to | * what steps you need to learn to set up simple or more complex conditions | ||
<!--T:11--> | |||
For step-by-step video instructions check out [http://www.youtube.com/watch?v=oexr0z-eo9U this tutorial] or download the condition sample survey: [[Media:LimeSurvey_Survey_Setting_Conditions.zip|LimeSurvey_Survey_Setting_Conditions.zip]]. | |||
<!--T:238--> | |||
{{Hint|Text=The conditions functionalities work like a GUI for [[Expression Manager|the expressions and equations that can be applied to questions]], allowing the users to easily increase the complexity of their surveys without getting into expressions and relevance equations. However, [[Expression Manager|the Expression Manager]] must be studied/known to increase the range of options that is available within LimeSurvey.}} | |||
==Hide/Show Branching Versus Jump Branching== <!--T:12--> | |||
You can design logical branching with LimeSurvey, | <!--T:13--> | ||
You can design logical branching with LimeSurvey, which means that you can decide that some questions will be displayed only if some conditions are met like "Show question X if the answer to question Y was Z". | |||
<!--T:14--> | |||
Our approach is to implement a '''Hide/Show Branching Logic''': | Our approach is to implement a '''Hide/Show Branching Logic''': | ||
* you can define a condition or a set of conditions on each question of your survey | * you can define a condition or a set of conditions on each question of your survey - if the condition is met, the question will be then displayed: | ||
<!--T:182--> | |||
<center>[[File:simple-condition-on-yes-question.png]]</center> | |||
<!--T:15--> | |||
<div class='simplebox'> [[File:help.png]] Simply put: | |||
* a question without a condition defined on it will always be displayed; | |||
* a question with a condition defined on it will not be displayed unless the condition is met.</div> | |||
<!--T:16--> | |||
This approach is different from the '''Jump Branching Logic''' that is sometimes implemented by other software. In the '''Jump Branching Logic''', the resulting action of a met condition would be to jump to another question (that is to say hide all questions in between). '''LimeSurvey doesn't implement this Jump Branching Logic''' method. Instead, if you wish to jump a series of questions, you should simply set the same condition on all the questions you do not wish to be displayed. For example, if the jump condition you want to set on Question2 is "Jump to Question5 if the answer to Question1 is 'Yes'", you can simply: | |||
*set a condition on questions 2, 3 and 4 to only display "if the answer to Question1 was '''NOT''' 'Yes'" | |||
<!--T:17--> | |||
LimeSurvey makes setting the same condition on multiple questions (and thus implementing '''Jump Branching Logic''') easy by allowing you to "copy" a condition from one question to a series of others. In the above example, you would begin by setting the condition on Question2, then from the same screen, you would copy that condition to Question3 and Question4. | |||
<!--T:191--> | |||
<div class='simplebox'> [[File:help.png]] To find out more details on how you can copy conditions within LimeSurvey, please continue reading the following [[Setting conditions#How to copy conditions|wiki section]].</div> | |||
==Supported Types of Conditions== <!--T:18--> | |||
<!--T:19--> | |||
Basically, a condition can compare values, returning either true or false. | |||
<!--T:20--> | |||
The values that can be compared are '''answers to previous questions'''. For instance, if you answer 'Yes' to Question1, Question2 will then be showed to the survey respondent: | |||
<!--T:21--> | |||
<center>[[File:Questions_example_set_conditions_y.png]]</center> | |||
<!--T:183--> | |||
<hr width="50%" style="margin:auto"> | |||
<!--T:22--> | |||
At this point, it is important to understand what is considered an eligible question-entry for the condition editor. | |||
A ''question-entry'' is either: | <!--T:23--> | ||
A '''question-entry''' is either: | |||
* a simple question (for all question types apart from Array questions) | * a simple question (for all question types apart from Array questions) | ||
** for instance: text questions, radio or dropdown lists, and even multiple choices questions | ** for instance: text questions, radio or dropdown lists, and even multiple choices questions | ||
* or a row in Array questions (except for Array dual scale and Array | * or a row in Array questions (except for Array dual scale and Array multiple flexible questions) | ||
** for instance: | ** for instance: array with 5 radio buttons or array with label questions | ||
* or either the left part or the right part of an Array dual scale question | * or either the left part or the right part of an Array dual scale question | ||
* or each cell of an Array | * or each cell of an Array flexible question | ||
<!--T:192--> | |||
{{Note|Check the following [[Question types|link]] to find out more about the available question types in LimeSurvey.}} | |||
<!--T:24--> | |||
* '''constant values''' | * '''constant values''' | ||
** for instance: " | ** for instance: "If you answered more than 18 years to the question below" | ||
[[File:simple-condition-on- | <!--T:184--> | ||
<center>[[File:simple-condition-on-numerical-question.png]]</center> | |||
Several comparison operators are supported from the simple "equals" | |||
* The basic ones | <!--T:25--> | ||
* The greater/less than operator family is also available, and is usually | * '''Participants' profile data:''' To use data from the survey participants table, "Anonymized responses" must be set to '''NO'''. This option can be found in survey [[Participant settings|participant settings]] panel. | ||
** Please note that comparisons on numeric fields | |||
** If you're using a question entry whose type is text, | |||
<!--T:26--> | |||
<center>[[File:simple-condition-on-token.png]]</center> | |||
<!--T:239--> | |||
<hr width="50%" style="margin:auto"> | |||
<!--T:27--> | |||
Several comparison operators are supported - from the simple "equals" to the advanced "regular expression": | |||
* The basic ones refer to the "equal" and "not equal to" operations | |||
* The ''greater/less than'' operator family is also available, and is usually used when using numeric question-entries | |||
** Please note that comparisons on numeric fields make use of the numeric order. For instance, 2 < 10 | |||
** If you're using a question entry whose type is text, the condition could be evaluated as "2" > "10" (string order)! | |||
** Numeric questions, as well as text questions (when they have the 'numbers_only' attribute set), will use the numeric order for comparisons | ** Numeric questions, as well as text questions (when they have the 'numbers_only' attribute set), will use the numeric order for comparisons | ||
* An advanced comparison operator using regular expressions is also available | * An advanced comparison operator using regular expressions is also available (don't panic! If you don't know what this means, then you don't need it) | ||
** the pattern is '''not''' to be enclosed in '/' characters | ** the pattern is '''not''' to be enclosed in '/' characters | ||
** for instance | ** for instance: '''[a-zA-Z]$''' | ||
==How can I combine conditions== | ==How can I combine conditions?== <!--T:28--> | ||
<!--T:30--> | |||
You can '''build complex conditions''' by '''combining simple conditions''' with the '''AND '''and '''OR '''logical operators. | You can '''build complex conditions''' by '''combining simple conditions''' with the '''AND '''and '''OR '''logical operators. | ||
We'll talk about complex conditions later, | <!--T:29--> | ||
<center>[[File:simple-conditions-combination.png]]</center> | |||
<!--T:31--> | |||
However, it is important to understand that '''LimeSurvey automatically determines which logical operator to apply'''. This means that the use of the '''OR '''or '''AND '''operators is determined '''according to the context''' of the condition. In the above example, there is only one scenario. This means that LimeSurvey makes use of [https://en.wikipedia.org/wiki/Boolean_algebra Boolean algebra], which means that operator '''or''' is "computed" first. | |||
<!--T:32--> | |||
We'll talk more about complex conditions [[Setting_conditions#The usage of scenarios - Using ORed conditions between different questions|later]]. Let's first focus together on the elementary ones. | |||
=The conditions designer= <!--T:34--> | |||
<!--T:193--> | |||
First, you need to access the [[Question toolbar options#The question toolbar|conditions designer]]. To do that, click on the question you wish to apply the condition to: | |||
<!--T:194--> | |||
<center>[[File:Question designer search question.png]]</center> | |||
<!--T:195--> | |||
Now, look for the '''Set conditions''' button located on the top question bar: | |||
<!--T:196--> | |||
<center>[[File:Question designer set conditions.png]]</center> | |||
<!--T:197--> | |||
Once accessed, the following page will be displayed: | |||
<!--T:198--> | |||
<center>[[File:Question designer top.png]]</center> | |||
<!--T:199--> | |||
The conditions designer panel can be divided into three sections: | |||
* [[Setting conditions#The conditions designer toolbar|The conditions designer toolbar]] | |||
* [[Setting conditions#Overview of the existent conditions|The current existent question conditions]] | |||
* [[Setting conditions#Add/Edit conditions|Add/edit condition menu]] | |||
==The conditions designer toolbar== <!--T:200--> | |||
<!--T:201--> | |||
You may find on the toolbar the following options: | |||
<!--T:240--> | |||
<center>[[File:Show conditions designer toolbar.png]]</center> | |||
<!--T:203--> | |||
*'''Show conditions for this question''': Click on this button to get a quick overview of the current existent conditions that are applied to your question. | |||
<!--T:204--> | |||
*'''Add and edit conditions''': It represents the default page that opens automatically once you click the '''Set conditions''' button. It is divided in two parts: (1) a table displaying all the existent conditions and scenarios, and (2) the [[Setting conditions#Add/Edit conditions|add/edit conditions menu]]. | |||
<!--T:205--> | |||
*'''Copy conditions''': Sometimes, you wish to apply the same condition to X questions in order to get questionY displayed at the end. For this, click on '''Copy conditions'''. A new window will open displaying the current existent conditions added to your question (let's call it question3). To add them to question5, check the desired conditions you wish to be copied, select question5, and click on the '''Copy conditions''' button located on the bottom left part of the panel. For further information, please continue reading the following [[Setting conditions#How to copy conditions|wiki section]]. | |||
<!--T:207--> | |||
*'''Save and close''': Once you are done with the changes, click '''Save and close''' to get your conditions saved. | |||
<!--T:208--> | |||
*'''Move to question''': In order not to leave the conditions designer panel while moving to another question, use the following option to select from the dropdown list the next question you wish to apply conditions to. Please note that the dropdown list displays the questions that are displayed in the survey before and after the current question. | |||
<!--T:209--> | |||
*'''Close''': If you wish to exit the panel without performing any changes, you can either go straight to the settings/structure tab and select the desired option or click '''Close''', which is located in the upper right of the screen. | |||
==Overview of the existent conditions== <!--T:210--> | |||
<!--T:211--> | |||
This section displays a table that contains all the existent scenarios and conditions of a question. Certain actions can be performed from here: | |||
<!--T:213--> | |||
<center>[[FIle:Show conditions for this questions pic.png]]</center> | |||
<!--T:241--> | |||
*In the top right part, three actions are available: | |||
**Quick-add conditions - it fastens the process of adding conditions (read [[Setting conditions#Add/Edit conditions|below]] to learn about all the options) | |||
**Renumber scenarios - if clicked, the scenarios will be renumbered with incremental numbers beginning from one. Please note that this option is displayed only if two or more scenarios are applied to your question. | |||
**Delete all conditions - you can delete via this action all the current existent conditions and scenarios applied to your question. | |||
<!--T:242--> | |||
<center>[[FIle:Conditions designer quickadd and delete.png]]</center> | |||
<!--T:243--> | |||
*Besides the id number of each scenario there are three buttons that allow you to perform the following actions: | |||
**Delete scenario | |||
**Change scenario number | |||
**Add condition to this scenario - click on this button to add another condition to the desired scenario | |||
<!--T:244--> | |||
<center>[[FIle:Conditions Designer table scenarios.png]]</center> | |||
<!--T:245--> | |||
*Two actions can be performed on each condition: | |||
**Delete condition | |||
**Edit condition - if clicked, you will be able to edit the condition from the [[Setting conditions#Add/Edit conditions|conditions menu]] | |||
<!--T:246--> | |||
<center>[[FIle:Conditions Designer table conditions.png]]</center> | |||
==Add/Edit conditions== <!--T:215--> | |||
<!--T:216--> | |||
The bottom part of the screen is allocated to the Add/edit conditions menu: | |||
<!--T:217--> | |||
<center>[[File:Add_edit_condition_q.png]]</center> | |||
= | <!--T:247--> | ||
<div class='simplebox'> You can also edit the condition from the same location if you pressed before on the green pencil that corresponds to the question you wish to be edited (see the [[Setting conditions#Overview of the existent conditions|conditions and scenarios table]]).</div> | |||
<!--T:218--> | |||
To understand how the conditions feature works in LimeSurvey, we will first present the elementary conditions. | |||
[[File: | <!--T:38--> | ||
<div class='simplebox'>[[File:help.png]] '''Note''': For the moment '''don't modify the default scenario''' ([[File:default_scenario.png]]) that is automatically selected in the condition addition form. It will be covered later within this [[Setting conditions#The usage of scenarios - Using ORed conditions between different questions|wiki section]].</div> | |||
==Definition of elementary conditions== | ===Definition of elementary conditions=== <!--T:39--> | ||
<!--T:40--> | |||
An elementary condition is simply a single condition '''without any OR or AND''' logical operators. | An elementary condition is simply a single condition '''without any OR or AND''' logical operators. | ||
<!--T:41--> | |||
It is composed by: | It is composed by: | ||
* a left operand: the ''tested value'' | * a left operand: the ''tested value''. You can choose the ''tested value'' type by selecting the appropriate tab in the condition editor. It can either be a previous question or a [[Survey participants|survey participant]] attribute. | ||
<!--T:185--> | |||
<center>[[File:edit-conditions-testedvalueTab.png]]</center> | |||
<!--T:248--> | |||
If you select a question-entry (from the '''Previous questions''' tab) and if this question uses predefined answers, then the corresponding predefined answers are displayed under the '''Predefined''' tab of the comparison value selection. | |||
<!--T:249--> | |||
<div class='simplebox'> [[File:help.png]] Note that in order to use the Token your survey must: | |||
*not use [[Participant settings|anonymous answers]] | |||
*use a [[Survey participants|survey participants table]] and [[Participant settings|closed access]].</div> | |||
<!--T:42--> | |||
* a ''comparison operator''. Choose the ''comparison operator'' you want to apply from the dropdown list (''less than'', ''less than or equal to'', ''equals'', ''not equal to'', ''greater than or equal to'', ''greater than'', ''[[Expression Manager|regular expression]]''). | |||
<!--T:43--> | |||
* a ''comparison | * a right operand: the ''comparison value''. You can choose the ''comparison value'' type by selecting the appropriate tab in the condition editor. When you create a condition, you can select as the comparison value a predefined value (answer), a constant, a question, a survey participant attribute, or a regular expression: | ||
[[File:edit-conditions-comparisonvalueTab.png]] | <!--T:44--> | ||
<center>[[File:edit-conditions-comparisonvalueTab.png]]</center> | |||
==Example of elementary conditions and how to create them== | ===Example of elementary conditions and how to create them=== <!--T:219--> | ||
* Show | |||
** ''tested value'' = answer to | |||
<!--T:45--> | |||
* Show Question 'AAMN' '''if''' "the answer to Question 'Gender' is the predefined answer 'Male'" | |||
** ''tested value'' = answer to Question 'Gender' | |||
** ''comparison operator'' = equals | ** ''comparison operator'' = equals | ||
** ''comparison value'' = answer code | ** ''comparison value'' = predefined answer code (the 'Male' answer in this case) | ||
<!--T:187--> | |||
<center>[[File:edit-simple-condition-predefanswer.png]]</center> | |||
<!--T:46--> | |||
* Show | * Show Question 'Alcohol' '''if''' "the answer to Question 'Age' is greater or equal than the numerical value '18'" | ||
** ''tested value''= answer to | ** ''tested value'' = answer to Question 'Age' | ||
** ''comparison operator''= greater than | ** ''comparison operator'' = greater than or equal to | ||
** ''comparison value''= the constant value | ** ''comparison value'' = the constant value '18' | ||
< | <!--T:47--> | ||
<center>[[File:edit-simple-condition-constant.png]]</center> | |||
<!--T:48--> | |||
{{Alert|title=Attention|text=When using a constant 'comparison value' for a date question, regardless of the date format set in your survey, you must use the YYYY-MM-DD date format.}} | |||
<!--T:220--> | |||
* Show Question 'Alcohol' '''if''' "the answer to Question 'BirthDate' is greater than 2000-01-01'''" | |||
** ''tested value'' = answer to Question 'BirthDate' | |||
** ''comparison operator'' = Greater than or equal to | |||
** ''comparison value'' = '2000-01-01' (the format in the constant field: 2000-01-01) | |||
<!--T:188--> | |||
<center>[[File:Date time example condition.png]]</center> | |||
<!--T:49--> | |||
* Show Question 'Alcohol' '''if''' "the the 'DrinkingHistory' [[Survey participants|participant's attribute]]" matches the 'Yes' string. | |||
** ''tested value''= the 'DrinkingHistory' value taken from the [[Survey participants#Manage attributes|survey participants table]] | |||
** ''comparison operator'' = equals | |||
** ''comparison value'' = the constant value 'Yes' | |||
<!--T:50--> | |||
<center>[[File:edit-simple-condition-leftToken.png]]</center> | |||
=Conditions and scenarios in LimeSurvey= <!--T:250--> | |||
==Default condition combinations== <!--T:52--> | |||
<!--T:53--> | |||
As said earlier, LimeSurvey automatically decides which logical operator (AND or OR) should be applied between conditions depending on the 'context'. | As said earlier, LimeSurvey automatically decides which logical operator (AND or OR) should be applied between conditions depending on the 'context'. | ||
<!--T:54--> | |||
Note also that '''the order in which you define your elementary conditions is not relevant''' as LimeSurvey will automatically reorder them according to its own logic. | Note also that '''the order in which you define your elementary conditions is not relevant''' as LimeSurvey will automatically reorder them according to its own logic. | ||
Let's study this in detail. | <!--T:55--> | ||
Let's study this in detail. Two rules should be always remembered: | |||
* [[Setting conditions#First rule: conditions having the same tested value are ORed together|First rule]]: conditions having the same ''tested value'' are ORed together | |||
* [[Setting conditions#Second rule: conditions having different tested value are ANDed together|Second rule]]: conditions having different tested value are ANDed together | |||
===First rule: conditions having the same ''tested value'' are ORed together=== <!--T:56--> | |||
<!--T:57--> | |||
When you have several conditions, they are '''ORed''' together if they share the same '''tested value'''. This is the case if the condition applies to several answers belonging to one single question. For example, a condition was applied below to three answers belonging to the same question - if answer to Question 'FavColour' equals 'green' '''OR''' answer to Question 'FavColour' equals 'red' '''OR''' answer to Question 'FavColour' equals 'blue', then Question 'BirthDate' will be displayed to the survey respondent: | |||
<!--T:58--> | |||
<center>[[File:edit-conditions-naturalOr-edit.png]] | |||
<!--T:221--> | |||
[[File:edit-conditions-naturalOr-result.png]]</center> | |||
<!--T:222--> | |||
<div class='simplebox'>[[File:help.png]] Note: To select multiple predefined answers, don't forget to hold the Shift or Ctrl key while selecting the '''tested values'''.</div> | |||
===Second rule: conditions having different ''tested value'' are ANDed together=== <!--T:59--> | |||
<!--T:60--> | |||
When you have several conditions, they are '''ANDed''' together if they don't share the same '''tested values'''. For example, you may see below the case for several conditions based on different previous questions - "If answer to Question 'Alcohol' equals 'Y' answer '''AND''' answer to Question 'Gender' equals 'F'", then Question 'Alcoholconsumption' will be displayed to the survey respondent: | |||
<!--T:61--> | |||
<center>[[File:edit-conditions-naturalAND-editA.png]] | |||
<!--T:223--> | |||
[[File:edit-conditions-naturalAND-editB.png]] </center> | |||
<!--T:224--> | |||
<center>[[File:edit-conditions-naturalAND-result.png]]</center> | |||
== | ===The multiple options questions=== <!--T:66--> | ||
<!--T:67--> | |||
<div class='simplebox'>[[File:help.png]] '''Note:''' This paragraph applies to ''Multiple options'' and ''Multiple options with comments'' questions, and not to ''Array Multiple Flexible (number) with checkbox layout'' questions (in case of the latter, each checkbox is a separate question-entry and is not really handled as other multiple options question-types).</div> | |||
<!--T:69--> | |||
The ''Multiple choice'' and ''Multiple choice with comments'' question types will be displayed in two flavors: | |||
* a ''Group of checkboxes'' flavor which let you set conditions on all possible answers of the respective question; | |||
* a set of ''Single checkbox'' entries which lets you set conditions on each checkbox individually. | |||
[[File:edit-conditions-MultipleOptions1.png]] | <!--T:68--> | ||
<center>[[File:edit-conditions-MultipleOptions1.png]]</center> | |||
====The group of checkboxes flavour==== <!--T:225--> | |||
. | <!--T:226--> | ||
Now, let's focus on an example to better understand the difference between the two flavours. Let's imagine that we wish to display the 'Pointchoice' Question only if the respondent checks at least one of the ''tested answers'' listed under the 'MultipleOrganizations' Question. | |||
. | <!--T:227--> | ||
As mentioned above, the group of checkboxes flavor allows you to set conditions on all possible answers of the respective question. Therefore, only the options that refer to responsibilities are selected as '''comparison values''' below: | |||
<!--T:228--> | |||
<center>[[File:edit-conditions-MultipleOptionsOR.png]]</center> | |||
<!--T:229--> | |||
As we can observe, the conditions get ORed due to the ''Group of checkboxes'' flavour selected in the beginning.: | |||
[[File:edit-conditions- | <!--T:230--> | ||
<center>[[File:edit-conditions-MultipleOptionsOR-result.png]]</center> | |||
= | ====ANDing conditions in multiple choice questions==== <!--T:231--> | ||
<!--T:232--> | |||
Now, let's focus on a similar example. However, we are looking this time only for the most active members to ask them further questions. To do this, we make use of the '''Single checkbox''' flavour which allows you to set conditions based on each checkbox individually. | |||
<!--T:233--> | |||
In this example, question X will be displayed if ''A'' and ''B'' are checked: | |||
<!--T:79--> | |||
<center>[[File:edit-conditions-MultipleOptionsAND2.png]]</center> | |||
<!--T:251--> | |||
<center>[[File:edit-conditions-MultipleOptionsAND3.png]]</center> | |||
<!--T:234--> | |||
Once done, you can observe that the two conditions are ANDed now. | |||
[[File:edit-conditions- | <!--T:80--> | ||
<center>[[File:edit-conditions-MultipleOptionsAND-result.png]]</center> | |||
The | <!--T:235--> | ||
This means that your question will not be displayed unless both tested values (the selected subquestions) are met. | |||
==The usage of scenarios - Using ORed conditions between different questions== <!--T:81--> | |||
<!--T:82--> | |||
Now, you may argue that sometimes you need to have '''ORed''' conditions even when they are set on different questions (that is to say on different '''tested values'''). This is why we got scenarios! | |||
===Definition of a scenario=== <!--T:84--> | |||
[[ | <!--T:85--> | ||
A scenario is simply '''a manual grouping of conditions''' in which some conditions are evaluated independently of other conditions from other scenarios. The complex condition resulting in this association of several scenarios will be met only if one scenario is met. In other words, scenarios are '''logical grouping of conditions''', respecting the above [[Setting conditions#Default condition combinations|rules]], and '''which are ORed together''' to build complex conditions. | |||
<!--T:86--> | |||
Everything described above applies to the conditions located in every scenario. By default, all the new conditions are created inside the ''Default Scenario'', which uses number '1' as its identifier. When you create new conditions, you can choose whether they are added to the default scenario or not. To change the scenario, just use another identifier. | |||
===Adding a question to another scenario=== <!--T:89--> | |||
<!--T:90--> | |||
When you create (or edit) a condition, you can modify the scenario in which the condition is stored by simply clicking on the add scenario button: | |||
<!--T:91--> | |||
<center>[[File:edit-conditions-EditorView-Scenario.png]]</center> | |||
<!--T:92--> | |||
As you can observe, the default scenario uses as identifier '1'. To add conditions to different scenarios, change the identifier by typing a different number in the box. | |||
<!--T:93--> | |||
The number id of a scenario has no importance and different scenarios can have non-continuous ids. | The number id of a scenario has no importance and different scenarios can have non-continuous ids. | ||
<!--T:252--> | |||
<center>[[File:Conditions test ids.png]]</center> | |||
<!--T:132--> | |||
You can change the number assigned to a scenario by clicking this Icon [[File:scenario_edit.png]] and assigning the new id to the scenario. | |||
<!--T:133--> | |||
<center>[[File:edit_scenario_conditions.png]]</center> | |||
<!--T:135--> | |||
<div class='simplebox'> [[File:help.png]] '''Note:''' As said above, scenario numbers have no impact in the way conditions are evaluated. However, modifying the scenario numbers are needed in order to: | |||
* decide in which order the scenarios are displayed when using the printable version of a survey | |||
* merge conditions from two scenarios (in order to merge scenario 10 with scenario 1, just renumber scenario 10, so that it is scenario 1).</div> | |||
===Example: creating three scenarios=== <!--T:236--> | |||
<!--T:253--> | |||
To create three scenarios, you need at least three conditions and to add to each of them a different scenario id. Once done, the scenarios are going to be connected among themselves via the 'OR' operator. For example, it could look like this: | |||
<!--T:94--> | |||
<center>[[File:edit-conditions-EditorView-Scenario2.png]]</center> | |||
== AND vs OR in the same scenario== <!--T:254--> | |||
<!--T:255--> | |||
You may end up in certain cases with AND and OR logical operators in the same scenario: | |||
[[File: | <!--T:256--> | ||
<center>[[File:And vs OR example.png]]</center> | |||
<!--T:257--> | |||
LimeSurvey will always apply first OR. For further details on this, you may check the following Wikipedia article on [https://en.wikipedia.org/wiki/Boolean_algebra Boolean algebra]. | |||
<!--T:258--> | |||
However. the order of operations can also be observed in the Relevance equation field. For the above example, the relevance equation is highlighted below: | |||
<!--T:259--> | |||
<center>[[File:AND vs OR relevance eq.png]]</center> | |||
<!--T:260--> | |||
As it can be observed, a set of extra parentheses is added for the OR logical operations in order to let the software know that it must be "computed" first. | |||
<!--T:261--> | |||
<div class='simplebox'> [[File:help.png]] '''Help:''' For more information on relevance equations, check the [[Expression Manager]] and [[QS:Relevance|relevance equation]] wiki sections. </div> | |||
= | =How to copy conditions= <!--T:262--> | ||
<!--T:263--> | |||
The copy conditions functionality can be used when you wish to apply the same set of conditions you applied to Question5 to Question10. In this way, you will not have to manually recreate the conditions you applied to the previous question(s). | |||
<!--T:264--> | |||
To start copying conditions, you first have to select the question the condition(s) is/are applied to (Question 'LowQ' in our case). Then, select the conditions you wish to be copied and select the question you wish to have the conditions added to (Question 'Alcohol' in our case). | |||
<!--T:202--> | |||
<center>[[File:Copy conditions panel.png]]</center> | |||
[[ | <!--T:265--> | ||
<div class='simplebox'>[[FIle:help.png]] '''Note:''' Conditions can only be set based on questions that appear before the question on which the condition is set.</div> | |||
<!--T:266--> | |||
Please pay attention to how the copy conditions functions work when you wish to copy and apply a set of conditions located under different scenarios to another question which uses the same or different scenario id numbers. To summarise the possible cases you might have, check the following example: | |||
<!--T:267--> | |||
* | * you wish to copy Scenario 1 - Condition A, Scenario 1- Condition B, Scenario 7 - Condition C, and Scenario 7 - Condition D from QuestionX into QuestionY | ||
* | *QuestionY already contains Scenario 1 - Condition A, Scenario - Condition C, Scenario 6 - Condition E, Scenario 8- Condition F. | ||
*Once copied, the following conditions will be applied to QuestionY: | |||
**Scenario 1: Condition A, Condition B, Condition C -> '''Condition A is not copied anymore as it already exists in QuestionY, only condition B being copied.''' | |||
**Scenario 6: Condition E -> not affected | |||
**Scenario 7: Condition C, Condition D -> '''a new scenario is created where the two conditions are added to it''' | |||
**Scenario 8: Condition F -> not affected | |||
=Reset conditions= <!--T:271--> | |||
<!--T:272--> | |||
To quickly reset all the survey conditions, click on one survey-related setting, look for '''Tools''' on the top toolbar, and click '''Reset conditions:''' | |||
<!--T:273--> | |||
<center>[[File:Reset_conditions_location.png]]</center> | |||
<!--T:274--> | |||
Next, confirm on the next page that you want to proceed and all the conditions will be deleted. | |||
=Things to watch out for= <!--T:143--> | |||
==General considerations== <!--T:144--> | |||
<!--T:145--> | |||
There are a few basic rules you should keep in mind before setting conditions on a question: | There are a few basic rules you should keep in mind before setting conditions on a question: | ||
*Once a single condition has been set for a question, that question '''will not | *Once a single condition has been set for a question, that question '''will not be displayed''' unless that condition is met. | ||
*Conditions can only be set based on questions that appear '''before''' the question on which the condition is set. | *Conditions can only be set based on questions that appear '''before''' the question on which the condition is set. | ||
*If you change the order of questions in your survey after you create conditions LimeSurvey does not warn you if the changed order will break | *If you change the order of questions in your survey after you create conditions, LimeSurvey does not warn you if the changed order will break any of your conditions. You should always put aside the creation of conditions until you are satisfied with the order of questions and groups in your survey. | ||
*You can modify conditions even after a survey has been activated. This should be done with caution, as there is no "consistency checking" applied here. | *You can modify conditions even after a survey has been activated. This should be done with caution, as there is no "consistency checking" applied here. | ||
==Conditions using the 'no answer' predefined answer== <!--T:146--> | |||
<!--T:147--> | |||
<center>[[File:noanswer_conditions.png]]</center> | |||
<!--T:148--> | |||
Setting the following condition "Show question 'FavColour' if the answer to the question 'Gender' is 'no answer'" really means "show question 'FavColour' if question 'Gender' was displayed to the survey participant who did not submit answer". | |||
<!--T:268--> | |||
{{Hint|Text=To have the no answer option displayed as a predefined answer, the question cannot be [[QS:Mandatory|mandatory]].}} | |||
==Chained conditions== <!--T:149--> | |||
<!--T:150--> | |||
If you set conditions on a question that, itself, has conditions, you could end up with your survey behaving in ways you might not have predicted. For example, a typical side-effect is that if you hide all questions in a group with chained conditions, the group header will still be shown unless you correct these conditions as explained below. | |||
<!--T:151--> | |||
<center>[[File:chained_conditions1.png]]</center> | |||
<!--T:152--> | |||
<center>[[File:chained_conditions2_bad.png]]</center> | |||
<!--T:153--> | |||
In the above example, the 'Alcohol' question is displayed if the respondent has previously answered to the 'AAMN' question 'No (N)'. However, the 'AAMN' question might not be displayed at the end if the respondent did not select to the previous question ('Gender') answer 'Male (M)'. In this scenario, no 'Alcohol' question will be displayed if 'Male (M)' was chosen previously. | |||
<!--T:269--> | |||
To have the 'Alcohol' question displayed, you have to copy the conditions from the earlier question(s) to the one you're editing. To have the 'Alcohol' question displayed, you need to set up the following set of conditions: | |||
* Show 'AAMN' if the answer to 'Gender' is 'Male (M)' | |||
* Show 'Alcohol' if answer to 'Gender' is 'Male (M)' '''and''' if answer to 'AAMN' is No (N)'. | |||
<!--T:157--> | |||
After correction, the correct set of conditions for 'Alcohol' should look like this: | |||
<!--T:158--> | |||
<center>[[File:chained_conditions2_good.png]]</center> | |||
<!--T:159--> | |||
So if you are designing a complicated survey with a large number of conditions, make sure you test the survey for as many different combinations of results as you can think of. | |||
<!--T:270--> | |||
<div class='simplebox'>[[File:help.png]] To find out more on how you can copy conditions in LimeSurvey, please scroll up or click here to continue reading the dedicates [[Setting_conditions#How_to_copy_conditions|wiki section]].</div> | |||
==Limitations and workarounds== <!--T:160--> | |||
===Progress-bar=== <!--T:161--> | |||
<!--T:162--> | |||
If you create a survey where many questions get skipped because of conditions, the progress bar either jumps over a set of questions or the survey ends at 50%. | |||
<!--T:163--> | |||
To avoid such behavior, the questions that could be skipped should be arranged between the shown questions. In this way, only one or two questions get skipped per answer. | |||
<!--T:164--> | |||
For example, based on Question1 (yes or no question), 14 questions (2A to 15A) will be displayed if the answer to Question1 is 'Yes', or 2B to 15B if the answer to Question1 was 'No'. | |||
<!--T:165--> | |||
If you arrange the questions in one group and arrange them like 2A, 2B, 3A, 3B, and so on, you will get a nearly correct progress bar, while arranging the questions like 2A, 3A, 4A, [...], 2B, 3B, 4B, ... you will get a progress bar from 0 to 50% or from 50% to 100%, depending on the answer to the first question. | |||
=== Setting a constant comparison value for a "Date" Question Type=== <!--T:166--> | |||
<!--T:167--> | |||
You have to use the internal representation of Date values (which is '''YYYY-MM-DD''') to define your constant comparison value. | |||
=== Setting conditions for "Other" Options in the Multiple Options Question Type=== <!--T:168--> | |||
<!--T:169--> | |||
In the multiple options question type, you can use the "Other" provided in the question type as a valid choice but you cannot set conditions on it. For example, Question No 1 says "Which color do you prefer to use?" Answer checkbox choices are Blue, Black and Other. If the participant chooses Blue, you can set a condition. If the participant chooses Black, you can set a different condition. '''However, if the participant chooses "Other" and types in something in the text box, there is NO way a condition can be set.''' LimeSurvey does not recognize if the participant chose the "Other" condition. This is NOT a bug but a limitation. | |||
<!--T:170--> | |||
There is no real field recorded for the 'other' checkbox for this question type. Thus, the only way to know if the user has answered the 'other' part of the question or not would be to check if the value of the text written in the other input field is empty or not. | There is no real field recorded for the 'other' checkbox for this question type. Thus, the only way to know if the user has answered the 'other' part of the question or not would be to check if the value of the text written in the other input field is empty or not. | ||
However, due to the specific way | <!--T:171--> | ||
However, due to the specific way Multiple choice questions are handled, testing the 'other' text input field has never been implemented. | |||
<!--T:172--> | |||
As a workaround, add an explicit answer option called 'Other' and do not use the built-in 'other' option of these question types. Then add an additional short text question which will be displayed if this 'Other' checkbox was clicked. | As a workaround, add an explicit answer option called 'Other' and do not use the built-in 'other' option of these question types. Then add an additional short text question which will be displayed if this 'Other' checkbox was clicked. | ||
===How to use parenthesis for the boolean expressions?=== <!--T:173--> | |||
<!--T:174--> | |||
'''''You can't!''''' | '''''You can't!''''' | ||
<!--T:175--> | |||
If you want to design something like: | If you want to design something like: | ||
<!--T:176--> | |||
''(condition1 OR condition2)'' AND ''(condition3 OR condition4)'', | |||
<!--T:177--> | |||
you'll have to set up: | you'll have to set up: | ||
(condition1 AND condition3) OR | <!--T:178--> | ||
''(condition1 AND condition3)'' OR | |||
(condition1 AND condition4) OR | <!--T:179--> | ||
''(condition1 AND condition4)'' OR | |||
(condition2 AND condition3) OR | <!--T:180--> | ||
''(condition2 AND condition3)'' OR | |||
(condition2 AND condition4) | <!--T:181--> | ||
''(condition2 AND condition4)'' | |||
</translate> | |||
Revision as of 15:54, 6 December 2018
Overview of Conditions in LimeSurvey
LimeSurvey has a very powerful logical branching feature. It can be accessed by clicking on the Set conditions button - ![]() - located on each question bar.
- located on each question bar.
In this chapter we will describe:
- what conditions you can find in LimeSurvey
- what you can and can't do with conditions
- what steps you need to learn to set up simple or more complex conditions
For step-by-step video instructions check out this tutorial or download the condition sample survey: LimeSurvey_Survey_Setting_Conditions.zip.

Hide/Show Branching Versus Jump Branching
You can design logical branching with LimeSurvey, which means that you can decide that some questions will be displayed only if some conditions are met like "Show question X if the answer to question Y was Z".
Our approach is to implement a Hide/Show Branching Logic:
- you can define a condition or a set of conditions on each question of your survey - if the condition is met, the question will be then displayed:

- a question without a condition defined on it will always be displayed;
- a question with a condition defined on it will not be displayed unless the condition is met.
This approach is different from the Jump Branching Logic that is sometimes implemented by other software. In the Jump Branching Logic, the resulting action of a met condition would be to jump to another question (that is to say hide all questions in between). LimeSurvey doesn't implement this Jump Branching Logic method. Instead, if you wish to jump a series of questions, you should simply set the same condition on all the questions you do not wish to be displayed. For example, if the jump condition you want to set on Question2 is "Jump to Question5 if the answer to Question1 is 'Yes'", you can simply:
- set a condition on questions 2, 3 and 4 to only display "if the answer to Question1 was NOT 'Yes'"
LimeSurvey makes setting the same condition on multiple questions (and thus implementing Jump Branching Logic) easy by allowing you to "copy" a condition from one question to a series of others. In the above example, you would begin by setting the condition on Question2, then from the same screen, you would copy that condition to Question3 and Question4.
Supported Types of Conditions
Basically, a condition can compare values, returning either true or false.
The values that can be compared are answers to previous questions. For instance, if you answer 'Yes' to Question1, Question2 will then be showed to the survey respondent:

At this point, it is important to understand what is considered an eligible question-entry for the condition editor.
A question-entry is either:
- a simple question (for all question types apart from Array questions)
- for instance: text questions, radio or dropdown lists, and even multiple choices questions
- or a row in Array questions (except for Array dual scale and Array multiple flexible questions)
- for instance: array with 5 radio buttons or array with label questions
- or either the left part or the right part of an Array dual scale question
- or each cell of an Array flexible question
- constant values
- for instance: "If you answered more than 18 years to the question below"

- Participants' profile data: To use data from the survey participants table, "Anonymized responses" must be set to NO. This option can be found in survey participant settings panel.

Several comparison operators are supported - from the simple "equals" to the advanced "regular expression":
- The basic ones refer to the "equal" and "not equal to" operations
- The greater/less than operator family is also available, and is usually used when using numeric question-entries
- Please note that comparisons on numeric fields make use of the numeric order. For instance, 2 < 10
- If you're using a question entry whose type is text, the condition could be evaluated as "2" > "10" (string order)!
- Numeric questions, as well as text questions (when they have the 'numbers_only' attribute set), will use the numeric order for comparisons
- An advanced comparison operator using regular expressions is also available (don't panic! If you don't know what this means, then you don't need it)
- the pattern is not to be enclosed in '/' characters
- for instance: [a-zA-Z]$
How can I combine conditions?
You can build complex conditions by combining simple conditions with the AND and OR logical operators.

However, it is important to understand that LimeSurvey automatically determines which logical operator to apply. This means that the use of the OR or AND operators is determined according to the context of the condition. In the above example, there is only one scenario. This means that LimeSurvey makes use of Boolean algebra, which means that operator or is "computed" first.
We'll talk more about complex conditions later. Let's first focus together on the elementary ones.
The conditions designer
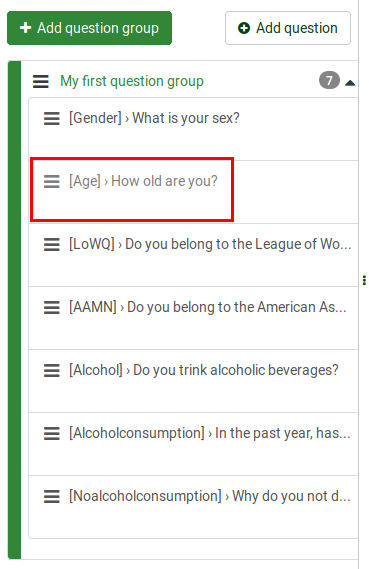
First, you need to access the conditions designer. To do that, click on the question you wish to apply the condition to:
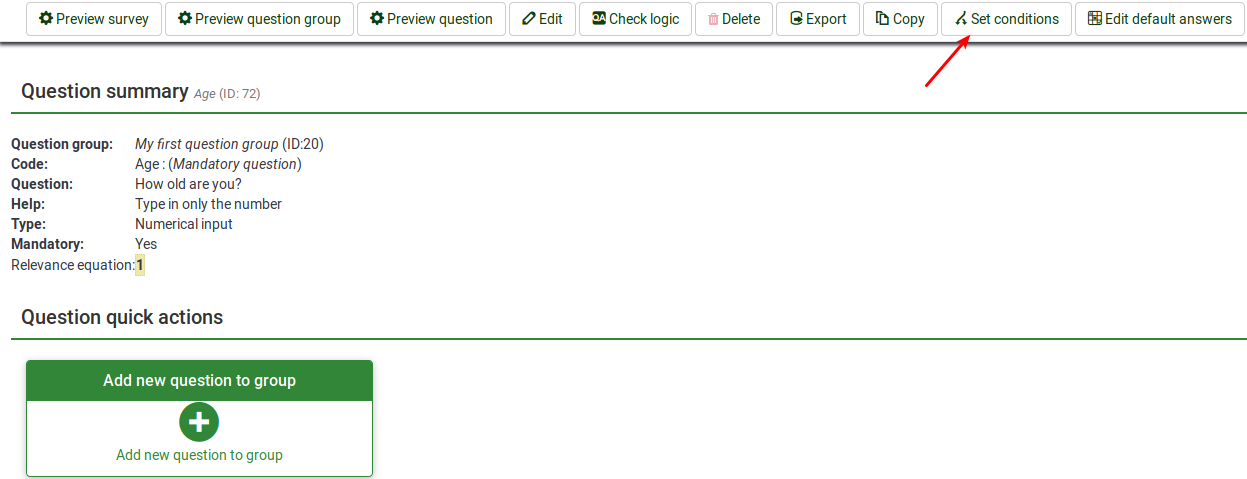
Now, look for the Set conditions button located on the top question bar:
Once accessed, the following page will be displayed:
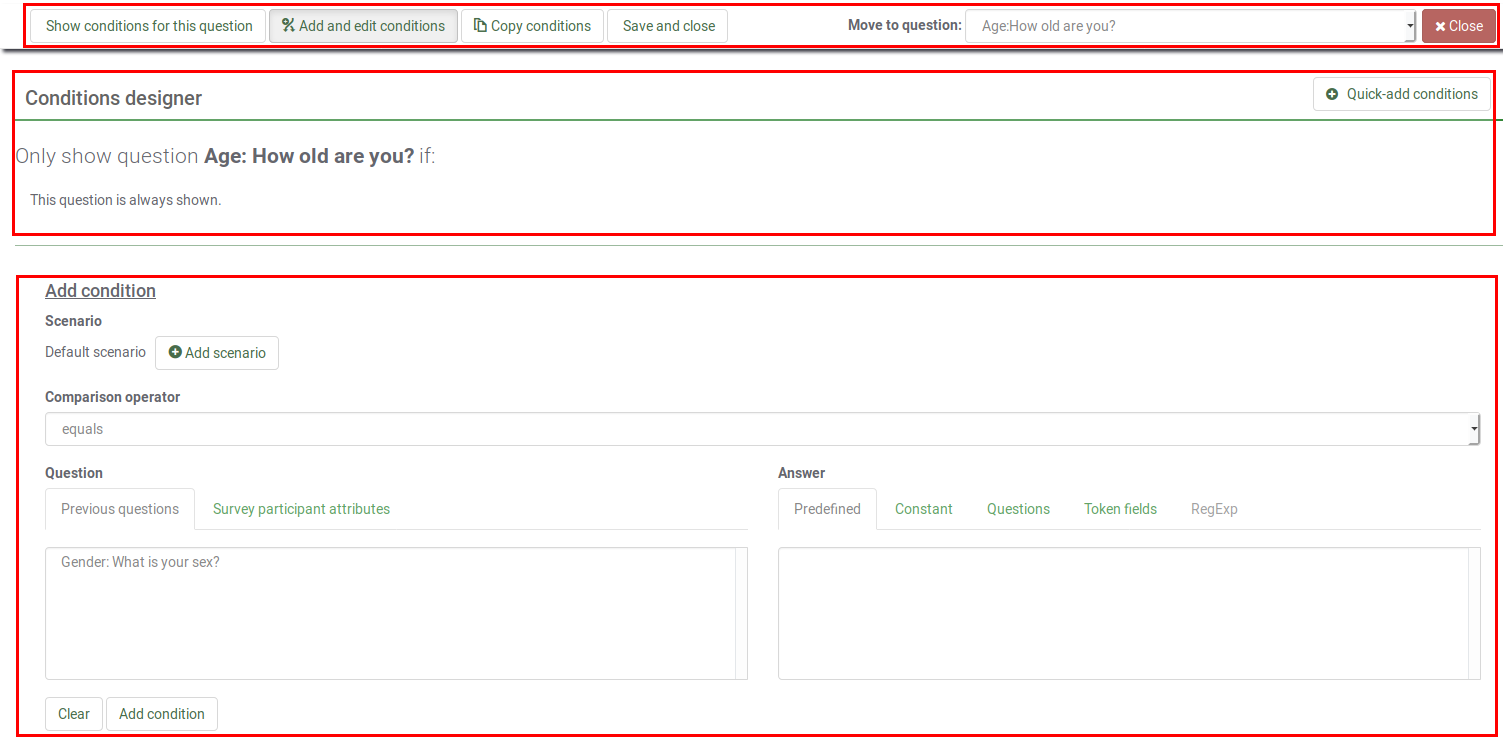
The conditions designer panel can be divided into three sections:
The conditions designer toolbar
You may find on the toolbar the following options:

- Show conditions for this question: Click on this button to get a quick overview of the current existent conditions that are applied to your question.
- Add and edit conditions: It represents the default page that opens automatically once you click the Set conditions button. It is divided in two parts: (1) a table displaying all the existent conditions and scenarios, and (2) the add/edit conditions menu.
- Copy conditions: Sometimes, you wish to apply the same condition to X questions in order to get questionY displayed at the end. For this, click on Copy conditions. A new window will open displaying the current existent conditions added to your question (let's call it question3). To add them to question5, check the desired conditions you wish to be copied, select question5, and click on the Copy conditions button located on the bottom left part of the panel. For further information, please continue reading the following wiki section.
- Save and close: Once you are done with the changes, click Save and close to get your conditions saved.
- Move to question: In order not to leave the conditions designer panel while moving to another question, use the following option to select from the dropdown list the next question you wish to apply conditions to. Please note that the dropdown list displays the questions that are displayed in the survey before and after the current question.
- Close: If you wish to exit the panel without performing any changes, you can either go straight to the settings/structure tab and select the desired option or click Close, which is located in the upper right of the screen.
Overview of the existent conditions
This section displays a table that contains all the existent scenarios and conditions of a question. Certain actions can be performed from here:
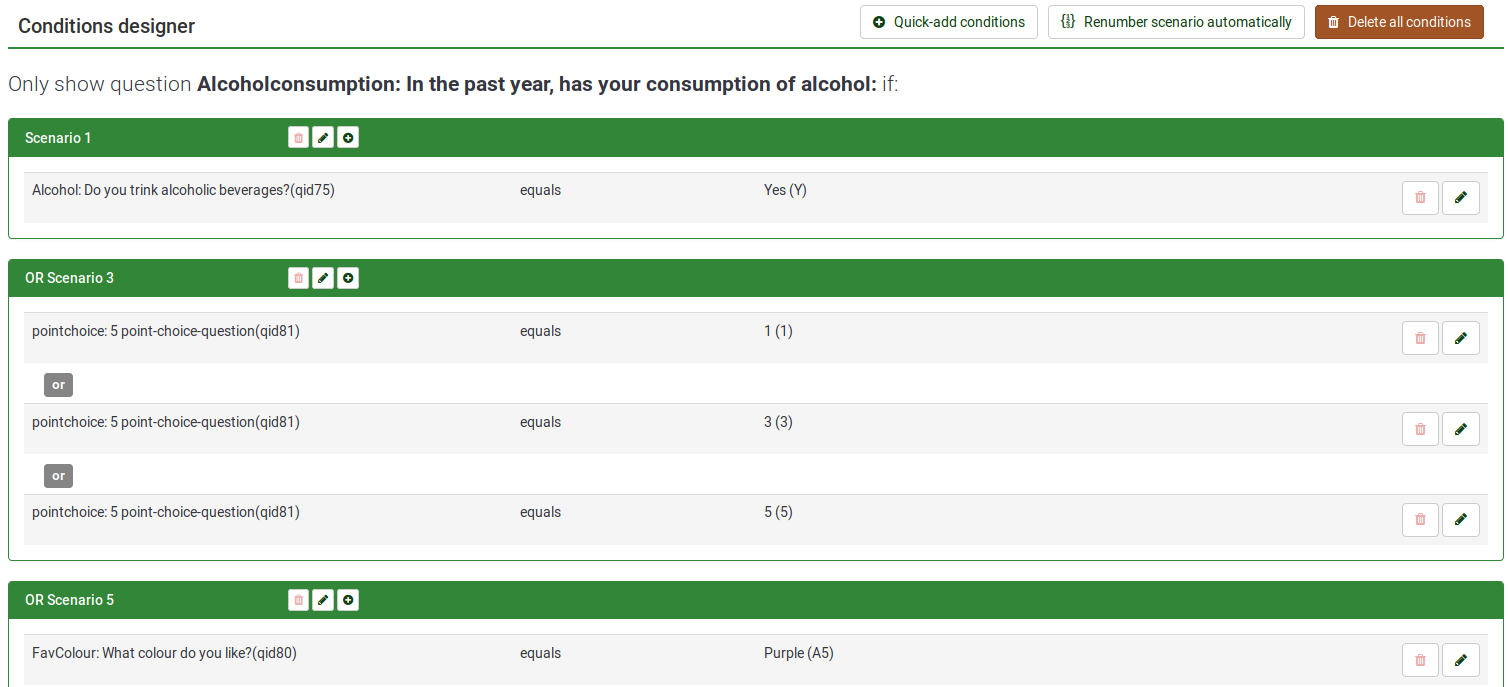
- In the top right part, three actions are available:
- Quick-add conditions - it fastens the process of adding conditions (read below to learn about all the options)
- Renumber scenarios - if clicked, the scenarios will be renumbered with incremental numbers beginning from one. Please note that this option is displayed only if two or more scenarios are applied to your question.
- Delete all conditions - you can delete via this action all the current existent conditions and scenarios applied to your question.

- Besides the id number of each scenario there are three buttons that allow you to perform the following actions:
- Delete scenario
- Change scenario number
- Add condition to this scenario - click on this button to add another condition to the desired scenario

- Two actions can be performed on each condition:
- Delete condition
- Edit condition - if clicked, you will be able to edit the condition from the conditions menu

Add/Edit conditions
The bottom part of the screen is allocated to the Add/edit conditions menu:

To understand how the conditions feature works in LimeSurvey, we will first present the elementary conditions.
Definition of elementary conditions
An elementary condition is simply a single condition without any OR or AND logical operators.
It is composed by:
- a left operand: the tested value. You can choose the tested value type by selecting the appropriate tab in the condition editor. It can either be a previous question or a survey participant attribute.

If you select a question-entry (from the Previous questions tab) and if this question uses predefined answers, then the corresponding predefined answers are displayed under the Predefined tab of the comparison value selection.
- not use anonymous answers
- use a survey participants table and closed access.
- a comparison operator. Choose the comparison operator you want to apply from the dropdown list (less than, less than or equal to, equals, not equal to, greater than or equal to, greater than, regular expression).
- a right operand: the comparison value. You can choose the comparison value type by selecting the appropriate tab in the condition editor. When you create a condition, you can select as the comparison value a predefined value (answer), a constant, a question, a survey participant attribute, or a regular expression:

Example of elementary conditions and how to create them
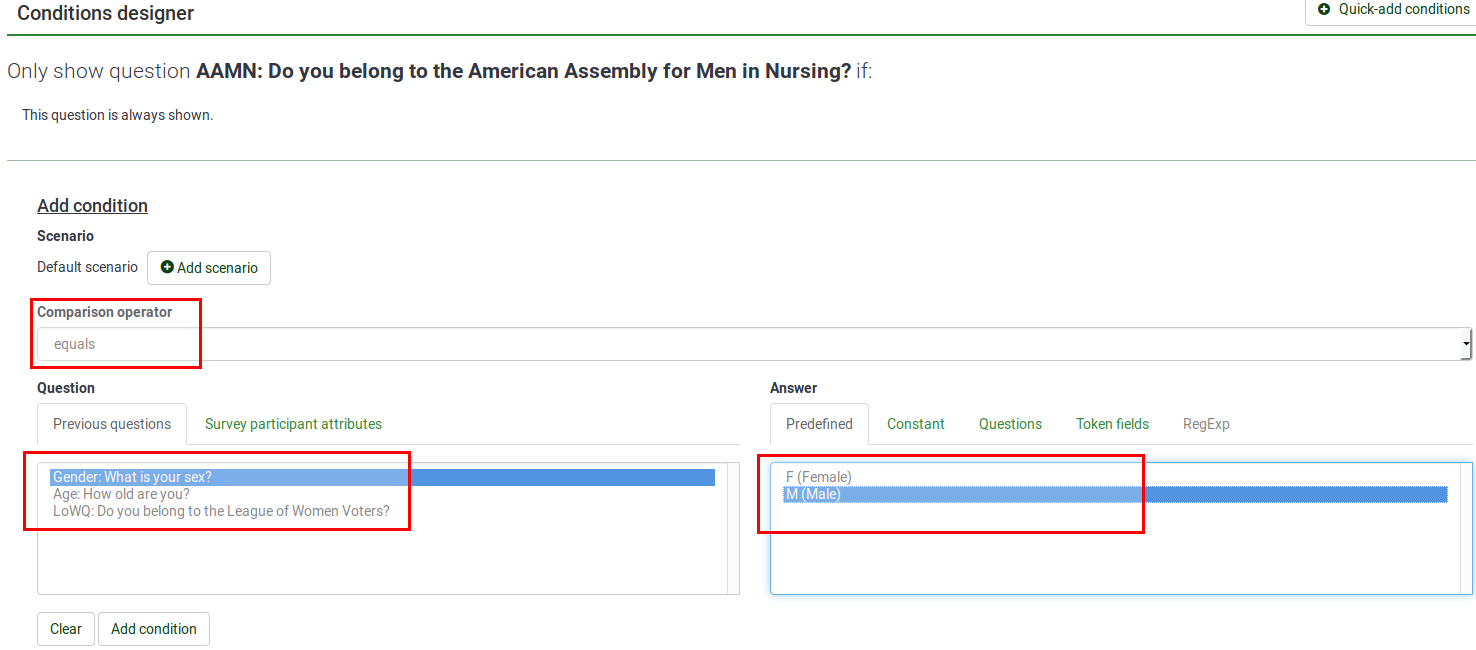
- Show Question 'AAMN' if "the answer to Question 'Gender' is the predefined answer 'Male'"
- tested value = answer to Question 'Gender'
- comparison operator = equals
- comparison value = predefined answer code (the 'Male' answer in this case)
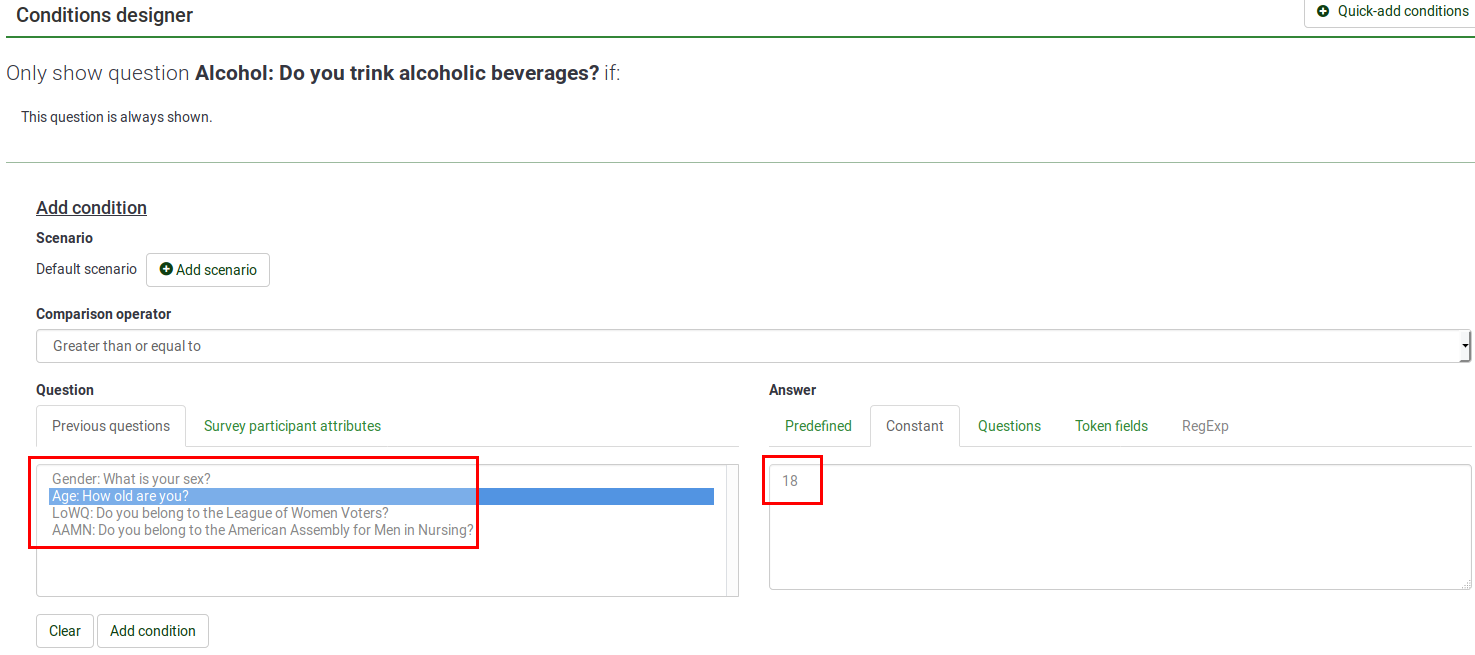
- Show Question 'Alcohol' if "the answer to Question 'Age' is greater or equal than the numerical value '18'"
- tested value = answer to Question 'Age'
- comparison operator = greater than or equal to
- comparison value = the constant value '18'
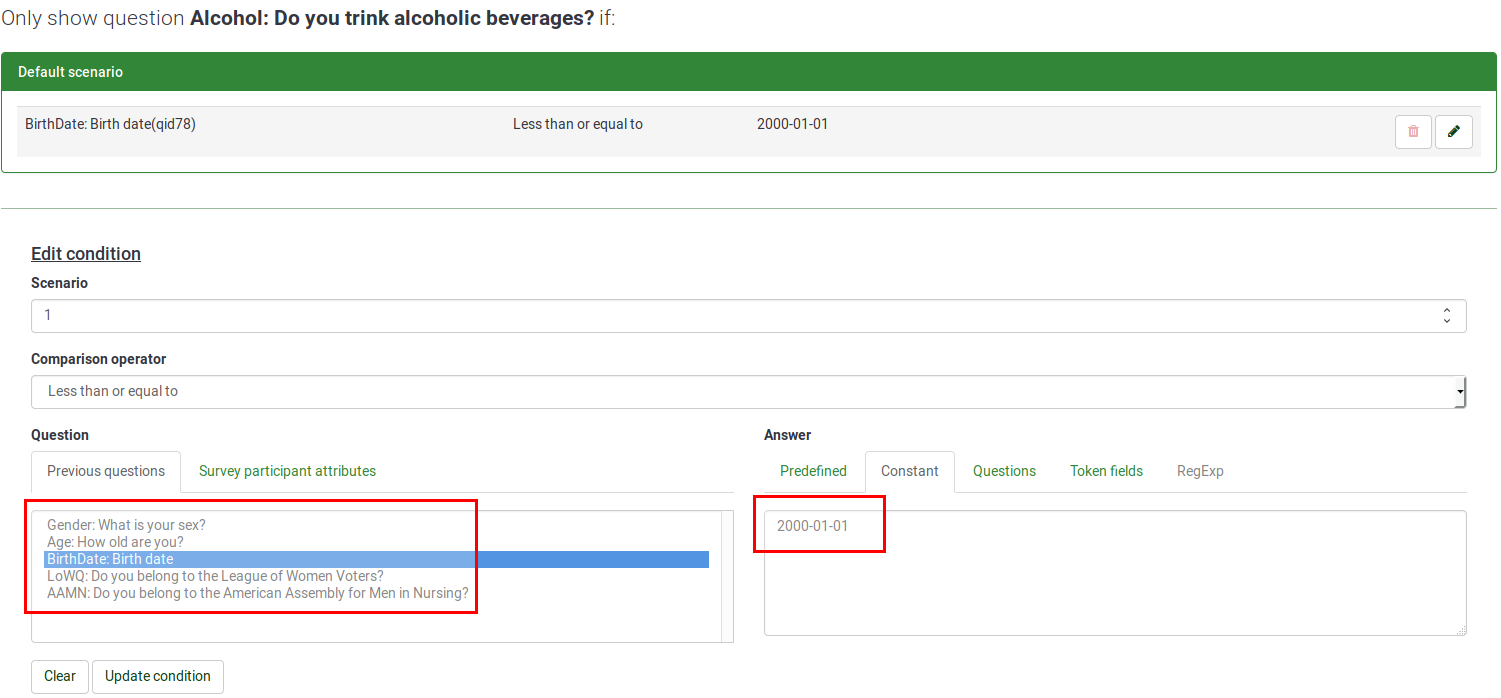
- Show Question 'Alcohol' if "the answer to Question 'BirthDate' is greater than 2000-01-01"
- tested value = answer to Question 'BirthDate'
- comparison operator = Greater than or equal to
- comparison value = '2000-01-01' (the format in the constant field: 2000-01-01)
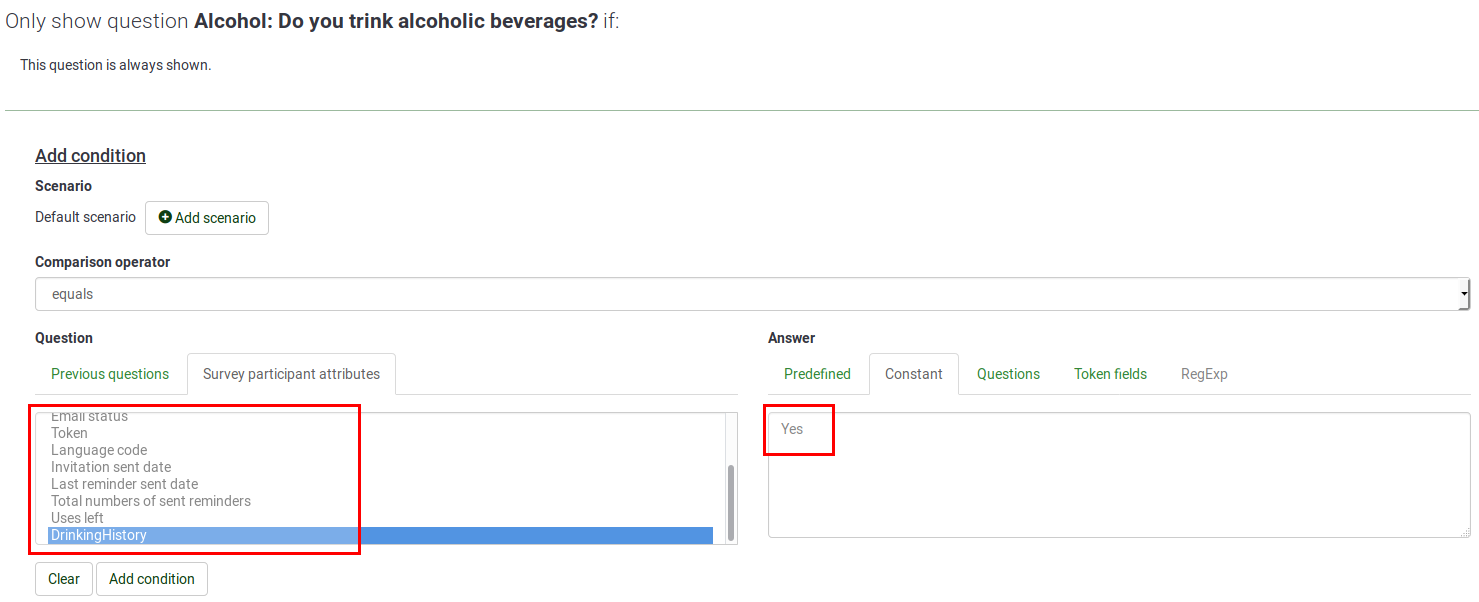
- Show Question 'Alcohol' if "the the 'DrinkingHistory' participant's attribute" matches the 'Yes' string.
- tested value= the 'DrinkingHistory' value taken from the survey participants table
- comparison operator = equals
- comparison value = the constant value 'Yes'
Conditions and scenarios in LimeSurvey
Default condition combinations
As said earlier, LimeSurvey automatically decides which logical operator (AND or OR) should be applied between conditions depending on the 'context'.
Note also that the order in which you define your elementary conditions is not relevant as LimeSurvey will automatically reorder them according to its own logic.
Let's study this in detail. Two rules should be always remembered:
- First rule: conditions having the same tested value are ORed together
- Second rule: conditions having different tested value are ANDed together
First rule: conditions having the same tested value are ORed together
When you have several conditions, they are ORed together if they share the same tested value. This is the case if the condition applies to several answers belonging to one single question. For example, a condition was applied below to three answers belonging to the same question - if answer to Question 'FavColour' equals 'green' OR answer to Question 'FavColour' equals 'red' OR answer to Question 'FavColour' equals 'blue', then Question 'BirthDate' will be displayed to the survey respondent:


Second rule: conditions having different tested value are ANDed together
When you have several conditions, they are ANDed together if they don't share the same tested values. For example, you may see below the case for several conditions based on different previous questions - "If answer to Question 'Alcohol' equals 'Y' answer AND answer to Question 'Gender' equals 'F'", then Question 'Alcoholconsumption' will be displayed to the survey respondent:


The multiple options questions
The Multiple choice and Multiple choice with comments question types will be displayed in two flavors:
- a Group of checkboxes flavor which let you set conditions on all possible answers of the respective question;
- a set of Single checkbox entries which lets you set conditions on each checkbox individually.

The group of checkboxes flavour
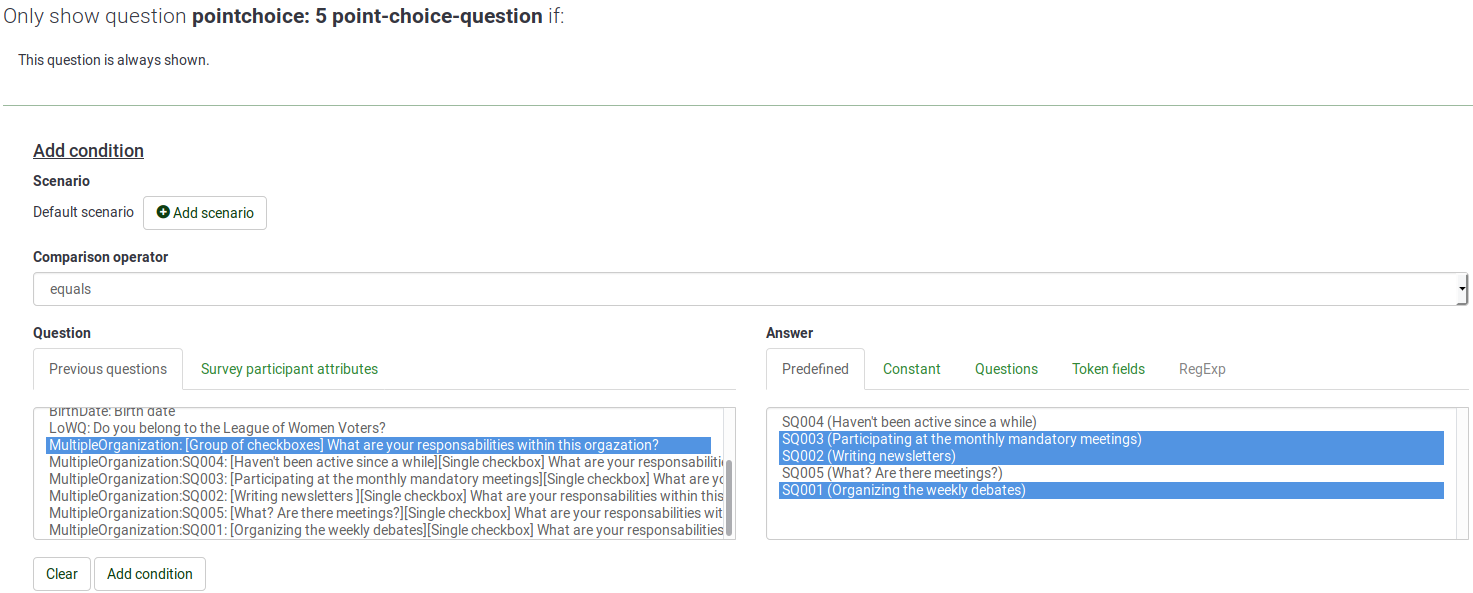
Now, let's focus on an example to better understand the difference between the two flavours. Let's imagine that we wish to display the 'Pointchoice' Question only if the respondent checks at least one of the tested answers listed under the 'MultipleOrganizations' Question.
As mentioned above, the group of checkboxes flavor allows you to set conditions on all possible answers of the respective question. Therefore, only the options that refer to responsibilities are selected as comparison values below:
As we can observe, the conditions get ORed due to the Group of checkboxes flavour selected in the beginning.:

ANDing conditions in multiple choice questions
Now, let's focus on a similar example. However, we are looking this time only for the most active members to ask them further questions. To do this, we make use of the Single checkbox flavour which allows you to set conditions based on each checkbox individually.
In this example, question X will be displayed if A and B are checked:
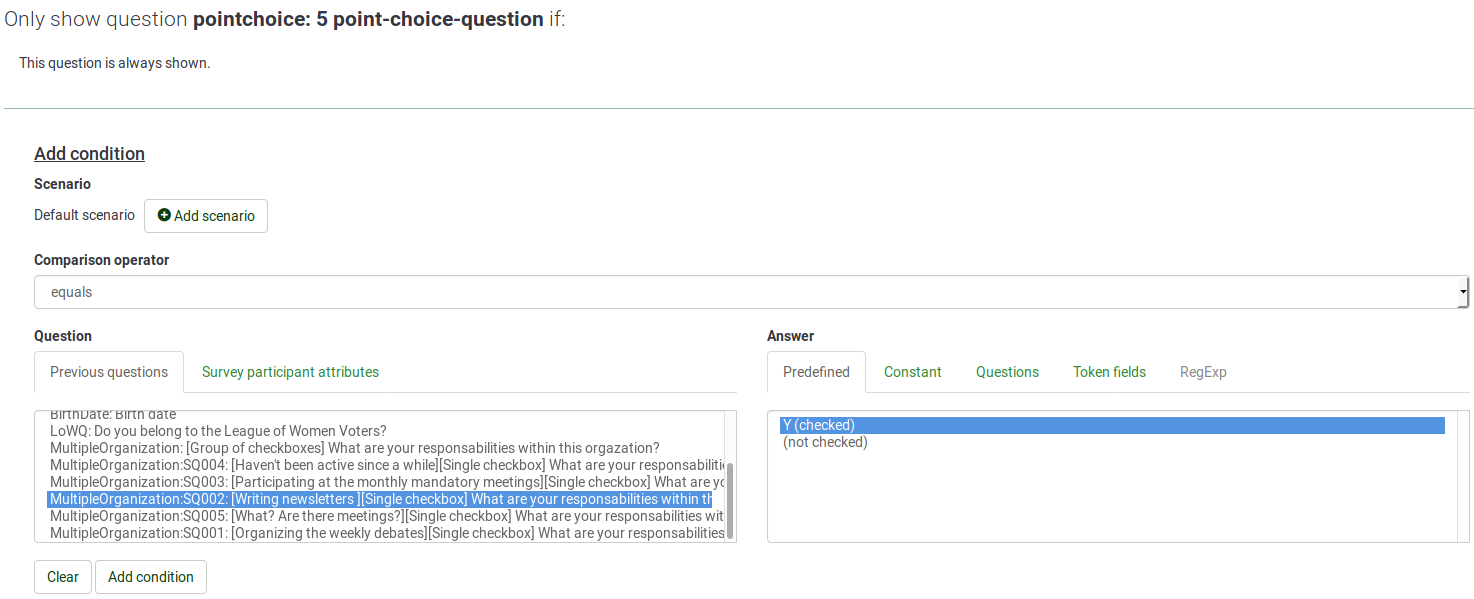
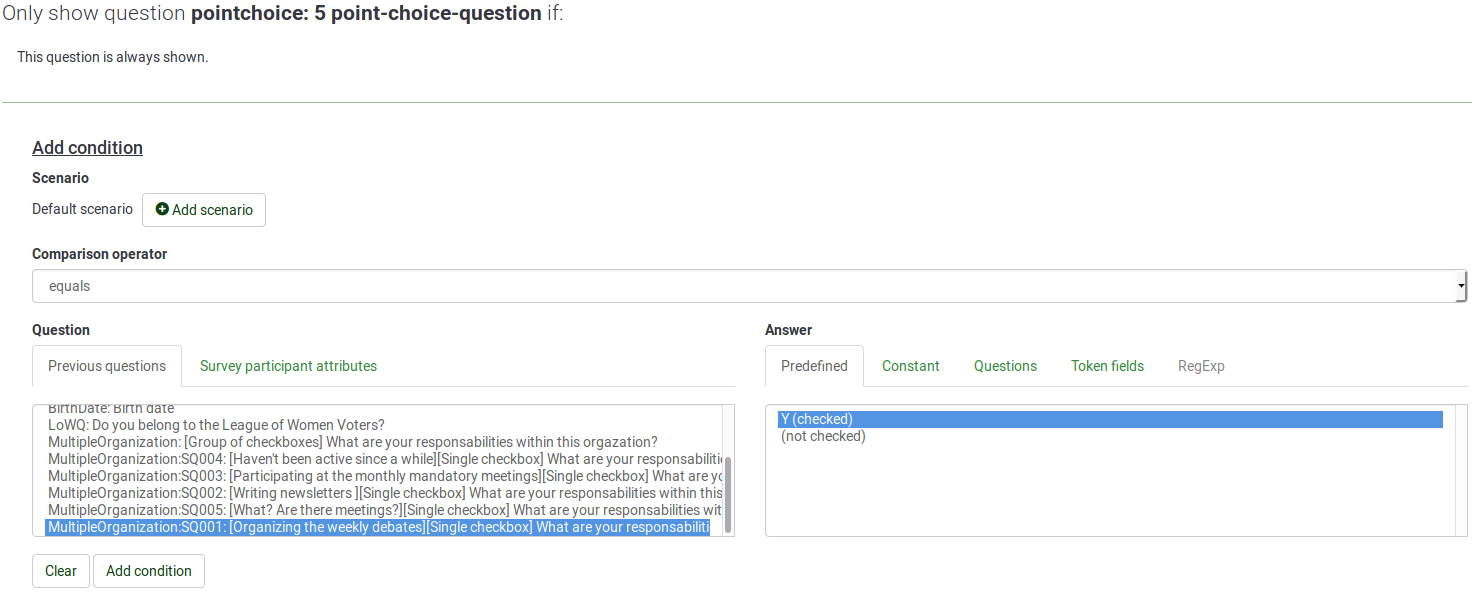
Once done, you can observe that the two conditions are ANDed now.

This means that your question will not be displayed unless both tested values (the selected subquestions) are met.
The usage of scenarios - Using ORed conditions between different questions
Now, you may argue that sometimes you need to have ORed conditions even when they are set on different questions (that is to say on different tested values). This is why we got scenarios!
Definition of a scenario
A scenario is simply a manual grouping of conditions in which some conditions are evaluated independently of other conditions from other scenarios. The complex condition resulting in this association of several scenarios will be met only if one scenario is met. In other words, scenarios are logical grouping of conditions, respecting the above rules, and which are ORed together to build complex conditions.
Everything described above applies to the conditions located in every scenario. By default, all the new conditions are created inside the Default Scenario, which uses number '1' as its identifier. When you create new conditions, you can choose whether they are added to the default scenario or not. To change the scenario, just use another identifier.
Adding a question to another scenario
When you create (or edit) a condition, you can modify the scenario in which the condition is stored by simply clicking on the add scenario button:
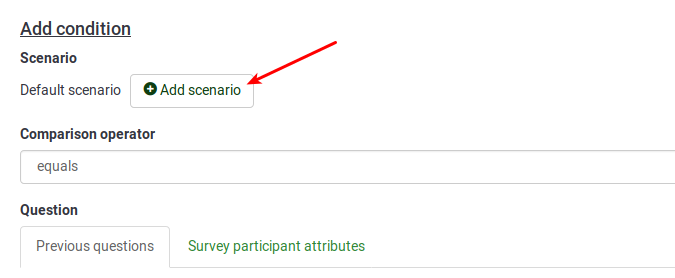
As you can observe, the default scenario uses as identifier '1'. To add conditions to different scenarios, change the identifier by typing a different number in the box.
The number id of a scenario has no importance and different scenarios can have non-continuous ids.

You can change the number assigned to a scenario by clicking this Icon ![]() and assigning the new id to the scenario.
and assigning the new id to the scenario.

- decide in which order the scenarios are displayed when using the printable version of a survey
- merge conditions from two scenarios (in order to merge scenario 10 with scenario 1, just renumber scenario 10, so that it is scenario 1).
Example: creating three scenarios
To create three scenarios, you need at least three conditions and to add to each of them a different scenario id. Once done, the scenarios are going to be connected among themselves via the 'OR' operator. For example, it could look like this:
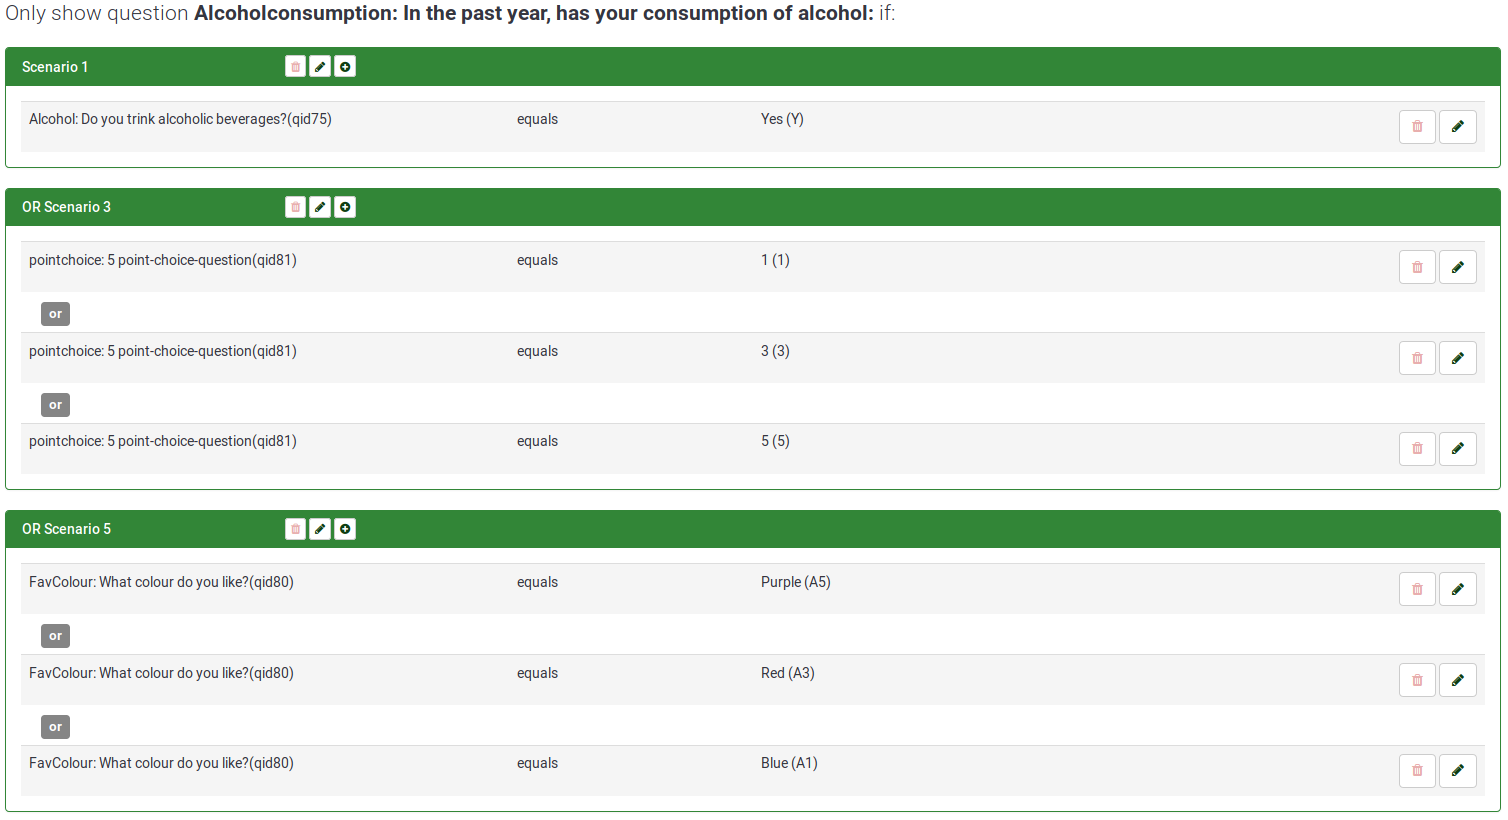
AND vs OR in the same scenario
You may end up in certain cases with AND and OR logical operators in the same scenario:
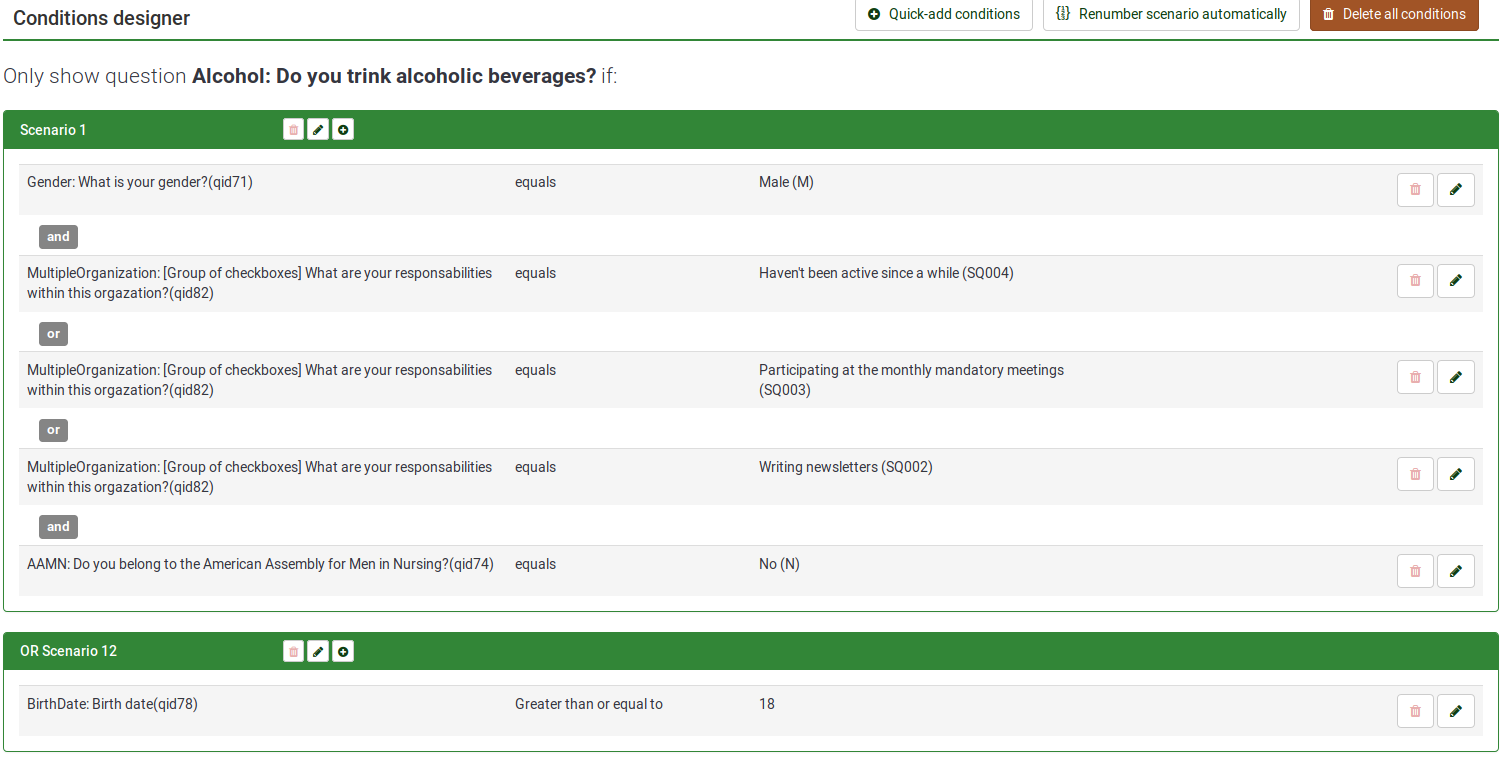
LimeSurvey will always apply first OR. For further details on this, you may check the following Wikipedia article on Boolean algebra.
However. the order of operations can also be observed in the Relevance equation field. For the above example, the relevance equation is highlighted below:

As it can be observed, a set of extra parentheses is added for the OR logical operations in order to let the software know that it must be "computed" first.
How to copy conditions
The copy conditions functionality can be used when you wish to apply the same set of conditions you applied to Question5 to Question10. In this way, you will not have to manually recreate the conditions you applied to the previous question(s).
To start copying conditions, you first have to select the question the condition(s) is/are applied to (Question 'LowQ' in our case). Then, select the conditions you wish to be copied and select the question you wish to have the conditions added to (Question 'Alcohol' in our case).
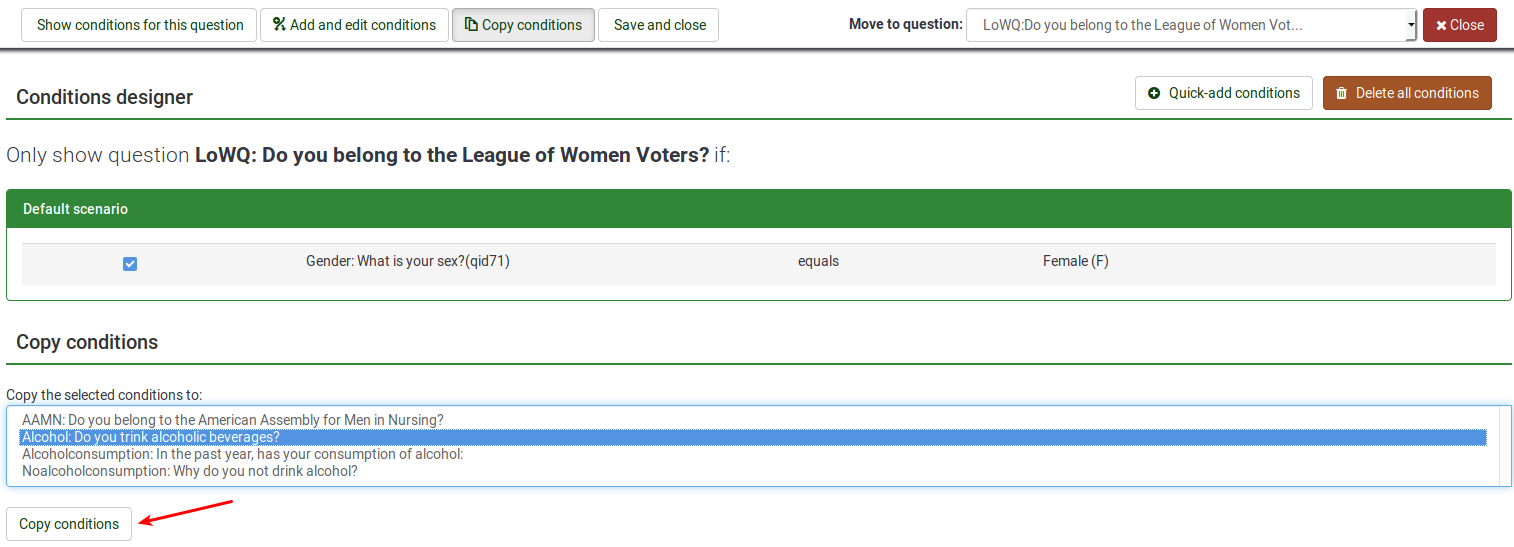
Please pay attention to how the copy conditions functions work when you wish to copy and apply a set of conditions located under different scenarios to another question which uses the same or different scenario id numbers. To summarise the possible cases you might have, check the following example:
- you wish to copy Scenario 1 - Condition A, Scenario 1- Condition B, Scenario 7 - Condition C, and Scenario 7 - Condition D from QuestionX into QuestionY
- QuestionY already contains Scenario 1 - Condition A, Scenario - Condition C, Scenario 6 - Condition E, Scenario 8- Condition F.
- Once copied, the following conditions will be applied to QuestionY:
- Scenario 1: Condition A, Condition B, Condition C -> Condition A is not copied anymore as it already exists in QuestionY, only condition B being copied.
- Scenario 6: Condition E -> not affected
- Scenario 7: Condition C, Condition D -> a new scenario is created where the two conditions are added to it
- Scenario 8: Condition F -> not affected
Reset conditions
To quickly reset all the survey conditions, click on one survey-related setting, look for Tools on the top toolbar, and click Reset conditions:
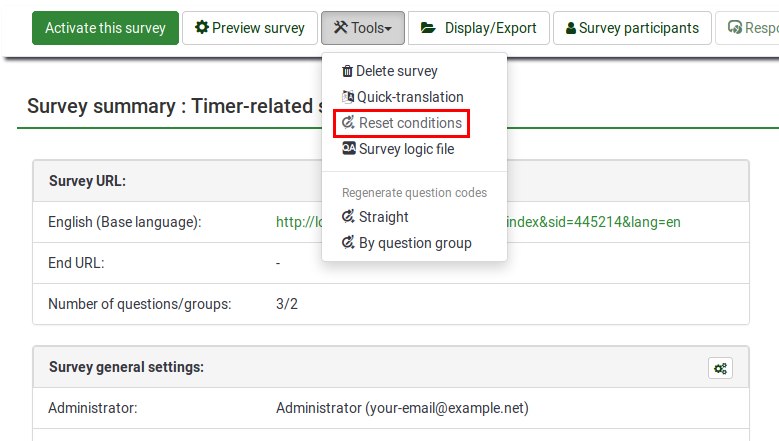
Next, confirm on the next page that you want to proceed and all the conditions will be deleted.
Things to watch out for
General considerations
There are a few basic rules you should keep in mind before setting conditions on a question:
- Once a single condition has been set for a question, that question will not be displayed unless that condition is met.
- Conditions can only be set based on questions that appear before the question on which the condition is set.
- If you change the order of questions in your survey after you create conditions, LimeSurvey does not warn you if the changed order will break any of your conditions. You should always put aside the creation of conditions until you are satisfied with the order of questions and groups in your survey.
- You can modify conditions even after a survey has been activated. This should be done with caution, as there is no "consistency checking" applied here.
Conditions using the 'no answer' predefined answer

Setting the following condition "Show question 'FavColour' if the answer to the question 'Gender' is 'no answer'" really means "show question 'FavColour' if question 'Gender' was displayed to the survey participant who did not submit answer".

Chained conditions
If you set conditions on a question that, itself, has conditions, you could end up with your survey behaving in ways you might not have predicted. For example, a typical side-effect is that if you hide all questions in a group with chained conditions, the group header will still be shown unless you correct these conditions as explained below.


In the above example, the 'Alcohol' question is displayed if the respondent has previously answered to the 'AAMN' question 'No (N)'. However, the 'AAMN' question might not be displayed at the end if the respondent did not select to the previous question ('Gender') answer 'Male (M)'. In this scenario, no 'Alcohol' question will be displayed if 'Male (M)' was chosen previously.
To have the 'Alcohol' question displayed, you have to copy the conditions from the earlier question(s) to the one you're editing. To have the 'Alcohol' question displayed, you need to set up the following set of conditions:
- Show 'AAMN' if the answer to 'Gender' is 'Male (M)'
- Show 'Alcohol' if answer to 'Gender' is 'Male (M)' and if answer to 'AAMN' is No (N)'.
After correction, the correct set of conditions for 'Alcohol' should look like this:

So if you are designing a complicated survey with a large number of conditions, make sure you test the survey for as many different combinations of results as you can think of.
Limitations and workarounds
Progress-bar
If you create a survey where many questions get skipped because of conditions, the progress bar either jumps over a set of questions or the survey ends at 50%.
To avoid such behavior, the questions that could be skipped should be arranged between the shown questions. In this way, only one or two questions get skipped per answer.
For example, based on Question1 (yes or no question), 14 questions (2A to 15A) will be displayed if the answer to Question1 is 'Yes', or 2B to 15B if the answer to Question1 was 'No'.
If you arrange the questions in one group and arrange them like 2A, 2B, 3A, 3B, and so on, you will get a nearly correct progress bar, while arranging the questions like 2A, 3A, 4A, [...], 2B, 3B, 4B, ... you will get a progress bar from 0 to 50% or from 50% to 100%, depending on the answer to the first question.
Setting a constant comparison value for a "Date" Question Type
You have to use the internal representation of Date values (which is YYYY-MM-DD) to define your constant comparison value.
Setting conditions for "Other" Options in the Multiple Options Question Type
In the multiple options question type, you can use the "Other" provided in the question type as a valid choice but you cannot set conditions on it. For example, Question No 1 says "Which color do you prefer to use?" Answer checkbox choices are Blue, Black and Other. If the participant chooses Blue, you can set a condition. If the participant chooses Black, you can set a different condition. However, if the participant chooses "Other" and types in something in the text box, there is NO way a condition can be set. LimeSurvey does not recognize if the participant chose the "Other" condition. This is NOT a bug but a limitation.
There is no real field recorded for the 'other' checkbox for this question type. Thus, the only way to know if the user has answered the 'other' part of the question or not would be to check if the value of the text written in the other input field is empty or not.
However, due to the specific way Multiple choice questions are handled, testing the 'other' text input field has never been implemented.
As a workaround, add an explicit answer option called 'Other' and do not use the built-in 'other' option of these question types. Then add an additional short text question which will be displayed if this 'Other' checkbox was clicked.
How to use parenthesis for the boolean expressions?
You can't!
If you want to design something like:
(condition1 OR condition2) AND (condition3 OR condition4),
you'll have to set up:
(condition1 AND condition3) OR
(condition1 AND condition4) OR
(condition2 AND condition3) OR
(condition2 AND condition4)