Quick start guide - LimeSurvey 3.0+/nl: Difference between revisions
From LimeSurvey Manual
No edit summary |
No edit summary |
||
| Line 53: | Line 53: | ||
Na het aanmaken van je LimeSurvey-account door het klikken op de knop '''SIGN UP''', wordt er een e-mail naar je verstuurd. Hierin staat een activatie-link, je moet door op de link te klikken | Na het aanmaken van je LimeSurvey-account door het klikken op de knop '''SIGN UP''', wordt er een e-mail naar je verstuurd. Hierin staat een activatie-link, je moet je account activeren door op de link te klikken. Als je dit doet dan ga je automatisch door naar de [https://www.limesurvey.org/ LimeSurvey website], je bent dan ingelogd met je net geactiveerde account. | ||
Revision as of 18:06, 18 June 2018
Wat is LimeSurvey?
LimeSurvey is een open source applicatie voor on-line enquêtes, geschreven in PHP en beschikbaar onder de GNU General Public License 2. De gebruiker kan met de applicatie on-line enquêtes ontwerpen en publiceren, de reacties verzamelen, statistieken aanmaken en gegevens exporteren. Je kunt LimeSurvey installeren op je eigen webserver (LimeSurvey CE) of je kunt een van de hosting services gebruiken.
In deze handleiding gaan we uit van het gebruik van een hosting service, ook bekend als LimeSurvey Pro. Als je LimeSurvey op je eigen webserver wilt zetten, lees dan installatie in de LimeSurvey Handleiding.
Aanmaken gratis LimeSurvey account
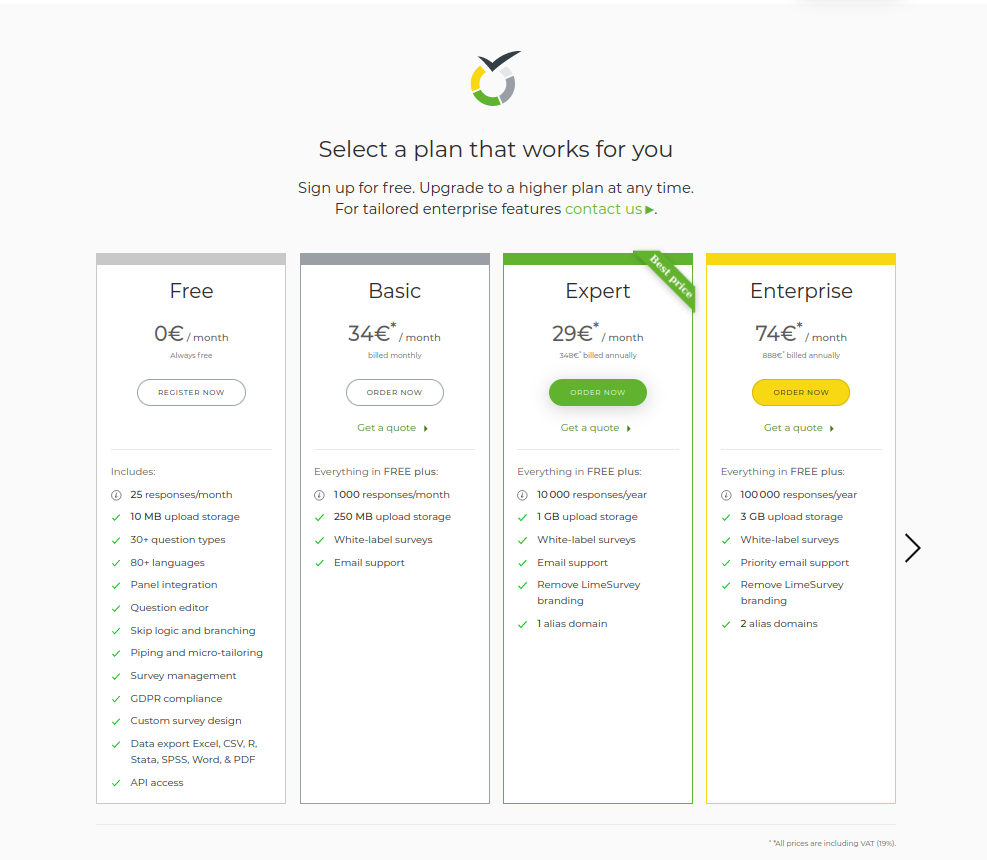
LimeSurvey staat elke gebruiker toe om een gratis account aan te maken om de applicatie uit te kunnen proberen. Ga met de muis over Editions & Pricing in de kopregel van LimeSurvey website heen en zoek de knop Editions & Pricing onder de LimeSurvey Pro tab:

De options zijn: free, basic, expert en enterprise. Klik op de knop Register Now onder de optie FREE:
Vul de volgende velden in:
- Username: de username van je account, met dit account krijg je ook toegang tot je LimeSurvey installatie.
- Email: het e-mailadres waarheen de link voor activatie wordt gestuurd.
- Password: het password van je account.
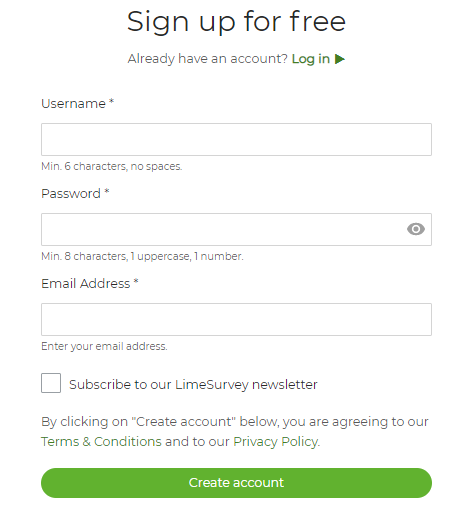
Als je met de muis over een veld gaat komt er een pop-up met een toelichting over dat veld. Je kunt je ook aanmelden voor de nieuwsbrief, je krijgt dan de laatste nieuwtjes, ondersteuning en eventueel kortingen.
LimeSurvey ondersteunt dat een gebruiker zich aanmeld via een eigen Twitter, Gmail of GitHub account. LimeSurvey neemt dan de benodigde basisinformatie over.
Na het aanmaken van je LimeSurvey-account door het klikken op de knop SIGN UP, wordt er een e-mail naar je verstuurd. Hierin staat een activatie-link, je moet je account activeren door op de link te klikken. Als je dit doet dan ga je automatisch door naar de LimeSurvey website, je bent dan ingelogd met je net geactiveerde account.
Je begint met het aanmaken van een installatie. Klik op je username en ga naar your LimeSurvey profile:

Kies op het Profile Menu de keuze Installations om een installatie aan te gaan maken:
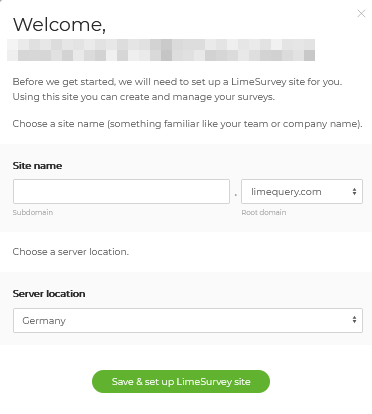
Daarna kun je invullen:
- de Domain name, de url-link van de enquête;
- de Server location, de serverlocatie die je het beste past.
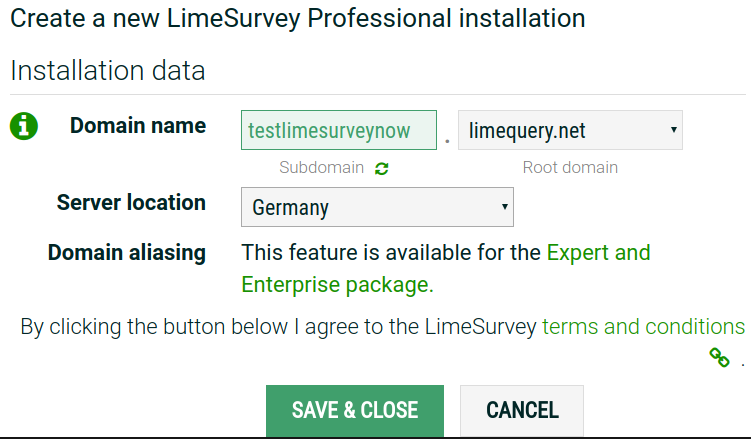
Na het invullen en opslaan van deze velden start de installatie, die ongeveer 10 seconden duurt. De instellingenpagina ziet er ongeveer als volgt uit:
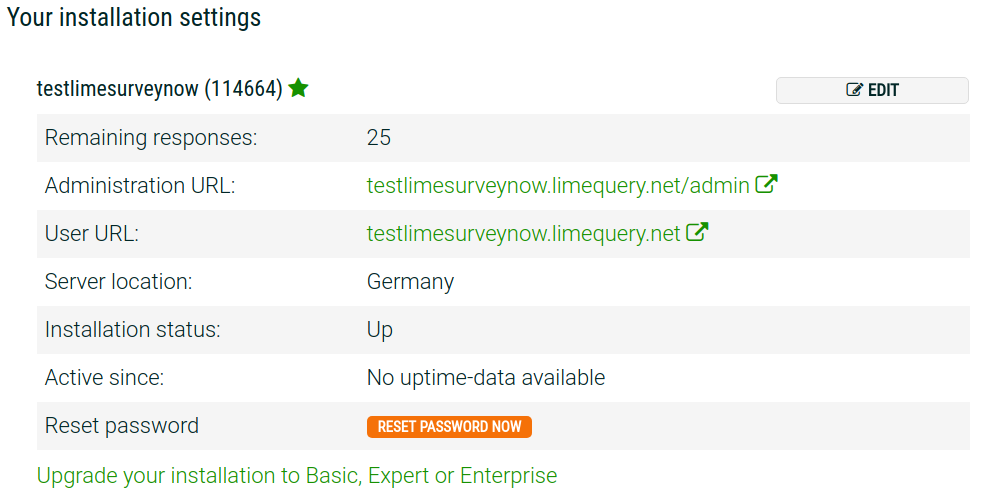
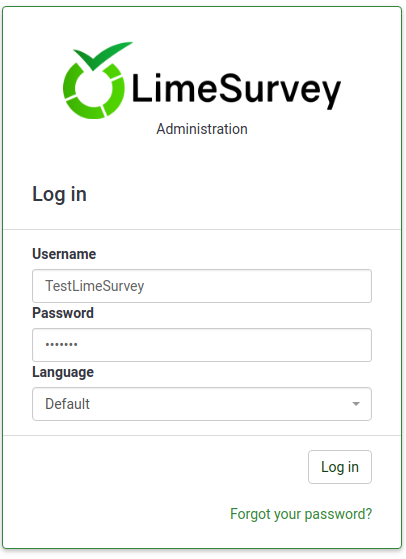
Je kunt nu de webserver benaderen door op de administration URL te klikken. Log daarna in met je LimeSurvey.org inloggegevens:
Het eerste gebruik van LimeSurvey
Na het inloggen kom je op de installatie-pagina van LimeSurvey. Rechtsboven is er een taakbalk. In het midden staan er zes blokken, elk met een van de LimeSurvey functionaliteiten.
De taakbalk heeft de volgende opties:
- Tutorials: If you click on this option, you will get access to the in-built LimeSurvey tutorials. For example, one tutorial that can be accessed from any LimeSurvey 3+ installation is "Beginner Tour".
- Configuration: Once selected, a dialog will show up from where you can administrate your LimeSurvey installation.
- Settings: Under this tab, you may find options that can help you customize your LimeSurvey installation.
- Home page settings: Users can use this option to tweak the settings of the home page according to their needs;
- Global settings: The changes done here affect the entire LimeSurvey installation, influencing also the setting of non-superadministrator users for all users;
- Plugin manager: It allows every user to activate a series of plugins that are supported by the LimeSurvey team. New plugins can also be added to your installation.
- Users: Under this tab you may find options related to the management of he users and survey participants.
- Manage survey administrators: New administration users can be added from here;
- Create/edit user groups: This function is meant to group administration users in individual groups;
- Central participant database: It permits every administrator to store the participants' information to a central table/database that is independent of any table with survey participants.
- Advanced settings: It includes options that are non user- or survey settings-related. They can be used to enhance your LimeSurvey installation.
- Theme editor: Click on the following option if you would like to add/edit/delete survey themes, admin themes, or question themes. The themes allow control over the look and feel of pages of your survey or of your LimeSurvey GUI;
- Manage label sets: Label sets are basically list templates where each list has a set of codes with labels and it can be used in most question types either as answers or as sub-questions;
- Check data integrity: It checks the consistency and the redundancy of the data;
- Backup entire database: It is used to backup the LimeSurvey data when important LimeSurvey upgrades are pushed or when you move your LimeSurvey installation to another server;
- ComfortUpdate: It is a tool utilized to easily update your LimeSurvey installation from your web browser with just a few mouse clicks (instead of performing a manual LimeSurvey reinstallation).
- Settings: Under this tab, you may find options that can help you customize your LimeSurvey installation.
- Surveys: A survey includes via different interconnected databases: languages, question groups, questions, question attributes, answers, subquestions, default answers, assessments, quotas, quota members, and quota language settings. By clicking on the green arrow, a window with the following options will load up:
- Create a new survey: New surveys can be created and added to the surveys list;
- Import a new survey: If you want to import a survey to your list of surveys, use this function;
- Copy a survey: It allows the user to quickly copy a survey. This will appear in the surveys list from where it can be edited;
- List surveys: It allows you you to get an overview on all the existing surveys.
- Response balance: It shows the number of responses left from your subscription. Because you have access only to a free account at the moment, 25 responses per month are available to you. If you run out of responses, purchase more from the following link;
- Storage: it represents the amount of MBs that are at your disposal to store your surveys and answers. Because you created a free account, you get 10 MB storage space. If you would like to receive more storage space, choose one of the following paid options from here;
- Username: By clicking on it, you can either access your user preferences or sign out from your account;
- Notifications: It is represented by the green bell - different notification related to your LimeSurvey installation will be displayed here.
There are six default boxes on the home page of your LimeSurvey installation:
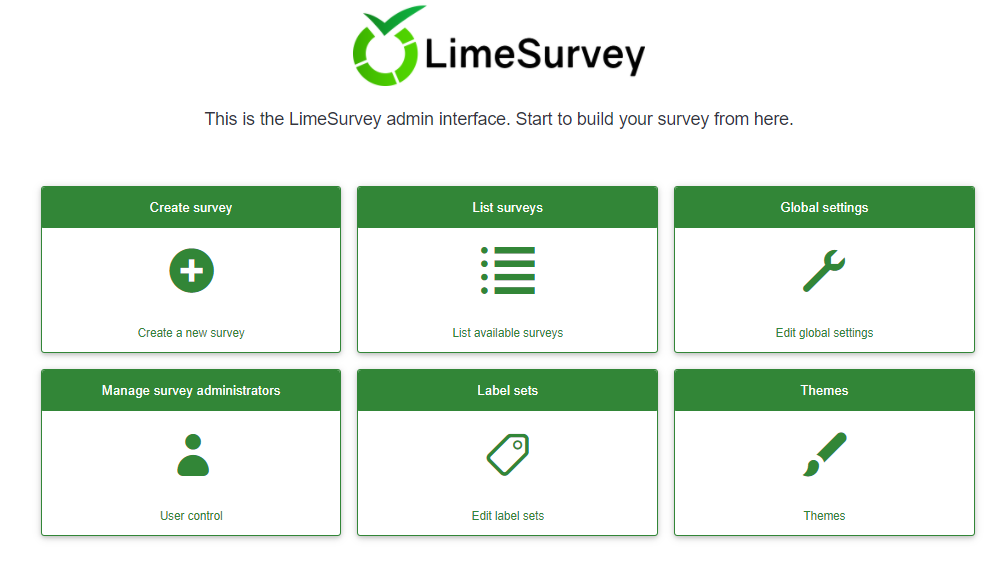
- Create survey
- List surveys
- Global settings
- ComfortUpdate
- Label Sets
- Themes
Enquête aanmaken
Om een enquête aan te maken, klik op het blok Enquête aanmaken.
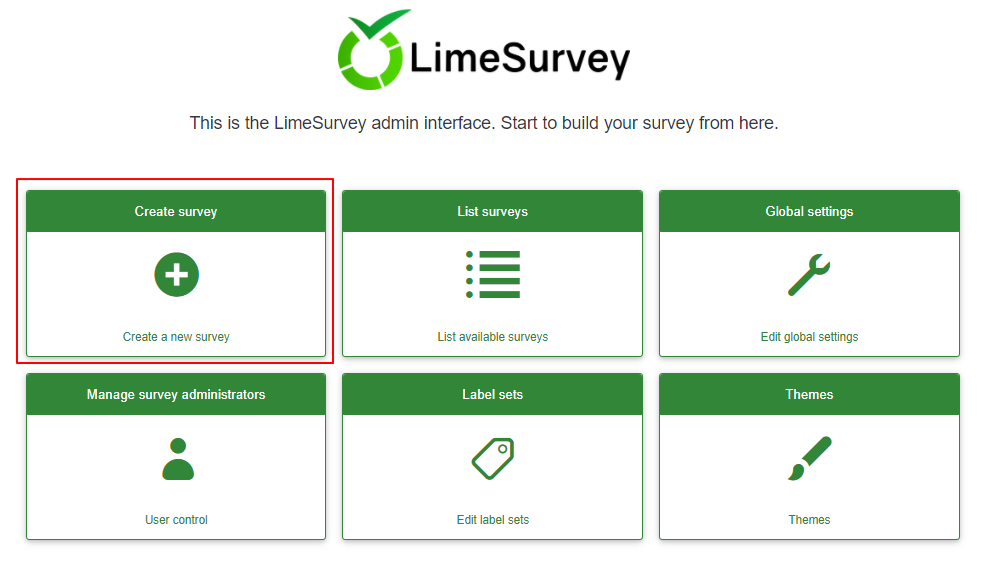
De pagina om een enquête aan te maken wordt getoond:
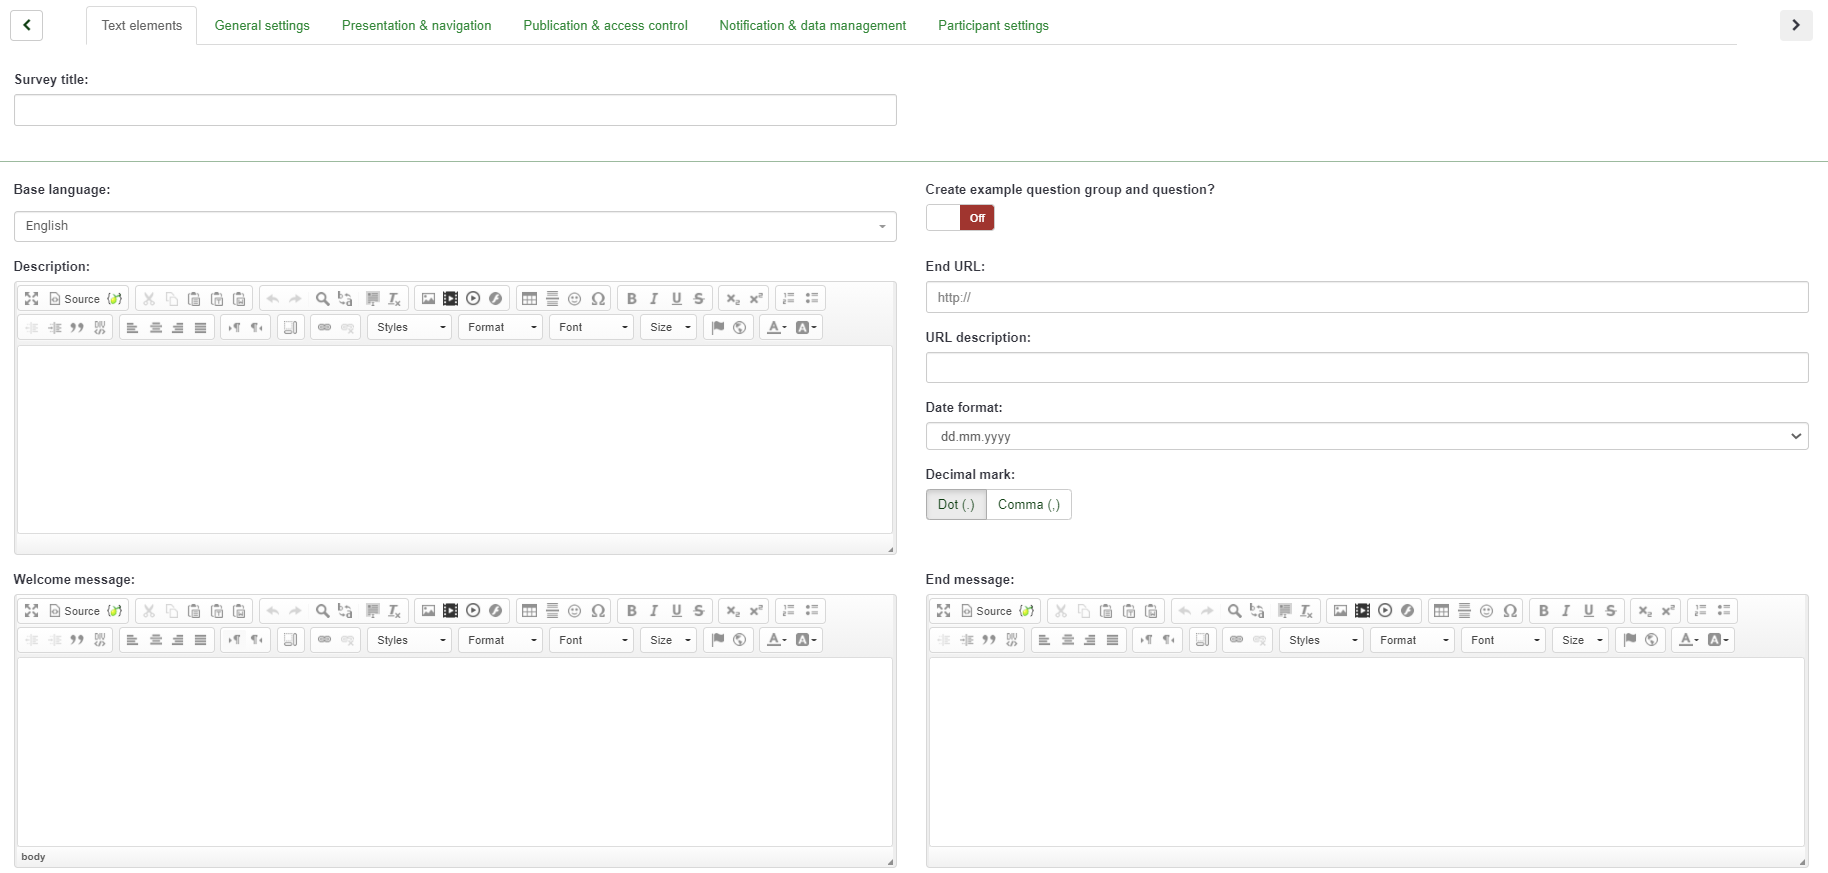
The following options will be displayed:
- Survey title: The title of the survey has to be typed in here. You cannot proceed further if no name is given to your survey. No worrires if you do not feel inspired at the moment, the title of the survey can be changed later;
- Base language: It is the main language of the survey. Additional languages can be added later from the settings of the survey;
- Sample question: It comes disabled by default. If you enable it, a question group and question examples will be added to your survey;
- End URL: You have the possibility to redirect users to another page when they finish filling in the questionnaire. If you wish to redirect them, type in the URL and activate the automatically load URL option that is located under the Presentation & navigation tab;
- URL description: A short end URL description can be added in the case in which the user is redirected to a non-related survey webpage. It may help the survey administrator to add notes vis-a-vis the usage of the respective URL; ;
- Date format: This option is important when you want to record timestamps together with the survey participants' answers. If you click on it, a drop-down list will show up with a multitude of date formats. Choose the one that fits your survey respondents (do not forget that different date formats are used across the world);
- Decimal format: Two options are available: dot (.) and comma (,). Choose the one that fits the place where you conduct your study (e.g., US vs Germany);
- Description: A short description of the survey can be added here;
- Welcome message: The survey participants will be prompted by this welcome message if something is typed in;
- End message: Type in a message that will be displayed to the survey participants when they submit the answers to the questionnaire.
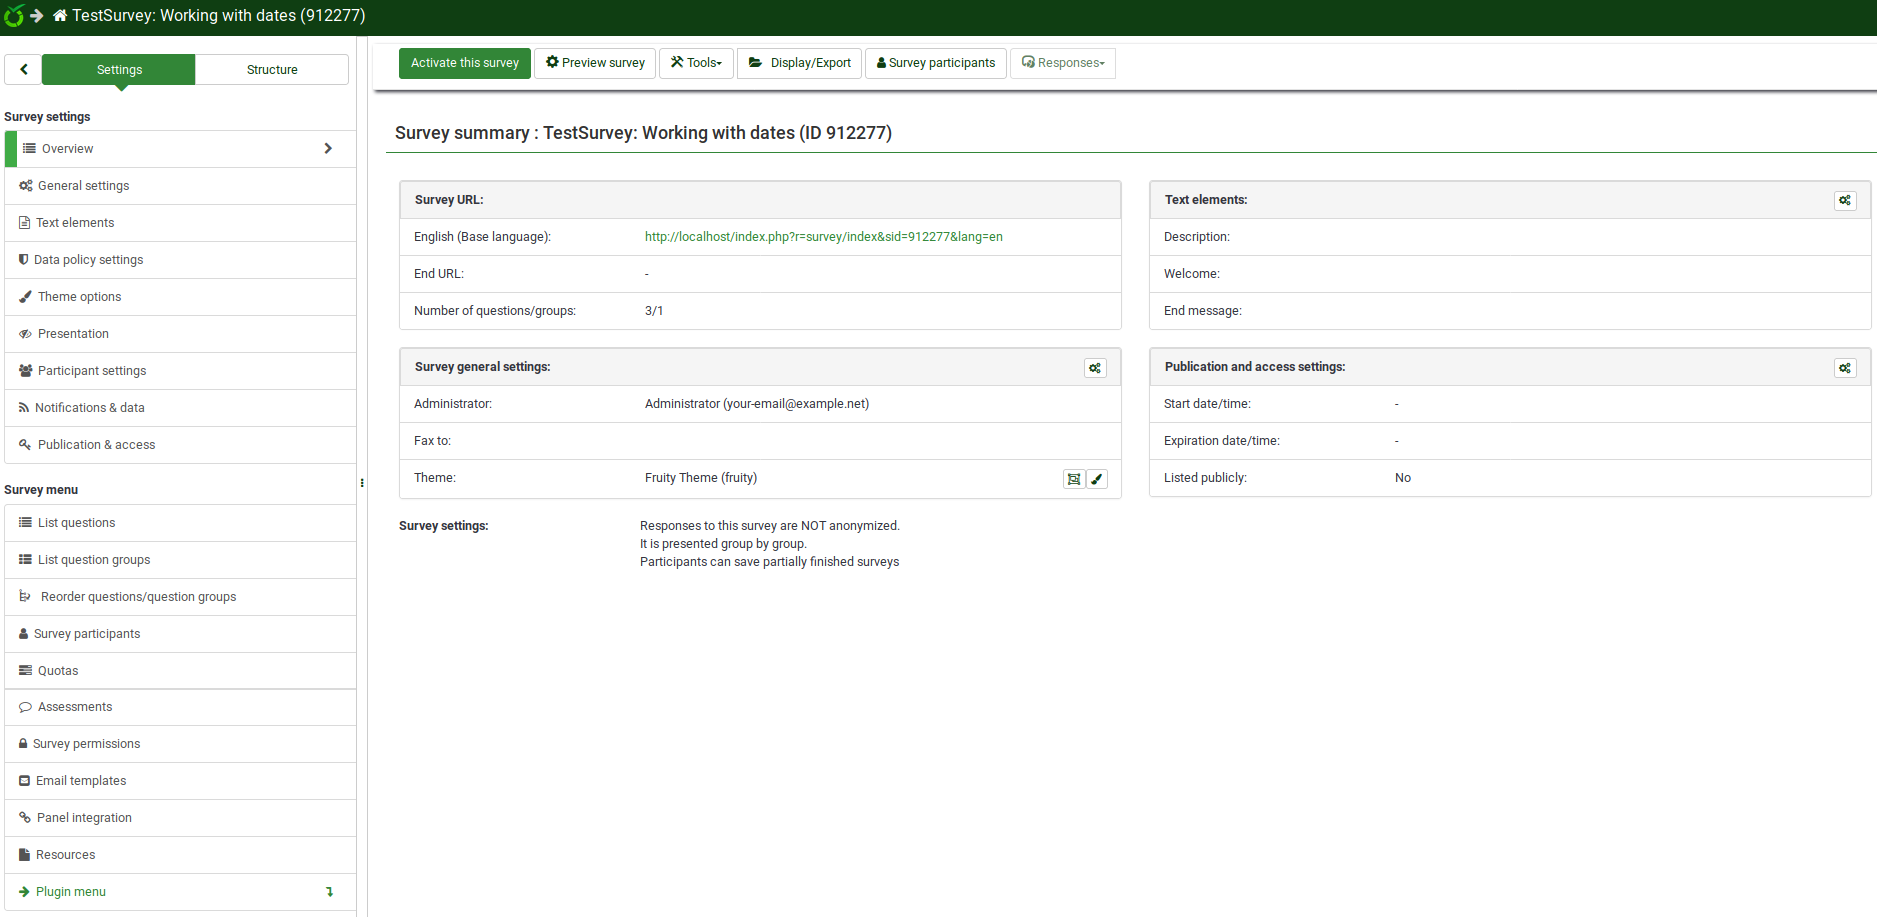
Als je wijzigingen hebt aangebracht klik dan op de knop Bewaar en sluit rechtsboven. Je komt dan op de beginpagina van de net toegevoegde enquête:
Groep toevoegen
Een vraaggroep wordt gebruikt om vragen per pagina te groeperen.
Om een vraaggroep toe te voegen moet je natuurlijk eerst naar de enquête gaan waarin je de vraaggroep wilt toevoegen. Dat kan door op de knop Enquêtes rechtsboven te klikken:
Click on the survey you wish to add the question group to - the survey page will show up. The left-side menu contains two tabs: settings and structure. To add questions and question groups, you have to work from the structure tab:
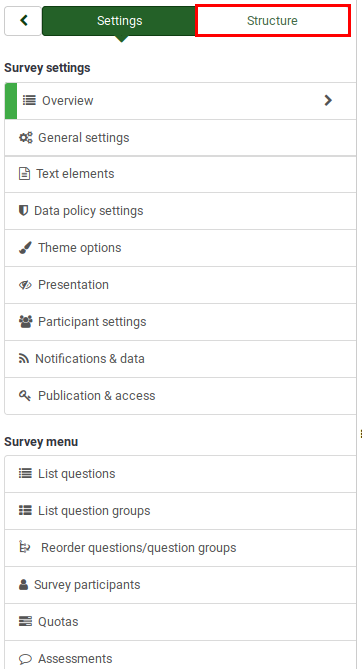
Once clicked on the Structure tab, the left-side menu will look like this:
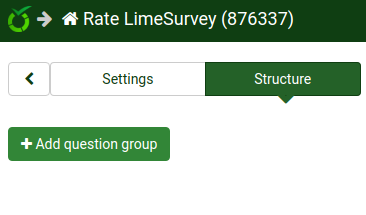
Als je op de knop Vraaggroep toevoegen klikt, dan wordt het volgende scherm getoond:
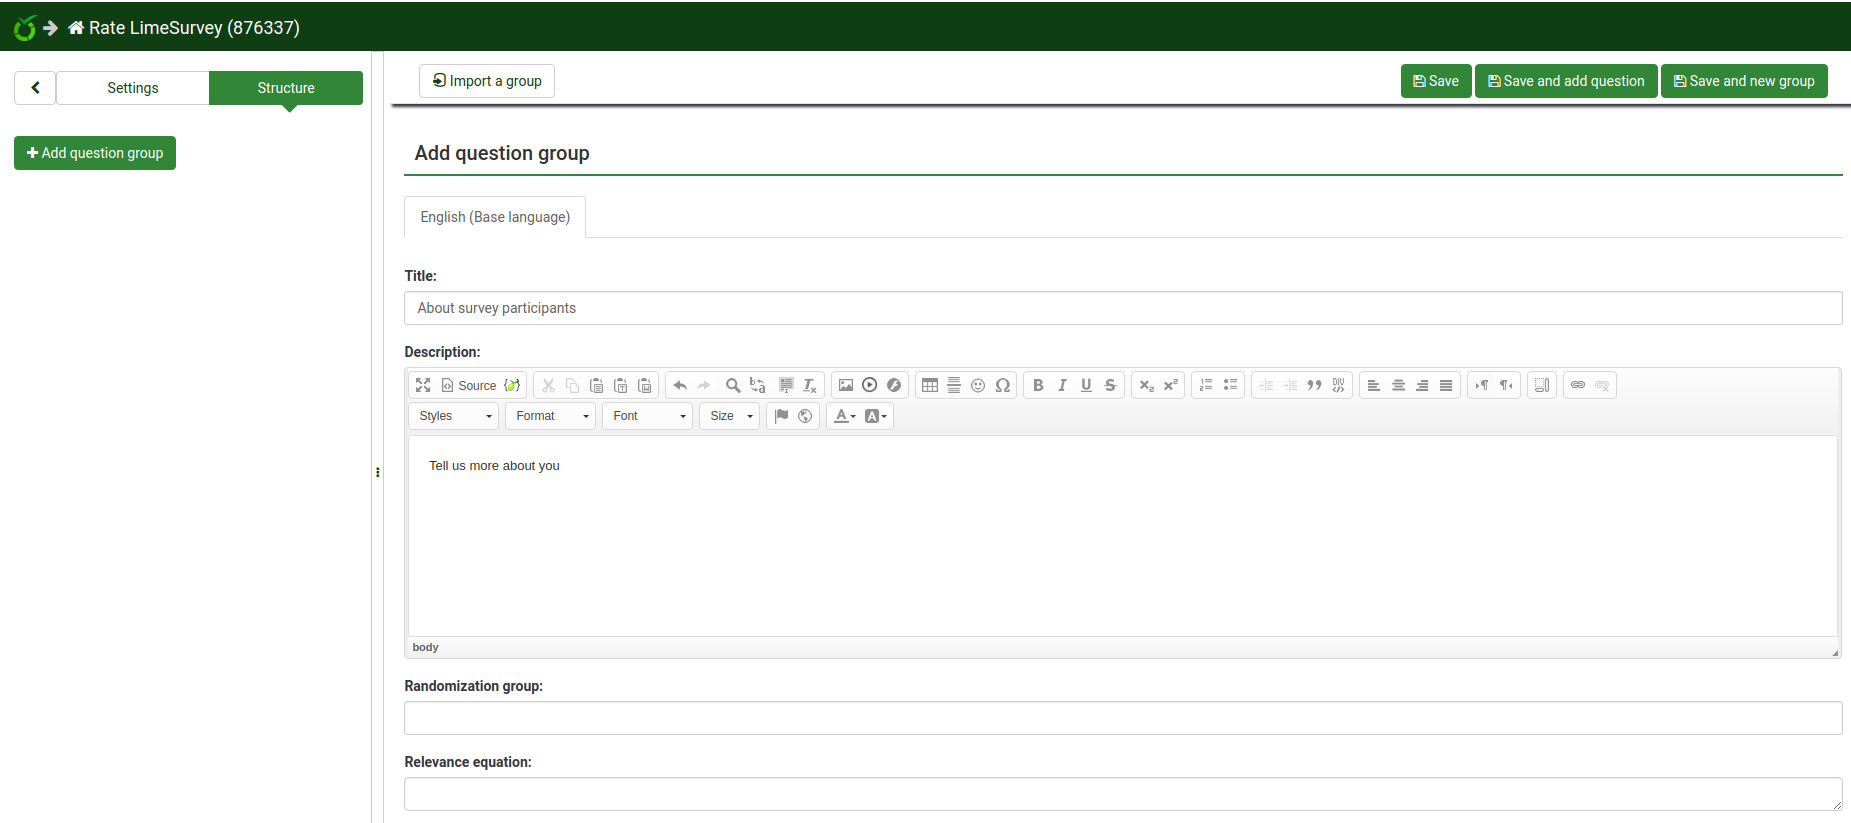
- Titel: De naam van de vraaggroep;
- Beschrijving: Een optionele beknopte beschrijving. Indien de bijbehorende optie aangezet is wordt het getoond aan de deelnemers van de enquête;
- Randomisatiegroep: Hiermee kun je de plaats van de vraaggroep willekeurig maken (dat moet je dan wel met de betreffende vraaggroepen ook doen);
- Relevantievergelijking: Hiermee kun je het laten beantwoorden van de vraaggroep afhankelijk maken van een eerder gegeven antwoord van die deelnemer.
Klik na het invullen op de knop Bewaar (rechtsboven).
Vraag toevoegen
To create a new question, always remember that you need first to create a question group. Please check the steps presented above to see how you can add a question group to a survey.
Once done creating the survey group, select again the structure tab and click on the add question button or select the question group from the left-side menu and click on the “add new question to group” button located under the Group quick actions:

Once clicked, the Create question page will load up. It contains the following options:
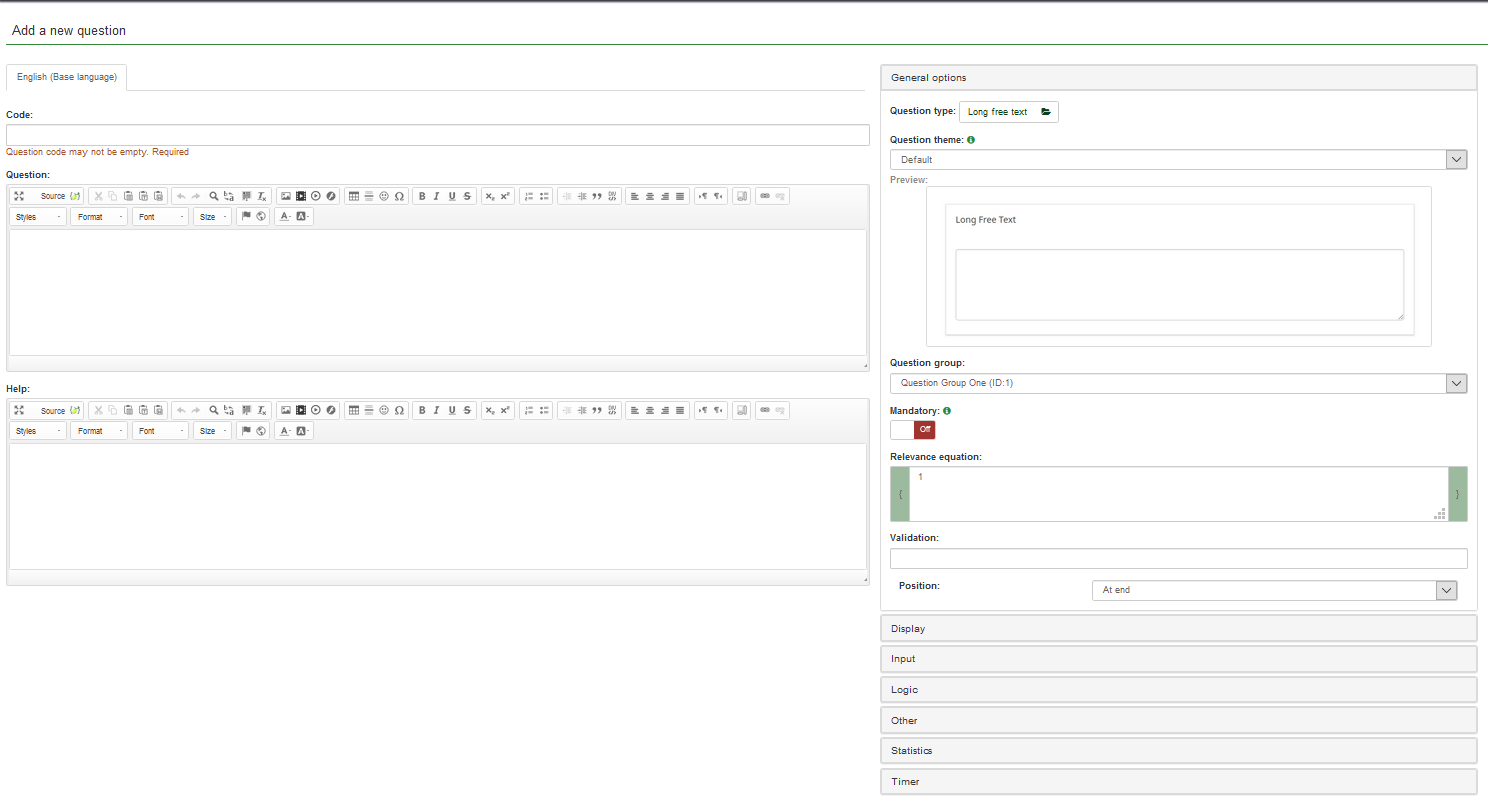
- Code: It represents the individual question name/code with which the survey is saved in the database and can be used further in more complex and advanced types of questions;
- Question: The name of the question that will actually appear in the survey for the survey participants;
- Help: A short text can be provided in order to help the survey participants better understand the question;
- General options: The functionalities located under this option allow you to modify the most important question-related settings. It includes four options:
- Question type: Many question types can be used in LimeSurvey. To better understand them, hover the mouse over each option or read our wiki on questions;
- Question group: You can choose here which question group you would like to add the question to;
- Validation: This feature is available on all free text type or numeric questions. It is used for response validation. If the response is not validated, the user will be prompted to try again before they can progress;
- Mandatory: It is available for all question types. This setting allows you to require users to answer the question before they can move on to the next question;
- Relevance equation: It is a setting for advanced users. It is recommended to use the default value of "1" (it means that the item will be always shown);
Please note that according to the selected question type, different tabs will be displayed below the General settings tab. To find out more on this, we suggest you to start reading first the following wiki section.
For example, if the Long free text question type is selected (the default option), then the following tabs will be displayed: General options, Display, Input, Logic, Logic, Other, Statistics, Timer. Click on the Save button. You will be redirected to a page that contains the summary of the recently added question:
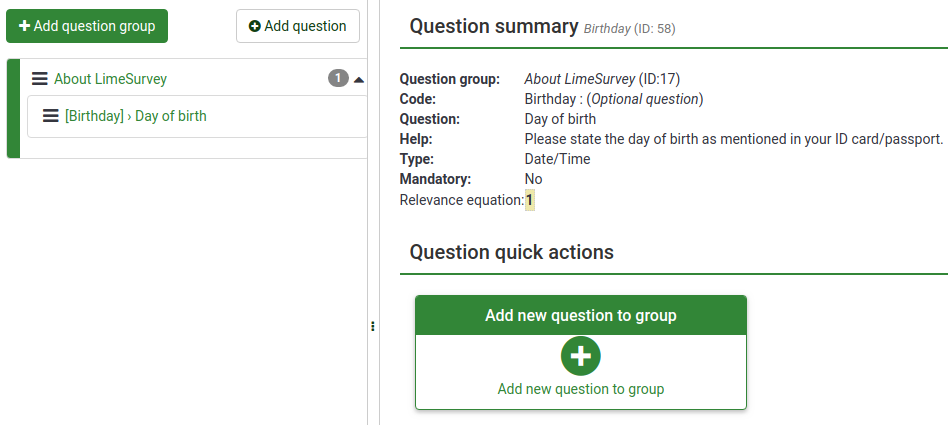
To add more questions, follow the same procedure described above.
Subvragen en antwoorden toevoegen
Verschillende vraagtypes hebben mogelijk subvragen of voorgedefinieerde antwoordsets nodig. Als je bijvoorbeeld naar de leeftijd vraagt heb je geen van beide nodig. Maar bij een eenvoudige arrayvraag zijn beide nodig.
Nu een voorbeeld met een array vraagtype:

Subvragen toevoegen
Om een subvraag toe te voegen, klik op Wijzig subvragen. Tik de subvragen voor de deelnemers in:

Antwoorden toevoegen
Om een antwoordset toe te voegen, klik op Wijzig antwoordopties. Tik de antwoorden in:

Sla de antwoorden op en bekijk de vraag. (Dit kan met de knop Voorvertoon.)
Our question looks like this:

Goed gedaan! Je hebt net een vraag van het arraytype toegevoegd.
Vragen ordenen
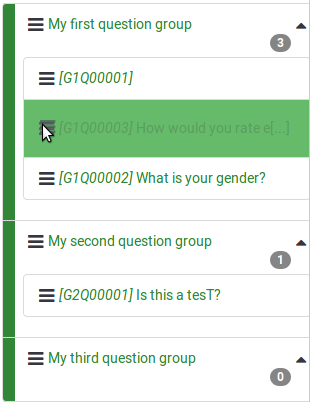
If your survey already contains dozens of questions, it is a time-consuming process to access each question and/or question group and edit the order one-by-one. Therefore, to quickly reorganize your questions and question groups, you can change the order of the questions and question groups from the Survey Structure menu. Once accessed, click on the three-lines symbol that is located in front of the question (group) name and start dragging it to the desired position.
Enquête activeren/stoppen
Now that you have at least one question and question group added to your survey, you can activate it. Select the Settings tab from the left-side menu and click on the Overview option. The following page will load up:
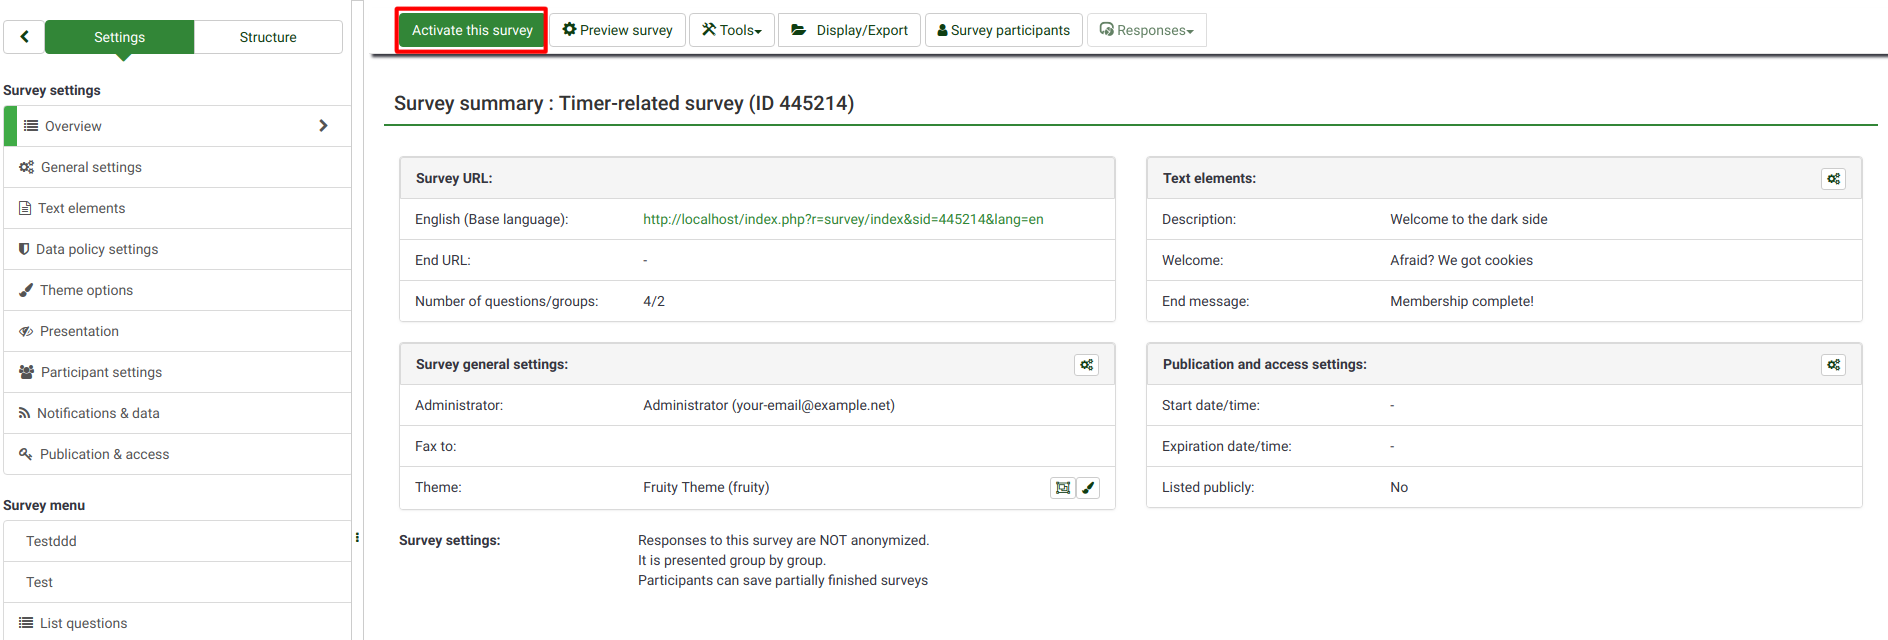
Check the toolbar and click on the Activate this survey button.
Voor de activatie wordt er eerst een scherm getoond waarin wat algemene instellingen van de enquête ingevuld kunnen worden:

- Anonymyzed responses: This option allows you to determine whether responses to your survey are matched up with information from your survey's token table, or kept "anonymous". If you decide to enable it, your survey is set to anonymize responses - there will be no way to connect answers and participants;
- Save IP address: If enabled, the IP address of the survey respondent will be stored together with his/her answers;
- Save timings: If enabled, the time spent on each page of the survey by each survey participant is recorded;
- Date stamp: Turn it on if you would like to see the date the answers were submitted;
- Save referrer URL: If enabled, the referrer URL will be stored together with the answers.
Klik na het inschakelen van de gewenste functies op de knop Enquête opslaan en activeren. De volgende tekst wordt nu getoond:

Kies de optie Nee, bedankt. om er een openbare enquête van te maken. Iedereen kan dan de enquête invullen!
Gefeliciteerd, je hebt je eerste enquête geactiveerd! Als je de URL wilt delen, ga dan naar de beginpagina van je enquête en zoek de URL op in de Enquête-samenvatting:
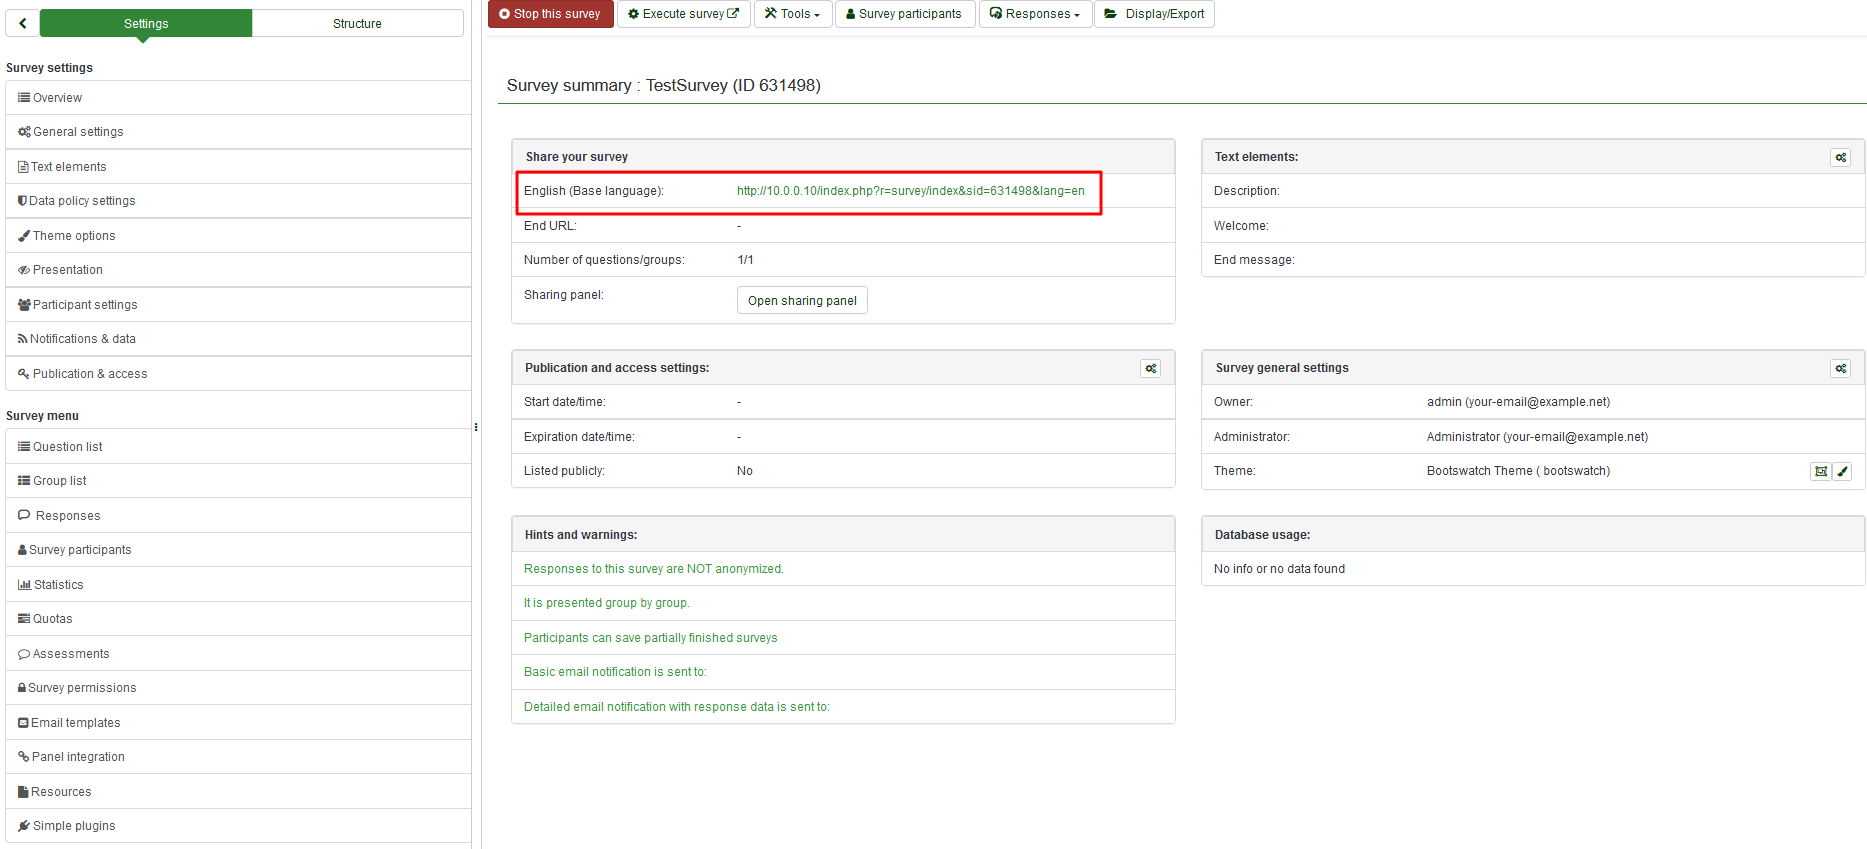
Kopieer de link en deel de link.
If you want to stop the survey, click on the Overview tab from the left-side menu and look for the Stop this survey button located on the top toolbar:

Statistieken
Om snel de statistieken van de enquête te bekijken kun je op de knop Enquête in de taakregel van de LimeSurvey beginpagina klikken. De beschikbare enquêtes worden getoond. Klik in de regel met de gewenste enquête op de knop Statistieken (![]() ) in het laatste veld:
) in het laatste veld:

Op een nieuw scherm worden een aantal diagrammen getoond. Als je er een rapport van wilt maken, ga dan naar beneden en klik op de knop om de afbeeldingen te exporteren. Elk diagram wordt een png-bestand die tezamen in een zip-bestand worden opgeslagen.
Rechtsboven is een knop waarmee een ervaren gebruiker toegang krijgt tot wat filters om de gegevens nog wat meer te specificeren.
Klik na het selecteren van de gewenste filters op de knop Toon statistieken, deze knop staat rechtsboven.

Afhankelijk van de gekozen uitvoer wordt het resultaat getoond in HTML, Excel of PDF.
Vragen en responsen exporteren
Als je de resultaten in een ander formaat wilt exporteren om met een applicatie als SPSS, R, STATA, ,., een overzicht aan te maken, selecteer dan eerst de betreffende enquête. Klik op de knop Responsen bovenin en daarna op Responsen & statistieken:

Je bevind je nu op de pagina om de responsen te bekijken. Klik op de knop Exporteren bovenin en kies het gewenste formaat bij het exporteren. Bij de bovenste optie worden alle beschikbare formaten getoond:

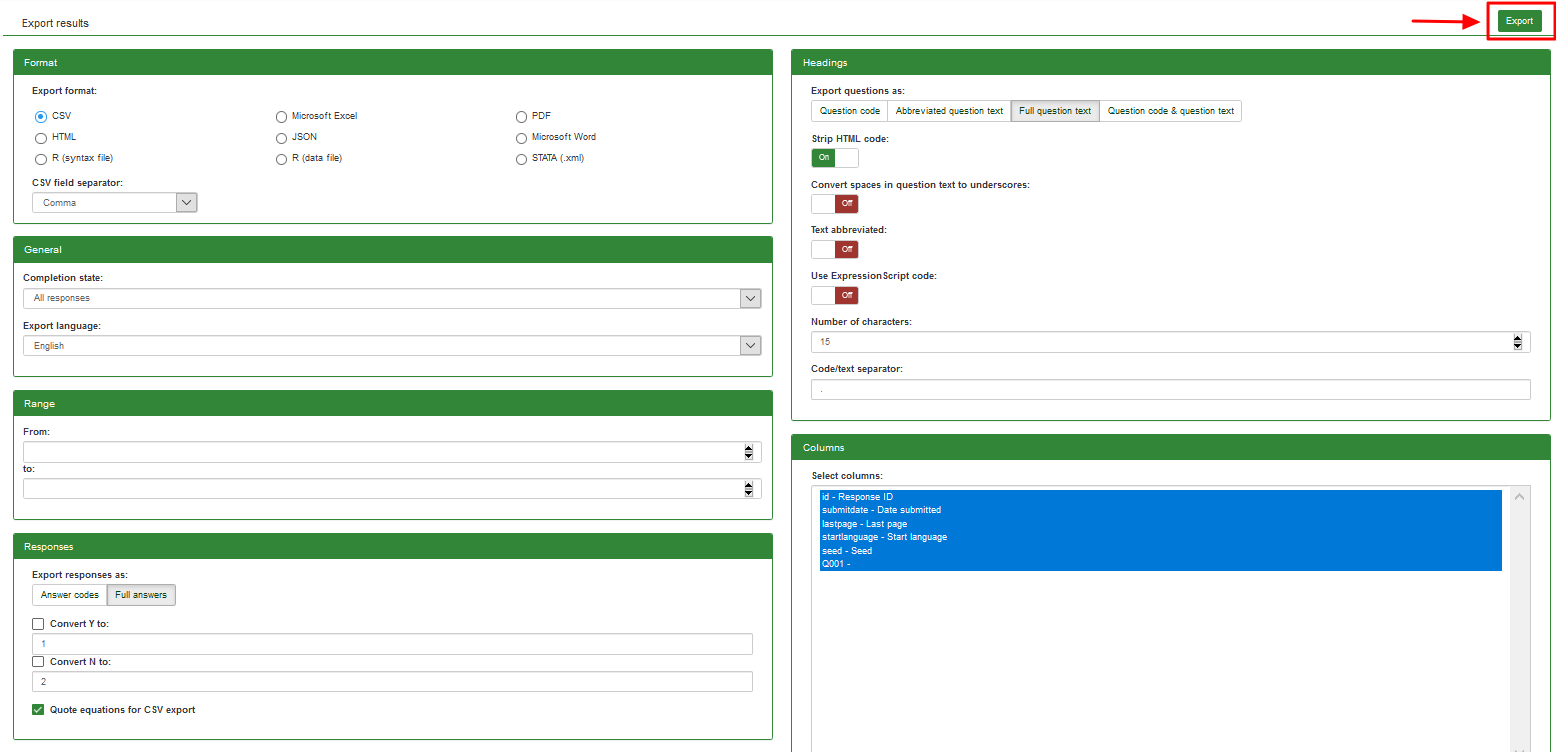
Klik, na het instellen van de filters, op de knop Exporteren.
Andere functies in LimeSurvey - alleen voor experts
Bekijk de eigenschappen van LimeSurvey Pro : https://www.limesurvey.org/editions-and-prices/limesurvey-pro/professional-features.
Als je nog vragen hebt dan kun je ze stellen op ons forum of je aanmelden op ons IRC channel.