Quick start guide - LimeSurvey 3.0+/de: Difference between revisions
From LimeSurvey Manual
Surveyunihi (talk | contribs) No edit summary |
Surveyunihi (talk | contribs) (Created page with "* '''Umfrage erstellen''' * '''Umfragenliste''' * '''Globale Einstellungen''' * '''ComfortUpdate''' * '''Beschriftungssets''' * '''Designvorlagen'''") |
||
| Line 154: | Line 154: | ||
* ''' | * '''Umfrage erstellen''' | ||
* ''' | * '''Umfragenliste''' | ||
* ''' | * '''Globale Einstellungen''' | ||
* '''ComfortUpdate''' | * '''ComfortUpdate''' | ||
* ''' | * '''Beschriftungssets''' | ||
* ''' | * '''Designvorlagen''' | ||
<div class="simplebox">[[File:help.png]] The boxes act like shortcuts for different LimeSurvey functionalities. The boxes and their number can be changed from '''Configuration -> Home page settings'''.</div> | <div class="simplebox">[[File:help.png]] The boxes act like shortcuts for different LimeSurvey functionalities. The boxes and their number can be changed from '''Configuration -> Home page settings'''.</div> | ||
Revision as of 11:14, 20 June 2018
Einleitung - Was ist LimeSurvey?
LimeSurvey ist eine freie Open Source-Onlineumfragesoftware, geschrieben in PHP und unter der GNU General Public License 2 veröffentlicht. Die Software ermöglicht es, Online Umfrage zu entwickeln und zu veröffentlichen, als auch Antworten zu sammeln, Statistiken über diese zu erstellen und die erhaltenen Daten für andere Programme zu exportieren. Sie können LimeSurvey entweder auf Ihrem eigenen Server installieren (LimeSurvey CE) oder direkt unseren Service LimeSurvey Pro nutzen.
Dieser Schnellstart beschäftigt sich hauptsächlich mit der Nutzung von LimeSurvey Pro. Um LimeSurvey auf Ihrem eigenen Server zu installieren, schauen Sie bitte in die Installationanleitung in unserer Anleitung.
Erstellen Sie gratis einen LimeSurvey Account
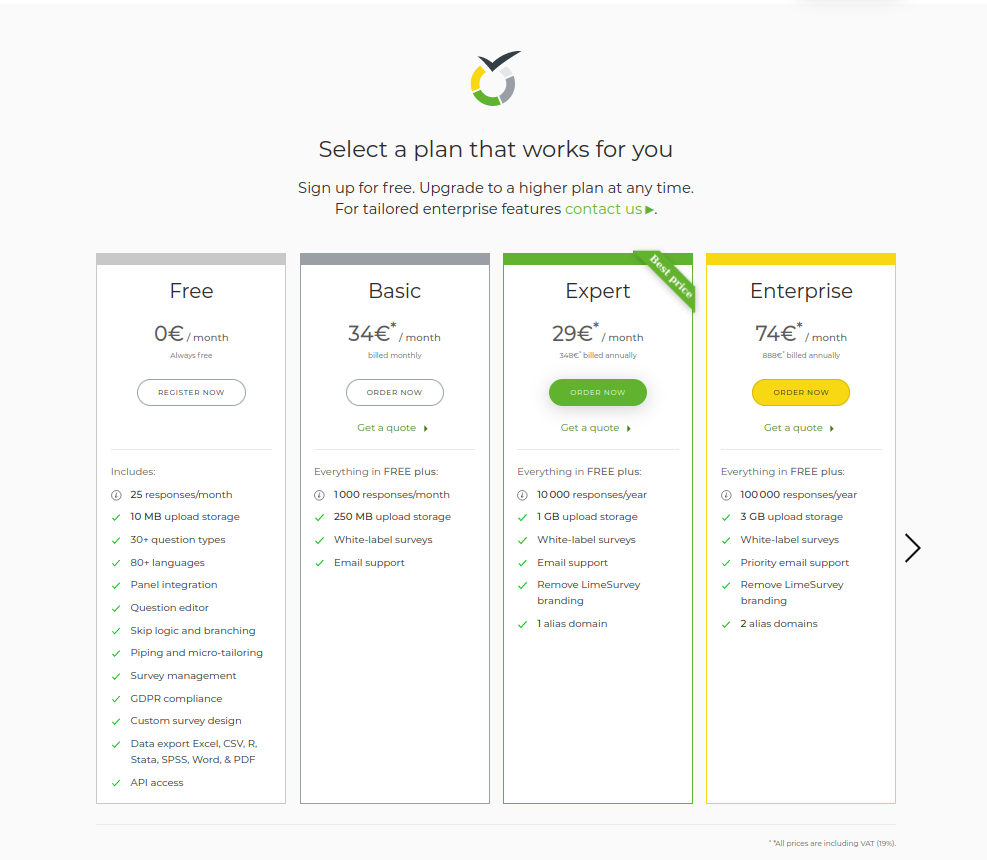
LimeSurvey ermöglicht es jedem Benutzer, einen Gratis-Account anzulegen, der die Möglichkeit bietet, alle Funktionen auszuprobieren. Um einfach einen Account zu erstellen, gehen Sie auf die LimeSurvey Website und bewegen Sie die Maus auf "Editionen & Preise" in der oberen Menüleiste. Klicken Sie danach auf den Link zu "Editionen & Preise" in der Rubrik LimeSurvey Pro.

Wählen Sie nun aus den vier verfügbaren Editionen (free, basic, expert und enterprise), die Version free mit einem Klick auf den Button "Jetzt registrieren".
Im nächsten Schritt füllen Sie bitte das Anmeldeformular aus:
- Benutzername: Der Benutzername, den Sie zum Anmelden verwenden. Dieser Benutzername verwenden Sie später auch, um sich in Ihrer Installation anzumelden;
- E-Mail: Diese E-Mail Adresse verwenden wir, um Ihnen den Aktivierungslink zuzusenden;
- Passwort: Bitte verwenden Sie wenigstens 6 Zeichen für Ihr Passwort. Dieses Passwort verwenden Sie später auch, um sich in Ihrer Installation anzumelden.
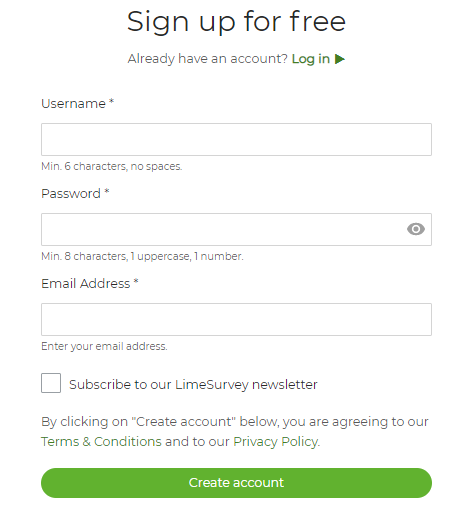
Wenn Sie den Mauszeiger über die Felder bewegen, öffnen sich PopUp-Textboxen mit weiteren Details zum jeweiligen Feld.
Optional können Sie sich auch für den LimeSurvey Newsletter anmelden, um Hilfe, Tips & Tricks, Rabatte und die neuesten Nachrichten zu erhalten.
Für einen schnelleren Anmeldeprozess können Sie sich auch über Ihren Twitter-, Gmail-, oder GitHub-Account registrieren. LimeSurvey wird aus dieser Quelle nur die notwendigen Informationen einholen.
Nachdem Sie Ihren LimeSurvey Account erstellt haben, indem Sie auf den "Jetzt registrieren"-Button geklickt haben, werden Sie eine E-Mail mit einem Aktivierungslink erhalten.
Klicken Sie bitte auf diesen. Danach werden Sie direkt auf die LimeSurvey Website weitergeleitet und dort automatisch eingeloggt.
Um zur Administration Ihrer LimeSurvey-Installation zu kommen, müssen Sie zuerst eine Installation erstellen.
Klicken Sie dazu auf Ihren Benutzername in der Hauptmenüleiste und gehen dann auf den Menüpunkt Mein LimeSurvey Profil

Klicken Sie auf Installationen im Profilmenü auf der linken Seite und erstellen Sie eine Installation.
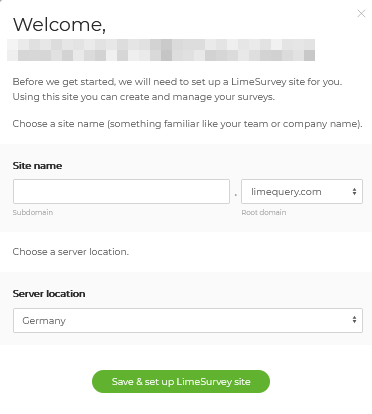
Sie werden dann gebeten, die folgenden Felder auszufüllen
- Subdomain und Domäne - Dies ist der name, bestehend aus Subdomäne und Domäne, unter der Ihre Installation erreichbar sein wird. Bitte verwenden Sie für die Subdomäne nur Kleinbuchstaben und Zahlen.
- Serverstandort – Wir bieten Deutschland, Kanada, Australien und die Vereinigten Staaten als Standorte an. Wählen Sie den, der am besten zu Ihren Bedürfnissen passt.
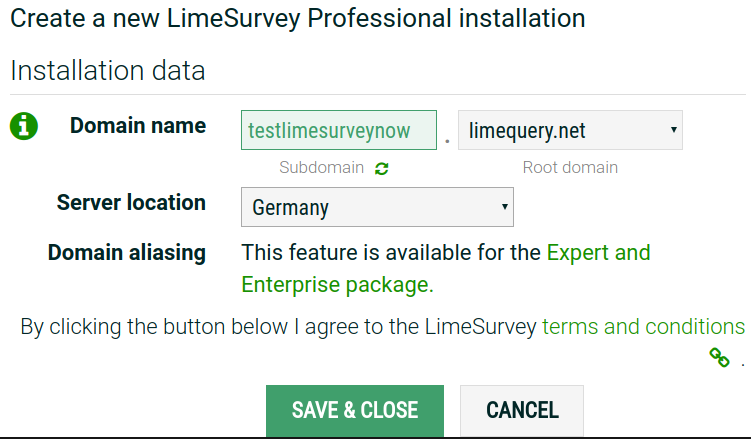
Wenn alle Felder korrekt ausgefüllt wurden und Sie auf "Speichern und Schließen" geklickt haben, wird die Installation erstellt.
Dies dauert einige Sekunden.
Die Seite mit den Einstellungen der Installation könnte beispielsweise so aussehen:
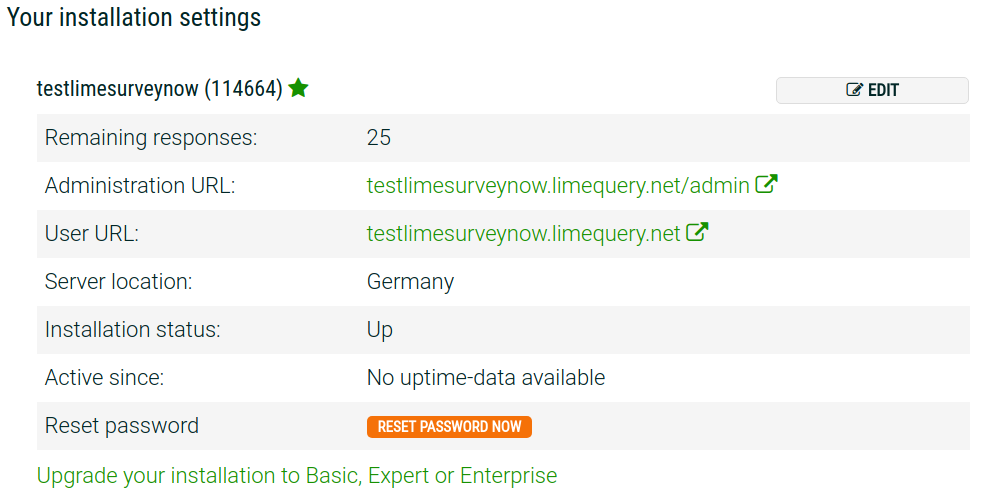
Jetzt können Sie Ihre Installation nutzen.
Klicken Sie dazu auf den "Administrations-Link" (Administration-URL).
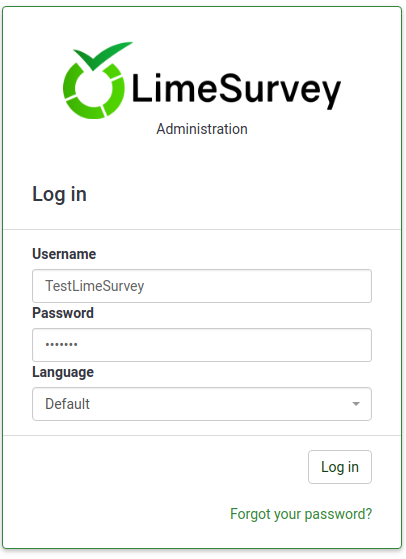
Um sich in Ihrer Installation anzumelden, verwenden Sie die selben Login-Daten wie auf LimeSurvey.org.
Mit LimeSurvey starten
Einmal eingeloggt, sehen Sie die Homepage Ihrer LimeSurvey-Installation. Diese enthält eine Toolbar am oberen Rand des Fensters und eine Gruppe von sechs Boxen darunter. Jede dieser sechs Boxen entspricht je einem Schnelllink zu einer LimeSurvey Funktion.
Die Toolbar enthält folgende Optionen:
- Anleitungen: Ein Klick hierauf führt Sie zu den eingebauten Tutorials von LimeSurvey. So ist beispielsweise in jedem LimeSurvey-System ab Version 3 eine "Einsteigertour" verfügbar.
- Konfiguration: Führt zu einem umfangreichen Untermenü, in dem Sie Ihre LimeSurvey-Installation verwalten können.
- Erweitert: Enthält Optionen, die nicht benutzer- oder einstellungsabhängig sind. Sie können verwendet werden, um Ihre LimeSurvey-Installation zu erweitern bzw. zu verbessern.
- Designvorlagen: Wenn Sie Designvorlagen hinzufügen/bearbeiten/löschen möchten, rufen Sie diese Option auf. Die Designvorlagen ermöglichen die Kontrolle über das Aussehen und die Handhabung (die Benutzeroberfläche) der Seiten Ihrer Umfrage(n);
- Beschriftungseinstellungen verwalten: Beschriftungssets sind vorgefertigte Listen von Textbausteinen, die in vielen Fragetypen entweder als Antwortoptionen oder als Unterfragen/Matrixitems verwendet werden können;
- Datenintegrität überprüfen: Überprüfung der Konsistenz und der Redundanz der Daten;
- Gesamte Datenbank sichern: Wird verwendet, um die LimeSurvey-Datenbank zu sichern, wenn wichtige LimeSurvey-Upgrades anstehen oder wenn Sie Ihre LimeSurvey-Installation auf einen anderen Server verlagern wollen.
- ComfortUpdate: ComfortUpdate ist ein Tool, mit dem Sie Ihre LimeSurvey-Installation mit wenigen Mausklicks (anstatt einer manuellen LimeSurvey-Neuinstallation) einfach von Ihrem Webbrowser aus aktualisieren können.
- Benutzer: Unter diesem Reiter finden Sie Optionen, die sich auf die Verwaltung der Benutzer und Umfrageteilnehmer beziehen.
- Umfrageadministratoren verwalten: Neue Administrationsbenutzer können von hier aus hinzugefügt werden;
- Benutzergruppen erstellen/bearbeiten: Diese Funktion ist für die Gruppierung von Administrationsbenutzern in einzelne Gruppen gedacht;
- Zentrale Teilnehmerdatenbank: Es erlaubt jedem Administrator, die Informationen der Teilnehmer in einer zentralen Tabelle zu speichern, die unabhängig von einer Token-Tabelle ist.
- Einstellungen: Unter dieser Registerkarte finden Sie weitere Optionen, die Ihnen bei der Anpassung Ihrer LimeSurvey-Installation helfen können.
- Homepage Einstellungen: Benutzer können diese Option verwenden, um die Einstellungen der Homepage ihren Bedürfnissen entsprechend anzupassen;
- Globale Einstellungen: Die hier vorgenommenen Änderungen betreffen die gesamte LimeSurvey-Installation und beeinflussen auch die Einstellung von Nicht-Superadministrator-Benutzern für alle Benutzer;
- Plugin-Manager: Im Plugin-Manager kann jeder Benutzer eine Reihe von Plugins zu aktivieren, die vom LimeSurvey Team unterstützt werden. Auch neue Plugins können zu Ihrer Installation hinzugefügt werden.
- Menükonfiguration: Erlaubt die Konfiguration von Umfragemenüs.
- Konfiguration der Menüeinträge: Erlaubt die Konfiguration der einzelnen Menüeinträge.
- Erweitert: Enthält Optionen, die nicht benutzer- oder einstellungsabhängig sind. Sie können verwendet werden, um Ihre LimeSurvey-Installation zu erweitern bzw. zu verbessern.
- Umfragen: Eine Umfrage umfasst über verschiedene miteinander verbundene Datenbestände: Sprachen, Fragengruppen, Fragen, Frageattribute, Antworten, Teilfragen, Standardantworten, Bewertungen, Quoten, Quoten, Quotenmitglieder und Quota-Spracheinstellungen. Durch Anklicken des grünen Pfeils öffnet sich ein Fenster mit folgenden Optionen:
- Erstellen Sie eine neue Umfrage: Neue Umfragen können erstellt und zur Liste der Umfragen hinzugefügt werden;
- Importieren Sie eine neue Umfrage: Wenn Sie eine Umfrage in Ihre Umfrageliste importieren möchten, verwenden Sie diese Funktion.
- Kopieren Sie eine Umfrage: Erlaubt es dem Benutzer, eine Umfrage schnell zu kopieren. Die kopierbaren Umfragen stehen in der Umfragenliste (siehe nächste Option), von wo aus sie bearbeitet werden können;
- Umfragenliste: Überblick über alle vorhandenen Umfragen. Zu dieser Liste gelangen Sie auch, wenn Sie in der Toolbar auf 'Umfragen' klicken.
- Antwort-Saldo: Zeigt die Anzahl der Antworten an, die aus Ihrem Abonnement noch übrig sind.
Da Sie im Moment nur Zugriff auf ein kostenloses Konto haben, stehen Ihnen 25 Antworten pro Monat zur Verfügung. Wenn Ihnen die Antworten ausgehen, können Sie ein Paket mit Antworten hier kaufen;
- Speicherplatz: Zeigt die Anzahl der MBs, die Ihnen zur Verfügung stehen, um Ihre Umfragen und Antworten zu speichern.
10 MB Speicherplatz sind in Ihrem kostenloses Konto inklusive. Wenn Sie mehr Speicherplatz erhalten möchten, können Sie ein Paket mit mehr Speicherplatz hier kaufen;
- Ihr Benutzername: Wenn Sie darauf klicken, können Sie entweder auf Ihre Benutzereinstellungen zugreifen oder sich von Ihrem Konto abmelden;
- Benachrichtigungen (Glockensymbol): Verschiedene Benachrichtigungen, die Ihre LimeSurvey-Installation betreffen, werden hier angezeigt.
Standardmäßig finden Sie sechs Schnelllink-Boxen auf der Startseite Ihrer LimeSurvey-Installation:
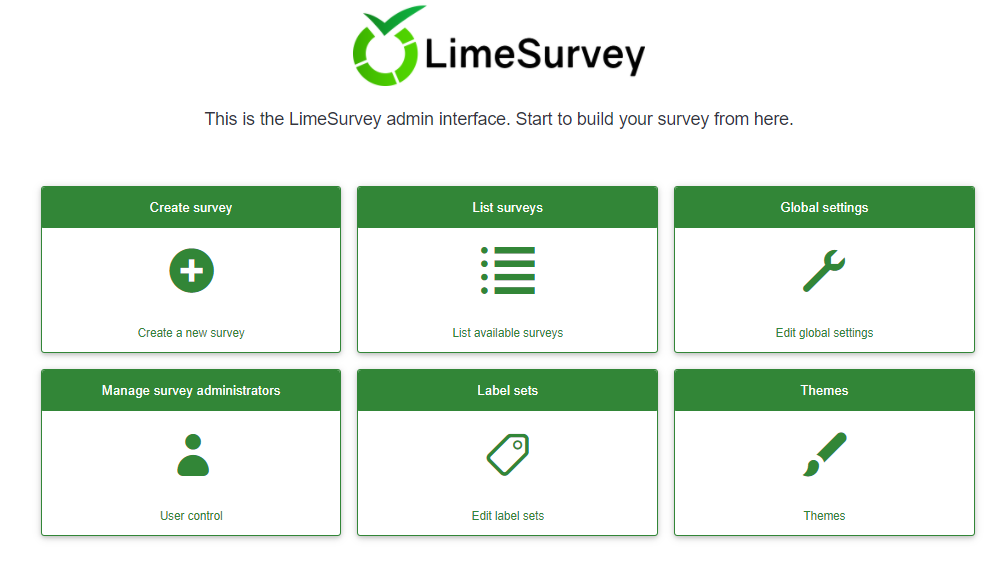
- Umfrage erstellen
- Umfragenliste
- Globale Einstellungen
- ComfortUpdate
- Beschriftungssets
- Designvorlagen
Create a survey
To create a survey, click on the Create a new survey box:
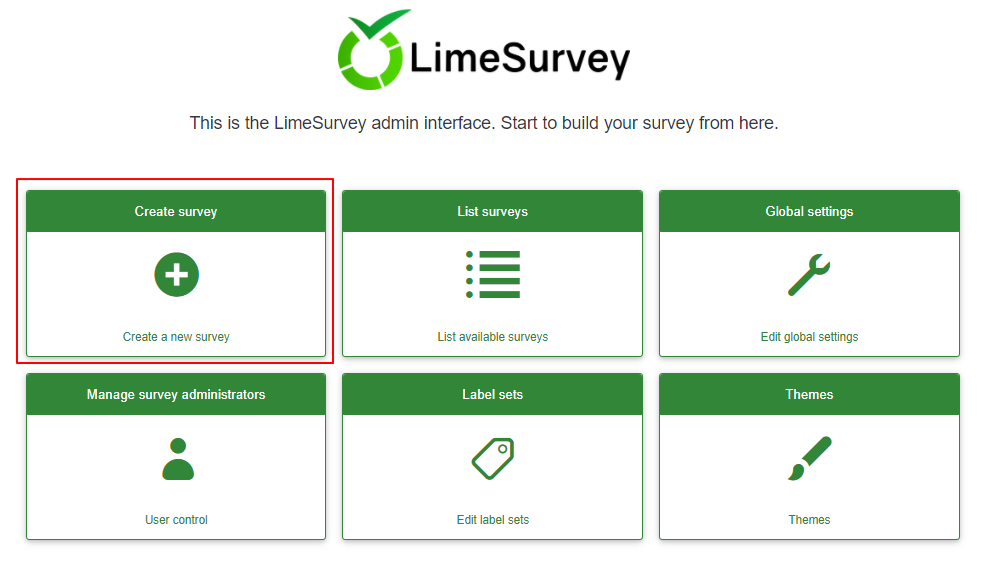
The Create survey page will be displayed:
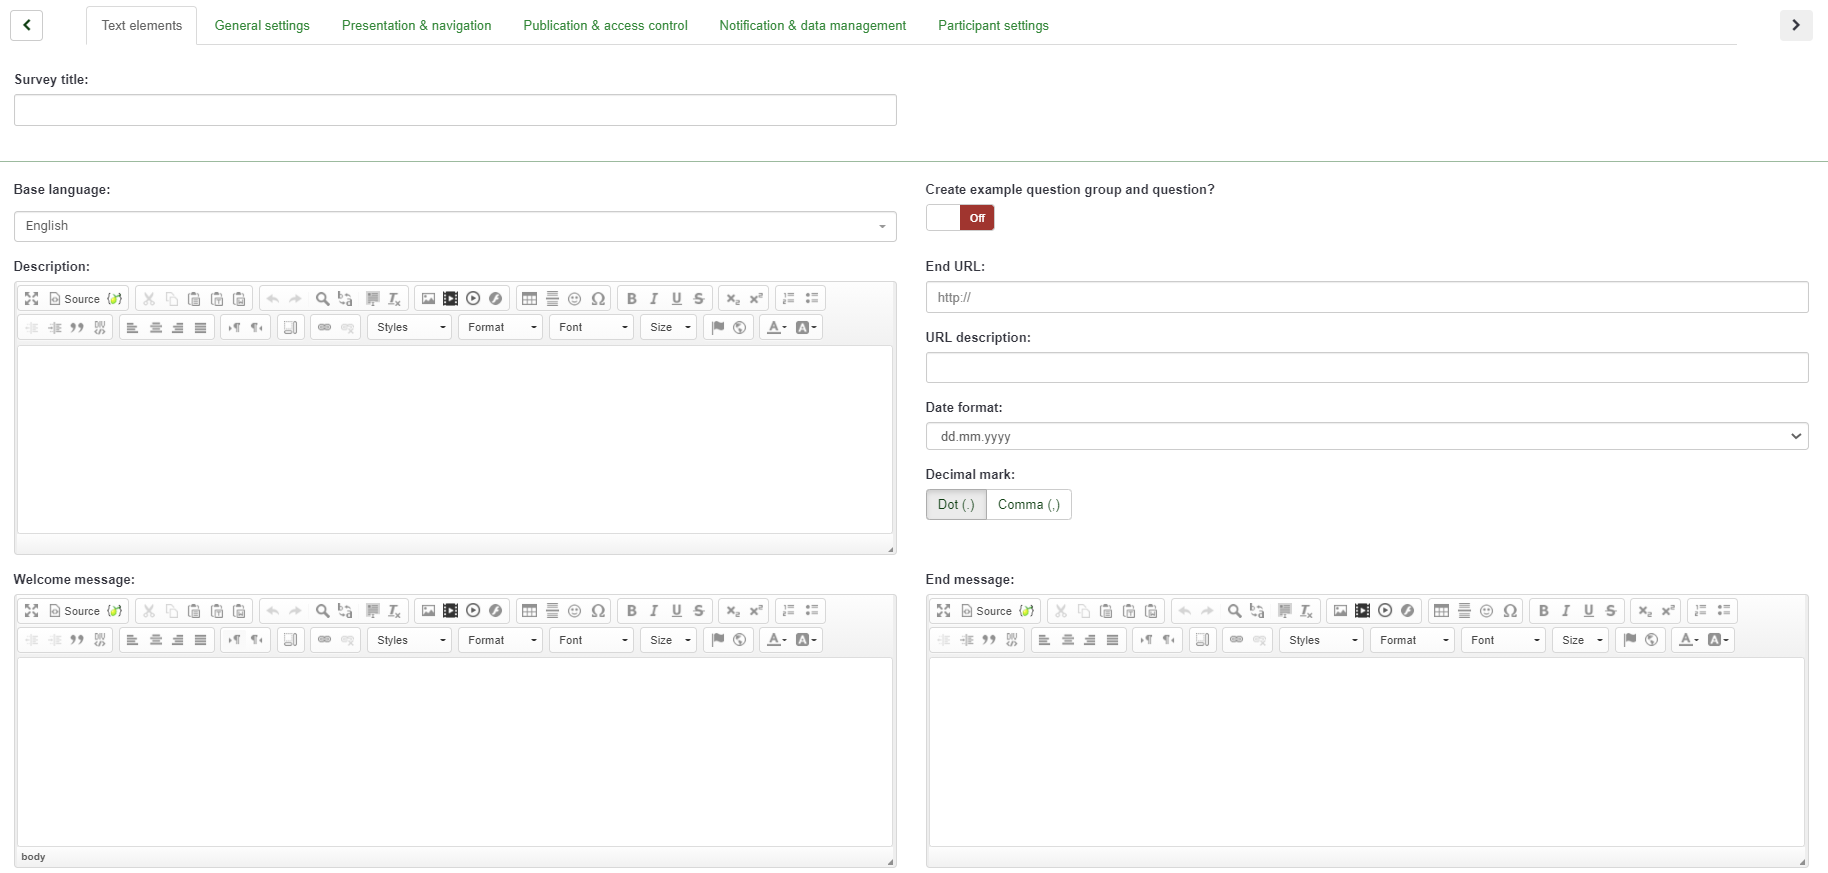
The following options will be displayed:
- Survey title: The title of the survey has to be typed in here. You cannot proceed further if no name is given to your survey. No worrires if you do not feel inspired at the moment, the title of the survey can be changed later;
- Base language: It is the main language of the survey. Additional languages can be added later from the settings of the survey;
- Sample question: It comes disabled by default. If you enable it, a question group and question examples will be added to your survey;
- End URL: You have the possibility to redirect users to another page when they finish filling in the questionnaire. If you wish to redirect them, type in the URL and activate the automatically load URL option that is located under the Presentation & navigation tab;
- URL description: A short end URL description can be added in the case in which the user is redirected to a non-related survey webpage. It may help the survey administrator to add notes vis-a-vis the usage of the respective URL; ;
- Date format: This option is important when you want to record timestamps together with the survey participants' answers. If you click on it, a drop-down list will show up with a multitude of date formats. Choose the one that fits your survey respondents (do not forget that different date formats are used across the world);
- Decimal format: Two options are available: dot (.) and comma (,). Choose the one that fits the place where you conduct your study (e.g., US vs Germany);
- Description: A short description of the survey can be added here;
- Welcome message: The survey participants will be prompted by this welcome message if something is typed in;
- End message: Type in a message that will be displayed to the survey participants when they submit the answers to the questionnaire.
If you are done completing the fields, click on the Save and close button located in the upper-right part of the window. You will be redirected to the home page of your recently added survey:
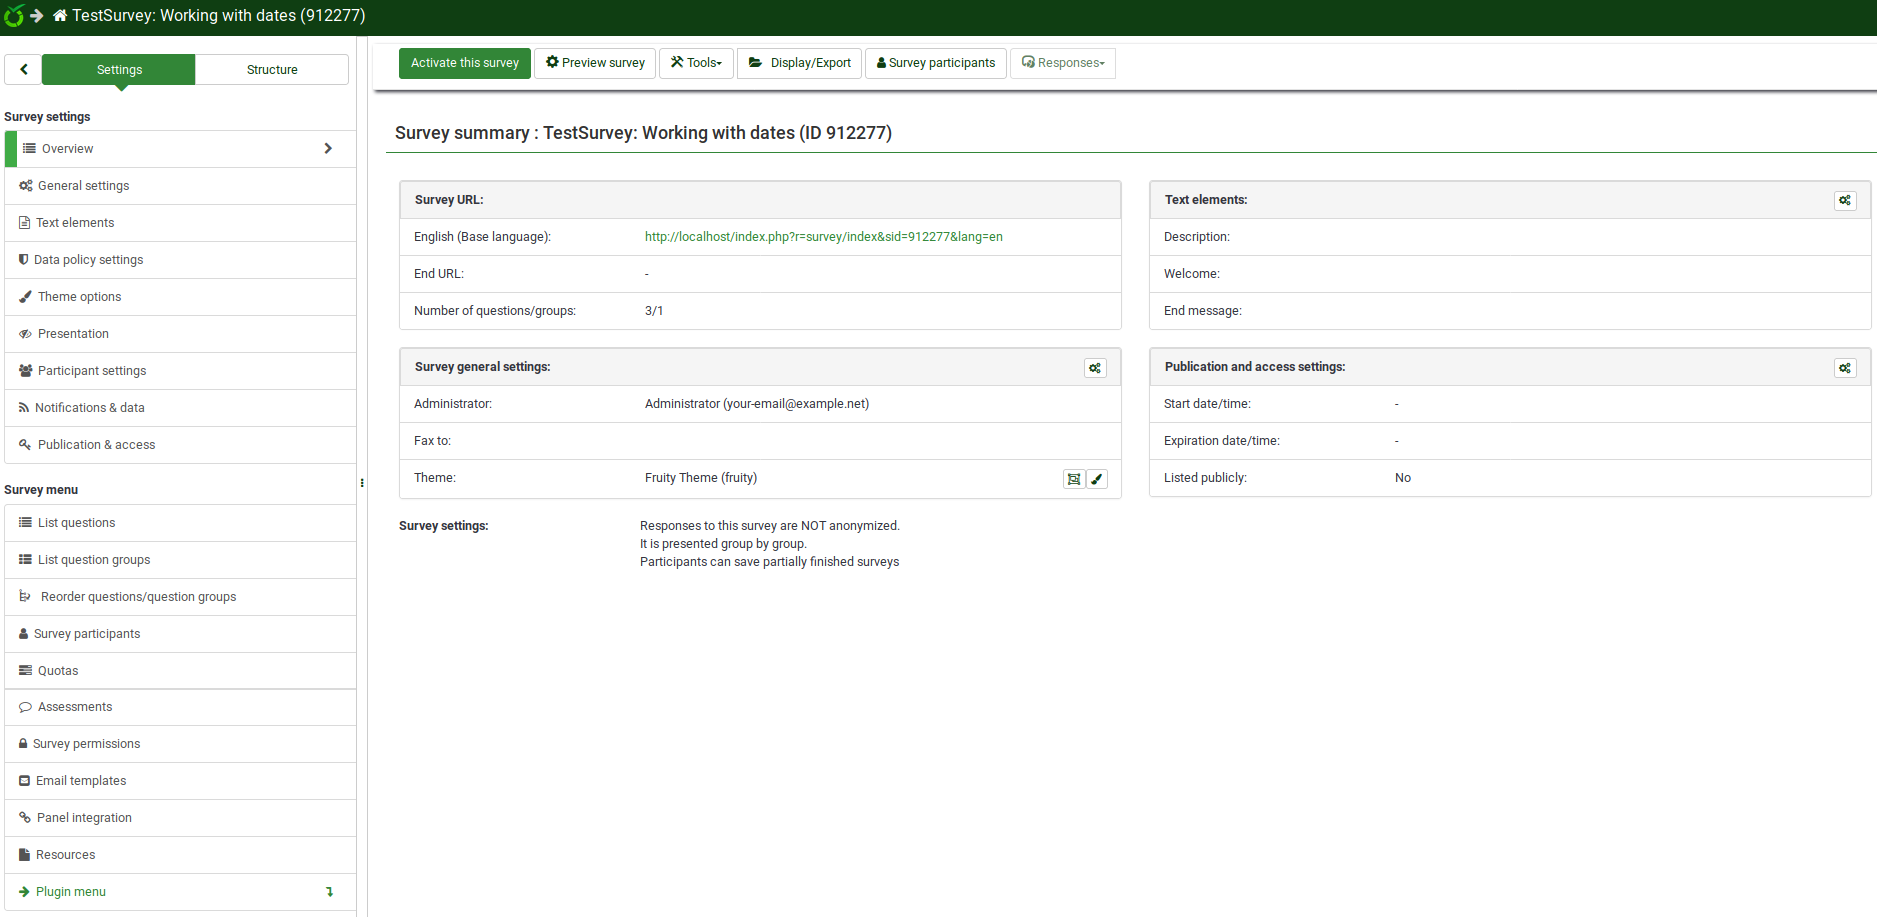
Create a question group
A question group is used to group different elements of a survey like descriptions, questions, and answers.
To create a question group, you have to first access the survey to which you want to add the question group. To do that, click on the Surveys button located on the top toolbar from the LimeSurvey home page:
Click on the survey you wish to add the question group to - the survey page will show up. The left-side menu contains two tabs: settings and structure. To add questions and question groups, you have to work from the structure tab:
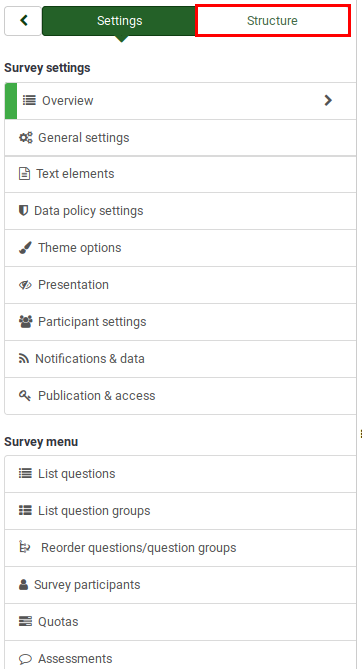
Once clicked on the Structure tab, the left-side menu will look like this:
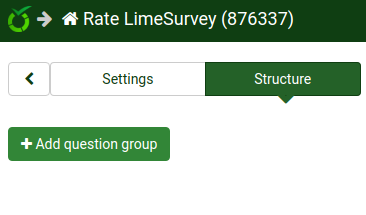
Now, click on the Add question group button. The following page will be displayed:
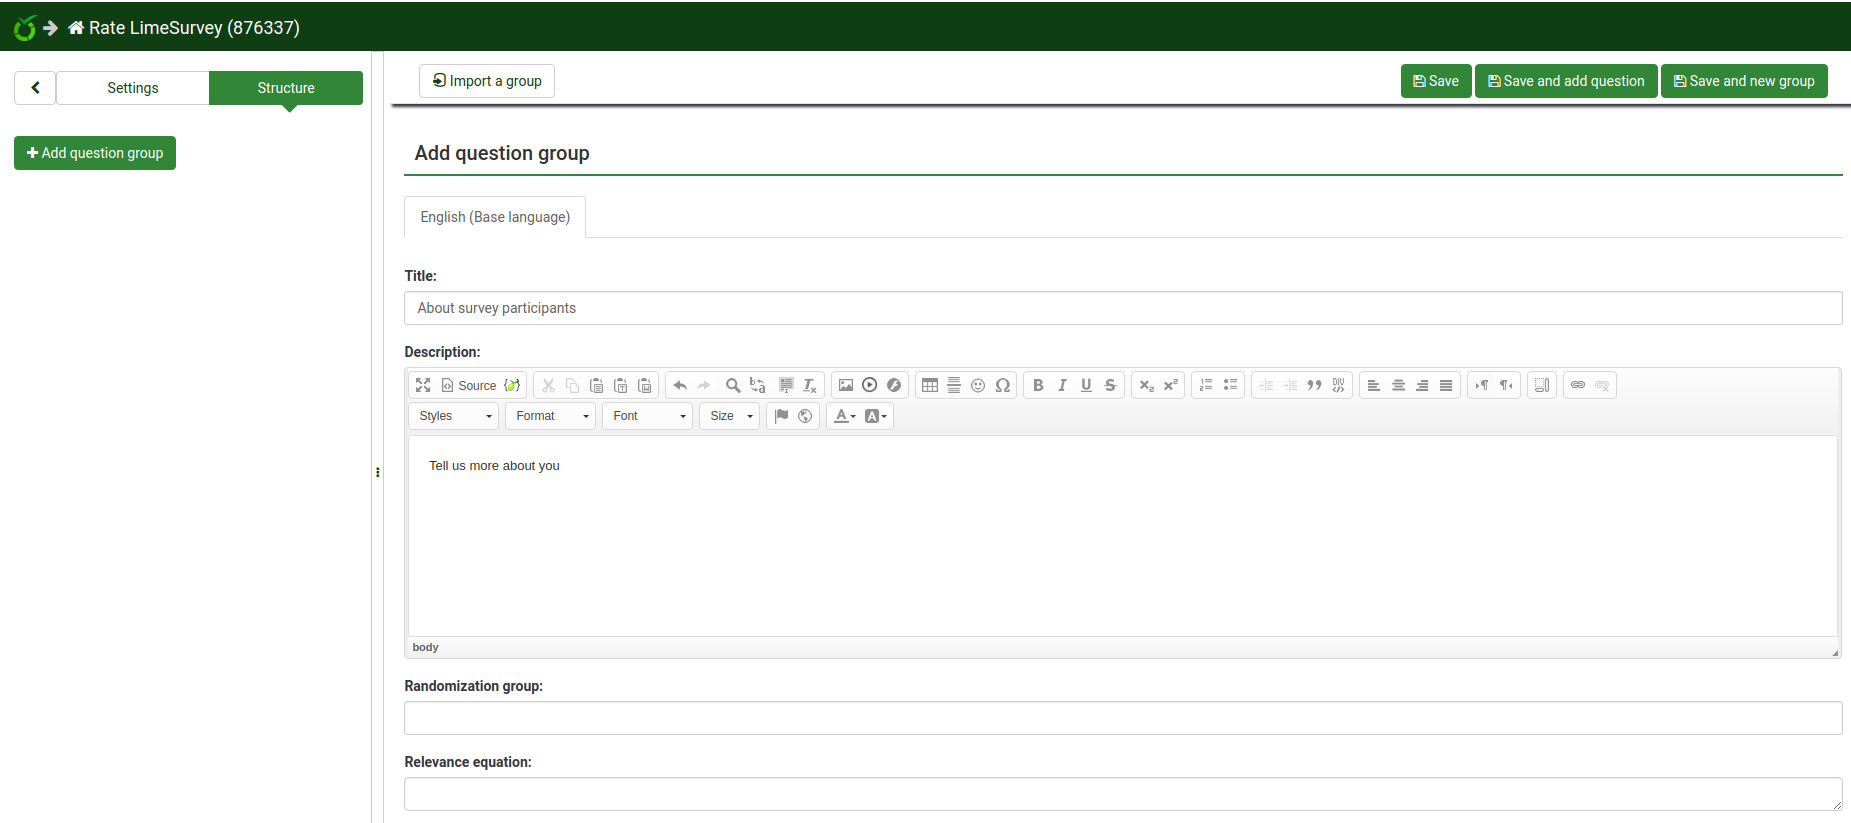
- Title: The name of the survey group;
- Description: A short description of the question group can be typed in. It can be displayed to the survey participants if the corresponding option is enabled from the settings of the survey;
- Randomization group: This function is used when you would like to randomize certain question groups (the same has to be allocated to the respective question groups);
- Relevance equation: It is used to make survey participants answer only to certain question groups, according to their prior answers.
Once done, click on the Save button located in the upper-right part of the window.
Create a question
To create a new question, always remember that you need first to create a question group. Please check the steps presented above to see how you can add a question group to a survey.
Once done creating the survey group, select again the structure tab and click on the add question button or select the question group from the left-side menu and click on the “add new question to group” button located under the Group quick actions:

Once clicked, the Create question page will load up. It contains the following options:
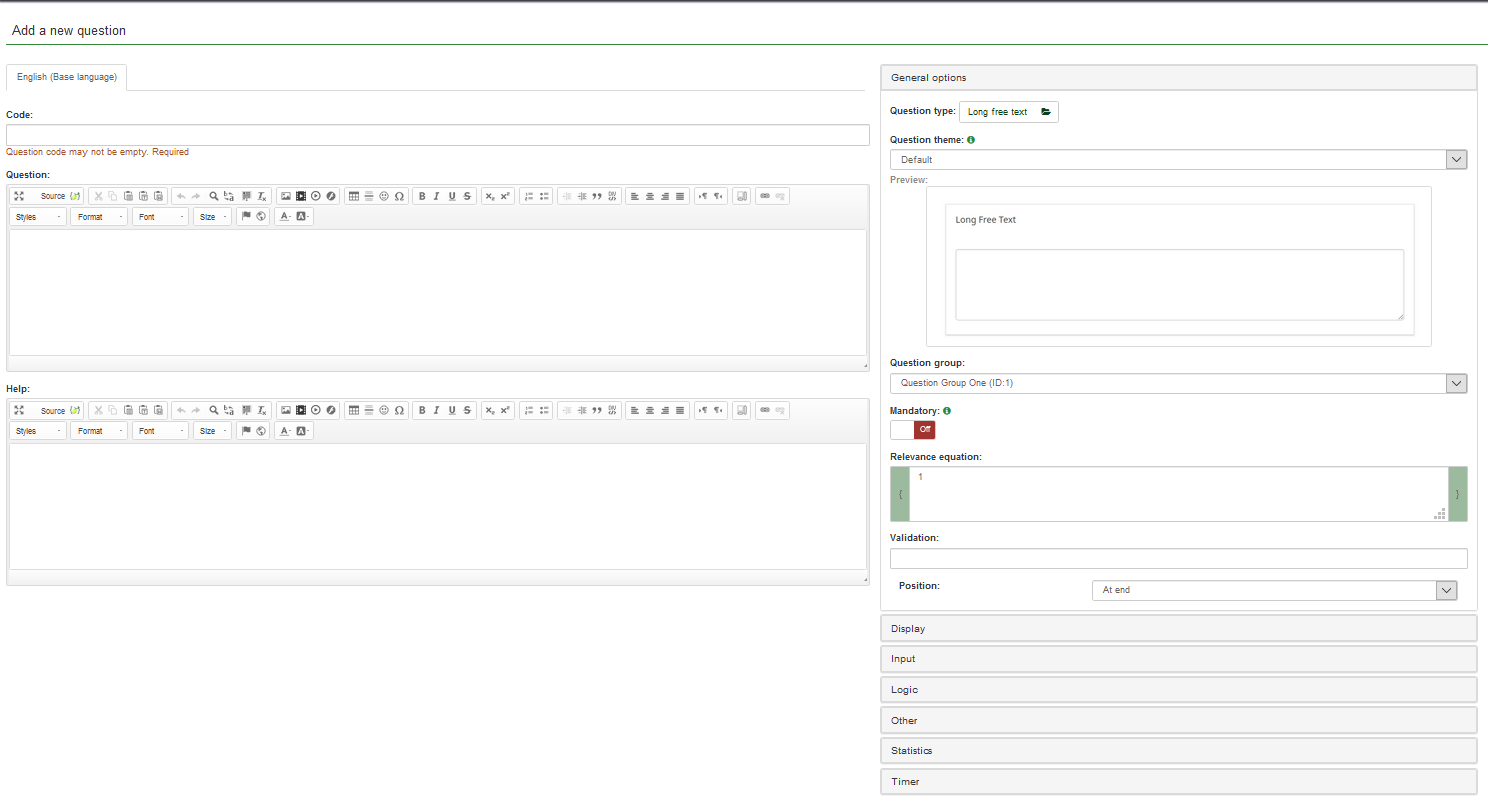
- Code: It represents the individual question name/code with which the survey is saved in the database and can be used further in more complex and advanced types of questions;
- Question: The name of the question that will actually appear in the survey for the survey participants;
- Help: A short text can be provided in order to help the survey participants better understand the question;
- General options: The functionalities located under this option allow you to modify the most important question-related settings. It includes four options:
- Question type: Many question types can be used in LimeSurvey. To better understand them, hover the mouse over each option or read our wiki on questions;
- Question group: You can choose here which question group you would like to add the question to;
- Validation: This feature is available on all free text type or numeric questions. It is used for response validation. If the response is not validated, the user will be prompted to try again before they can progress;
- Mandatory: It is available for all question types. This setting allows you to require users to answer the question before they can move on to the next question;
- Relevance equation: It is a setting for advanced users. It is recommended to use the default value of "1" (it means that the item will be always shown);
Please note that according to the selected question type, different tabs will be displayed below the General settings tab. To find out more on this, we suggest you to start reading first the following wiki section.
For example, if the Long free text question type is selected (the default option), then the following tabs will be displayed: General options, Display, Input, Logic, Other, Statistics, Timer. Click on the Save button. You will be redirected to a page that contains the summary of the recently added question:
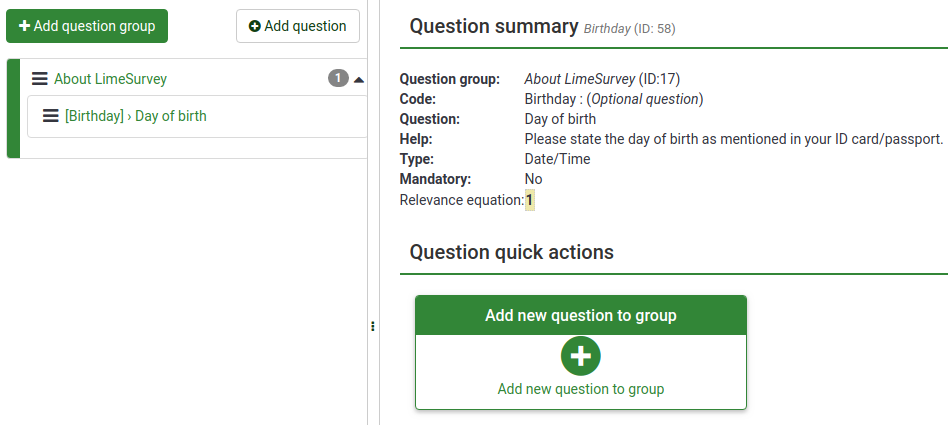
To add more questions, follow the same procedure described above.
Add subquestions and answers
Different types of questions require subquestions, predefined sets of answers, both or none. For example, a question that requires the age of a survey participant does not require any subquestion or predefined set of answers. On the other hand, a simple array question requires both subquestions and answers.
The next screenshot contains an array-type question:

Add subquestions
To add subquestions, go to the top toolbar and click on Edit subquestions. Type in the subquestions you wish the survey participants to answer to:

Add answers
To add a set of predefined answers, go to the top toolbar and click on Edit answer options. Type in the answers:

Save the set of answers and preview the question (look for the Preview question button located on the top toolbar).
Our question looks like this:

Congratulations! You have successfully created your first array-type question.
Organize questions
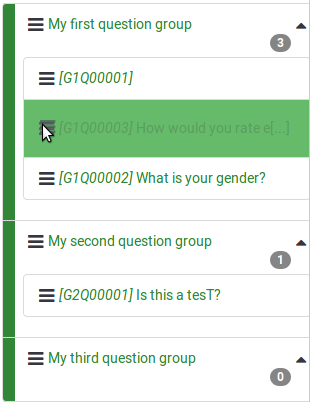
If your survey already contains dozens of questions, it is a time-consuming process to access each question and/or question group and edit the order one-by-one. Therefore, to quickly reorganize your questions and question groups, you can change the order of the questions and question groups from the Survey Structure menu. Once accessed, click on the three-lines symbol that is located in front of the question (group) name and start dragging it to the desired position.
Activate/Stop survey
Now that you have at least one question and question group added to your survey, you can activate it. Select the Settings tab from the left-side menu and click on the Overview option. The following page will load up:
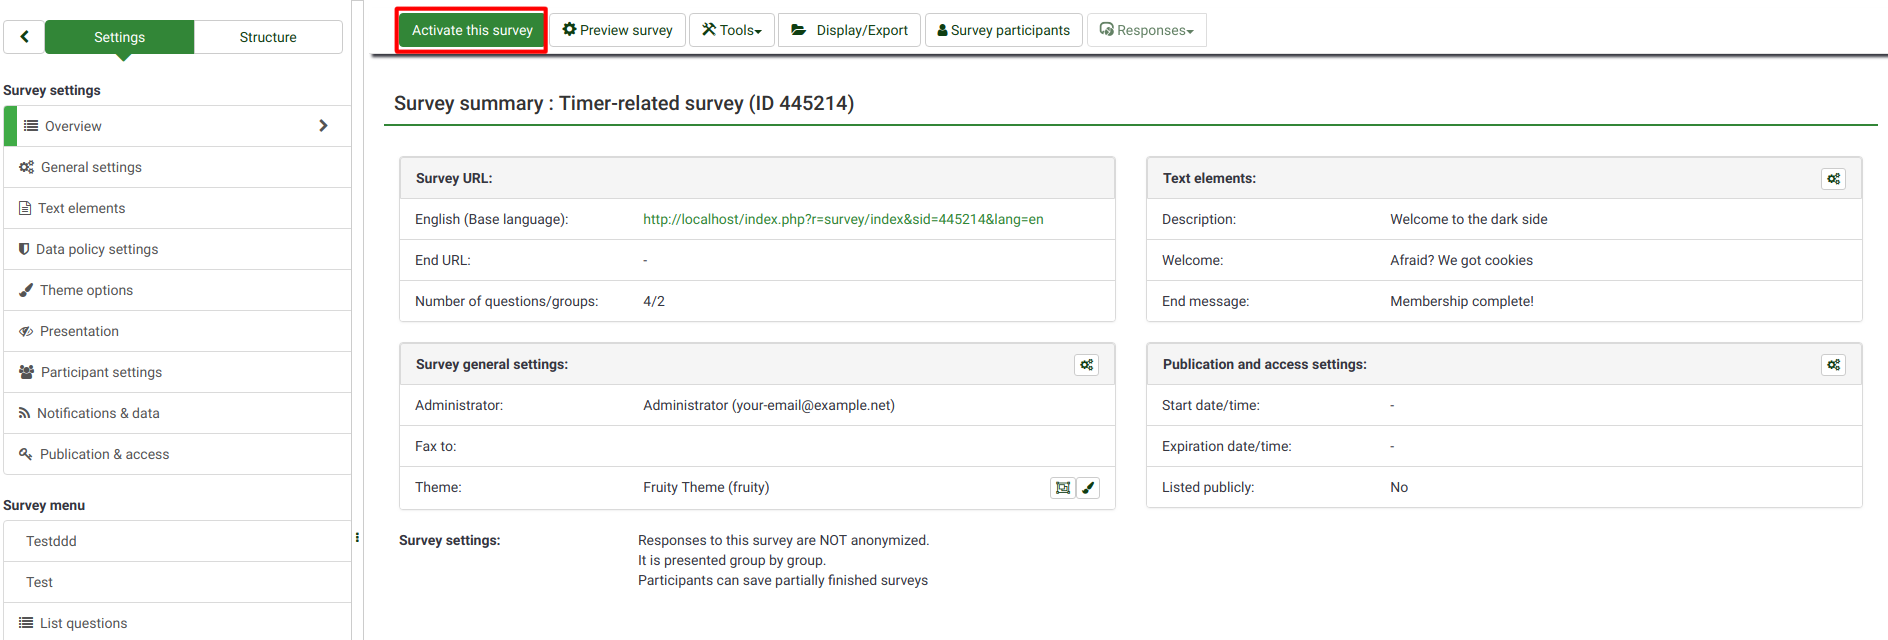
Check the toolbar and click on the Activate this survey button.
Before activation, a window will be displayed, asking you about some general survey settings:

- Anonymyzed responses: This option allows you to determine whether responses to your survey are matched up with information from your survey's token table, or kept "anonymous". If you decide to enable it, your survey is set to anonymize responses - there will be no way to connect answers and participants;
- Save IP address: If enabled, the IP address of the survey respondent will be stored together with his/her answers;
- Save timings: If enabled, the time spent on each page of the survey by each survey participant is recorded;
- Date stamp: Turn it on if you would like to see the date the answers were submitted;
- Save referrer URL: If enabled, the referrer URL will be stored together with the answers.
Once you are done enabling the desired functionalities, click on the Save & activate survey button. The following message should be displayed:

Select the option No, thanks to disable the closed-access mode! In this way, everyone will have access to your survey.
Congratulations! You have activated your first survey! If you want to start sharing the survey URL, go to the home page of your survey, and look for the survey URL in the Survey summary:
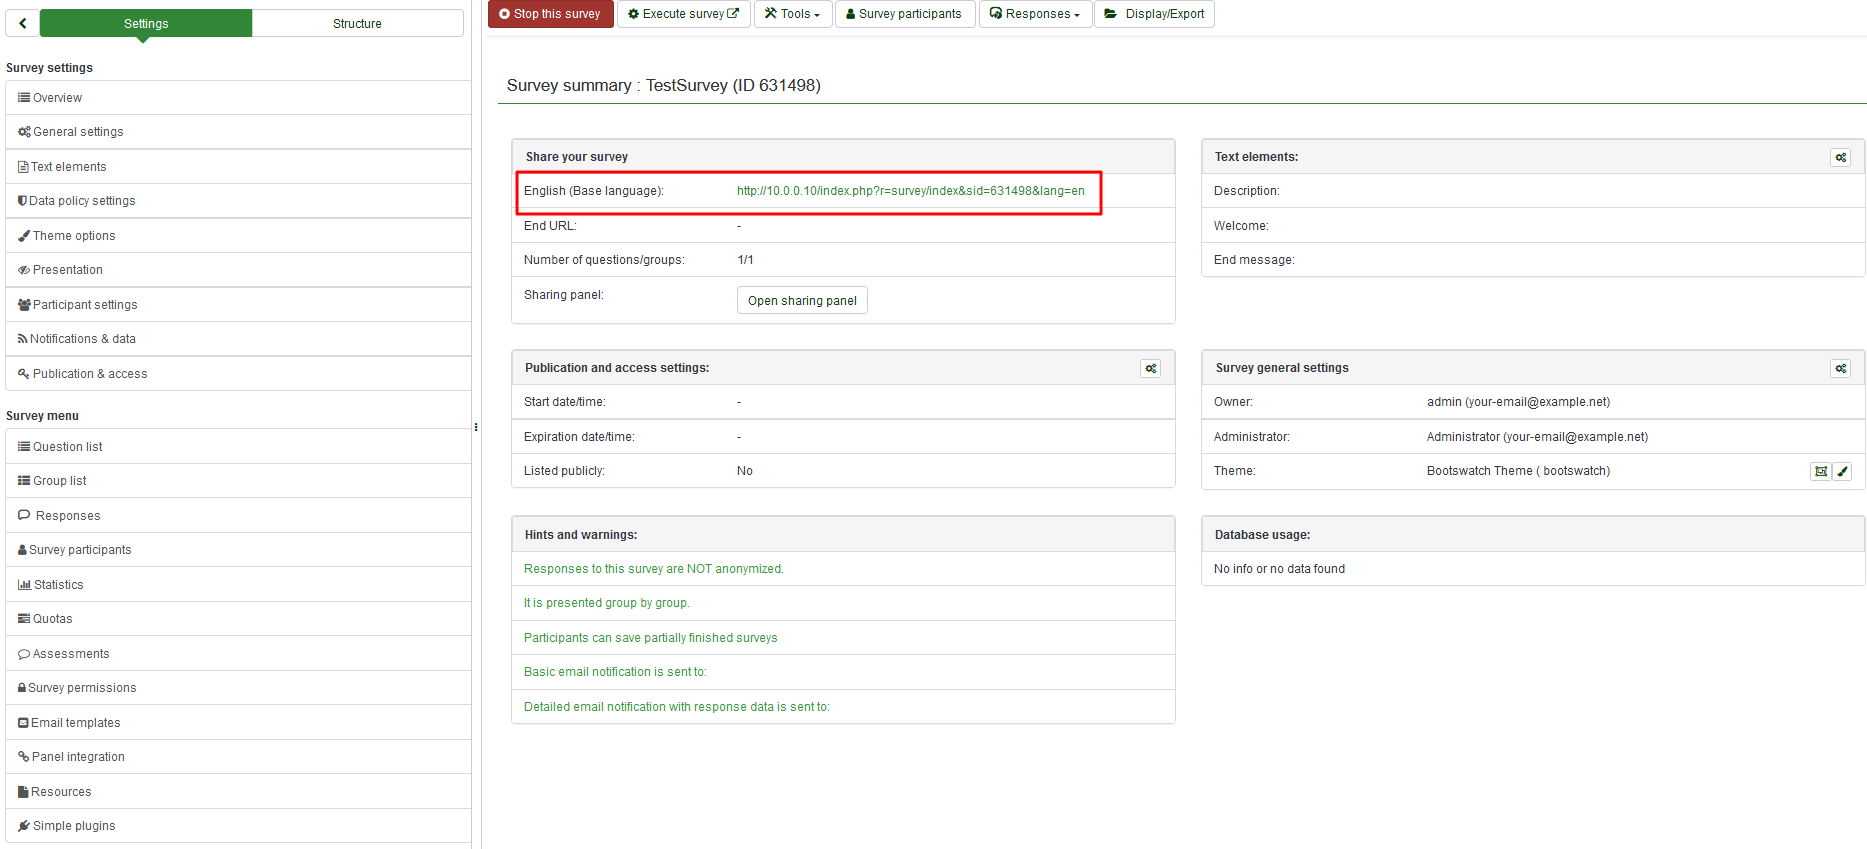
Copy the link and start sharing it.
If you want to stop the survey, click on the Overview tab from the left-side menu and look for the Stop this survey button located on the top toolbar:

Statistics
To quickly see your survey statistics, click on the Survey button located on the top toolbar of your LimeSurvey home page. A list with all the available surveys will be displayed. Now, go to the last column and click on the Statistics button (![]() ) that corresponds to the row of the survey you wish to analyse:
) that corresponds to the row of the survey you wish to analyse:

A new window with a set of graphs will be loaded up. If you want to use them in a report, scroll down and click on the Export images button located on the bottom-left part of the page. All the charts will be separately saved as .png files and archived in a .zip file.
On the upper-right part of the window, you can see the Expert mode button. Click on it in order to access more statistics-related filters.
Once you select the filters according to your desired analyses, click on the View Statistics button located on the upper-right part of the window.

According to the chosen output, the results are displayed in HTML, Excel or PDF.
Exporting the questions and responses
If you want to export the results in a different format in order to produce statistics and graphs using other apps such as SPSS, R, STATA, etc., access the survey you want to analyse. Click on the Responses button located on the top toolbar, and then on Responses & Statistics:

Now you are on the Browse responses page. Look at the top toolbar for the Export button and select the desired format you wish to export to. If you select the first option, all the availalbe formats in which you can export the data will be displayed:

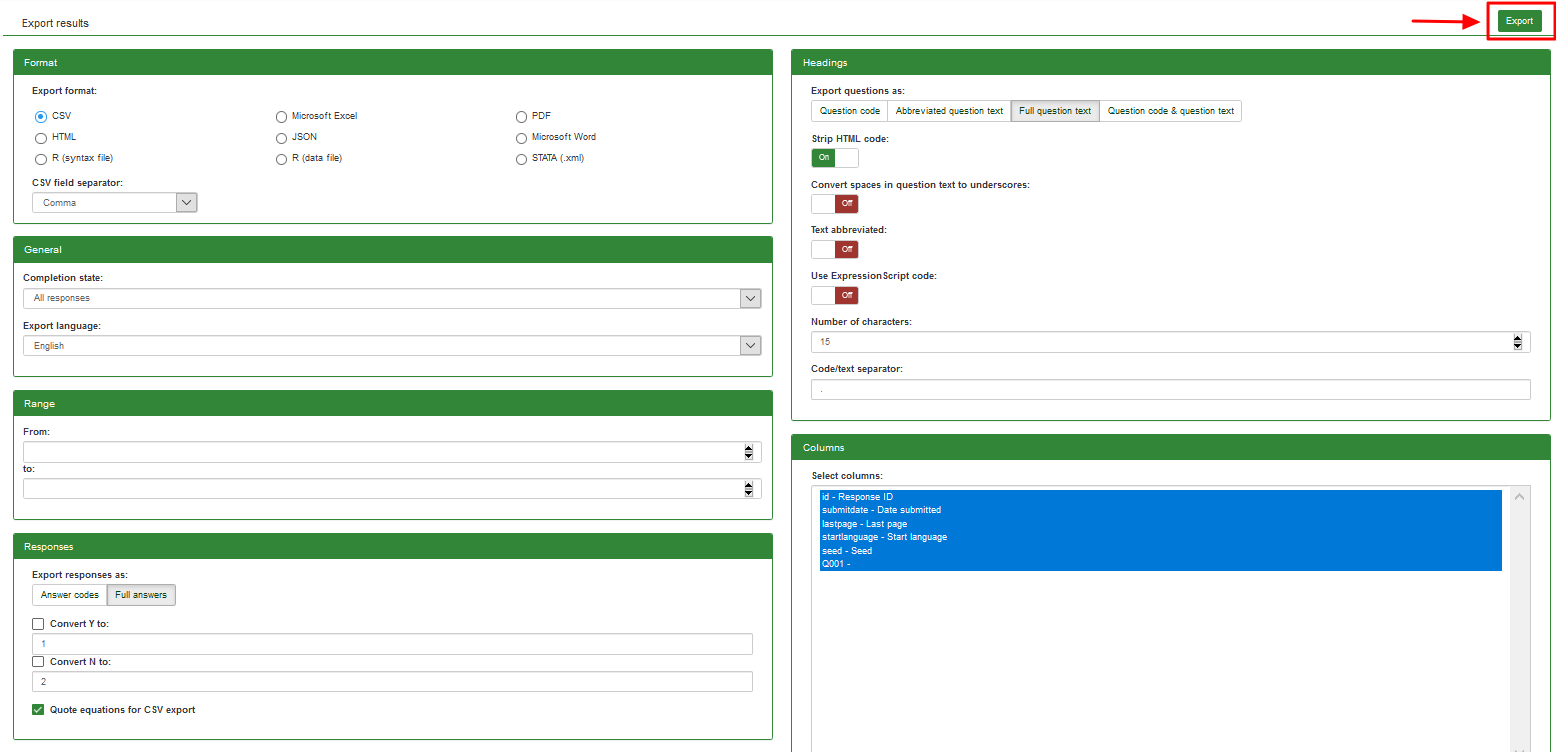
Once the filters are set, click on the Export button located in the upper-right side of the window.
Other LimeSurvey features - advanced users
Check the features of LimeSurvey Pro package by clicking on the following link: https://www.limesurvey.org/editions-and-prices/limesurvey-pro/professional-features.
If further questions arise, please post them on our forum or join the IRC channel.