Questions - introduction/ru: Difference between revisions
From LimeSurvey Manual
(Updating to match new version of source page) |
(Updating to match new version of source page) |
||
| (6 intermediate revisions by the same user not shown) | |||
| Line 1: | Line 1: | ||
<languages /> | <languages /> | ||
__ОГЛАВЛЕНИЕ__ | __ОГЛАВЛЕНИЕ__ | ||
{{Alert|title=Attention|text=Please note that the explanations and screenshots from this wiki section are based on LimeSurvey 3.}} | |||
=Вступление= | =Вступление= | ||
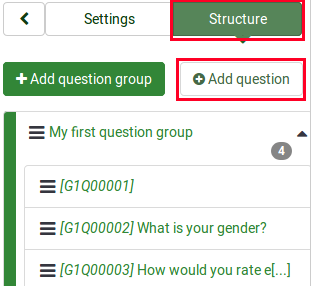
Once you [[Question groups - introduction#create a question group|created your question groups]], you can start adding questions within each group. There are multiple ways through which you can do that. Two solutions are presented below: | |||
* You may add questions from the [[Survey structure|survey structure menu]]; | |||
<center>[[File:Survey structure - add new question.png]]</center> | |||
* Access a question group and look for the ''add question'' quick action button; | |||
<center>[[File:Question group - add a new question.png]]</center> | |||
=Field descriptions= | |||
When adding a question, you will be asked about the '''question code''', '''question''' and '''help''' texts, and the general question options: | |||
<center>[[File:Add a question - 1.png]]</center> | |||
*''' | *'''Question code:''' It represents the ID, number or code for the question that is used for quick identification. This field is normally not displayed to people taking the survey unless specified in the [[Presentation]] panel - '''Show question number and/or code'''. It is especially useful if you wish to use the [[Assessments|LimeSurvey assessments feature]] and/or the [[Expression Manager|Expression Manager]]. | ||
<div class="simplebox">[[File:help.png]] '''Note:''' The question '''code''' must be unique across the same survey, must start with a letter, and can only contain alphanumeric characters. If you ever try to export your data to SPSS or R, you will discover that the "qcode" becomes the value label, so you have to make the code unique. For the time being, LimeSurvey will support legacy code values, but the [[Show logic file|Show logic file]] button will color-code such questions so that you know you should change their names.</div> | |||
*'''Question:''' This is the actual question being asked. There is no real limit to the length of the question here, however if you want to explain how to fill out the question, leave that for the "Help" field. HTML-code can be used, e.g., for including images: | |||
<syntaxhighlight lang="html" enclose="pre"> | |||
<img src="http://www.yourdomain.com/yourpics/pic.jpg"> | |||
</syntaxhighlight> | |||
<div class="simplebox">[[File:help.png]] '''Hint:''' You can also use the HTML WYSIWYG editor, which offers a GUI to perform the most important tasks such as using different fonts or sizes, including images, etc. To find out more about it, read the following [[First_login_-_your_user_preferences#HTML_editor_mode|wiki section]].</div> | |||
*'''Help:''' This is an optional field. It is useful if a question needs some explanation or you want to explain how it should be answered. When you put text in this field, a "question mark" icon appears on the survey entry screens with the help text right beside it. | |||
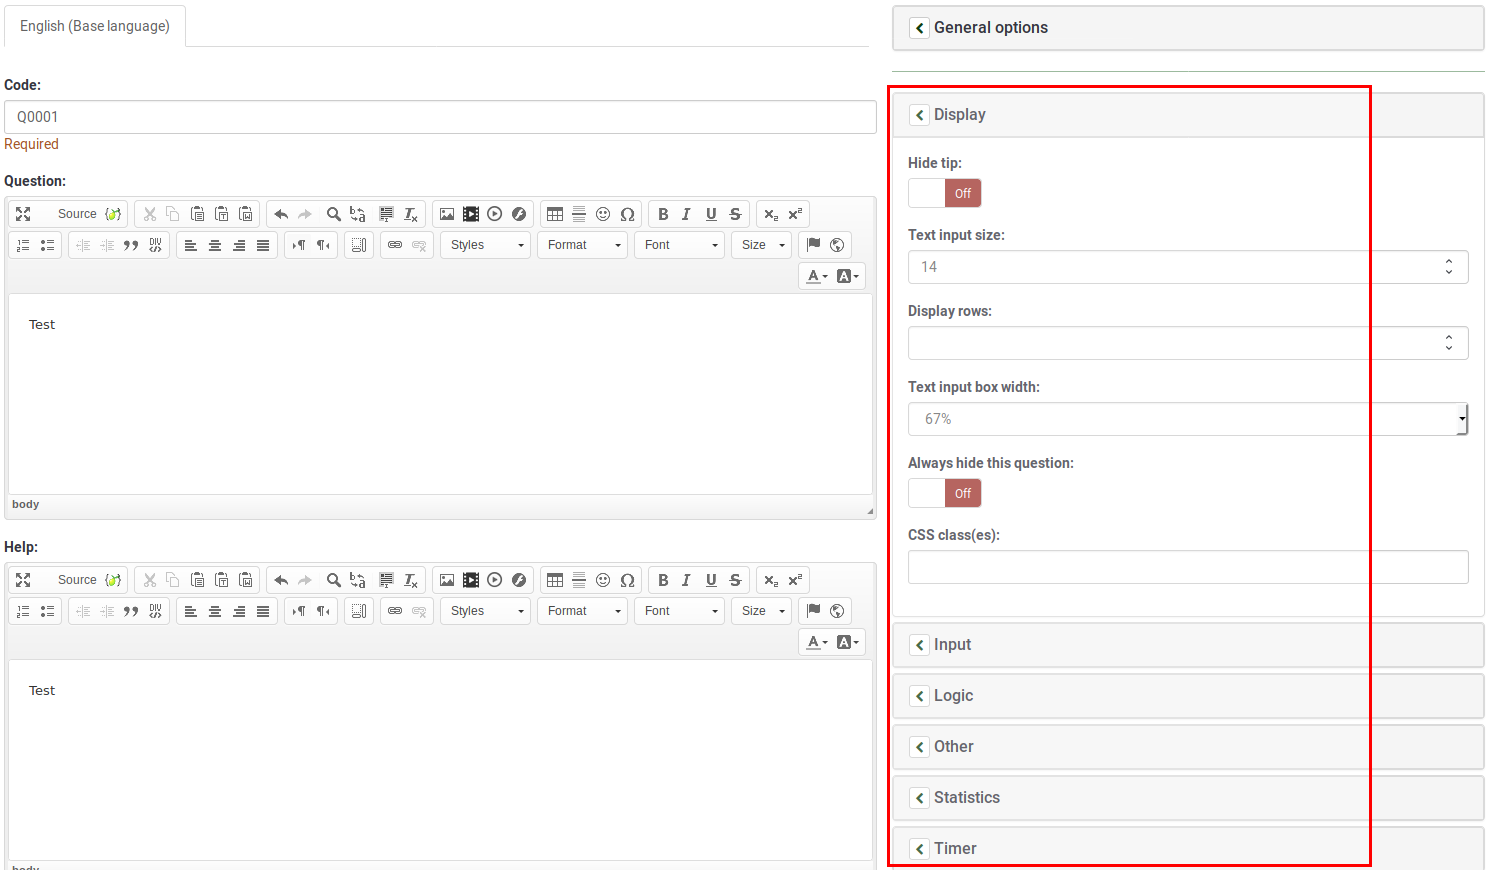
<div class="simplebox">[[File:help.png]] '''Note:''' The '''General options''' tab is accessed by default when you wish to add/edit a question (on the right side of the panel). The most important attributes can be found here such as the question type, question theme, as well as the mandatory attribute. However, you can edit further your question by making use of all the other attributes located under the rest of the tabs (see the below screenshot). To find out more about the multitude ways of designing questions in LimeSurvey, please continue reading the following [[Question types|wiki section]].</div> | |||
<center>[[File:Add question - 2.png]]</center> | |||
=General options= | |||
Different tabs are displayed on the right part of the screen. The most basic and important one is the '''General options''' tab. The following question settings can be changed from here: | |||
*'''Question type:''' This determines the type of response the survey allows. View the [[Question types|question types]] section for a description on the various available options; | |||
*'''Question group''': To change the question group of a question, select from the dropdown list the desired group; | |||
*'''Validation:''' This feature is available in all text- and numeric- type questions. You can use standard [[Using regular expressions|regular expressions]] in this field to validate the responses to the question, and if the responses don't validate against this expression, the user will be prompted to try again before he or she can progress further; | |||
*'''Other?:''' This option can be used only with certain question types. If enabled, the question will include as a possible answer an extra "other" option/answer box, which can be selected by the survey participant if he or she is not satisfied with the predefined answer options; | |||
*'''Mandatory?:''' This setting allows you to require survey participants to answer all the mandatory questions before they can move on to the next question. Note that for ranking question, all items have to be ranked; | |||
*'''Relevance''': This is the Boolean equation that specifies the question conditions. If it evaluates to true, the question will be displayed to the survey participant; otherwise it is hidden and since it is irrelevant, data for that question is NULLed in the database. Details about how to use this option can be found in the [[Expression Manager|Expression Manager]] wiki section. | |||
<div class="simplebox">[[File:help.png]] '''Note:''' As it can be observed in the above screenshot, many other options can be used besides the general options tab to customize your question. These more advanced question settings are different for each question type! Therefore, please consult the documentation for your particular [[Question types|question type]].</div> | |||
=Импорт вопроса= | =Импорт вопроса= | ||
You may find on the top of the '''Add question''' page a toolbar with different options, one of them being the import one: | |||
<center>[[File:Import a question 1.png]]</center> | |||
The following options will be displayed: | |||
<center>[[File:Import a question 2.png]]</center> | |||
* '''Browse:''' Select the .lsq file (the LimeSurvey question-type format); | |||
* '''Destination question group:''' Select the question group you wish to add the imported question to; | |||
* '''Automatically rename question code if already exists:''' If the question code already exists, enable this option to use another question code. You can also have two questions that use the same question code. However, some issues might appear if you use more complex LimeSurvey options such as the [[Expression Manager]] or when you work with the exported data in R or SPSS (qcode becoming a value label). | |||
<div class="simplebox">[[File:help.png]] '''Hint:''' To check if the question codes are unique across your survey, use the [[Show logic file]] LimeSurvey function to highlight the similar question codes.</div> | |||
*'''Convert resource links:''' It is usually used together with the [[Expression Manager]] to create advanced question types. If you use them together, complex branching, assessments, validation, and/or tailoring can be done. | |||
To import the question, click on the '''Import''' button located on the upper right part of the screen. If succeeded, the question import summary should look like this: | |||
<center>[[File:Import a question 3.png]]</center> | |||
=Information from survey participants table= | |||
<div class="simplebox">[[File:help.png]] Please note that the token tables are called now survey participants tables.</div> | |||
You can insert information or text from the survey participants table into your question so that it can show context related information. For LimeSurvey to do this, the survey needs to be set as [[Participant settings#Participant settings panel|not anonymous]] (i.e: tracked) and it needs to have a [[Survey participants|survey participants table]] created. | |||
The following placeholders can be used within a question: | |||
{| | {| | ||
|{TOKEN:FIRSTNAME}|| | |{TOKEN:FIRSTNAME}||inserts the value from the "firstname" field located in the survey participants table | ||
|- | |- | ||
|{TOKEN:LASTNAME}|| | |{TOKEN:LASTNAME}||inserts the value from the "lastname" field located in the survey participants table | ||
|- | |- | ||
|{TOKEN:EMAIL}|| | |{TOKEN:EMAIL}||inserts the value from the "email" field located in the survey participants table | ||
|- | |- | ||
|{TOKEN:ATTRIBUTE_1}|| | |{TOKEN:ATTRIBUTE_1}||inserts the value from the "attribute_1" field located in the survey participants table | ||
|- | |- | ||
|{TOKEN:ATTRIBUTE_2}|| | |{TOKEN:ATTRIBUTE_2}||inserts the value from the "attribute_2" field located in the survey participants table | ||
|} | |} | ||
To use any of the placeholders from above, you must type it/them as written above in the question field text. For example: | |||
''Hello {TOKEN:FIRSTNAME}. We sent an email to you using this address {TOKEN:EMAIL}.'' | |||
<syntaxhighlight lang="php" enclose="pre"> | |||
If you wish to further customize your questions, use the [[Expression Manager]]. For example, if you wish to make use of the tailoring technique, type in: | |||
<syntaxhighlight lang="php" enclose="div">Что Вы думаете как {TOKEN:ATTRIBUTE_1} о Вашем {if(TOKEN:ATTRIBUTE_1=='worker','начальстве','персонале')}?</syntaxhighlight> | |||
<hr width="50%" style="margin:auto"> | |||
You may also use JavaScript to achieve further question customization. First, you have to allow JavaScript to be used when setting up questions. This can be achieved by deactivating the XSS filter from the [[Global settings|global settings]] of your LimeSurvey installation. However, deactivating this option is not always a good idea - read the following [[Optional settings|wiki section]] for further information. Question tailoring via JavaScript: | |||
<syntaxhighlight lang="php" enclose="div">Здравствуйте, {TOKEN:FIRSTNAME}. Мы отправили Вам письмо используя следующий адрес: {TOKEN:EMAIL}. Он указан верно? | <syntaxhighlight lang="php" enclose="div">Здравствуйте, {TOKEN:FIRSTNAME}. Мы отправили Вам письмо используя следующий адрес: {TOKEN:EMAIL}. Он указан верно? | ||
| Line 66: | Line 141: | ||
</syntaxhighlight> | </syntaxhighlight> | ||
=Информация из предыдущих ответов= | |||
LimeSurvey allows survey administrator to insert answer(s) from the previous question(s) into the text of a question: | |||
*You can refer to answers on the same page and even dynamically update tailored messages as responses change on the page. | |||
*You can use question code naming - for more details, see the [[Expression Manager]] documentation. | |||
A wizard has been integrated in the WYSIWYG HTML editor (FCKeditor), so that you can easily insert previous question/answer codes. This plugin is called ''LimeReplacementFields''. In order to use this feature in the FCKeditor, click on the "lime between brackets" icon and select a question from the select box. Only answers from previous pages are displayed. | |||
<center>[[File:Editor_replacementfields_button.png]]</center> | |||
<div class="simplebox">LimeReplacementFields | <div class="simplebox">[[File:help.png]] '''LimeReplacementFields notice:''' When you want to delete a reference to a {name} tag, please select all chars from the openning bracket to the closing bracket and press delete: DO NOT erase it char by char with the Delete or Backspace key otherwise the field will appear again.</div> | ||
=Оформление вида вопросов= | =Оформление вида вопросов= | ||
It is possible to generally edit the question layout/design with CSS using [[Theme editor|the theme editor]]. | |||
Revision as of 20:25, 17 July 2018
__ОГЛАВЛЕНИЕ__
Вступление
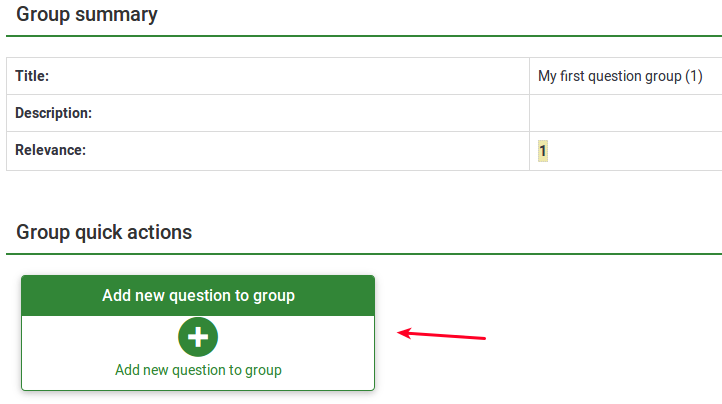
Once you created your question groups, you can start adding questions within each group. There are multiple ways through which you can do that. Two solutions are presented below:
- You may add questions from the survey structure menu;
- Access a question group and look for the add question quick action button;
Field descriptions
When adding a question, you will be asked about the question code, question and help texts, and the general question options:
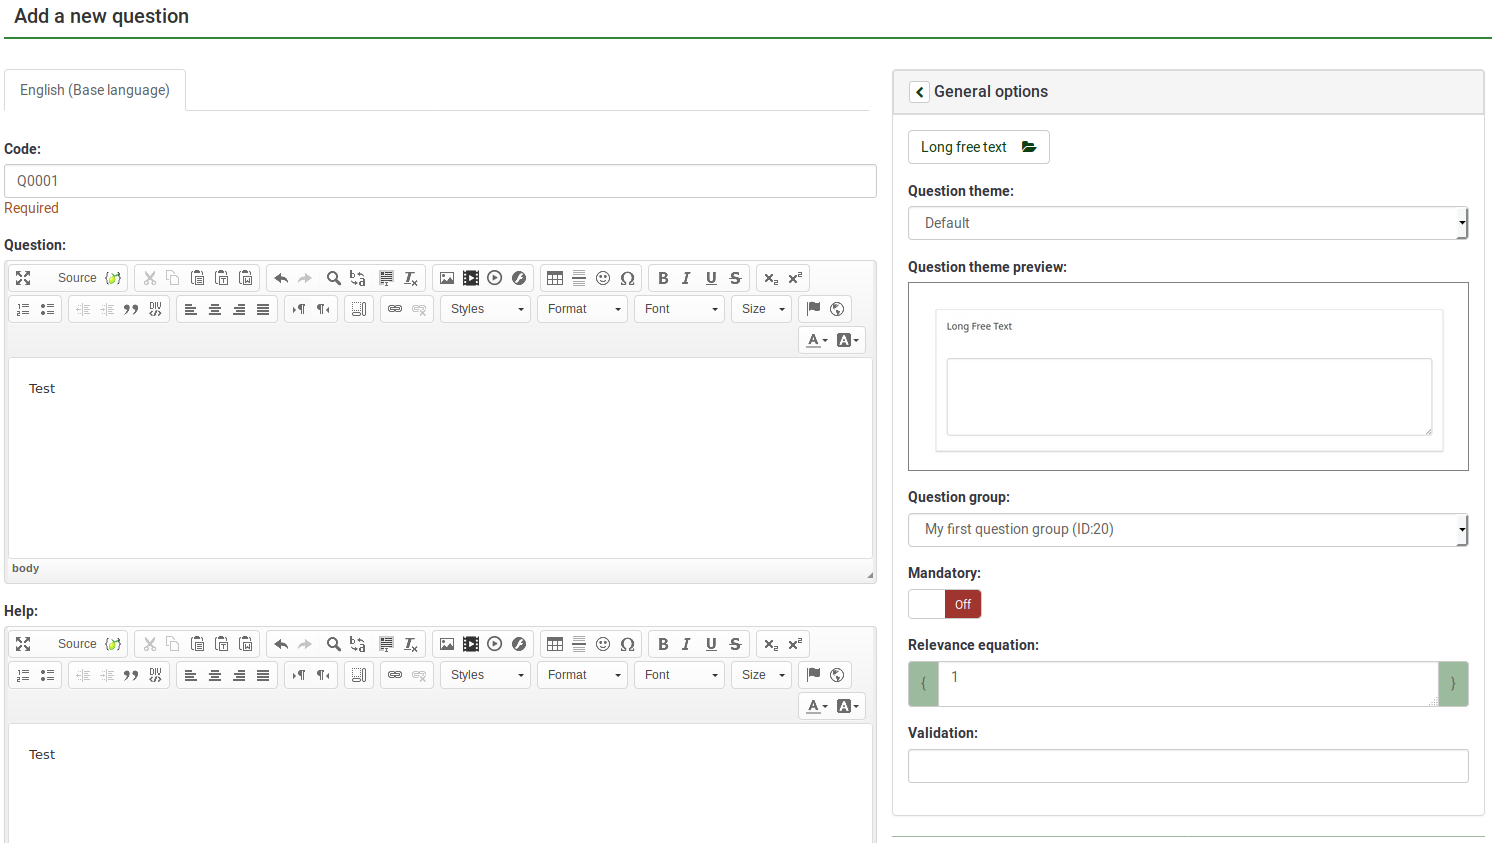
- Question code: It represents the ID, number or code for the question that is used for quick identification. This field is normally not displayed to people taking the survey unless specified in the Presentation panel - Show question number and/or code. It is especially useful if you wish to use the LimeSurvey assessments feature and/or the Expression Manager.
- Question: This is the actual question being asked. There is no real limit to the length of the question here, however if you want to explain how to fill out the question, leave that for the "Help" field. HTML-code can be used, e.g., for including images:
<img src="http://www.yourdomain.com/yourpics/pic.jpg">
- Help: This is an optional field. It is useful if a question needs some explanation or you want to explain how it should be answered. When you put text in this field, a "question mark" icon appears on the survey entry screens with the help text right beside it.
General options
Different tabs are displayed on the right part of the screen. The most basic and important one is the General options tab. The following question settings can be changed from here:
- Question type: This determines the type of response the survey allows. View the question types section for a description on the various available options;
- Question group: To change the question group of a question, select from the dropdown list the desired group;
- Validation: This feature is available in all text- and numeric- type questions. You can use standard regular expressions in this field to validate the responses to the question, and if the responses don't validate against this expression, the user will be prompted to try again before he or she can progress further;
- Other?: This option can be used only with certain question types. If enabled, the question will include as a possible answer an extra "other" option/answer box, which can be selected by the survey participant if he or she is not satisfied with the predefined answer options;
- Mandatory?: This setting allows you to require survey participants to answer all the mandatory questions before they can move on to the next question. Note that for ranking question, all items have to be ranked;
- Relevance: This is the Boolean equation that specifies the question conditions. If it evaluates to true, the question will be displayed to the survey participant; otherwise it is hidden and since it is irrelevant, data for that question is NULLed in the database. Details about how to use this option can be found in the Expression Manager wiki section.
Импорт вопроса
You may find on the top of the Add question page a toolbar with different options, one of them being the import one:

The following options will be displayed:
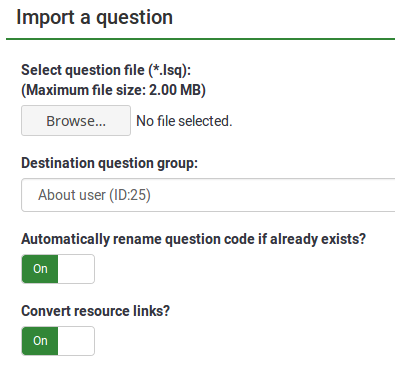
- Browse: Select the .lsq file (the LimeSurvey question-type format);
- Destination question group: Select the question group you wish to add the imported question to;
- Automatically rename question code if already exists: If the question code already exists, enable this option to use another question code. You can also have two questions that use the same question code. However, some issues might appear if you use more complex LimeSurvey options such as the Expression Manager or when you work with the exported data in R or SPSS (qcode becoming a value label).
- Convert resource links: It is usually used together with the Expression Manager to create advanced question types. If you use them together, complex branching, assessments, validation, and/or tailoring can be done.
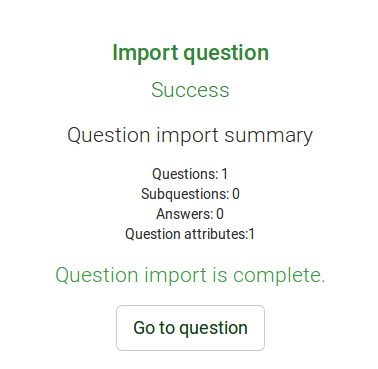
To import the question, click on the Import button located on the upper right part of the screen. If succeeded, the question import summary should look like this:
Information from survey participants table
You can insert information or text from the survey participants table into your question so that it can show context related information. For LimeSurvey to do this, the survey needs to be set as not anonymous (i.e: tracked) and it needs to have a survey participants table created.
The following placeholders can be used within a question:
| {TOKEN:FIRSTNAME} | inserts the value from the "firstname" field located in the survey participants table |
| {TOKEN:LASTNAME} | inserts the value from the "lastname" field located in the survey participants table |
| {TOKEN:EMAIL} | inserts the value from the "email" field located in the survey participants table |
| {TOKEN:ATTRIBUTE_1} | inserts the value from the "attribute_1" field located in the survey participants table |
| {TOKEN:ATTRIBUTE_2} | inserts the value from the "attribute_2" field located in the survey participants table |
To use any of the placeholders from above, you must type it/them as written above in the question field text. For example:
Hello {TOKEN:FIRSTNAME}. We sent an email to you using this address {TOKEN:EMAIL}.
If you wish to further customize your questions, use the [[Expression Manager]]. For example, if you wish to make use of the tailoring technique, type in:

<syntaxhighlight lang="php" enclose="div">Что Вы думаете как {TOKEN:ATTRIBUTE_1} о Вашем {if(TOKEN:ATTRIBUTE_1=='worker','начальстве','персонале')}?
You may also use JavaScript to achieve further question customization. First, you have to allow JavaScript to be used when setting up questions. This can be achieved by deactivating the XSS filter from the global settings of your LimeSurvey installation. However, deactivating this option is not always a good idea - read the following wiki section for further information. Question tailoring via JavaScript:
Здравствуйте,  {TOKEN:FIRSTNAME}. Мы отправили Вам письмо используя следующий адрес: {TOKEN:EMAIL}. Он указан верно?
Что Вы думаете как {TOKEN:ATTRIBUTE_1} о Вашем
<script type="text/javascript" language="Javascript">;
   var job='{TOKEN:ATTRIBUTE_1}';
   if (job=='worker') {
      document.write ('начальстве')
   } else {
      document.write('персонале')
   }
</script>
?
Информация из предыдущих ответов
LimeSurvey allows survey administrator to insert answer(s) from the previous question(s) into the text of a question:
- You can refer to answers on the same page and even dynamically update tailored messages as responses change on the page.
- You can use question code naming - for more details, see the Expression Manager documentation.
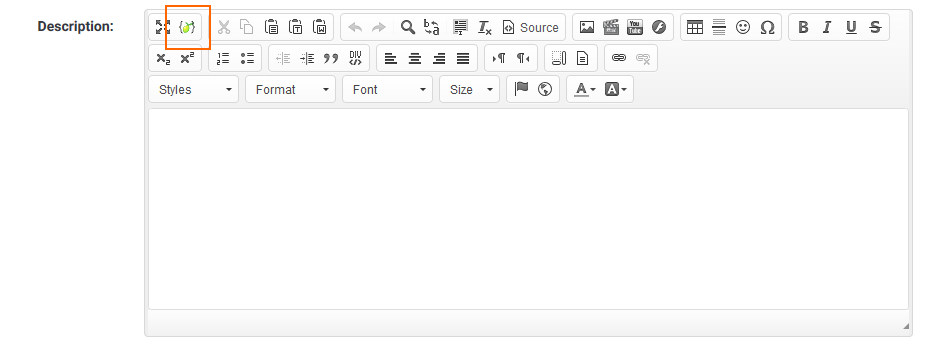
A wizard has been integrated in the WYSIWYG HTML editor (FCKeditor), so that you can easily insert previous question/answer codes. This plugin is called LimeReplacementFields. In order to use this feature in the FCKeditor, click on the "lime between brackets" icon and select a question from the select box. Only answers from previous pages are displayed.
Оформление вида вопросов
It is possible to generally edit the question layout/design with CSS using the theme editor.