質問タイプ - 自由回答(短い)
From LimeSurvey Manual
概略
この質問タイプでは、1行のテキスト入力を得ることができます。

例: Short_free_text_question.zip
注意: MySQLデータベースでは、最大文字数が制限されています。PostgresとMSSQLでは、入力できる最大文字数は255です。
全般オプション
回答必須
説明
このオプションにより、アンケートの質問に回答者が必ず答えるようにすることができます。回答必須の質問に回答しない場合、回答者は先に進むことができません。ある質問に複数のサブ質問があり、特定のサブ質問のみを回答必須とする場合は、ロジックタブの下にある最小回答数属性を使用します。
設定可能な値
- オン - 参加者が次のページに進む前に質問に回答する必要があります。回答の選択肢に「回答なし」は表示されません。
- ソフト - 質問に回答せずに次のページに進もうとすると警告が表示されますが、参加者は警告を無視して先に進むことができます。「回答なし」オプションは表示されます(アンケートの表示設定で有効になっている場合)。
- オフ(規定値) - 質問に回答しなくてもよくなります
google mapを利用した質問が回答必須である場合、アンケート利用者は赤い点を動かすか、緯度経度をテキストボックスに入力する必要があります。利用者は単純に既定値を使うことはなく、"次へ"ボタンを押します。質問テキストの内容についてアドバイスすることを推奨します。
条件(以前の"出現条件")
説明
条件の結果値が「1」または「true」になると、質問がアンケートの中で「関連する」、つまりアンケート参加者に提示されます。その他の場合は質問は表示されません。どのような質問でも関連式を指定することができます。この関数は条件の後継であり、より複雑な条件ロジックをサポートします。
構文ハイライト
条件を保存するたびに、検証され構文がハイライトされます。エラーにも色がつくので、すぐに気づいて直すことができます。

有効な値
- ExpressionScriptの構文に従うすべての条件(中括弧は外す)。
例
構文ハイライトによい例があります。
(正規表現を使った)検証 (preg_validation)
説明
この設定は、質問内のすべての値の検証に使う正規表現を指定するものです。
質問やサブ質問への回答のどれかがこの検証要件に適合しない場合、テキスト入力欄の背景色が赤くなり、回答者が直すべき場所に気づきやすくなっています。回答者が送信ボタンを押さなくてもそれぞれの質問を検証することができます。
有効な値
- 有効な任意の正規表現
例
- こちらにいくつか例があります
表示
接頭辞 (prefix)
説明
テキスト入力ボックスの前に接頭辞として表示する文字列です。接頭辞は入力部分の左側に表示されます。
画面が小さいときは、接頭辞は入力部分の上に表示されます。左側にしたい場合 (New in 3.0.0 ) : 質問にsuffix-prefix-force クラスを加えます。
有効な値
- 入力部分の前に表示したい任意の文字列
例
この属性に"$"を設定すると、テキスト入力ボックスの直前にドルマークが表示されます。
接尾辞 (suffix)
説明
テキスト入力ボックスの接尾辞となるテキストです。接尾辞は入力部分の右側に表示されます。
画面が小さい場合、接尾辞は入力部分の下に表示されます。右側に表示したい場合 (New in 3.0.0 ) : 質問にsuffix-prefix-force クラスを追加します。
有効な値
- 入力部分の後ろに表示したい任意の文字列
例
この属性に"%"を設定すると、テキスト入力ボックスの直後にパーセントマークが表示されます。
表示行数 (display_rows)
説明
すべてのコメントをチェックするためにスクロールバーを使わずに表示する行数を指定します。設定値より多くの行がある場合、スクロールバーが表示されます。"自由回答(長い)"質問タイプの既定値は5、"自由回答(非常に長い)質問タイプ"は30です。
有効な値
- 0より大きい整数
TIP非表示 (hide_tip)
説明
多くの質問では、「以下からひとつだけ選択してください」のような注記(tip)や質問への回答方法を示すテキストが表示されます。この属性で、tipやヒントを表示するかしないかを設定できます。
こうしたtipやヒントには、検証基準(最小/最大回答数、最小/最大/合計値)に関するメッセージが含まれます。hide_tipをオンにすると、こうしたメッセージは表示されませんが、無効なデータを入力するとtipが表示されます。赤色で表示されますが、検証基準を満たすと緑色になります。
利用可能な設定値
- オン - tipやヒント非表示
- オフ(規定値)
入力ボックスの幅 (text_input_width)
説明
この属性では、テキスト入力ボックス(のラッパー)の幅を設定します。入力ボックスは(サブ)質問に対する回答のために使われます。幅の設定値が十分に大きい場合、テキスト入力ボックスは次の行に表示されます。このオプションは、入力部分のサイズや絡む全体の幅を設定するものではないことに注意してください。
設定可能な値
- 規定値: 選択すると、規定値はラベルと対応するテキスト入力ボックスが同じ行になるよう設定されます。例えば、テキスト入力ボックスの幅が41%の場合、テキスト入力ボックスの幅の値はラベルと入力ボックスが同じ行になる値(この場合58%)になります。テキスト入力ボックスの幅が58%以上の場合、テキスト入力ボックスは次の行に表示されます。
- 8%; 17%...92%, 100%: 選択値が大きくなるほどテキスト入力ボックスが大きくなります。
例
- サブ質問/ラベルの下に入力部分を表示させたい場合は、ドロップダウンリストから100%を選択します。
テキスト入力ボックスのサイズ (input_box_size)
説明
この機能は、テキスト領域(テキスト入力ボックス)のサイズを指定するものです。何も設定しなければ、LimeSurveyは入力ボックスを既定のサイズで表示します。この設定で既定の動作を変えることができます。
有効な値
- 任意の数値
質問テンプレート (question_theme)
説明
それぞれの質問にカスタマイズされたテンプレートを適用することができます。
利用可能な設定
- テンプレートパネルの質問テンプレートにある作成済みの質問テンプレート
参照: https://manual.limesurvey.org/Question_themes
説明
オンにすると、その質問は常に表示されません。この機能は以下のような場合に使用します。
- 質問にURLをあらかじめ入力しておき、それを画面に表示させたくない場合。それぞれの質問がページに埋め込まれないため、アンケートで使用される条件が無効になります。
- ExpressionScriptで値をその場で保存または計算したい場合。
利用可能な設定値
- オン
- オフ(規定値)
CSS クラス (css_class)
説明
特定の質問に特別な CSS クラスを追加するときは、この欄に CSS クラス名を入力します。クラス名を列挙するときはスペースで区切ります。
有効な値
- 任意の文字列と CSS クラスを区切るスペース

入力
最大文字数 (maximum_chars)
説明
この設定はテキストベースの質問で入力できる最大文字数を指定するものです。例えば20と入力すると、アンケート参加者は20文字を超えて入力することができません。
有効な値
- 0より大きい任意の整数
位置
マッピングサービスを使う (location_mapservice)
説明
フリーテキスト質問タイプでこのオプションを使うと、テキストボックスではなく地図が表示されます(両方を同時に利用することはできません)。
利用可能な設定値
- オフ(既定値)
- MapQuestのOpenStreetMap
- Google Maps
上級者向け
位置の既定値としてのIP (location_nodefaultfromip)
説明
オンにすると、地図上の既定の位置が利用者のIPアドレスをベースとしたものになります。
利用するためには、IP情報データベースのAPIキーに有効な値を設定する必要があります
利用可能な設定値
- はい(既定値)
- いいえ
郵便番号を保存する (location_postal)
説明
アンケート結果テーブルに郵便番号を保存するときに使います。Google mapと有効なgoogle map API keyがあれば使用できます。
利用可能な設定値
- はい
- いいえ
都市名を保存 (location_city)
説明
アンケート結果テーブルに都市の情報を保存するときに使います。Google Mapsとgoogle Maps API keyがあれば使用できます。
利用可能な設定値
- オン
- オフ(規定値)
県名を保存 (location_state)
説明
有効にすると、県の情報がアンケート結果テーブルに保存されます。 Google Mapsと有効なGoogle Maps API keyがあれば使用できます。
利用可能な設定値
- いいえ(既定値)
- はい
国名を保存 (location_country)
Description
アンケート結果テーブルに国の情報を保存するときに使います。Google mapと有効なgoogle map API keyがあれば使用できます。
利用可能な設定値
- オン
- オフ(規定値)
ズームレベル (location_mapzoom)
地図のズームレベルを設定します。
有効な値
- 最小値は0、最大値は11
例
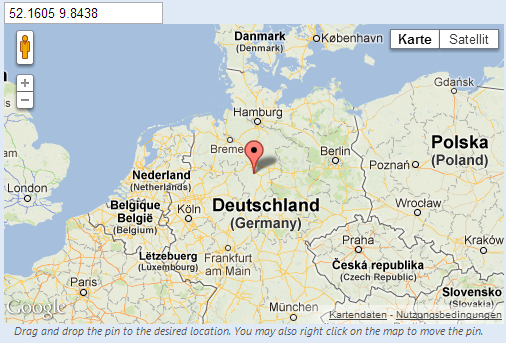
次の画像ではズームレベル=5の500x300サイズの地図が表示されています。

既定の位置 (location_defaultcoordinates)
説明
地図を表示したときに中心隣る位置の緯度と経度を入力します。
例
緯度 [スペース] 経度: 52.1605 9.8438
地図の横幅 (location_mapwidth)
地図の横幅をピクセル単位で設定します。既定値は500pxです。
地図の縦幅 (location_mapheight)
地図の縦幅をピクセル単位で設定します。既定値は300pxです。
Logic
ランダムグループ名 (random_group)
説明
質問を特定のランダムグループに入れることにより、そのグループ内のすべての質問をランダムな順番でアンケート回答者に提示するものです。
ランダムグループ名を使用した例は、ExpressionScriptのサンプルアンケートにあります。
有効な値
任意の文字列(例:'group1')を入力します。ランダムグループ名ボックスに同じ名前がセットされたすべての質問がアンケートの中でランダムになります(お互いにランダムに入れ替わる)。
プレビュー
質問をプレビューするには、質問グループのプレビュー機能ではなくアンケートのプレビューを使用します。前者では、質問をランダムな順序で表示できないと報告されているためです。
質問の検証式 (em_validation_q)
説明
質問全体(複数選択質問をまとめて)を検証する式です。検証条件に合致しない場合、em_validation_q_tip で設定したメッセージが表示されます(CSSスタイルは.errorとなります)。このTIPは.em_q_fn_validationというCSSスタイルが使われ、template.cssの既定では非表示となります。
本機能とサブ質問の検証式(em_validation_sq オプション)との大きな違いは、質問または質問の一部が検証エラーとなると、エラーメッセージが表示される点です。サブ質問の検証式では、それぞれのテキスト入力欄(例えば配列質問タイプにおいてですが、単一入力する質問タイプでも機能します)の背景が(薄い)赤色になります。
有効な値
- ExpressionScriptの構文に従うすべての式(中括弧は外す)。
例
- 自由回答(短い・複数)で利用者の情報を集め、有効なメールアドレスと電話番号が入力されたか検証したいとき
この例は無効な回答がいくつかある場合にどのように見えるかを示します。

これはひとつだけ、無効な回答がある場合の見え方です。

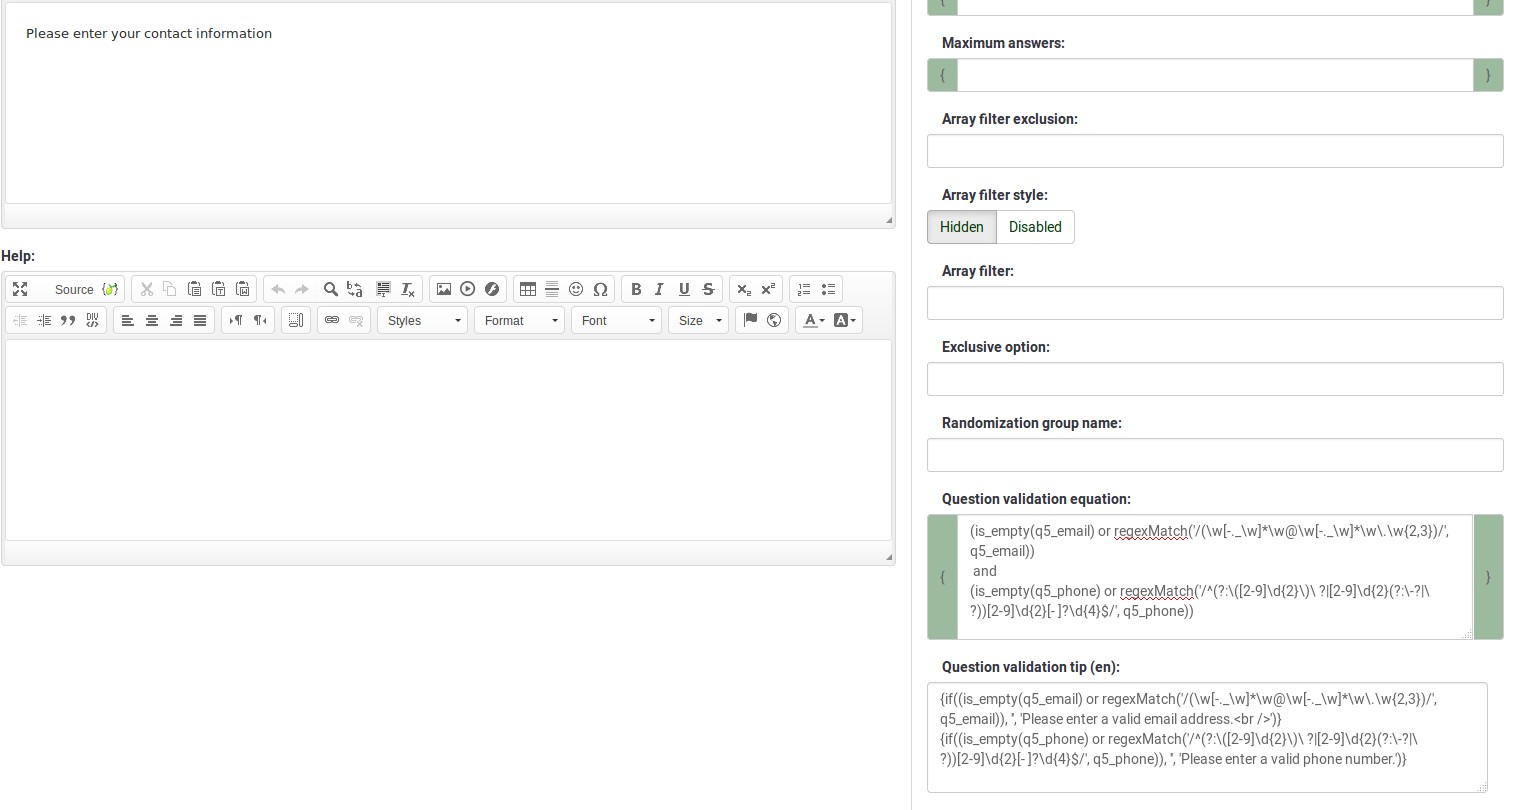
これは、情報を入力するためにどのように質問を編集するかを示します。

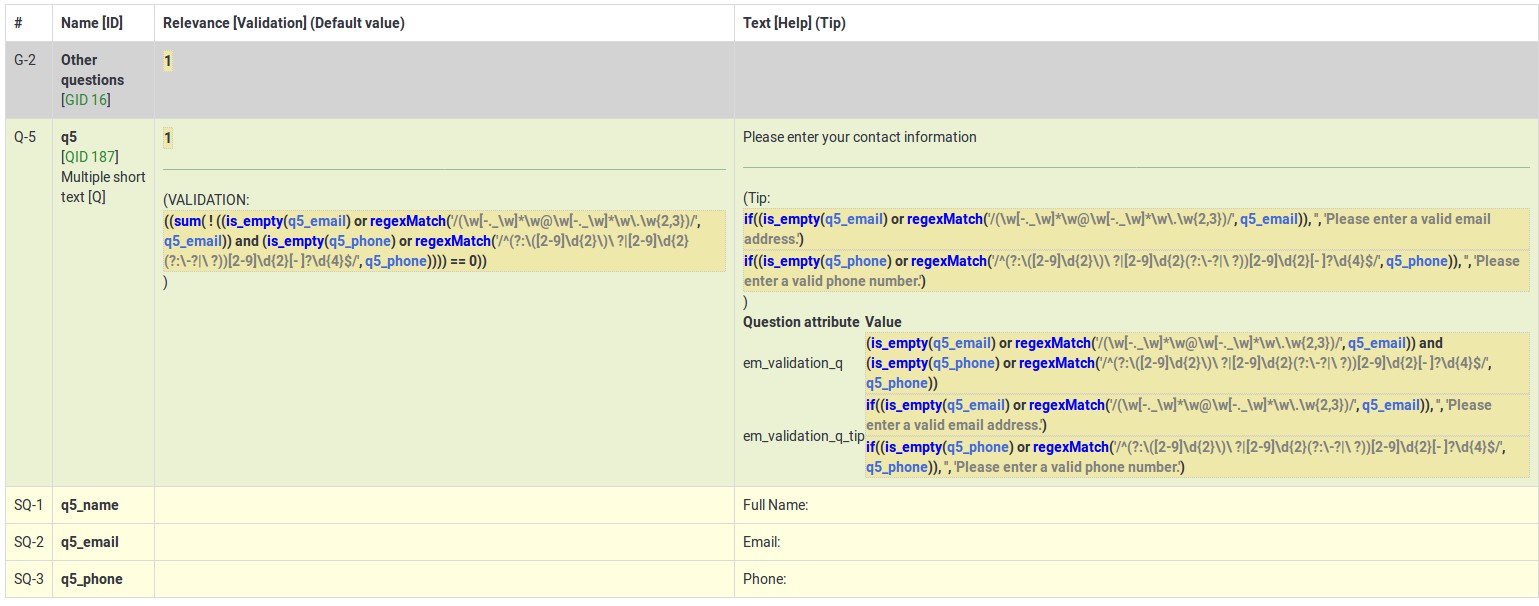
これは、ロジックファイルの出力の一部で、式が正しいか、構文エラーがないかをチェックできます。

お分かりのように、検証式はメールアドレスと電話番号が空白か正規表現フィルターにマッチするかテストしています。
電話番号やメールアドレスが無効な場合、検証TIPはワーニングメッセージだけ表示します。

LimeSurveyに上記の例をインポートする場合は、この.lsqファイルをダウンロードしてください。Em_validation_q_example.zip
質問の検証式のTIP (em_validation_q_tip)
説明
質問の検証式を使用する際、質問のTIPとしてどのように入力すべきか表示するときに使います。
有効な値
- 任意の文字列またはExpressionScriptの構文を使用した式
例
例として、質問の検証式ウィキセクションの例を参照してください。自由回答(短い・複数)で検証エラーとなった部分でどのようにTIPが表示されるかがわかります。
サブ質問の検証式 (em_validation_sq)
説明
各々のサブ質問(テキスト)を検証するための式です。検証条件に適合しないテキスト欄はエラーであることを示すため、背景色がピンク色になります(.em_sq_fn_validation CSSスタイルを使用)。正規表現ベースの検証も可能です。
有効な値
- ExpressionScriptの構文に従うすべての式(中括弧は外す)。
例
例えば、回答を3の倍数に限定する場合、式は次のようになります。
(this / 3) == floor(this/3)
予約値thisは、テキスト入力欄の入力値に自動的に置き換えられます。
サブ質問の検証式のTIP (em_validation_sq_tip)
説明
em_validation_sqを使用する際、入力した回答が正しくないときに表示されるメッセージ/TIPを設定します。
有効な値
- 任意の文字列
例
- メールアドレスを検証する場合は、TIPは、"正しいメールアドレスを入力してください"のようになります。
その他
印刷用ビューで改ページするか (page_break)
説明
この属性は、印刷用ビューからアンケートを実際に印刷するときだけアクティブになります。質問の前で改ページします。
設定可能な値
- オン
- オフ(規定値)
数字のみ (numbers_only)
説明
このオプションをオンにすると、参加者はテキストボックスに数字のみ入力できるようになります。
式質問タイプでは、この設定は結果が文字列ではなく数字だけでなければならないことになります。小数点について式が正しく計算/変換されます。
質問タイプによる動作
- 既定値: 数字以外の値が入力されたら、テキストボックスがすぐに消去され、正しい値を入力できるようになります。
- 配列(テキスト): 数字のみオプションがオフの場合、"合計を表示"と"総計を表示"オプションが無効にされ、合計欄が表示されません。
- 式: このオプションをオンにすると、式の結果を強制的に数値に変換します。式の結果が数字ではない(かつ空白でない)場合、式は NaN を返し、結果テーブルには空文字列が保存されます。
利用可能な設定値
- オン
- オフ(既定値)
統計
地図の表示 (display_map)
説明
統計ページで地図上に住所や位置の印をつけたいときに使用します。
利用可能な設定値
- オン(既定値)
- オフ
チャートの表示 (display_chart)
説明
この属性により、アンケート管理者は、アンケート参加者に対し、アンケート送信後に質問の結果を含むチャートを表示するかを選択することができます。
- プレゼンテーション&ナビゲーション設定の公開統計設定
- プレゼンテーション&ナビゲーション設定のチャート表示設定
- 公開統計質問属性
- チャート表示属性
利用可能な設定値
- オン
- オフ(規定値)
チャートタイプ (chart_type)
説明
この属性により、アンケート管理者は、アンケート参加者に対し、アンケート送信後にどのようなチャートを表示するかを選択することができます。
利用可能な選択肢
- 棒グラフ
- 円グラフ
- レーダー
- ライン
- 鶏頭図
- ドーナツ
タイマー
制限時間 (time_limit)
説明
質問にtime_limit属性を設定すると、質問の表示とともにカウントダウンが始まります。カウントダウンタイマーが切れると、自動的に次のページに進んだり、これ以上の入力をできないようにさせたりできます。
有効な値
- 任意の正の整数
例
240と入力すると、制限時間は4分(つまり240秒)となります。
<translate>
<onlyinclude>
Time limit action (time_limit_action)
Description
Sets the action performed when a time_limit has expired. By default the action for a time limit is "Warn and move on", which means the system will give a short warning that the time limit has expired before saving the question and effectively automatically clicking "Next >>". The alternative choices are to:
- "Move on without warning", which automatically clicks the "Next >>" button after the timer is finished but without any warning message.
- "Disable only", which disables changes in the question so the participant can't change anything, but doesn't automatically click the "Next >>" button.
This setting is only applicable if the general time limit setting is activated.
Available options
- Warn and move on (default): will warn the participant that the time has expired, and then click the next button
- Move on without warning: will immediately click the next button after the time limit has expired
- Disable only: will disable the answer after the time limit has expired but not automatically click next
Additional information
Instead of relying on mandatory questions, you may use expressions (read more about question and subquestion validation equations) to make the user not leave empty the answer fields. To see how the validation equations work, check the following example.
In the case in which you want to apply a timer to a question group, activate the group-by-group survey mode, set up a question to use the time limit functionality, and choose the warn and move on (default) option as time limit action. Once the question timer expires, the survey will move to the next page.
</translate>
Time limit disable next (time_limit_disable_next)
Description
It allows disabling the "next" button while a time_limit countdown is occurring. Normally, even if the time limit countdown is active, if the participant wants to click "Next" and move on to the next question or question group, they can simply click on the "Next" button (thus cutting short the time spent on the question or question group). By activating this function, the next button will appear greyed out and will not be available until the countdown timer has finished.
This settings is only applicable if the general time limit setting is activated.
Available options
- On - The "Next" button will be disabled until the time limit countdown is complete.
- Off (default)
Time limit disable prev (time_limit_disable_prev)
Description
It allows disabling the "previous" button while a time_limit countdown is occurring. Normally, even if a time limit countdown is active, if the participant wants to click on "Previous" and move to the previous question or question group, they can simply click on the "Previous" button (thus cutting short the time spent on the question or question group). By activating this function, the previous button will appear greyed out and will not be available until the countdown timer has finished.
This settings is only applicable if the general time limit setting is activated.
Available options
- On - the "Previous" button will be disabled until the time limit countdown is complete.
- Off (default)
Time limit countdown message (time_limit_countdown_message)
Description
Write in this field the text message you wish to be displayed in the countdown timer during the countdown. This setting is applicable only if the general time limit setting is activated. If nothing is written, the the field will use the default value: "Time remaining".
Time limit timer CSS style (time_limit_timer_style)
Description
It allows (and overrides the default) css styling used to display the countdown timer. The default style value for this attribute will be used if it does not exist, which is: 'width: 150px; margin-left: auto; margin-right: auto; border: 1px solid #111; text-align: center; background-color: #EEE; margin-bottom: 5px; font-size: 8pt;'.
Any text entered into this attribute will overwrite the entire default css style, so you should ensure that care is taken when entering a value for this attribute. A simple way to hide this is to copy the default style into this attribute and add 'display: none;' to the end.
This settings is only applicable if the general time limit setting is activated.
Time limit expiry message display time (time_limit_message_delay)
Description
This attribute sets how many seconds the time_limit_message is displayed before the time_limit_action occurs. If this attribute is not set, it defaults to a value of 1 (1 second).
This settings is only applicable if the general time limit settings is activated.
Example
time_limit_message_delay: 5 = the message displays for 5 seconds
Time limit expiry message (time_limit_message)
Description
This is the text of the message that appears to the participant when the time_limit has expired. By default, this message is "Your time to answer this question has expired". If the time_limit_action attribute is set to "Move on without warning" this message is not displayed. You can set the CSS style for this text in the time_limit_message_style attribute (see below).
This settings is only applicable if the general time limit settings is activated.
Example
time_limit_message: The time limit on answering this question is now up.
Time limit message CSS style (time_limit_message_style)
Description
It allows (and overrides the default) css styling used to display the time limit message. The default style value for this attribute will be used if it does not exist, which is: 'top: 10px; left: 35%; width: 30%; height: 60px; padding: 16px; border: 8px solid #555; background-color: white; z-index: 1002; text-align: center; overflow: auto'.
Any text entered into this attribute will overwrite the entire default css style, so you should ensure that care is taken when entering a value for this attribute. It is strongly recommended that you re-use the z-index value, or that, at least, the z-index value is higher than that used for the time_limit_warning_message_style attribute (which defaults to 1001).
Example
Set to: top: 10px; left: 35%; width: 30%; height: 60px; padding: 16px; border: 8px solid #555; background-color: black; color: white; z-index: 1010; text-align: center; overflow: auto
Time limit warning message timer (time_limit_warning)
Description
With the help of this attribute, you can set the time (in seconds) when the time_limit_warning_message will be displayed before the time limit expires. Setting a value for this attribute activates the time limit warning message.
This settings is only applicable if the general time limit settings is activated. This setting also exists for a second warning message.
Example
If you set this to '20', then the time limit warning message will appear 20 seconds before the time limit countdown reaches zero.
Time limit warning message display time (time_limit_warning_display_time)
Description
It sets for how long the time_limit_warning_message is displayed before it is removed/hidden from the screen. By default, if the time_limit_warning_message appears, it will remain visible until the countdown timer has completed the countdown. If a value greater than zero is introduced in this field, the message will be hidden after that many seconds.
This setting is applicable only if the general time limit setting is activated. This setting also exists for a second warning message.
Example
time_limit_warning_display_time: 10 = The time limit warning message will disappear 10 seconds after its moment of appearance.
Time limit warning message (time_limit_warning_message)
Description
If set up, it displays the text of the warning message which is displayed for a fixed period of time before a time limit expires. The default text is "Your time to answer this question has nearly expired. You have {TIME} remaining." {TIME} is replaced by a formatted description which represents the amount of time left (i.e. "30 seconds", "1 minute or 5 seconds"). This message only appears if the time_limit_warning attribute exists. You can set from the time_limit_warning attribute when the message (time_limit_warning_message) appears.
This question attribute is only applicable if the time limit setting is activated and you set some text in the time limit warning message field. This setting also exists for a second warning message.
Example
Attention: In {TIME} the time limit to answer question will expire.
Time limit warning CSS style (time_limit_warning_style)
Description
It allows (and overrides the default) css styling used to display the time limit warning message. The default style value for this attribute will be used if it does not exist, which is: 'top: 10px; left: 35%; width: 30%; height: 60px; padding: 16px; border: 8px solid #555; background-color: white; z-index: 1001; text-align: center; overflow: auto'.
Any text entered into this attribute will overwrite the entire default css style for the warning message, so you should ensure that care is taken when entering a value for this attribute. It is strongly recommended that you re-use the z-index value, or that, at least, the z-index value be lower than that used for the time_limit_message_style attribute (which defaults to 1002).
This settings is only applicable if the general time limit setting is activated. This setting also exists for a second warning message.
Example
top: 10px; left: 35%; width: 30%; height: 60px; padding: 16px; border: 8px solid #555; background-color: gray; color: white; z-index: 1001; text-align: center; overflow: auto