Vraagtype - Lijst (Radioknoppen)
From LimeSurvey Manual
Korte beschrijving
Met dit vraagtype verzamel je invoer van een lijst met radioknoppen.
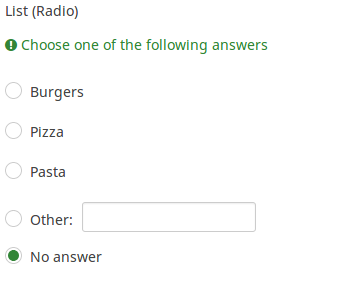
Download voorbeeld (Engels): Z_-_List_Flexible_Labels_Radio.csv
Algemene opties
Optie 'Anders' (other)
Beschrijving
Deze optie wordt bij meerdere vraagtypes gebruikt. Je kunt hiermee een keuze toevoegen voor de gebruiker als die een ander antwoord wil kiezen dan de vooraf bedachte antwoorden. Normaal gesproken is dit een keuze 'Anders', waarbij dan eventueel kan worden aangegeven of die keuze dan door de gebruiker mag worden ingevuld.
Beschikbare opties
- Aan
- Uit (standaard)
Verplicht (mandatory)
Beschrijving
Met deze optie kan de enquête-beheerder instellen dat een bepaalde vraag beantwoordt moet worden voordat de deelnemer verder kan gaan met invullen. Als je een vraag hebt met subvragen en je wilt niet alle onderdelen verplicht maken, gebruik dan de optie Minimum aantal antwoorden (min_answers) op de tab Logica.
Beschikbare opties
- Aan - Vraag moet worden beantwoord voordat de deelnemer naar de volgende pagina kan - de antwoordoptie 'Geen antwoord' wordt nooit getoond.
- Zacht - Als de vraag niet wordt beantwoord, wordt een waarschuwing weergegeven wanneer wordt geprobeerd door te gaan naar de volgende pagina - de deelnemer kan er echter voor kiezen de waarschuwing te negeren en verder te gaan. Merk op dat de optie 'Geen antwoord' nog steeds wordt weergegeven (indien geactiveerd in de instellingen voor enquêtepresentatie)
- Uit (standaard) - Vraag kan onbeantwoord blijven
Conditie (eerder "Relevantievergelijking")
Beschrijving
Als de waarde van de conditie 1 of true is dan is de vraag relevant en wordt de vraag getoond bij het invullen van de enquête. En anders niet. Bij elke vraag kun je een relevantievergelijking specificeren. Dit vervangt de condities, het ondersteunt veel meer complexe logica.
Syntax markering in kleur
Wanneer je de conditie opslaat, dan wordt het geëvalueerd en met kleur gemarkeerd. De fouten worden met een kleur aangegeven waardoor je de fouten gemakkelijker ziet,

Geldige waarden
- Een conditie gebruikt de syntax die beschreven is in ExpressionScript, zonder de omringende accolades.
Voorbeelden
Voorbeelden van het met kleur markeren, oftewel syntax markering.
Tonen
Sorteer antwoorden alfabetisch (alphasort)
Beschrijving
Als je een lijst met radioknoppen of een dropdownlijst gebruikt, dan kun je deze lijst sorteren door dit attribuut te gebruiken.
Beschikbare opties
- Aan
- Uit (standaard)
Willekeurige volgorde (random_order)
Beschrijving
Met dit attribuut kun je er voor zorgen dat de volgorde van de antwoordopties/subvragen willekeurig is. Het tonen in willekeurige volgorde kan mogelijke ruis bij het invullen voorkomen. Als een vraag subvragen heeft dan is de volgorde van de subvragen ook random, maar niet de volgorde van de antwoordopties.
Beschikbare opties
- Ja - Willekeurige volgorde bij starten door deelnemer van de enquête
- Nee (standaard)
Label 'Anders' (other_replace_text)
Beschrijving
Je kunt met deze tekst het label "Anders:" bij de antwoordopties vervangen.
Voorbeeld
Als je bij dit attribuut invult "Andere:", dan krijg je als antwoordoptie een keuze "Andere:" in plaats van "Anders:".
Vraagthema (question_theme)
Beschrijving
Hiermee kun je aangepaste thema's gebruiken bij de betreffende vragen.
Beschikbare opties
- Zie bij Vraagthema's in het paneel Thema's.
Lees: https://manual.limesurvey.org/Question_themes
Toon kolommen (display_columns)
Beschrijving
Deze instelling maakt het je mogelijk om meer dan 1 antwoordoptie op een regel te tonen. Je geeft hier dan het aantal kolommen op dat je op een regel wilt tonen. We raden aan om het te beperken tot maximaal het aantal antwoordopties.
Geldige waarden
- Een positief getal groter dan 0
Voorbeelden
- Als je drie antwoordopties hebt, en je wilt ze horizontaal tonen in plaats van verticaal, vul dan hier de waarde 3 in.
- Als je zes antwoordopties hebt, en je wilt op elke regel er twee tonen, vul dan hier 2 in.
Verberg tip (hide_tip)
Beschrijving
Bijna alle vraagtypes hebben een helptekst om de deelnemer te ondersteunen bij het invullen van de vraag. Met dit attribuut kun je de helpfunctie uitzetten.
Deze helptekst bevat informatie over de validatie (minimum/maximum aantal antwoorden, minimum/maximum van de som van de antwoorden). Als de hide_tip ingeschakeld is wordt de helptekst verborgen, maar als de deelnemer een ongeldige waarde invult wordt de helptekst getoond (in het rood omdat het een foutmelding is). Na het verbeteren wordt de tekst groen.
Beschikbare opties
- Aan - de tip wordt verborgen
- Uit (standaard)
Beschrijving
Indien ingeschakeld wordt de vraag altijd verborgen voor de deelnemers aan de enquête. Je kunt dit gebruiken als:
- je met een URL een vraag al ingevuld toont, dan kun je met deze instelling voor zorgen dat de vraag helemaal niet getoond wordt aan de deelnemer. Deze instelling gaat voor wat met condities is ingesteld, de vraag wordt helemaal niet opgenomen op de pagina.
- je een even snel een waarde wilt bepalen of opslaan met ExpressionScript.
Beschikbare opties
- Aan
- Uit (standaard)
CSS-class (css_class)
Beschrijving
Als je een speciale CSS-class wilt gebruiken bij bepaalde vragen dan kun je hier de classname invoeren. Gebruik een spatie als scheidingsteken als je meer classnames wilt invoeren.
Geldige waarden
- Een tekst met spaties tussen de verschillende CSS-classnames.

Ondersteuning bij afdrukken enquête (printable_survey_relevance_help)
Beschrijving
Als je een enquête afdrukt kun je ook de relevantievergelijkingen afdrukken. Maar waarschijnlijk wil je liever geen expressie afdrukken maar een uitleg. Hier kun je die uitleg invullen.
Geldige waarden
- Een tekst voor degene die de enquête op papier invult.
Logic
Arrayfilter stijl (array_filter_style)
Beschrijving
Bepaalt hoe de eerder gefilterde subvragen in het filter getoond worden.
Beschikbare opties
- Verborgen (standaard), de eerder geselecteerde subvragen worden niet getoond.
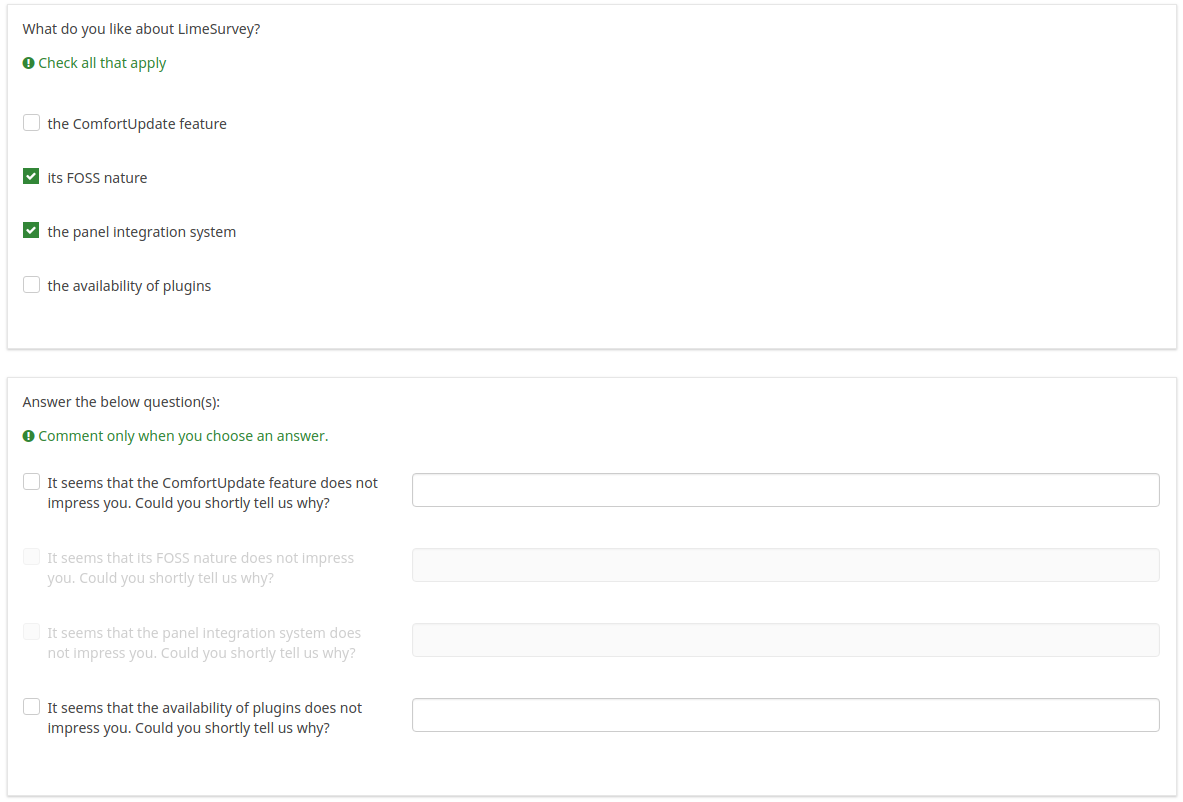
- Uitgeschakeld, de eerder geselecteerde subvragen worden grijs weergegeven en zijn niet te selecteren.
Voorbeeld
Als je kiest voor "Uitgeschakeld" dan worden de eerder geselecteerde subvragen getoond als:
Arrayfilter (array_filter)
Beschrijving
Met een arrayfilter kun je een meerkeuzevraag gebruiken om te selecteren welke responsen getoond worden in een vervolglijst, array of meerkeuzevraag.
- Meerkeuzevragen
- Meerkeuzevragen met opmerkingen
- Meerdere korte vrije teksten
- Meervoudige numerieke invoer
- Array (5 punten, 10 punten, Ja/Nee/Weet niet, Meer/Gelijk/Minder, per kolom)
- Array (Dubbele schaal, teksten, getallen)
- Rangschikken
Verder kan elk van deze vraagtypes worden gefilterd.
De enige uitzondering is Array (per kolom), die kan andere vragen filteren, maar kan niet zelf worden gefilterd.Filter zetten
Om een filter te zetten vul je de vraagcode van een vraag met meerdere opties in. Voorbeeld: als de vraagcode "Q1" is, vul dan "Q1" in het veld 'Arrayfilter' van de vraag die je wilt filteren. Alleen de in vraag Q1 geselecteerde antwoordopties worden getoond.
Trapsgewijs
De geselecteerde opties kunnen trapsgewijs worden getoond. Je kunt een vraag selecteren die een andere vraag filtert, die een andere vraag filtert, enz.
Arrayfilter voorbeeld
Een voorbeeld van deze krachtige instelling:
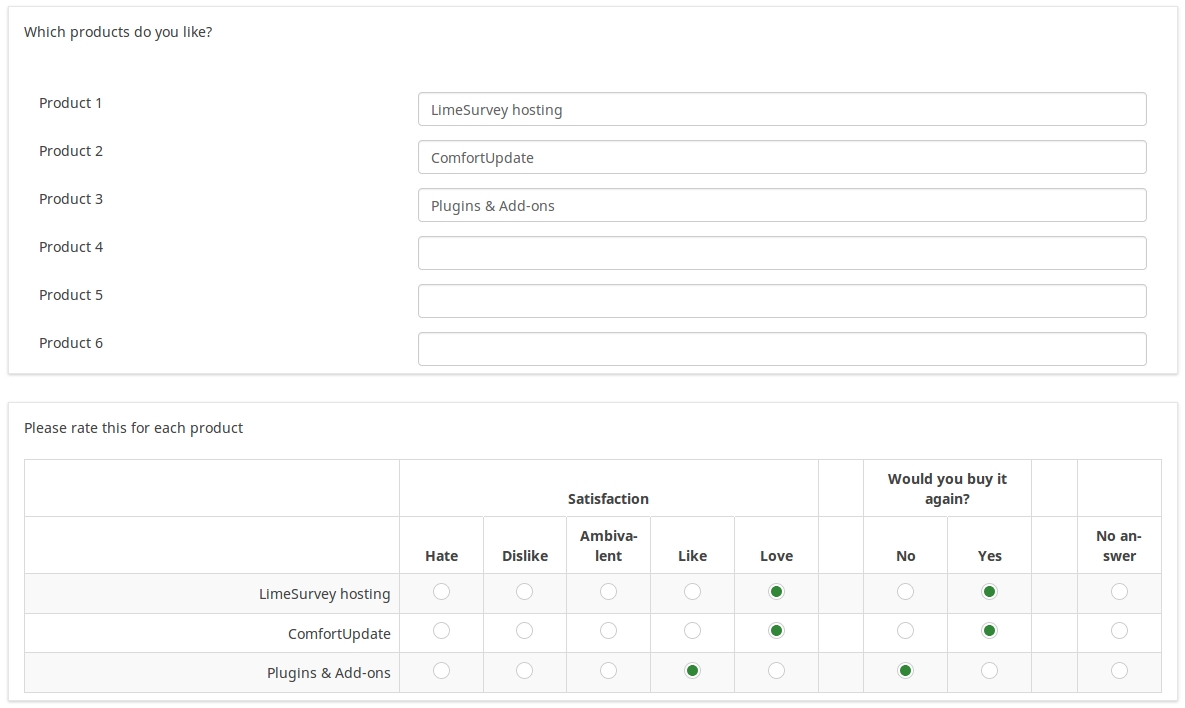
In het voorbeeld hierboven zijn er twee vragen. Eerst een van het Meerdere korte vrije teksten vraagtype en een van Array dubbele schaal vraagtype. De ingevulde antwoorden van de eerste worden later herhaald. De gegeven antwoorden worden dus gefilterd.
Dit voorbeeld kun je downloaden en importeren.
Arrayfilter uitsluiting (array_filter_exclude)
Beschrijving
Met een arrayfilter uitsluiting kun je een meerkeuzevraag gebruiken om te selecteren welke responsen niet getoond worden in een vervolglijst, array of meerkeuzevraag.
- Meerkeuzevragen
- Meerkeuzevragen met opmerkingen
- Meerdere korte vrije teksten
- Meervoudige numerieke invoer
- Array (5 punten, 10 punten, Ja/Nee/Weet niet, Meer/Gelijk/Minder, per kolom)
- Array (Dubbele schaal, teksten, getallen)
- Rangschikken
Verder kunnen deze vraagtypes worden gefilterd.
De enige uitzondering is Array per kolom, die kan andere vragen filteren, maar niet zelf kan worden gefilterd.Hoe in te stellen
Voer de vraagcode van een meerkeuzevraag in in het arrayfilter uitsluiting van de vraag die je aanpast. De vraag van de ingevoerde vraagcode dient als bron voor de huidige vraag, de daar niet gekozen opties dienen als antwoordopties voor de huidige vraag. Een voorbeeld, als de meerkeuzevraag als vraagcode "Q1" heeft, dan vul je dus "Q1" in bij het filter. Alleen de antwoorden die bij vraag Q1 niet zijn geselecteerd zijn bij de huidige vraag antwoordopties.
Trapsgewijs
De uitsluitfilters kunnen trapsgewijs worden getoond, je kunt dan een vraag selecteren die een andere vraag filtert, die een andere vraag filtert, enz.
Voorbeeld
Daar geven we een voorbeeld bij:
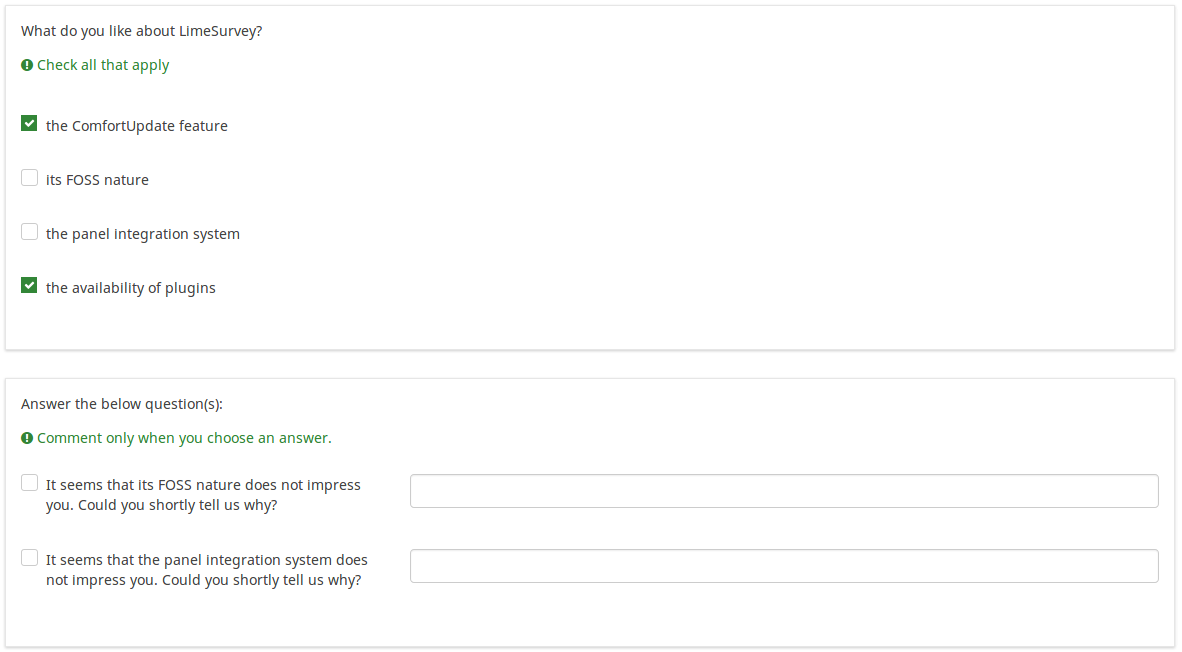
In bovenstaand voorbeeld staan twee vragen. De eerste is een meerkeuzevraag en de volgende een met opmerkingen. Voorbeeld: als de opties ComfortUpdate en Plugins worden gekozen bij de eerste vraag dan ontbreken die bij de vervolgvraag, maar de andere 2 opties zijn aanwezig.
Dit voorbeeld kun je downloaden en de vraaggroep vervolgens importeren in je LimeSurvey installatie.
Uitsluitend getallen voor 'Anders' (other_numbers_only)
Beschrijving
Als deze optie is ingeschakeld en ook de optie 'Anders' op de tab Algemene opties is ingeschakeld dan kunnen er alleen getallen worden ingevuld door de deelnemer in het veld Anders.
Beschikbare opties
- Aan
- Uit (standaard)
'Anders:' opmerking verplicht (other_comment_mandatory)
Beschrijving
Alleen van toepassing bij een verplichte vraag met een optie "Anders", de deelnemer kan in dit veld een opmerking / toelichting invullen (other comment).
Als deze instelling gekozen is, en de deelnemer kiest de optie "Andere" (checkbox of lijst), dan moet de deelnemer een opmerking / toelichting invullen.
Deze optie is er niet voor meerkeuzevragen omdat de checkbox "Anders" hiervoor niet bestaat, alleen de ingevulde opmerking wordt opgeslagen. Dit is dus alleen zinvol als other_comment_mandatory ingesteld is, daarom is dat altijd zo voor dit vraagtype.
Beschikbare opties
- Aan
- Uit (standaard)
Voorbeeld
Indien ingeschakeld voor een vraag met vraagtype "Meerkeuzevragen met opmerkingen", als de deelnemer een waarde invult in het linkerdeel van het "Anders" antwoord maar niet in de opmerking zelf, dan wordt er een waarschuwing getoond.
Randomisatiegroepsnaam (random_group)
Beschrijving
Plaatst de vragen in een randomisatiegroep waardoor de vragen in een willekeurige volgorde getoond worden aan de deelnemers.
Een voorbeeld van een enquête met deze functie staat hier.
Geldige waarden
Geef een tekst op (bijvoorbeeld: 'groep1'). Alle vragen die deze tekst bij dit veld hebben krijgen onderling een willekeurige plaats.
Preview
Als je een voorbeeld van de vragen wilt bekijken, gebruik dan het voorvertonen van de enquête in plaats van die van de vragengroep, omdat van de tweede is gemeld dat deze de vragen niet in een willekeurige volgorde zou weergeven.
Question validation equation (em_validation_q)
Description
This is an equation that is used to validate the entire question (e.g, all of its parts collectively for a multi-answer question). If the question fails the validation criteria, then em_validation_q_tip message will be displayed (it uses the CSS style .error). This tip uses the .em_q_fn_validation CSS style, which is hidden by default within template.css.
The main difference between this feature and the subquestion validation equations (em_validation_sq option) is that for this feature, if the question (or question parts) fail validation, then an error message could be shown. For the subquestion validation, each text entry cell (e.g., in an array question type, but it can also be applied to single entry question types) will be styled so that the background color is (light) red.
Valid values
- Any equation that makes use of the ExpressionScript syntax, without surrounding curly braces.
Example
- You want to collect demographic information from users via a multiple short text question, and you want to validate that the user has entered a valid email address and phone number.
This example shows how the question looks with invalid answers:

And here is what it looks like with one invalid answer:

Here is how you edit a question to enter that information:
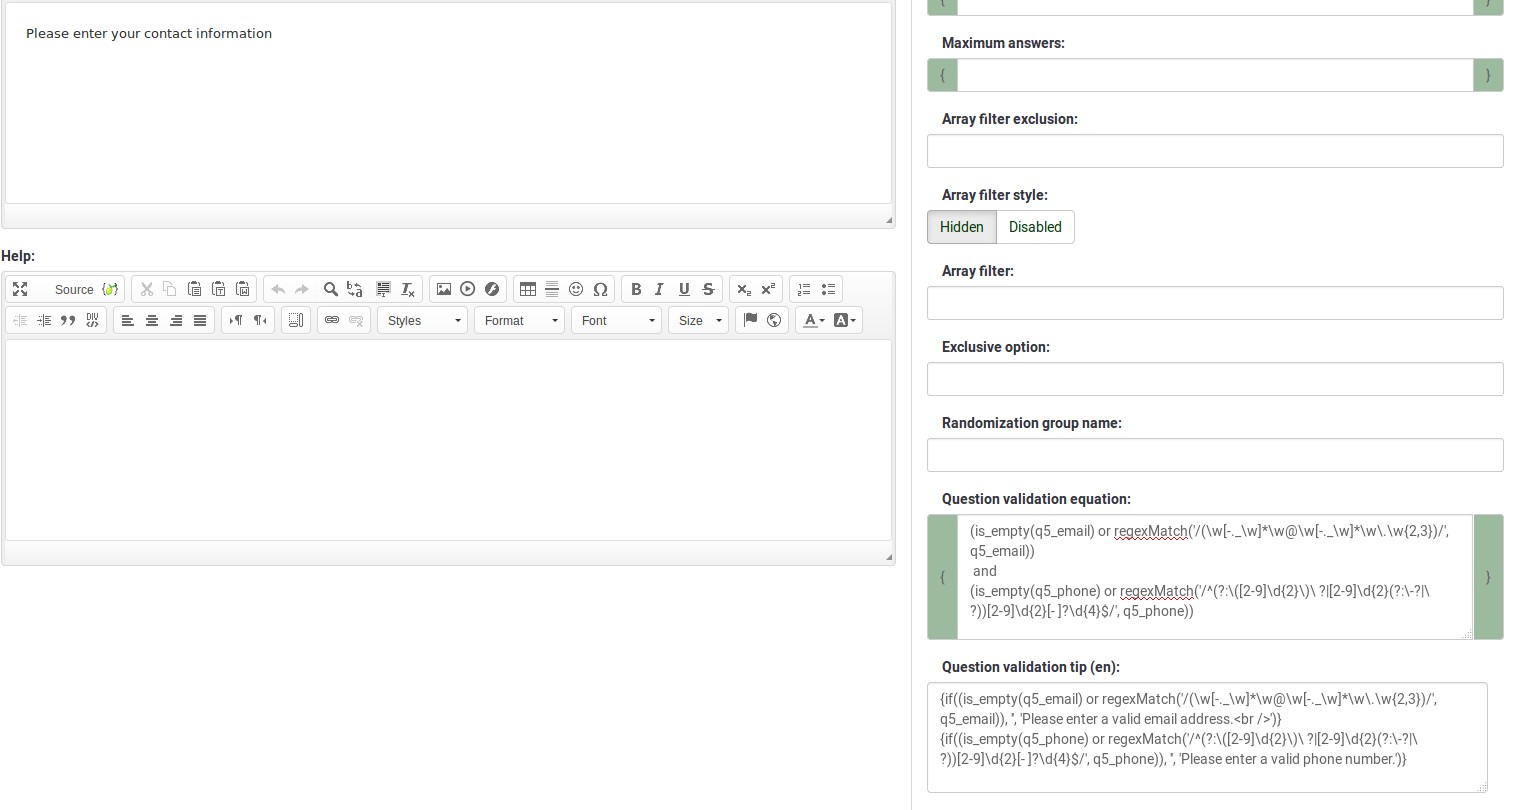
And here is part of the Show Logic File output that lets you check the accuracy of your expression and ensure that there are no syntax errors:
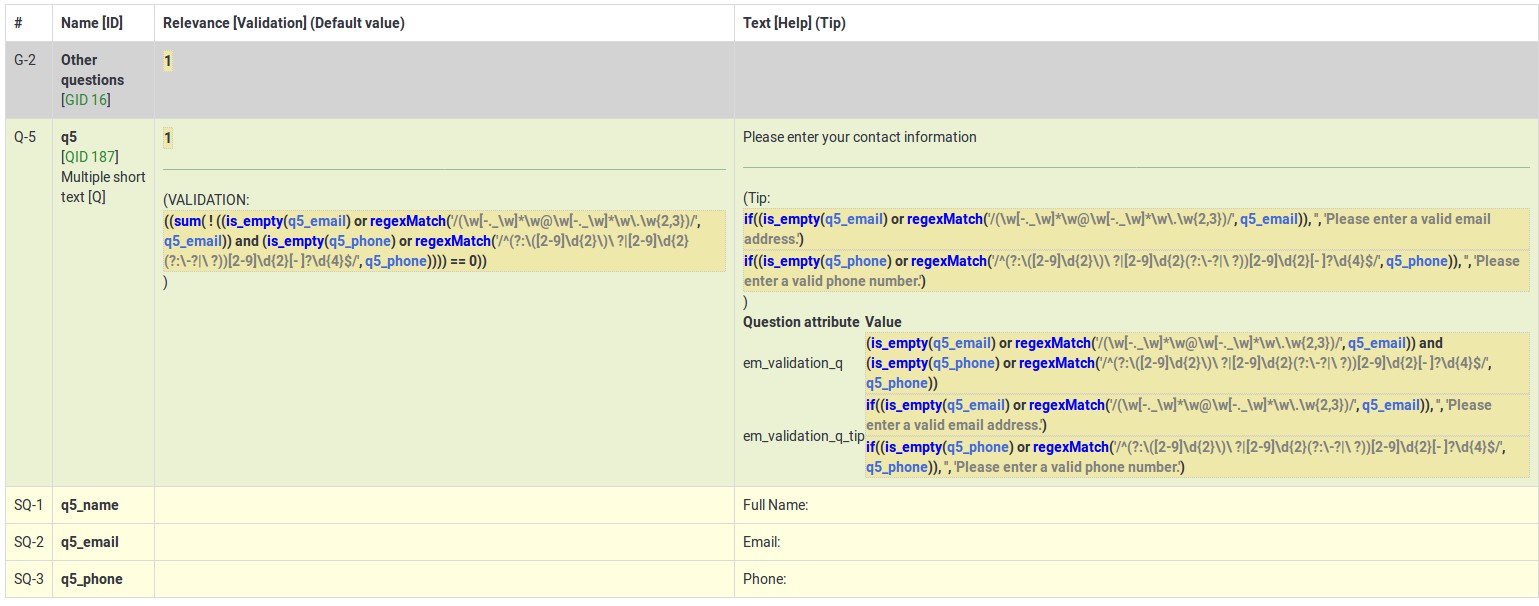
As you can see, the validation equation tests that both the email and phone number are either empty or match a regular expression filter.
The validation tip only shows the warning message if the phone or email appears invalid.

If you wish to import the example from above into your LimeSurvey installation, download the following .lsq file: Em_validation_q_example.zip.

Tip for whole question validation equation (em_validation_q_tip)
Description
If you are using the question validation equation, you can use this box in order to display an optional message as question tip on how the question has to be filled out.
Valid values
- Any string or equation that makes use of the ExpressionScript syntax.
Example
See the example from the question validation equation wiki section- it shows how the tip can be tailored to show which parts of a multiple short text question fail the validation criteria.
Other
Insert page break in printable view (page_break)
Description
This attribute is only active when you actually print a survey from the Printable View. It forces a page break before the question.
Available options
- On
- Off (default)
SPSS export scale type (scale_export)
Description
This is used for SPSS export only. This attribute overrides the default scale guessed by SPSS. To learn what the different measurement scales do, please read the related SPSS documentation.
Available options
- Default (default)
- Nominal
- Ordinal
- Scale
Statistics
Show in public statistics (public_statistics)
Description
This attribute allows the survey administrator to chose if a particular question results should be displayed to the survey participants after they submitted the survey.
The default setting for each question is 'Off' (=Do not show the question statistics to the respondents). You have to enable this for every single question if you want to show the survey statistics of that (those) particular question(s) to the survey participants after the survey submission.
Available options
- On
- Off (default)
Display chart (display_chart)
Description
This attribute allows the survey administrator to choose if a chart that contains the question results should be displayed to the survey participants after they filled out the survey.
- public statistics survey setting from the presentation & navigation settings
- show graphs survey setting from the presentation & navigation settings
- public statistics question attribute, and
- display chart question attribute.
Available options
- On
- Off (default)
Chart type (chart_type)
Description
This attribute allows the survey administrator to choose which type of chart will be displayed to the respondent once he/she finished filling out the survey.
Available options
- Bar chart
- Pie chart
- Radar
- Line
- PolarArea
- Doughnut
Timer
Time limit (time_limit)
Description
Setting the time_limit attribute on a question will cause a countdown timer to begin counting down as soon as that question/page is loaded. At the expiry of the countdown timer the question will either automatically move on to the next page or become read-only.
Valid values
- Any positive integer number
Example
Set it to 240 to count down from 4 minutes (240 seconds).
<translate>
<onlyinclude>
Time limit action (time_limit_action)
Description
Sets the action performed when a time_limit has expired. By default the action for a time limit is "Warn and move on", which means the system will give a short warning that the time limit has expired before saving the question and effectively automatically clicking "Next >>". The alternative choices are to:
- "Move on without warning", which automatically clicks the "Next >>" button after the timer is finished but without any warning message.
- "Disable only", which disables changes in the question so the participant can't change anything, but doesn't automatically click the "Next >>" button.
This setting is only applicable if the general time limit setting is activated.
Available options
- Warn and move on (default): will warn the participant that the time has expired, and then click the next button
- Move on without warning: will immediately click the next button after the time limit has expired
- Disable only: will disable the answer after the time limit has expired but not automatically click next
Additional information
Instead of relying on mandatory questions, you may use expressions (read more about question and subquestion validation equations) to make the user not leave empty the answer fields. To see how the validation equations work, check the following example.
In the case in which you want to apply a timer to a question group, activate the group-by-group survey mode, set up a question to use the time limit functionality, and choose the warn and move on (default) option as time limit action. Once the question timer expires, the survey will move to the next page.
</translate>
Time limit disable next (time_limit_disable_next)
Description
It allows disabling the "next" button while a time_limit countdown is occurring. Normally, even if the time limit countdown is active, if the participant wants to click "Next" and move on to the next question or question group, they can simply click on the "Next" button (thus cutting short the time spent on the question or question group). By activating this function, the next button will appear greyed out and will not be available until the countdown timer has finished.
This settings is only applicable if the general time limit setting is activated.
Available options
- On - The "Next" button will be disabled until the time limit countdown is complete.
- Off (default)
Time limit disable prev (time_limit_disable_prev)
Description
It allows disabling the "previous" button while a time_limit countdown is occurring. Normally, even if a time limit countdown is active, if the participant wants to click on "Previous" and move to the previous question or question group, they can simply click on the "Previous" button (thus cutting short the time spent on the question or question group). By activating this function, the previous button will appear greyed out and will not be available until the countdown timer has finished.
This settings is only applicable if the general time limit setting is activated.
Available options
- On - the "Previous" button will be disabled until the time limit countdown is complete.
- Off (default)
Time limit countdown message (time_limit_countdown_message)
Description
Write in this field the text message you wish to be displayed in the countdown timer during the countdown. This setting is applicable only if the general time limit setting is activated. If nothing is written, the the field will use the default value: "Time remaining".
Time limit timer CSS style (time_limit_timer_style)
Description
It allows (and overrides the default) css styling used to display the countdown timer. The default style value for this attribute will be used if it does not exist, which is: 'width: 150px; margin-left: auto; margin-right: auto; border: 1px solid #111; text-align: center; background-color: #EEE; margin-bottom: 5px; font-size: 8pt;'.
Any text entered into this attribute will overwrite the entire default css style, so you should ensure that care is taken when entering a value for this attribute. A simple way to hide this is to copy the default style into this attribute and add 'display: none;' to the end.
This settings is only applicable if the general time limit setting is activated.
Time limit expiry message display time (time_limit_message_delay)
Description
This attribute sets how many seconds the time_limit_message is displayed before the time_limit_action occurs. If this attribute is not set, it defaults to a value of 1 (1 second).
This settings is only applicable if the general time limit settings is activated.
Example
time_limit_message_delay: 5 = the message displays for 5 seconds
Time limit expiry message (time_limit_message)
Description
This is the text of the message that appears to the participant when the time_limit has expired. By default, this message is "Your time to answer this question has expired". If the time_limit_action attribute is set to "Move on without warning" this message is not displayed. You can set the CSS style for this text in the time_limit_message_style attribute (see below).
This settings is only applicable if the general time limit settings is activated.
Example
time_limit_message: The time limit on answering this question is now up.
Time limit message CSS style (time_limit_message_style)
Description
It allows (and overrides the default) css styling used to display the time limit message. The default style value for this attribute will be used if it does not exist, which is: 'top: 10px; left: 35%; width: 30%; height: 60px; padding: 16px; border: 8px solid #555; background-color: white; z-index: 1002; text-align: center; overflow: auto'.
Any text entered into this attribute will overwrite the entire default css style, so you should ensure that care is taken when entering a value for this attribute. It is strongly recommended that you re-use the z-index value, or that, at least, the z-index value is higher than that used for the time_limit_warning_message_style attribute (which defaults to 1001).
Example
Set to: top: 10px; left: 35%; width: 30%; height: 60px; padding: 16px; border: 8px solid #555; background-color: black; color: white; z-index: 1010; text-align: center; overflow: auto
Time limit warning message timer (time_limit_warning)
Description
With the help of this attribute, you can set the time (in seconds) when the time_limit_warning_message will be displayed before the time limit expires. Setting a value for this attribute activates the time limit warning message.
This settings is only applicable if the general time limit settings is activated. This setting also exists for a second warning message.
Example
If you set this to '20', then the time limit warning message will appear 20 seconds before the time limit countdown reaches zero.
Time limit warning message display time (time_limit_warning_display_time)
Description
It sets for how long the time_limit_warning_message is displayed before it is removed/hidden from the screen. By default, if the time_limit_warning_message appears, it will remain visible until the countdown timer has completed the countdown. If a value greater than zero is introduced in this field, the message will be hidden after that many seconds.
This setting is applicable only if the general time limit setting is activated. This setting also exists for a second warning message.
Example
time_limit_warning_display_time: 10 = The time limit warning message will disappear 10 seconds after its moment of appearance.
Time limit warning message (time_limit_warning_message)
Description
If set up, it displays the text of the warning message which is displayed for a fixed period of time before a time limit expires. The default text is "Your time to answer this question has nearly expired. You have {TIME} remaining." {TIME} is replaced by a formatted description which represents the amount of time left (i.e. "30 seconds", "1 minute or 5 seconds"). This message only appears if the time_limit_warning attribute exists. You can set from the time_limit_warning attribute when the message (time_limit_warning_message) appears.
This question attribute is only applicable if the time limit setting is activated and you set some text in the time limit warning message field. This setting also exists for a second warning message.
Example
Attention: In {TIME} the time limit to answer question will expire.
Time limit warning CSS style (time_limit_warning_style)
Description
It allows (and overrides the default) css styling used to display the time limit warning message. The default style value for this attribute will be used if it does not exist, which is: 'top: 10px; left: 35%; width: 30%; height: 60px; padding: 16px; border: 8px solid #555; background-color: white; z-index: 1001; text-align: center; overflow: auto'.
Any text entered into this attribute will overwrite the entire default css style for the warning message, so you should ensure that care is taken when entering a value for this attribute. It is strongly recommended that you re-use the z-index value, or that, at least, the z-index value be lower than that used for the time_limit_message_style attribute (which defaults to 1002).
This settings is only applicable if the general time limit setting is activated. This setting also exists for a second warning message.
Example
top: 10px; left: 35%; width: 30%; height: 60px; padding: 16px; border: 8px solid #555; background-color: gray; color: white; z-index: 1001; text-align: center; overflow: auto