Question type - List (Radio)/ja: Difference between revisions
From LimeSurvey Manual
Bravehorse (talk | contribs) (Created page with "{{QS:display_columns/ja}}") |
Bravehorse (talk | contribs) (Created page with "{{QS:Hide_tip/ja}}") |
||
| Line 34: | Line 34: | ||
{{QS:display_columns/ja}} | {{QS:display_columns/ja}} | ||
{{QS:Hide_tip}} | {{QS:Hide_tip/ja}} | ||
{{QS:Hidden}} | {{QS:Hidden}} | ||
Revision as of 03:24, 23 May 2018
概略
この質問タイプでは、ラジオボタンから回答を得ることができます。
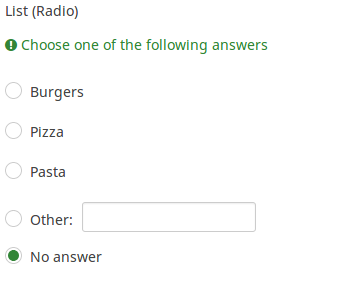
Example: List_radio_example.zip
全般オプション
オプション 'その他' (other)
説明
この設定は、複数選択タイプの質問で、回答リストに列挙したもの以外から回答できるようにすることができます。
利用可能な設定値
- オン
- オフ(規定値)
回答必須
説明
このオプションにより、アンケートの質問に回答者が必ず答えるようにすることができます。回答必須の質問に回答しない場合、回答者は先に進むことができません。ある質問に複数のサブ質問があり、特定のサブ質問のみを回答必須とする場合は、ロジックタブの下にある最小回答数属性を使用します。
設定可能な値
- オン - 参加者が次のページに進む前に質問に回答する必要があります。回答の選択肢に「回答なし」は表示されません。
- ソフト - 質問に回答せずに次のページに進もうとすると警告が表示されますが、参加者は警告を無視して先に進むことができます。「回答なし」オプションは表示されます(アンケートの表示設定で有効になっている場合)。
- オフ(規定値) - 質問に回答しなくてもよくなります
条件(以前の"出現条件")
説明
条件の結果値が「1」または「true」になると、質問がアンケートの中で「関連する」、つまりアンケート参加者に提示されます。その他の場合は質問は表示されません。どのような質問でも関連式を指定することができます。この関数は条件の後継であり、より複雑な条件ロジックをサポートします。
構文ハイライト
条件を保存するたびに、検証され構文がハイライトされます。エラーにも色がつくので、すぐに気づいて直すことができます。

有効な値
- ExpressionScriptの構文に従うすべての条件(中括弧は外す)。
例
構文ハイライトによい例があります。
表示
回答をアルファベット順にソート (alphasort)
説明
オンにすると、ラジオボタンリストやドロップダウンリストを使用する場合、リストをアルファベット順に並べ替えることができます。
利用可能な設定値
- オン
- オフ(規定値)
回答のランダム表示(random_order)
説明
この属性により、回答の選択肢/サブ質問の順番は無視され、ランダムに並べ替えられます。このオプションにより、アンケートの偏りをなくすことができます。サブ質問がある場合、サブ質問の順番はランダムになりますが、回答の選択肢の順番はランダムにはなりません。
有効な値
- はい - 参加者がアンケートを開始するときにランダム化する
- いいえ(規定値)
'その他' 選択肢のラベル (other_replace_text)
説明
Short text string to replace the text "Other" as label for the "other" option. "その他"選択肢のラベルとして"その他"に代わる文字列です。
例
"上記以外:"と設定すると、"その他"の代わりに"上記以外:"と表示されます。
質問テンプレート (question_theme)
説明
それぞれの質問にカスタマイズされたテンプレートを適用することができます。
利用可能な設定
- テンプレートパネルの質問テンプレートにある作成済みの質問テンプレート
参照: https://manual.limesurvey.org/Question_themes
列の表示 (display_columns)
説明
この設定により、回答の選択肢を複数列にわたって表示させることができます。列の数を指定します。列の数は回答数以下にすることを推奨します。
有効な値
- 0より大きい整数
例
- 3つの選択肢があり、これらを横に並べたい場合は"3"と設定します。
- 6つの選択肢があり、2列(列あたり3つ)にしたい場合は'2'と設定します。
TIP非表示 (hide_tip)
説明
多くの質問では、「以下からひとつだけ選択してください」のような注記(tip)や質問への回答方法を示すテキストが表示されます。この属性で、tipやヒントを表示するかしないかを設定できます。
こうしたtipやヒントには、検証基準(最小/最大回答数、最小/最大/合計値)に関するメッセージが含まれます。hide_tipをオンにすると、こうしたメッセージは表示されませんが、無効なデータを入力するとtipが表示されます。赤色で表示されますが、検証基準を満たすと緑色になります。
利用可能な設定値
- オン - tipやヒント非表示
- オフ(規定値)
Description
If enabled, the question will always be hidden - it will not be displayed to the survey participants. This function can be used in the following scenarios:
- If you wish to prefill a question with a URL and you want not to have it displayed on the screen. This overrides any conditions used within the survey because the respective question will not even be embedded on the page.
- If you wish to store or calculate a value on the fly via the ExpressionScript - Presentation.
Available options
- On
- Off (default)
CSS class (css_class)
Description
If you want to add special CSS classes to certain questions, you can enter the CSS class name(s) in this box. Make sure you leave an empty space between different class names.
Valid values
- Any text string with a space between different CSS class names.

Relevance help for printable survey (printable_survey_relevance_help)
Description
If you wish to print a survey, you can also print the relevance equations for each question. But, if you wish to offer instead an explanation rather than the expression on the printed form, fill in this box with the text explanation for the relevance equation.
Valid values
- Any text and/or numbers you wish to be displayed on the printable form.
Logic
Array filter style (array_filter_style)
Description
This function allows you to choose how the array filtered subquestions are displayed. They can either be "hidden" or "disabled".
Available options
- Hidden (default) - if this option is selected, then the previously selected subquestions will not be displayed in the second question.
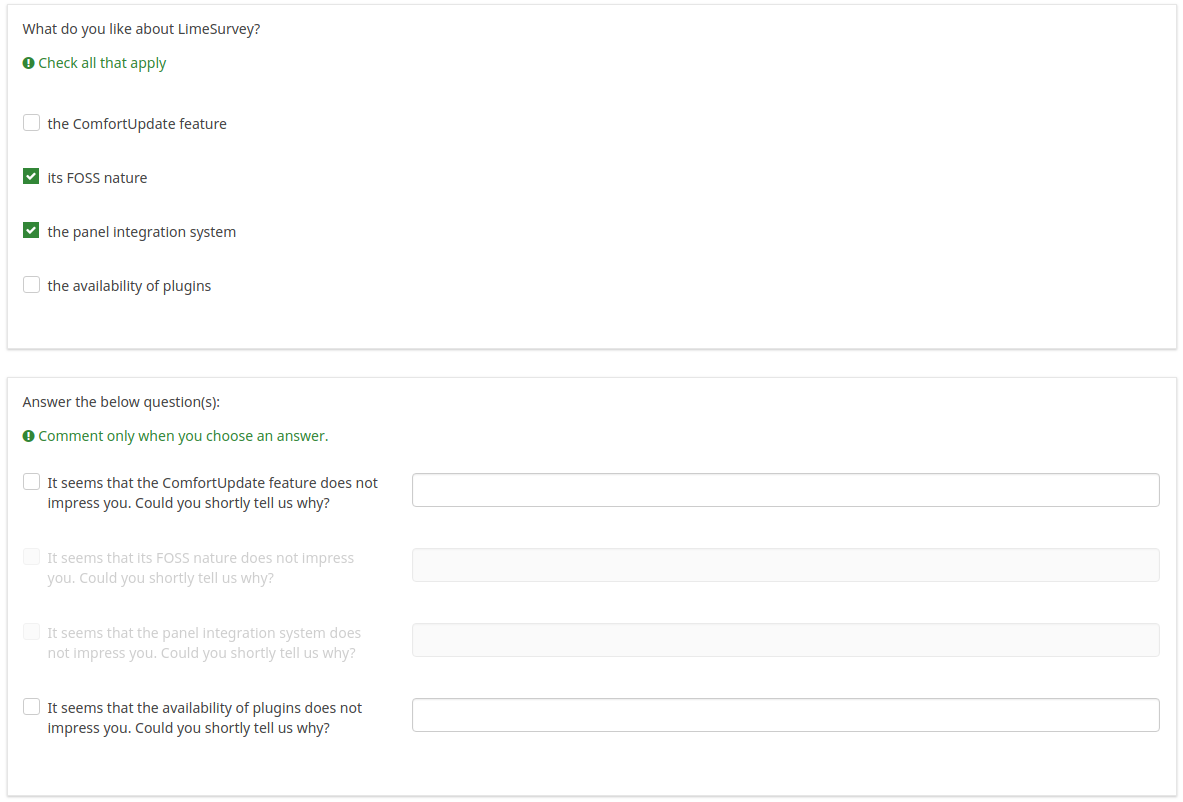
- Disabled - if this option is selected, then the previously selected subquestions will be greyed out and become unselectable.
Example
If you wish to use the "disabled" option, then the previously selected subquestions will be displayed like this:
Array filter (array_filter)
Description
The Array filter setting allows you to use any multiple choice question to select or set which responses are displayed in a subsequent list, array or multiple choice question.
- Multiple choice
- Multiple choice with comments
- Multiple short text
- Multiple numeric
- Array (5 point, 10 point, Yes/No/Unknown, Increase/Same/Decrease, Column)
- Array (Dual Scale, Text, Numbers)
- Ranking
Furthermore, each of these question types can be filtered.
The only exception is Array (Column), which can filter other questions, but not itself.How to set a filter
To set a filter, enter the question code of a multiple options question in the array filter box of the question you are currently editing. The respective question will be used as the source of information for the current question, the selected answers from the previous question being retrieved and used as answer options for the current question. For example, if your source multiple option question code is "Q1", enter "Q1" into the 'Array Filter' box to start the filtering process of the answers. Only the answer options that are selected in question Q1 will be visible in the array_filter-ed question.
Cascading
The selected options can be displayed in cascade. This means that you can select a question which filters another question, which filters another question, and so on.
Array filter example
Let's take a look at the following example to better understand the power of this setting:
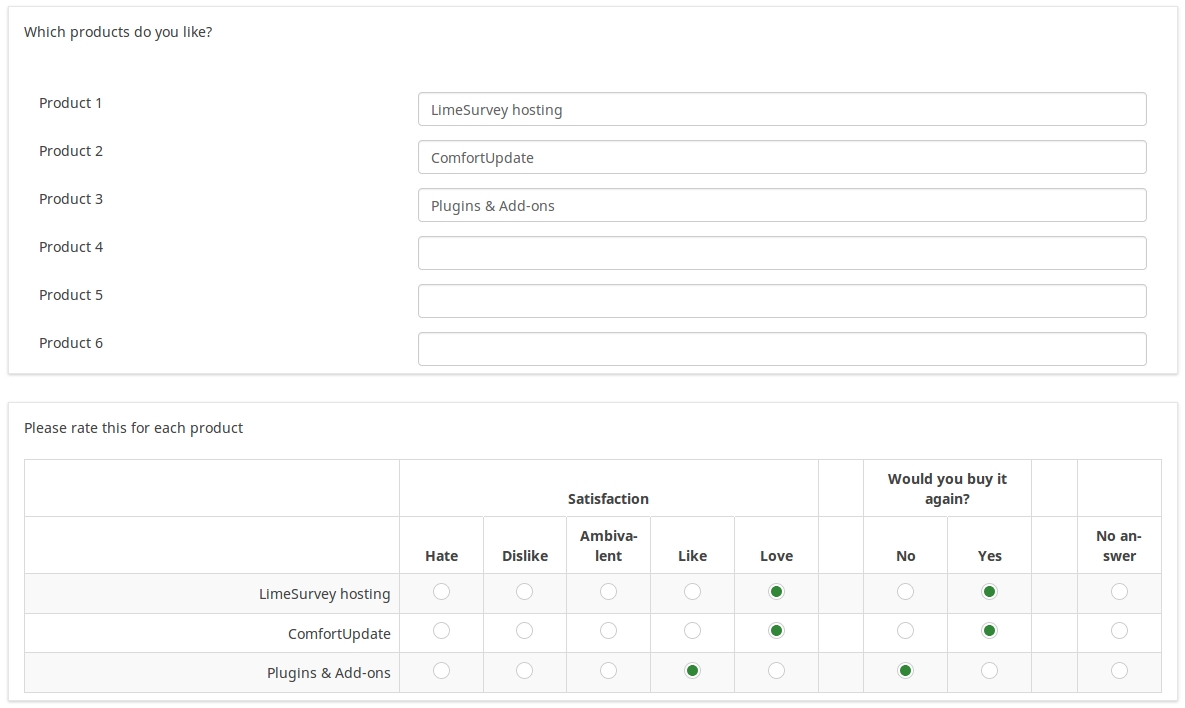
In the screenshot from above, we got two questions. The first one is a multiple short text question type, while the second one is an array dual scale question type. The answers you provide in the first question will be listed in the second one. Technically, the answers you provide to the subquestions from the first question are filtered and displayed in the second question.
This example can be downloaded from the following link: limesurvey_group_32.lsg. Import this question group into your LimeSurvey installation.
Array exclusion filter (array_filter_exclude)
Description
The Array filter exclusion setting allows you to use any multiple choice question to select or set which responses are NOT displayed in a subsequent list, array or multiple choice question.
- Multiple choice
- Multiple choice with comments
- Multiple short text
- Multiple numeric
- Array (5 point, 10 point, Yes/No/Unknown, Increase/Same/Decrease, By column)
- Array (Dual Scale, Text, Numbers)
- Ranking
Furthermore, each of these types of questions can filtered.
The only exception is Array by column which can filter other questions, but it cannot be filtered.How to set it up
Enter the question code of a multiple options question in the array exclusion filter box of the question you are currently editing. The respective question will be used as the source of information for the current question, the non-selected answers from the previous question being retrieved and used as answer options for the current question. For example, if your source multiple option question code is "Q1", enter "Q1" into the 'Array exclusion filter' box to start the filtering process of the answers. Only the answer options that are NOT selected in question Q1 will be visible in your question.
Cascading
The selected options can be displayed in cascade. This means that you can select a question which filters another question, which filters another question, and so on.
Example
Let's see together the below example:
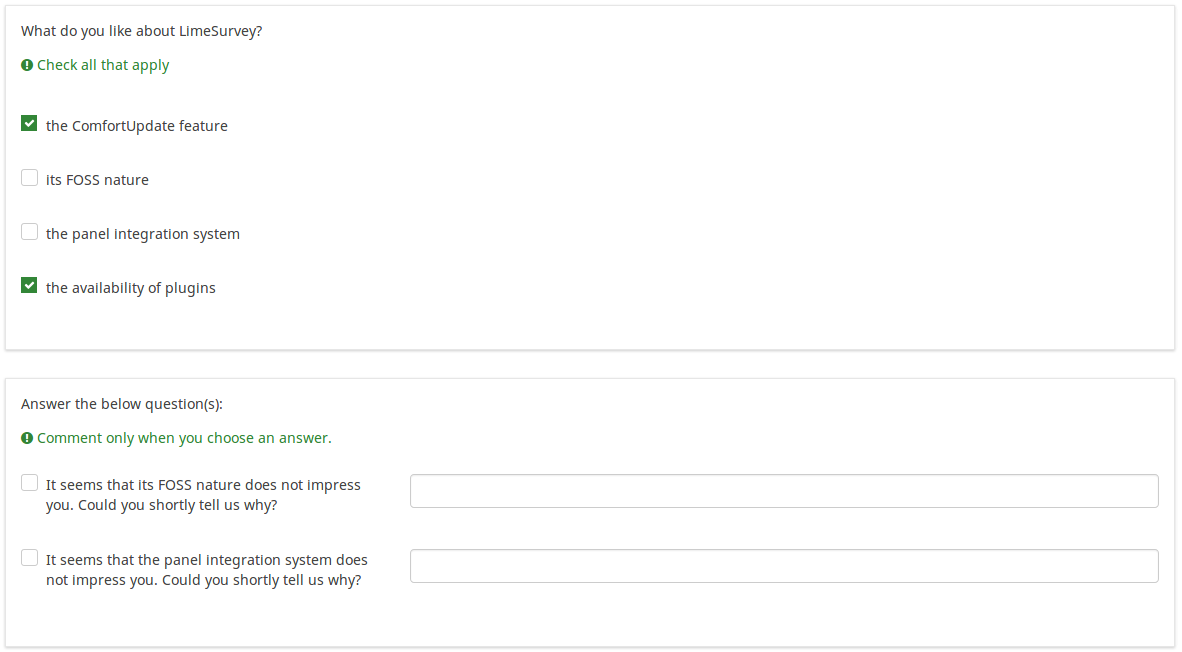
In the screenshot from above, we got two questions. The first one is a multiple choice question type, while the second one is a multiple choice with comments question type. The answers you provide in the first question will be excluded from the second one. For example, if you select the ComfortUpdate option (that has the subquestion code 'SQ1') and the Plugin option ('SQ4'), the 'SQ1' and the 'SQ4' subquestion correspondents from the second question will be excluded. In our screenshot, we can observe that only the unselected options in the first question and displayed in the second one.
This example can be downloaded from the following link: Limesurvey_group_array_filter_exclude.zip. Import this question group into your LimeSurvey installation.
Numbers only for 'Other' (other_numbers_only)
Description
If this attribute is enabled together with the "option other" one (located under the General options tab), only numbers can be typed in by the survey respondents in the "other" textbox.
Available options:
- On
- Off (default)
'Other:' comment mandatory (other_comment_mandatory)
Description
It only applies to mandatory questions having an "other answer" option in which the participant can give a free text response ("other comment").
When this setting is activated and the participant selects the other answer (the "other checkbox" or "other answer in a list"), then he will have to give a comment in the "Other comment" input box in order to proceed to the next page.
Note that this option is not available for Multiple Choice questions because the "Other" checkbox status is not recorded in the database for this question type, only the content being recorded. This means that checking the "other" checkbox is just a visual effect that is only meaningful if the text box is filled in: that is why other_comment_mandatory is assumed to be set for this question type.
Available options
- On
- Off (default)
Example
If activated for a "Multiple options with comments" question and the user enters a value in the left part of the Other answer but doesn't enter text in the Other Comment part, a warning message will be displayed when he tries to proceed to the next page.
Randomization group name (random_group)
Description
It places the questions into a specified randomization group, all questions included in the specified group being displayed in a random order to the survey respondents.
You can find a sample survey using randomization group name in ExpressionScript sample survey.
Valid values
Just enter any string you like (for example: 'group1'). All question which have set the same string within the randomization group name box will have their place in the survey randomized (=randomly exchanged among each other).
Preview
To preview the questions use the preview survey instead of the preview question group function, as the second has been reported to not show the questions in a randomized order.
Question validation equation (em_validation_q)
Description
This is an equation that is used to validate the entire question (e.g, all of its parts collectively for a multi-answer question). If the question fails the validation criteria, then em_validation_q_tip message will be displayed (it uses the CSS style .error). This tip uses the .em_q_fn_validation CSS style, which is hidden by default within template.css.
The main difference between this feature and the subquestion validation equations (em_validation_sq option) is that for this feature, if the question (or question parts) fail validation, then an error message could be shown. For the subquestion validation, each text entry cell (e.g., in an array question type, but it can also be applied to single entry question types) will be styled so that the background color is (light) red.
Valid values
- Any equation that makes use of the ExpressionScript syntax, without surrounding curly braces.
Example
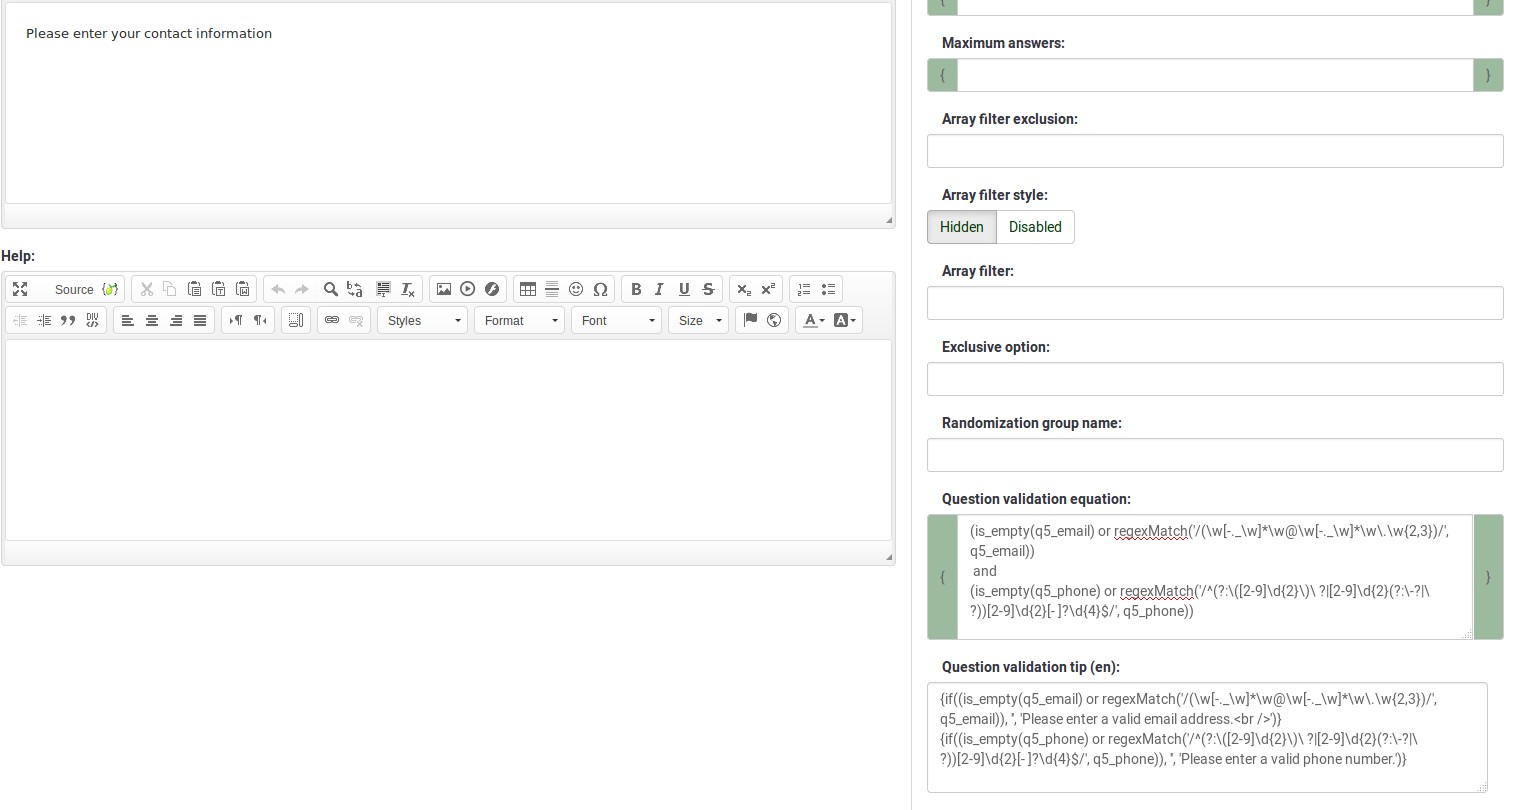
- You want to collect demographic information from users via a multiple short text question, and you want to validate that the user has entered a valid email address and phone number.
This example shows how the question looks with invalid answers:

And here is what it looks like with one invalid answer:

Here is how you edit a question to enter that information:
And here is part of the Show Logic File output that lets you check the accuracy of your expression and ensure that there are no syntax errors:
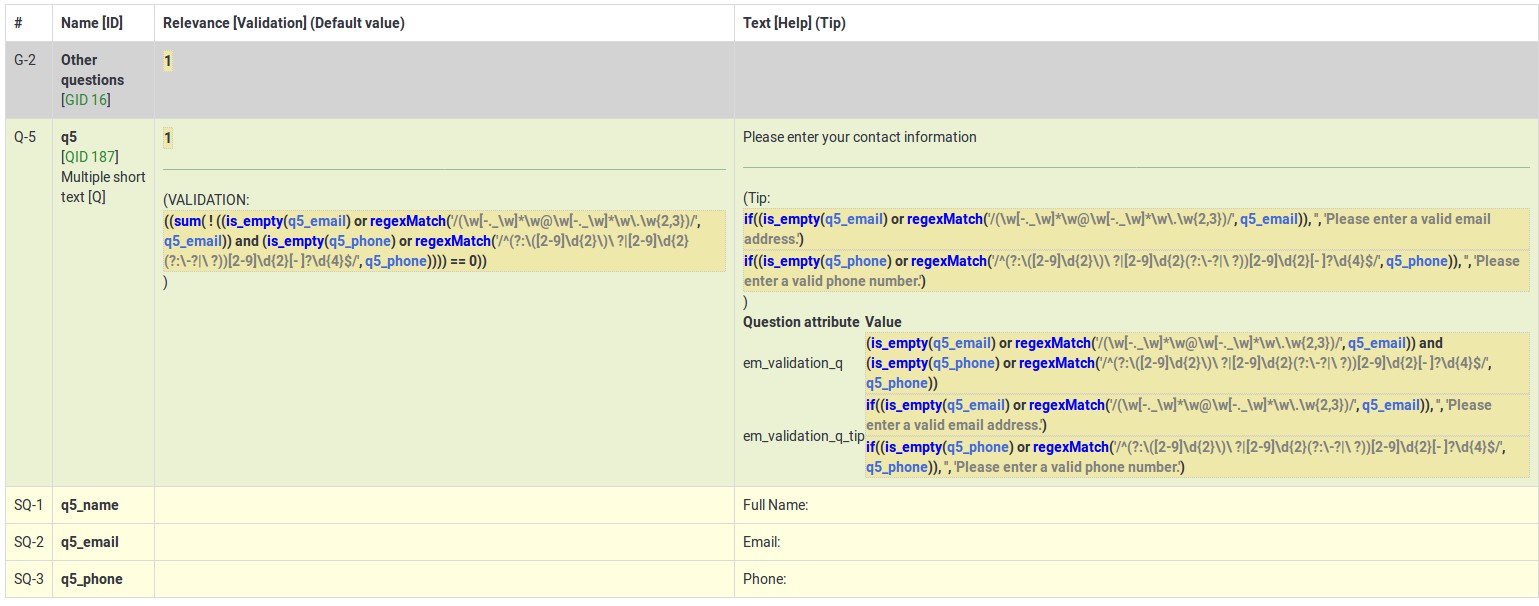
As you can see, the validation equation tests that both the email and phone number are either empty or match a regular expression filter.
The validation tip only shows the warning message if the phone or email appears invalid.

If you wish to import the example from above into your LimeSurvey installation, download the following .lsq file: Em_validation_q_example.zip.

Tip for whole question validation equation (em_validation_q_tip)
Description
If you are using the question validation equation, you can use this box in order to display an optional message as question tip on how the question has to be filled out.
Valid values
- Any string or equation that makes use of the ExpressionScript syntax.
Example
See the example from the question validation equation wiki section- it shows how the tip can be tailored to show which parts of a multiple short text question fail the validation criteria.
Other
Insert page break in printable view (page_break)
Description
This attribute is only active when you actually print a survey from the Printable View. It forces a page break before the question.
Available options
- On
- Off (default)
SPSS export scale type (scale_export)
Description
This is used for SPSS export only. This attribute overrides the default scale guessed by SPSS. To learn what the different measurement scales do, please read the related SPSS documentation.
Available options
- Default (default)
- Nominal
- Ordinal
- Scale
Statistics
Show in public statistics (public_statistics)
Description
This attribute allows the survey administrator to chose if a particular question results should be displayed to the survey participants after they submitted the survey.
The default setting for each question is 'Off' (=Do not show the question statistics to the respondents). You have to enable this for every single question if you want to show the survey statistics of that (those) particular question(s) to the survey participants after the survey submission.
Available options
- On
- Off (default)
Display chart (display_chart)
Description
This attribute allows the survey administrator to choose if a chart that contains the question results should be displayed to the survey participants after they filled out the survey.
- public statistics survey setting from the presentation & navigation settings
- show graphs survey setting from the presentation & navigation settings
- public statistics question attribute, and
- display chart question attribute.
Available options
- On
- Off (default)
Chart type (chart_type)
Description
This attribute allows the survey administrator to choose which type of chart will be displayed to the respondent once he/she finished filling out the survey.
Available options
- Bar chart
- Pie chart
- Radar
- Line
- PolarArea
- Doughnut
Timer
The following question types support timers:
The timer attributes work best with surveys using the Question by question format. They can also be used in the surveys that use the Group by group format. But, running the group by group format can break the mandatory questions, and implicitly, the survey.
Time limit (time_limit)
Description
Setting the time_limit attribute on a question will cause a countdown timer to begin counting down as soon as that question/page is loaded. At the expiry of the countdown timer the question will either automatically move on to the next page or become read-only.
Valid values
- Any positive integer number
Example
Set it to 240 to count down from 4 minutes (240 seconds).
<translate>
<onlyinclude>
Time limit action (time_limit_action)
Description
Sets the action performed when a time_limit has expired. By default the action for a time limit is "Warn and move on", which means the system will give a short warning that the time limit has expired before saving the question and effectively automatically clicking "Next >>". The alternative choices are to:
- "Move on without warning", which automatically clicks the "Next >>" button after the timer is finished but without any warning message.
- "Disable only", which disables changes in the question so the participant can't change anything, but doesn't automatically click the "Next >>" button.
This setting is only applicable if the general time limit setting is activated.
Available options
- Warn and move on (default): will warn the participant that the time has expired, and then click the next button
- Move on without warning: will immediately click the next button after the time limit has expired
- Disable only: will disable the answer after the time limit has expired but not automatically click next
Additional information
Instead of relying on mandatory questions, you may use expressions (read more about question and subquestion validation equations) to make the user not leave empty the answer fields. To see how the validation equations work, check the following example.
In the case in which you want to apply a timer to a question group, activate the group-by-group survey mode, set up a question to use the time limit functionality, and choose the warn and move on (default) option as time limit action. Once the question timer expires, the survey will move to the next page.
</translate>
Time limit disable next (time_limit_disable_next)
Description
It allows disabling the "next" button while a time_limit countdown is occurring. Normally, even if the time limit countdown is active, if the participant wants to click "Next" and move on to the next question or question group, they can simply click on the "Next" button (thus cutting short the time spent on the question or question group). By activating this function, the next button will appear greyed out and will not be available until the countdown timer has finished.
This settings is only applicable if the general time limit setting is activated.
Available options
- On - The "Next" button will be disabled until the time limit countdown is complete.
- Off (default)
Time limit disable prev (time_limit_disable_prev)
Description
It allows disabling the "previous" button while a time_limit countdown is occurring. Normally, even if a time limit countdown is active, if the participant wants to click on "Previous" and move to the previous question or question group, they can simply click on the "Previous" button (thus cutting short the time spent on the question or question group). By activating this function, the previous button will appear greyed out and will not be available until the countdown timer has finished.
This settings is only applicable if the general time limit setting is activated.
Available options
- On - the "Previous" button will be disabled until the time limit countdown is complete.
- Off (default)
Time limit countdown message (time_limit_countdown_message)
Description
Write in this field the text message you wish to be displayed in the countdown timer during the countdown. This setting is applicable only if the general time limit setting is activated. If nothing is written, the the field will use the default value: "Time remaining".
Time limit timer CSS style (time_limit_timer_style)
Description
It allows (and overrides the default) css styling used to display the countdown timer. The default style value for this attribute will be used if it does not exist, which is: 'width: 150px; margin-left: auto; margin-right: auto; border: 1px solid #111; text-align: center; background-color: #EEE; margin-bottom: 5px; font-size: 8pt;'.
Any text entered into this attribute will overwrite the entire default css style, so you should ensure that care is taken when entering a value for this attribute. A simple way to hide this is to copy the default style into this attribute and add 'display: none;' to the end.
This settings is only applicable if the general time limit setting is activated.
Time limit expiry message display time (time_limit_message_delay)
Description
This attribute sets how many seconds the time_limit_message is displayed before the time_limit_action occurs. If this attribute is not set, it defaults to a value of 1 (1 second).
This settings is only applicable if the general time limit settings is activated.
Example
time_limit_message_delay: 5 = the message displays for 5 seconds
Time limit expiry message (time_limit_message)
Description
This is the text of the message that appears to the participant when the time_limit has expired. By default, this message is "Your time to answer this question has expired". If the time_limit_action attribute is set to "Move on without warning" this message is not displayed. You can set the CSS style for this text in the time_limit_message_style attribute (see below).
This settings is only applicable if the general time limit settings is activated.
Example
time_limit_message: The time limit on answering this question is now up.
Time limit message CSS style (time_limit_message_style)
Description
It allows (and overrides the default) css styling used to display the time limit message. The default style value for this attribute will be used if it does not exist, which is: 'top: 10px; left: 35%; width: 30%; height: 60px; padding: 16px; border: 8px solid #555; background-color: white; z-index: 1002; text-align: center; overflow: auto'.
Any text entered into this attribute will overwrite the entire default css style, so you should ensure that care is taken when entering a value for this attribute. It is strongly recommended that you re-use the z-index value, or that, at least, the z-index value is higher than that used for the time_limit_warning_message_style attribute (which defaults to 1001).
Example
Set to: top: 10px; left: 35%; width: 30%; height: 60px; padding: 16px; border: 8px solid #555; background-color: black; color: white; z-index: 1010; text-align: center; overflow: auto
Time limit warning message timer (time_limit_warning)
Description
With the help of this attribute, you can set the time (in seconds) when the time_limit_warning_message will be displayed before the time limit expires. Setting a value for this attribute activates the time limit warning message.
This settings is only applicable if the general time limit settings is activated. This setting also exists for a second warning message.
Example
If you set this to '20', then the time limit warning message will appear 20 seconds before the time limit countdown reaches zero.
Time limit warning message display time (time_limit_warning_display_time)
Description
It sets for how long the time_limit_warning_message is displayed before it is removed/hidden from the screen. By default, if the time_limit_warning_message appears, it will remain visible until the countdown timer has completed the countdown. If a value greater than zero is introduced in this field, the message will be hidden after that many seconds.
This setting is applicable only if the general time limit setting is activated. This setting also exists for a second warning message.
Example
time_limit_warning_display_time: 10 = The time limit warning message will disappear 10 seconds after its moment of appearance.
Time limit warning message (time_limit_warning_message)
Description
If set up, it displays the text of the warning message which is displayed for a fixed period of time before a time limit expires. The default text is "Your time to answer this question has nearly expired. You have {TIME} remaining." {TIME} is replaced by a formatted description which represents the amount of time left (i.e. "30 seconds", "1 minute or 5 seconds"). This message only appears if the time_limit_warning attribute exists. You can set from the time_limit_warning attribute when the message (time_limit_warning_message) appears.
This question attribute is only applicable if the time limit setting is activated and you set some text in the time limit warning message field. This setting also exists for a second warning message.
Example
Attention: In {TIME} the time limit to answer question will expire.
Time limit warning CSS style (time_limit_warning_style)
Description
It allows (and overrides the default) css styling used to display the time limit warning message. The default style value for this attribute will be used if it does not exist, which is: 'top: 10px; left: 35%; width: 30%; height: 60px; padding: 16px; border: 8px solid #555; background-color: white; z-index: 1001; text-align: center; overflow: auto'.
Any text entered into this attribute will overwrite the entire default css style for the warning message, so you should ensure that care is taken when entering a value for this attribute. It is strongly recommended that you re-use the z-index value, or that, at least, the z-index value be lower than that used for the time_limit_message_style attribute (which defaults to 1002).
This settings is only applicable if the general time limit setting is activated. This setting also exists for a second warning message.
Example
top: 10px; left: 35%; width: 30%; height: 60px; padding: 16px; border: 8px solid #555; background-color: gray; color: white; z-index: 1001; text-align: center; overflow: auto