Overzicht
From LimeSurvey Manual
Inleiding
Het paneel Overzicht geeft toegang tot de belangrijkste enquête gerelateerde instellingen en functies. Er zijn drie delen:
Taakbalk
De taakbalk heeft de volgende opties:
- Enquête status: afhankelijk van de status kun je deze vier knoppen zien op het linkerdeel van de taakbalk:
 : wordt getoond als de enquête niet actief is. Als je de URL van de enqu6ete wilt zien kijk dan naar het URL-veld op de enquête samenvatting.
 : wordt getoond als de enquête actief is. Je kunt door hier dan op te klikken voorkomen dat deelnemers de enquête nog invullen of zelfs maar benaderen.
 : Als de enquête actief is kun je hiermee de enquête controleren en zelf invullen. Anders dan bij voorvertonen worden je antwoorden nu wel vastgelegd.
 : wordt getoond als de enquête verlopen is. Je kunt de enquête weer reactiveren door naar het paneel publicatie & toegang te gaan en daar de datum te wijzigen.
- Voorvertonen enquête: Bedoeld op de enquête te testen. Als de enquête in meerdere talen is dan is er een groene pijl, test alle talen waarin je je enquête maakt!
- Hulpmiddel: menu met de functies:
- Verwijder enquête
- Snelle vertaling: snelle toegang tot het menu voor vertalingen, alleen beschikbaar als de enquête meertalig is.
- Resetten condities: de condities worden verwijderd.
- Enquête logica-bestand: Controleren logica enquête, alleen nodig als je wat moeilijkere dingen doet.
- Opnieuw genereren vraagcodes: Bij het aanmaken van vragen wordt er per vraag een uniek ID toegekend, als de opbouw van de enquête wat rommelig is dan kun je nummers opnieuw toekennen. Je kunt hernummeren op de manieren:
- Per vraag: Elke vraag krijgt een oplopend nummer in de volgorde waarin ze in de vraag in de enquête staat (bijv. Q00001, Q0002, enz.)
- Per vraaggroep: Op volgorde van vraaggroep en daarbinnen op vraag: (G1Q00001, G1Q00002, G2Q00001, enz.)
- Tonen/Exporteren: Lees deze pagina
- Survey participants: It is used when you would like to invite a group of people to be part of your survey and ensure that each person can only participate once. For further details, check the survey participants wiki page;
- Responses: It offers the survey administrator access to menus that allows him/her to see the stored responses, enter new data, export or import answers, and view the partially saved but not submitted answers. By clicking on the arrow, three options will show up:
- Responses & Statistics: It displays a summary of all the stored survey responses and respondents;
- Data entry screen: It allows the survey administrator to enter new data into his/her response tables. It is a useful function when you first record the answers from the survey participants offline and then you want to analyse their answers via the functionalities provided by LimeSurvey;
- Partial (saved) responses: It displays the partially (but not submitted) saved responses.
Snelle acties
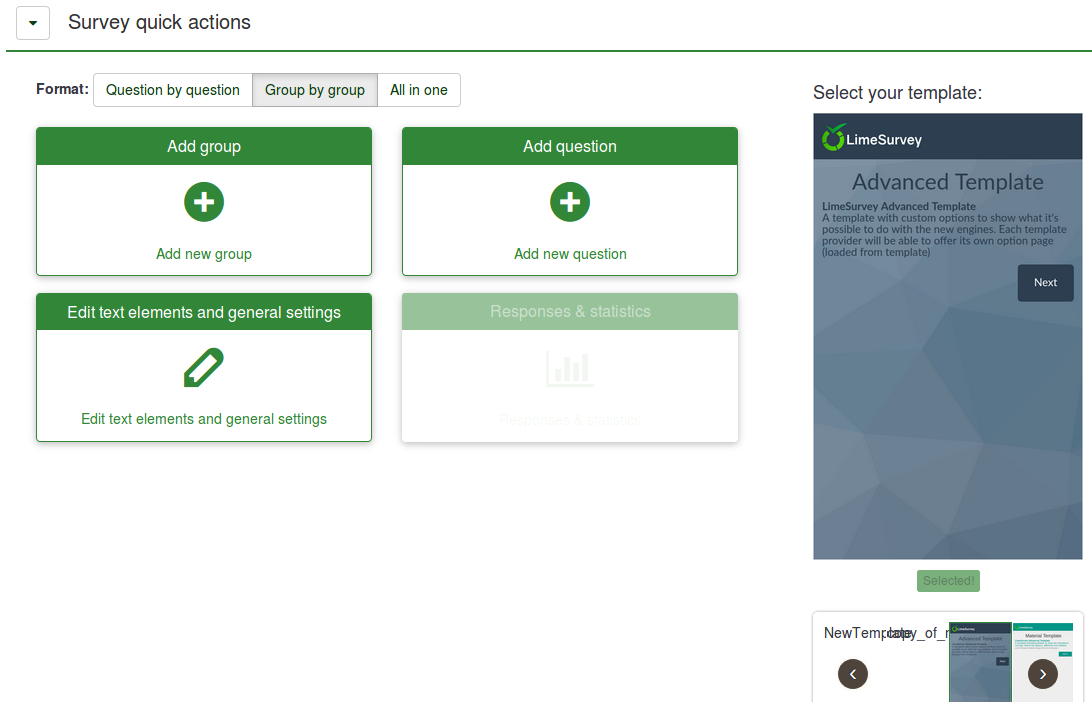
Below, you will see in the screenshot five options:

- Format: It allows you to choose the way in which the questions will be displayed to the survey respondents. Three options are available:
- Question by Question : The questions will be displayed one by one (one question per page). If this option is picked up, a separate "welcome" page and "end" page will be displayed when taking the survey;
- Group by Group : Each survey page will display a question group. Also, a separate "welcome" page and "end" page will still be displayed when taking the survey, as in the "Question by Question" surveys;
- All in one : If chosen, all the pages will be displayed on a single page. If you select this option, no separate pages exist for the "welcome" and "end" pages - they will all appear on the same page, together with the questions.
- Add group: It offers quick access to the Add question group panel - not available if the survey is activated;
- Add question: It offers quick access to the Add question panel - not available if the survey is activated;
- Edit text elements and general settings: If you click on it, LimeSurvey redirects you to the survey general settings page. For further details, please continue reading this manual section on LimeSurvey general settings;
- Response & Statistics: It allows you to "filter" your data and retrieve the desired information from your survey stored responses. For further details, please continue reading about the Statistics panel - not clickable if no responses are stored;
- Template selection: It allows you to select the template of your survey.
Samenvatting
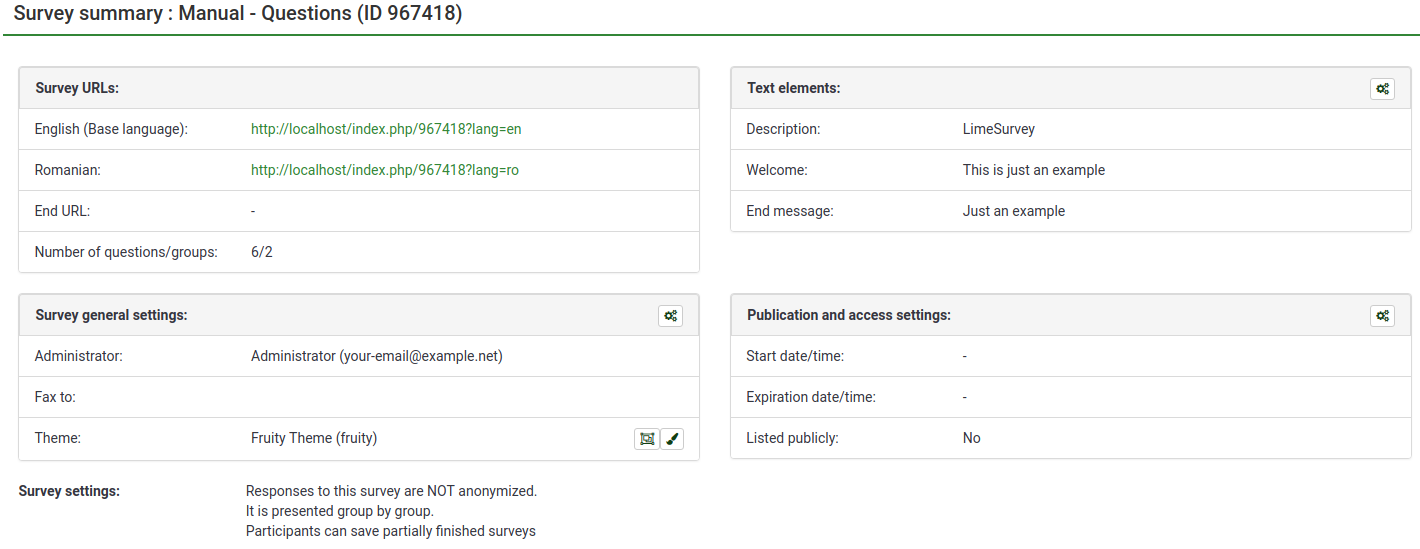
The bottom part of the Overview section offers some general information about your survey:

- Survey URLs: It displays the URLs used by the respondents to fill out the survey. If you have created a multilingual survey, each language has its own survey URL. In our case we have:
- English (Base language);
- Romanian: All the additional languages will be listed below the base language;
- End URL: You have the possibility to redirect respondents to another page once they are done filling out the questionnaire. Meer informatie.
- Administrator: It shows the user that is the administrator of the survey;
- Fax to: It is used when you want to give a fax number on the "printable survey". For more details, check our wiki page on general settings;
- Number of questions/groups: It displays the total number of questions and question groups that exist within the respective survey. If you would like to add/edit/delete them, read about the survey structure of a LimeSurvey questionnaire;
- Survey Settings: A short description of the main settings employed by the respective survey;
- Survey texts: The options presented below can be edited from the paneel Enquête teksten:
- Description: A general survey description;
- Welcome: It displays the welcome message that is shown to the survey participants when they access the survey;
- End message: It displays the end message that is shown to the survey participants when they access the survey.
- Start date/time: It shows the start date and time of your survey. Even if the survey participants have access to the URL, they will not be able to start completing it till the start date.
- Expiration date/time: It shows the expiration date and time of your survey. After the expiration date/time, no more responses are recorded.
- Template: It allows you to quickly edit the survey template. You can:
For further details on the two options, check our wiki section on the usage of LimeSurvey's template editor.
All the options presented in the survey summary can be edited from the settings menu.