Menu entries configuration: Difference between revisions
From LimeSurvey Manual
mNo edit summary |
mNo edit summary |
||
| Line 8: | Line 8: | ||
<!--T:9--> | <!--T:9--> | ||
{{Box|The wiki is incomplete. More details have to be provided. If you would like to contribute to this wiki.}} | {{Box|The wiki is incomplete. More details have to be provided. If you would like to contribute to this wiki.}} | ||
| Line 15: | Line 14: | ||
<!--T:10--> | <!--T:10--> | ||
To access the Menu entries table, click on '''Configuration''' and then on '''Menu entries configuration''' | To access the Menu entries table, click on '''Configuration''' and then on '''Menu entries configuration''' | ||
<!--T:11--> | <!--T:11--> | ||
<center>[[File:Menu Entries Configuration.png|Menu Entries Configuration.png]]</center> | <center>[[File:Menu Entries Configuration.png|Menu Entries Configuration.png]]</center> | ||
<!--T:12--> | <!--T:12--> | ||
| Line 23: | Line 24: | ||
=Menu entries configuration= <!--T:3--> | =Menu entries configuration= <!--T:3--> | ||
<!--T:13--> | <!--T:13--> | ||
[[File:Menu Entries List.png|center]] | [[File:Menu Entries List.png|center]] | ||
<!--T:14--> | <!--T:14--> | ||
| Line 32: | Line 35: | ||
*[[Menu entries configuration#Edit menu entry|Edit menu entry]] | *[[Menu entries configuration#Edit menu entry|Edit menu entry]] | ||
*[[Menu entries configuration#Delete menu entry|Delete menu entry]] | *[[Menu entries configuration#Delete menu entry|Delete menu entry]] | ||
==Create a menu entry== <!--T:4--> | ==Create a menu entry== <!--T:4--> | ||
| Line 57: | Line 61: | ||
<!--T:17--> | <!--T:17--> | ||
If you would like to change the details of an already existing menu entry, click on the green button located in the '''Action''' column. The respective menu will get selected and in the upper right the '''+New menu entry''' button changes to '''Edit menu entry'''. Click on it and do the edits. | If you would like to change the details of an already existing menu entry, click on the green button located in the '''Action''' column. The respective menu will get selected and in the upper right the '''+New menu entry''' button changes to '''Edit menu entry'''. Click on it and do the edits. | ||
<!--T:18--> | <!--T:18--> | ||
[[File:Create new menu entry.png]] | [[File:Create new menu entry.png]] | ||
[[File:Edit menu entry.png]] | [[File:Edit menu entry.png]] | ||
==Delete menu entry== <!--T:6--> | ==Delete menu entry== <!--T:6--> | ||
Revision as of 14:45, 15 May 2018
General
To access the Menu entries table, click on Configuration and then on Menu entries configuration

This function allows you to create, edit or delete menu entries. In order to be shown, these entries have to be added into a menu.
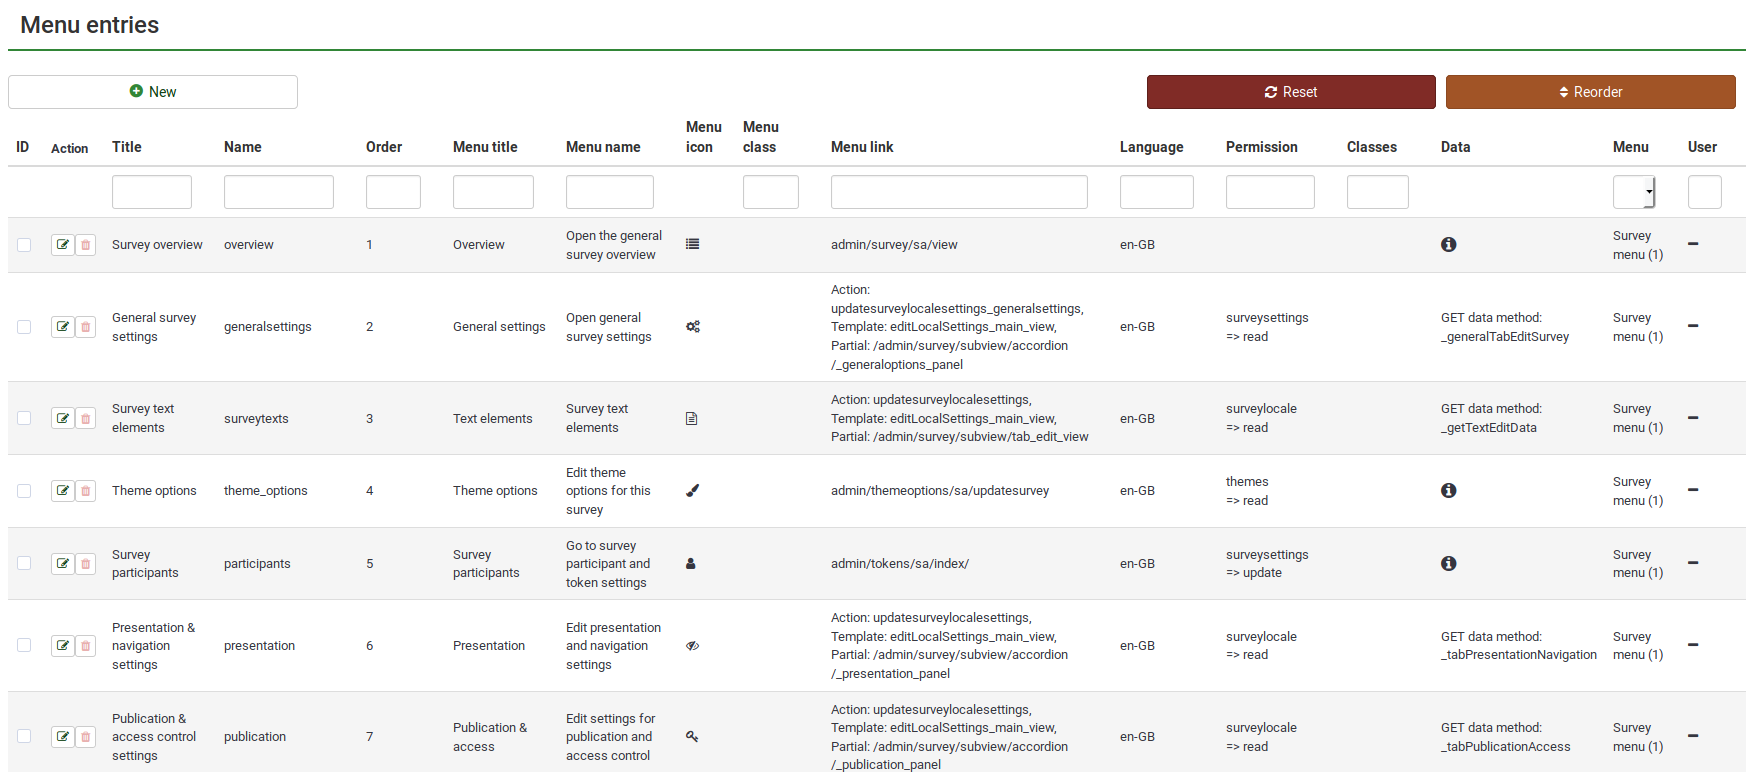
Menu entries configuration

The following actions are available to the users:
The following options are available:
- Menu: Select the menu where the new entry will be located (read our wiki on how to create menus here);
- Name: Type in the name of the menu entry;
- Title:
- Ordering: If more menu entries are added to a menu, use this function to order them
- Menu title:
- Menu name:
- Menu icon:
- Menu icon types:
- Menu class:
- Menu link: Link the menu entry to the URL of that function
- Permission:
- Permission grade:
If you would like to change the details of an already existing menu entry, click on the green button located in the Action column. The respective menu will get selected and in the upper right the +New menu entry button changes to Edit menu entry. Click on it and do the edits.
File:Create new menu entry.png
If you want to delete a menu entry, click on the red trash button that corresponds to that respective menu entry (located in the Action column).
Examples
When creating or editing a menu entry, you may find in the lower right part of the dialog the Toggle advanced options button. The following extra fields will be shown once you press it:
- Action
- Template
- Partial
- Classes
- Data
- Get data method
- Language
Once the edits are done, do not forget to click on the Save button.