Manage user groups/it: Difference between revisions
From LimeSurvey Manual
No edit summary |
(Updating to match new version of source page) |
||
| (7 intermediate revisions by 2 users not shown) | |||
| Line 1: | Line 1: | ||
<languages /> | <languages /> | ||
<div class="mw-translate-fuzzy"> | |||
==Generale== | ==Generale== | ||
</div> | |||
<div class="mw-translate-fuzzy"> | |||
I gruppi di utenti sono pensati per raggruppare gli utenti di amministrazione in singoli gruppi e sono limitati in termini di funzionalità al momento. Non ci sono veri e propri permessi legati a un gruppo. Lavorare con gruppi di utenti serve più come vantaggio macro e/o testuale. | I gruppi di utenti sono pensati per raggruppare gli utenti di amministrazione in singoli gruppi e sono limitati in termini di funzionalità al momento. Non ci sono veri e propri permessi legati a un gruppo. Lavorare con gruppi di utenti serve più come vantaggio macro e/o testuale. | ||
</div> | |||
= | =User group management= | ||
<div class="mw-translate-fuzzy"> | |||
Se clicchi sopra il menù '''Crea/Modifica gruppi''' nella barra principale degli strumenti amministrativi in alto, vieni indirizzato alla sotto-schermata '''Gruppi di Utenti'''. | Se clicchi sopra il menù '''Crea/Modifica gruppi''' nella barra principale degli strumenti amministrativi in alto, vieni indirizzato alla sotto-schermata '''Gruppi di Utenti'''. | ||
</div> | |||
[[File:usergroup.png]] | <center>[[File:usergroup.png]]</center> | ||
<center>[[File:UserGroupsListEmpty.png]]</center> | |||
==Create user groups== | |||
To add a user group, click the '''Add new user group''' button located on the upper-left corner of the window. Type in the name and the description of the user group and click '''Save''': | |||
<center>[[File:AddNewUserGroup.png]]</center> | |||
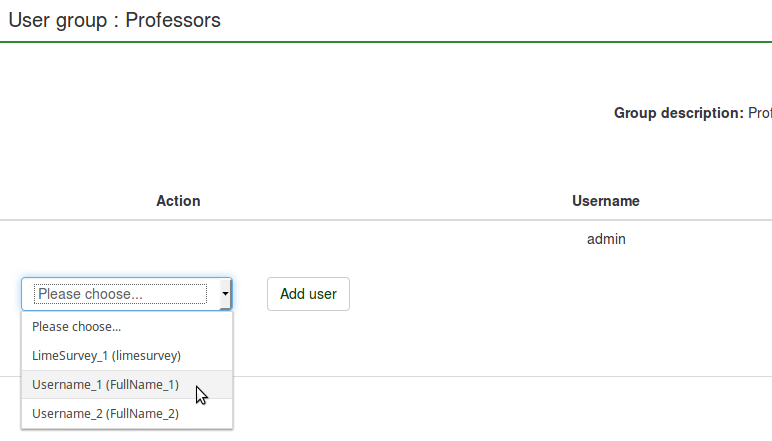
Now, you can add users to the newly created user group by selecting the desired user from the dropdown list and clicking the '''Add user''' button. | |||
<center>[[File:Adduserstoausergroup.png|0.75px]]</center> | |||
{{Hint|Text=You can see in the example below that the owner/creator of the user group is automatically added to his/her own user group..}} | |||
<center>[[File:UserGroupMembersList.png]]</center> | |||
Click '''Close''' (upper-right part of the window) to go back to the user groups list. You can observe the newly added group in the list. The following details are provided in the table: | |||
<center>[[File:UserGroupsList.png]]</center> | |||
*''User group ID'' : It shows a unique ID that is automatically assigned to each user group. | |||
*''Name'' : The name of the user group. | |||
*''Description'' : The description of the user group. | |||
*''Owner'' : The owner/creator of the user group. The owner cannot be changed. If this is necessary, you have to delete the group and create another one. | |||
*''Members'' : It shows the number of the members of the user group; | |||
*''Action'' : The last column shows a set of actions that are available for each user group from the user groups list. The following user group actions are presented below: '''view users''', '''edit user group''', '''email user group''', and '''delete user group'''. | |||
<center>[[File:UserGroupsListActions.png]]</center> | |||
==View user group members== | |||
If you click the green table, a more detailed view of the members of the user group will be shown. | |||
==Edit user group== | |||
Clicking the green pen allows you to edit the '''name''' and the '''description''' of the respective user group. | |||
==Email user group== | |||
The green mail symbol allows the group administrator to send mass emails to the members of that user group. Its functionality includes: | |||
*'''Send me a copy''': If ticked, an email will be sent to the owner of the user group/the one who created the user group. | |||
*'''Subject''': Type in the desired subject of your email. | |||
*'''Message''': Type in the desired message you wish to send to the members of the user group. | |||
<center>[[File:EmailToAllMembers.png]]</center> | |||
Then, click the '''Send''' button located under the ''Message'' text box. | |||
==Delete user group== | |||
To delete a user group, click the red wastebin button that is located on the line with the user group that you wish to delete and hit OK. | |||
<div class="mw-translate-fuzzy"> | |||
un '''Gruppo di utenti''' può essere scelto come oggetto di '''Impostazioni di sicurezza dell'indagine'''. All'interno di un sondaggio, clicca sull'icona '''Sicurezza Indagine'''. Una volta dentro, puoi aggiungere sia '''utenti''' individuali che '''gruppi''' di utenti. Aggiungendo un singolo '''utente''' puoi dargli specifici privilegi in quell'indagine, come: modificare le domande, attivare il sondaggio ed anche visualizzare i risultati e molti altri. L'aggiunta di un '''Gruppo di utenti''' si comporta come una funzione macro che semplicemente, in un solo istante, associa all'indagine tutti gli utenti appartenenti a tale gruppo e che per questo possiedono gli stessi permessi. | un '''Gruppo di utenti''' può essere scelto come oggetto di '''Impostazioni di sicurezza dell'indagine'''. All'interno di un sondaggio, clicca sull'icona '''Sicurezza Indagine'''. Una volta dentro, puoi aggiungere sia '''utenti''' individuali che '''gruppi''' di utenti. Aggiungendo un singolo '''utente''' puoi dargli specifici privilegi in quell'indagine, come: modificare le domande, attivare il sondaggio ed anche visualizzare i risultati e molti altri. L'aggiunta di un '''Gruppo di utenti''' si comporta come una funzione macro che semplicemente, in un solo istante, associa all'indagine tutti gli utenti appartenenti a tale gruppo e che per questo possiedono gli stessi permessi. | ||
</div> | |||
A '''user group''' can be used to offer [[Manage users#Set permissions for a single survey|specific survey permissions]], like editing the questions, activating the survey, and/or viewing the responses among others. Adding a '''user group''' behaves like a macro function that simply adds all the current members of the '''user group''' with the same privileges at that same time to the '''Survey'''. | |||
To change the survey permissions, go to the '''Settings''' menu of your survey. Click on '''Survey permissions''' and choose the user group that should be granted survey permissions: | |||
<center>[[File:LimeSurveySurveyPermissions.jpg]]</center> | |||
<center>[[File:LimeSurveyPermissionRightsUserGroup.png]]</center> | |||
Select in the next step the permissions that you allocate to the members of that user group. Do not forget to click the double-right arrowhead to get an extended view of the permissions matrix. | |||
<center>[[File:UserGroupSurveyPermissions.png]]</center> | |||
After you have finished editing the survey permissions, click the '''Save''' button, which is located in the upper right part of the screen. | |||
Some examples are provided [[Manage user groups#Examples|below]] in order to help you get a better understanding of the Limesurvey's survey permissions system. | |||
{{Note| If you want to grant survey permissions only to a user, [[Manage_users#Set_permissions_for_a_single_survey|read the following wiki]].}} | |||
=Things to watch out for= | |||
Some limitations of the user group functionality are presented below: | |||
<div class="mw-translate-fuzzy"> | |||
<div class="simplebox">'''Nota''':<br /> cambiamenti ad un '''Gruppo di utenti''' dopo l'aggiunta ad un'indagine non provocheranno cambiamenti nelle '''Impostazioni di sicurezza dell'indagine'''. I membri del gruppo sono bloccati al momento in cui il gruppo è stato aggiunto nelle "Impostazioni di sicurezza dell'indagine".</div> | |||
</div> | |||
Because the user group functions are still experimental, we kindly ask you to pay attention to any inconsistencies you may find while using LimeSurvey and report them via the [https://bugs.limesurvey.org/ bugs tracker] (recommended) or the [https://www.limesurvey.org/customer-support/contact-us ticket system]. | |||
<center>[[File:Deleteusersurveypermissions.png]]</center> | |||
=Examples= | |||
Some examples are provided below to help you better understand how a LimeSurvey user group works: | |||
==Informing members of a user group that they have received certain survey permissions== | |||
*Log in. | |||
*Go to the user groups list and click the green mail sign (located on the last column of the table). | |||
*Type the subject and the text body of the email. | |||
*Send it. | |||
==Granting certain permissions to a user group== | |||
*Log in as admin (or as a user that has the 'Survey security' and 'Survey content' permission). | |||
*Create a user group. | |||
*Add users to the user group. | |||
*Go to the '''Survey permissions''' page of the survey. | |||
*Add the user group and offer its members the survey permissions you wish them to have. | |||
==Adding a user to a user group== | |||
As mentioned above, adding a '''user group''' behaves like a macro function that simply adds all the current members of the '''user group''', easing the process of granting survey permissions. However, if a new member is added to that user group, that member will not automatically receive the rights that were previously granted to the other members of the user group. | |||
Therefore, you will have to repeat the steps shown in the example from above in order to grant him or her the same rights or you just add him or her separately, using the '''Add user''' function (from the 'Survey permission' panel). | |||
==Removing permissions of a user no longer in a user group== | |||
Removing him from the group should leave him without any user group permissions. However, <u>this is not happening</u> due to the limitations of the user group functionalities! '''If you delete the user from the user group, he or she still remains with the user group survey permissions'''. Therefore, a workaround is to manually delete the account from the 'Survey permissions' table. | |||
*Log in as administrator (or as a user with 'Survey security' permission). | |||
*Go to the '''Survey permissions''' page, which can be accessed from the '''Settings''' of the survey. | |||
*Delete the respective user from the 'Survey permissions' table. | |||
<center>[[File:Delete user from survey group.png|1.5px]]</center> | |||
==Removing all user group members with access to a survey== | |||
[[Manage user groups#Examples#I would like to remove all the user group members with access to one of my surveys|As mentioned above]], deleting a user from a group won't retrieve his survey permissions. '''The same goes for 'user groups''''. Deleting a user group won't retrieve the survey permissions that were previously granted to the members of the respective user group. At the moment, the only viable solution is to have them manually removed from the 'Survey permissions' table. | |||
Revision as of 21:47, 17 November 2021
Generale
I gruppi di utenti sono pensati per raggruppare gli utenti di amministrazione in singoli gruppi e sono limitati in termini di funzionalità al momento. Non ci sono veri e propri permessi legati a un gruppo. Lavorare con gruppi di utenti serve più come vantaggio macro e/o testuale.
User group management
Se clicchi sopra il menù Crea/Modifica gruppi nella barra principale degli strumenti amministrativi in alto, vieni indirizzato alla sotto-schermata Gruppi di Utenti.


Create user groups
To add a user group, click the Add new user group button located on the upper-left corner of the window. Type in the name and the description of the user group and click Save:

Now, you can add users to the newly created user group by selecting the desired user from the dropdown list and clicking the Add user button.


Click Close (upper-right part of the window) to go back to the user groups list. You can observe the newly added group in the list. The following details are provided in the table:

- User group ID : It shows a unique ID that is automatically assigned to each user group.
- Name : The name of the user group.
- Description : The description of the user group.
- Owner : The owner/creator of the user group. The owner cannot be changed. If this is necessary, you have to delete the group and create another one.
- Members : It shows the number of the members of the user group;
- Action : The last column shows a set of actions that are available for each user group from the user groups list. The following user group actions are presented below: view users, edit user group, email user group, and delete user group.
View user group members
If you click the green table, a more detailed view of the members of the user group will be shown.
Edit user group
Clicking the green pen allows you to edit the name and the description of the respective user group.
Email user group
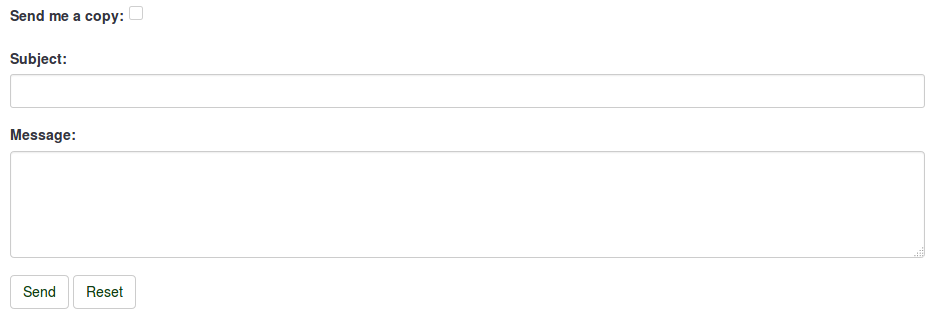
The green mail symbol allows the group administrator to send mass emails to the members of that user group. Its functionality includes:
- Send me a copy: If ticked, an email will be sent to the owner of the user group/the one who created the user group.
- Subject: Type in the desired subject of your email.
- Message: Type in the desired message you wish to send to the members of the user group.

Then, click the Send button located under the Message text box.
Delete user group
To delete a user group, click the red wastebin button that is located on the line with the user group that you wish to delete and hit OK.
un Gruppo di utenti può essere scelto come oggetto di Impostazioni di sicurezza dell'indagine. All'interno di un sondaggio, clicca sull'icona Sicurezza Indagine. Una volta dentro, puoi aggiungere sia utenti individuali che gruppi di utenti. Aggiungendo un singolo utente puoi dargli specifici privilegi in quell'indagine, come: modificare le domande, attivare il sondaggio ed anche visualizzare i risultati e molti altri. L'aggiunta di un Gruppo di utenti si comporta come una funzione macro che semplicemente, in un solo istante, associa all'indagine tutti gli utenti appartenenti a tale gruppo e che per questo possiedono gli stessi permessi.
A user group can be used to offer specific survey permissions, like editing the questions, activating the survey, and/or viewing the responses among others. Adding a user group behaves like a macro function that simply adds all the current members of the user group with the same privileges at that same time to the Survey.
To change the survey permissions, go to the Settings menu of your survey. Click on Survey permissions and choose the user group that should be granted survey permissions:


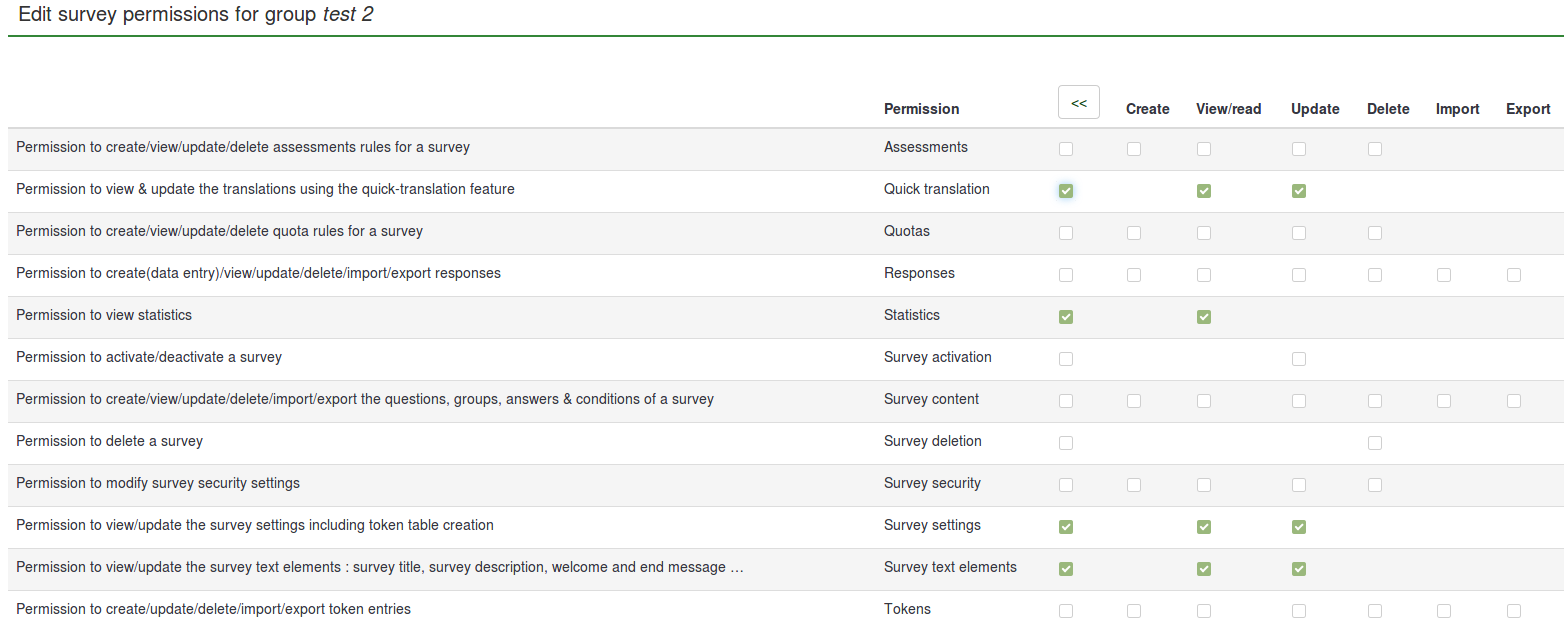
Select in the next step the permissions that you allocate to the members of that user group. Do not forget to click the double-right arrowhead to get an extended view of the permissions matrix.

After you have finished editing the survey permissions, click the Save button, which is located in the upper right part of the screen. Some examples are provided below in order to help you get a better understanding of the Limesurvey's survey permissions system.
Things to watch out for
Some limitations of the user group functionality are presented below:
cambiamenti ad un Gruppo di utenti dopo l'aggiunta ad un'indagine non provocheranno cambiamenti nelle Impostazioni di sicurezza dell'indagine. I membri del gruppo sono bloccati al momento in cui il gruppo è stato aggiunto nelle "Impostazioni di sicurezza dell'indagine".
Because the user group functions are still experimental, we kindly ask you to pay attention to any inconsistencies you may find while using LimeSurvey and report them via the bugs tracker (recommended) or the ticket system.

Examples
Some examples are provided below to help you better understand how a LimeSurvey user group works:
Informing members of a user group that they have received certain survey permissions
- Log in.
- Go to the user groups list and click the green mail sign (located on the last column of the table).
- Type the subject and the text body of the email.
- Send it.
Granting certain permissions to a user group
- Log in as admin (or as a user that has the 'Survey security' and 'Survey content' permission).
- Create a user group.
- Add users to the user group.
- Go to the Survey permissions page of the survey.
- Add the user group and offer its members the survey permissions you wish them to have.
Adding a user to a user group
As mentioned above, adding a user group behaves like a macro function that simply adds all the current members of the user group, easing the process of granting survey permissions. However, if a new member is added to that user group, that member will not automatically receive the rights that were previously granted to the other members of the user group. Therefore, you will have to repeat the steps shown in the example from above in order to grant him or her the same rights or you just add him or her separately, using the Add user function (from the 'Survey permission' panel).
Removing permissions of a user no longer in a user group
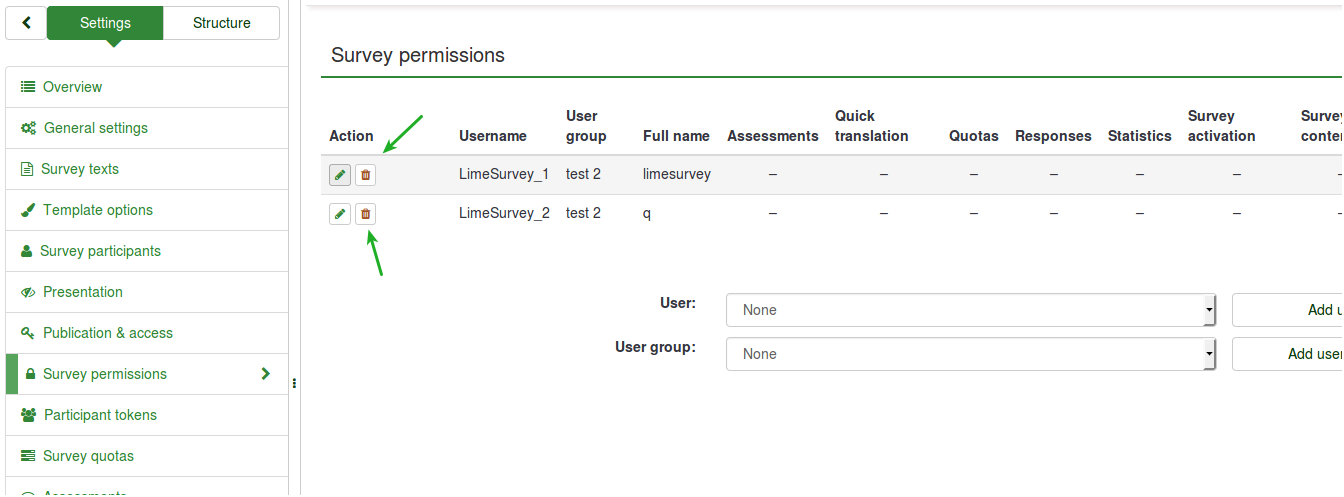
Removing him from the group should leave him without any user group permissions. However, this is not happening due to the limitations of the user group functionalities! If you delete the user from the user group, he or she still remains with the user group survey permissions. Therefore, a workaround is to manually delete the account from the 'Survey permissions' table.
- Log in as administrator (or as a user with 'Survey security' permission).
- Go to the Survey permissions page, which can be accessed from the Settings of the survey.
- Delete the respective user from the 'Survey permissions' table.

Removing all user group members with access to a survey
As mentioned above, deleting a user from a group won't retrieve his survey permissions. The same goes for 'user groups'. Deleting a user group won't retrieve the survey permissions that were previously granted to the members of the respective user group. At the moment, the only viable solution is to have them manually removed from the 'Survey permissions' table.