Home page settings: Difference between revisions
From LimeSurvey Manual
No edit summary |
mNo edit summary |
||
| Line 13: | Line 13: | ||
The following home page settings are available: | The following home page settings are available: | ||
<center[[File:Home page settings view.png]]</center> | <center[[File:Home page settings view.png]]</center> | ||
*'''Display logo''': If it is turned 'off' the logo situated above the boxes | *'''Display logo''': If it is turned 'off', the logo situated above the boxes disappears (the default value is 'On'); | ||
*'''Show last visited survey and question''': It is turned 'on' by default. It shows the last visited question and survey. the bar | *'''Show last visited survey and question''': It is turned 'on' by default. It shows the last visited question and survey. the bar being located between the logo and the boxes; | ||
*'''Show survey list''': The default value is 'Off'. If you turn it on, a survey list will appear below the boxes from the homepage; | *'''Show survey list''': The default value is 'Off'. If you turn it on, a survey list will appear below the boxes from the homepage; | ||
*'''Show search box on survey list''': If it is ticked 'Off', | *'''Show search box on survey list''': If it is ticked 'Off', the search box will not be shown in the '''survey list'''. Please note that this option does not have any effect on your home page if the '''Show survey list''' option is not turned on; | ||
*'''Wrap container around Boxes'''{{NewIn|3.0}}: If it is turned ''on'', the container around each box gets smaller (useful function when more boxes are added to your home page) ; | |||
*'''Boxes by row''': The number of boxes you would like to have on each row. The default number is '3'; | *'''Boxes by row''': The number of boxes you would like to have on each row. The default number is '3'; | ||
*'''Box offset'''{{ObsoleteIn|3.0}}: '''Box offset''' is a function the users center the boxes. For example, if you use 15 boxes, you can use the '''box offset''' function in order to better organize them into your home page. This function does not exist anymore in LimeSurvey 3.0 (and the later versions) because the boxes are automatically centered. | *'''Box offset'''{{ObsoleteIn|3.0}}: '''Box offset''' is a function the users center the boxes. For example, if you use 15 boxes, you can use the '''box offset''' function in order to better organize them into your home page. This function does not exist anymore in LimeSurvey 3.0 (and the later versions) because the boxes are automatically centered; | ||
*'''Box orientation'''{{NewIn|3.0}}: Three options are available: ''left to right'', ''right to left'', ''centered''. | |||
<!--T:3--> | <!--T:3--> | ||
Click on '''Save boxes settings''' once you are done. If everything is turned on, the | Click on '''Save boxes settings''' once you are done. If everything is turned on, the home page should look like this: | ||
[[File: Home page view.png]] | [[File: Home page view.png]] | ||
=Boxes=<!--T:4--> | =Boxes=<!--T:4--> | ||
The LimeSurvey installation comes by default with six boxes created: ''Create survey'', ''List survey'', ''Global settings'', ''ComfortUpdate'', ''Label sets'', and '' | The LimeSurvey installation comes by default with six boxes created: ''Create survey'', ''List survey'', ''Global settings'', ''ComfortUpdate'', ''Label sets'', and ''Templates''. | ||
==Create/Edit a box==<!--T:5--> | ==Create/Edit a box==<!--T:5--> | ||
*'''Position''': It shows the position | *'''Position''': It shows the box position (it is a numerical value); | ||
*'''Destination URL''': | *'''Destination URL''': It is the link via which the respective option/function is accessed. For example, the destination URL to backup the entire database is ''admin/dumpdb''; | ||
*'''Title''': The name of the box; | *'''Title''': The name of the box; | ||
*'''Icon''': It allows the user to select one of the LimeSurvey predefined icons; | *'''Icon''': It allows the user to select one of the LimeSurvey predefined icons; | ||
*'''Description''': A small description of what the box | *'''Description''': A small description of what the role of the box; | ||
*'''Display this box to''': It allows you to choose who can see the respective box: | *'''Display this box to''': It allows you to choose who can see the respective box: | ||
**''Only admin'' : Only the super administrator of the LimeSurvey installation can see those respective boxes; | **''Only admin'' : Only the super administrator of the LimeSurvey installation can see those respective boxes; | ||
**''Everybody'' : Everyone who logs | **''Everybody'' : Everyone who logs in the LimeSurvey installation can see those respective boxes; | ||
**''Nobody'' : Nobody can see those | **''Nobody'' : Nobody can see those boxes. It can be used when you would like, for example, to hide those boxes to which a [[Users#Manage user groups|user group]] does not have access to. | ||
**''Other user groups'' : Certain user groups are allowed to see those | **''Other user groups'' : Certain user groups are allowed to see those boxes. To find out more about user groups, read our wiki [[Users#Manage user groups|on how to manage them]]. | ||
==Create a box==<!--T:6--> | ==Create a box==<!--T:6--> | ||
In order to add a new box into the '''Boxes''' table, click on '''Create a new box''', located in the upper-part of the screen: | In order to add a new box into the '''Boxes''' table, click on '''Create a new box''', located in the upper-part of the screen: | ||
[[File:Creat and reset - boxes.png]]. | <center>[[File:Creat and reset - boxes.png]]</center>. | ||
Different text boxes have to be filled in: | Different text boxes have to be filled in: | ||
<center>[[File:Create a new box.png]]</center> | <center>[[File:Create a new box.png]]</center> | ||
Once done, click on the '''Save''' button that is located in the upper right part of the screen. | Once done, click on the '''Save''' button that is located in the upper-right part of the screen. | ||
{{Note|Check [[Home page settings#Examples|the example provided below]] to better understand this functionality.}} | {{Note|Check [[Home page settings#Examples|the example provided below]] to better understand this functionality.}} | ||
| Line 55: | Line 57: | ||
==Reset to the default settings==<!--T:7--> | ==Reset to the default settings==<!--T:7--> | ||
If you did too many | If you did too many changes and you would like to restore the '''Boxes''' list to its default values, click on the '''Reset to default boxes''' button, located in the upper-right side of the window. | ||
[[File:Creat and reset - boxes.png]] | <center>[[File:Creat and reset - boxes.png]]</center> | ||
=Examples=<!--T:8--> | =Examples=<!--T:8--> | ||
| Line 71: | Line 73: | ||
<center>[[File:Destination URL.png]]</center>}} | <center>[[File:Destination URL.png]]</center>}} | ||
*Save the | *Save the box and access the home page of your LimeSurvey installation. | ||
<center>[[File:Add a new box - example 2.png]]</center> | <center>[[File:Add a new box - example 2.png]]</center> | ||
*Click on the newly created box | *Click on the newly created box and check whether it is working or not (if not, check its destionation URL): | ||
<center>[[File:Create a new box example test.png]]</center> | <center>[[File:Create a new box example test.png]]</center> | ||
</translate> | </translate> | ||
Revision as of 15:40, 24 August 2017
General
The home page settings page allows every user to tweak its settings according to their needs. The button can be accessed from Configuration->Home page settings(located under the Settings tab):

Besides the home page settings, new boxes (for different user groups) can be created in order to facilitate the management of your LimeSurvey installation.
Home page settings
The following home page settings are available:
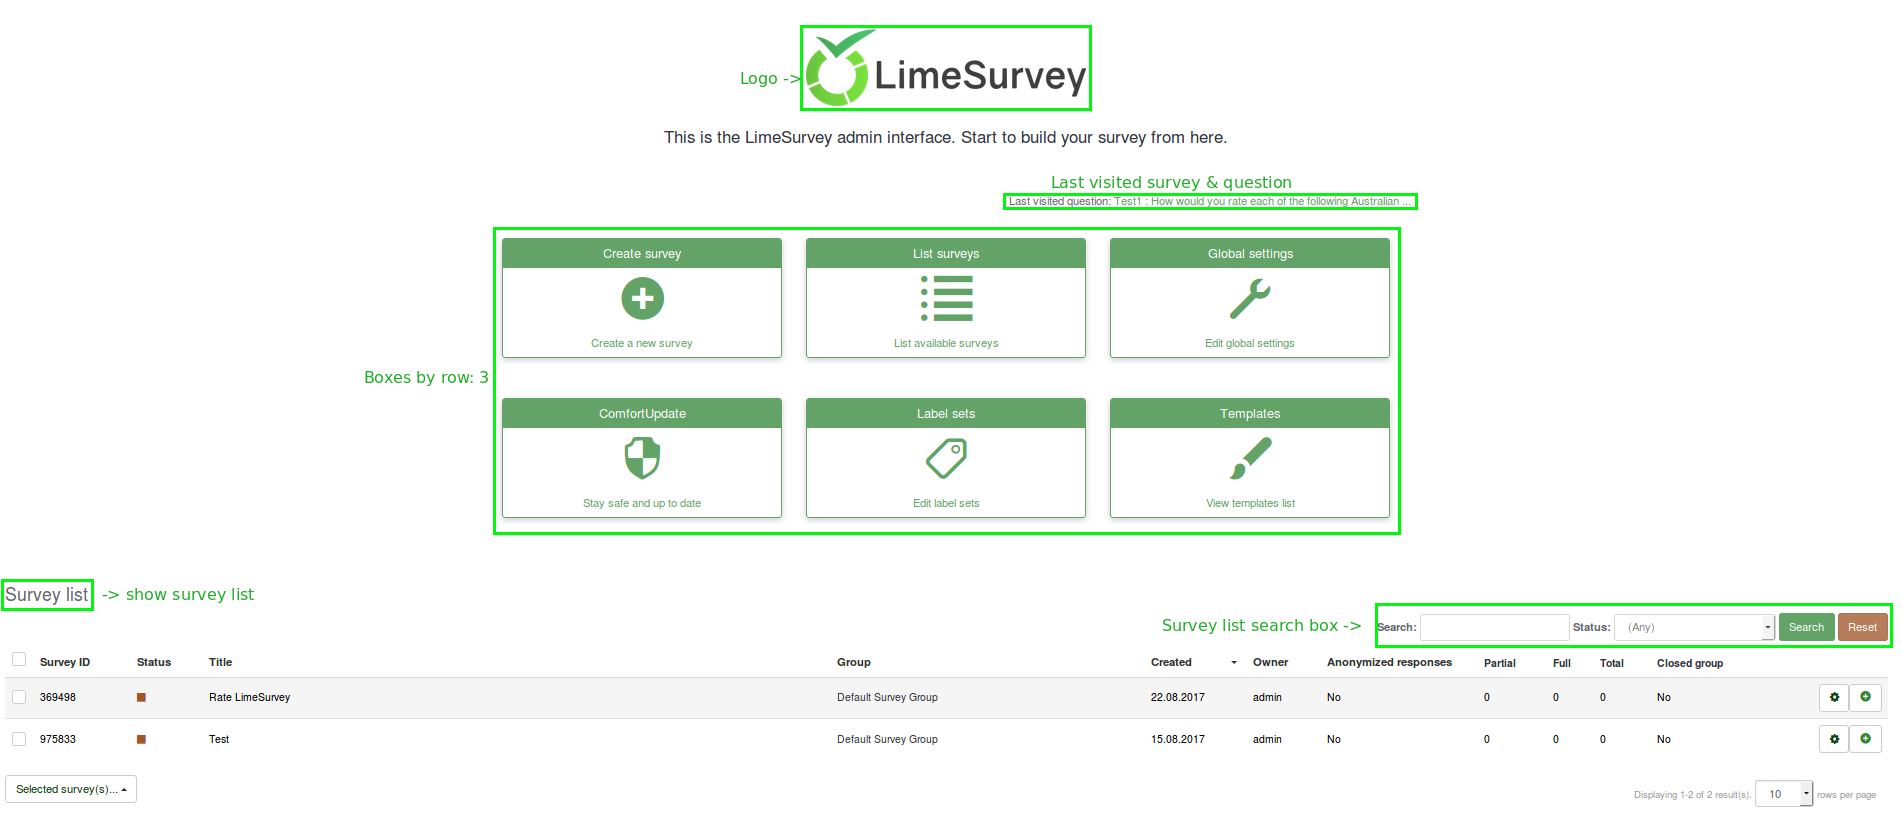
- Display logo: If it is turned 'off', the logo situated above the boxes disappears (the default value is 'On');
- Show last visited survey and question: It is turned 'on' by default. It shows the last visited question and survey. the bar being located between the logo and the boxes;
- Show survey list: The default value is 'Off'. If you turn it on, a survey list will appear below the boxes from the homepage;
- Show search box on survey list: If it is ticked 'Off', the search box will not be shown in the survey list. Please note that this option does not have any effect on your home page if the Show survey list option is not turned on;
- Wrap container around Boxes (New in 3.0 ): If it is turned on, the container around each box gets smaller (useful function when more boxes are added to your home page) ;
- Boxes by row: The number of boxes you would like to have on each row. The default number is '3';
- Box offset (Obsolete since 3.0): Box offset is a function the users center the boxes. For example, if you use 15 boxes, you can use the box offset function in order to better organize them into your home page. This function does not exist anymore in LimeSurvey 3.0 (and the later versions) because the boxes are automatically centered;
- Box orientation (New in 3.0 ): Three options are available: left to right, right to left, centered.
Click on Save boxes settings once you are done. If everything is turned on, the home page should look like this:
Boxes
The LimeSurvey installation comes by default with six boxes created: Create survey, List survey, Global settings, ComfortUpdate, Label sets, and Templates.
Create/Edit a box
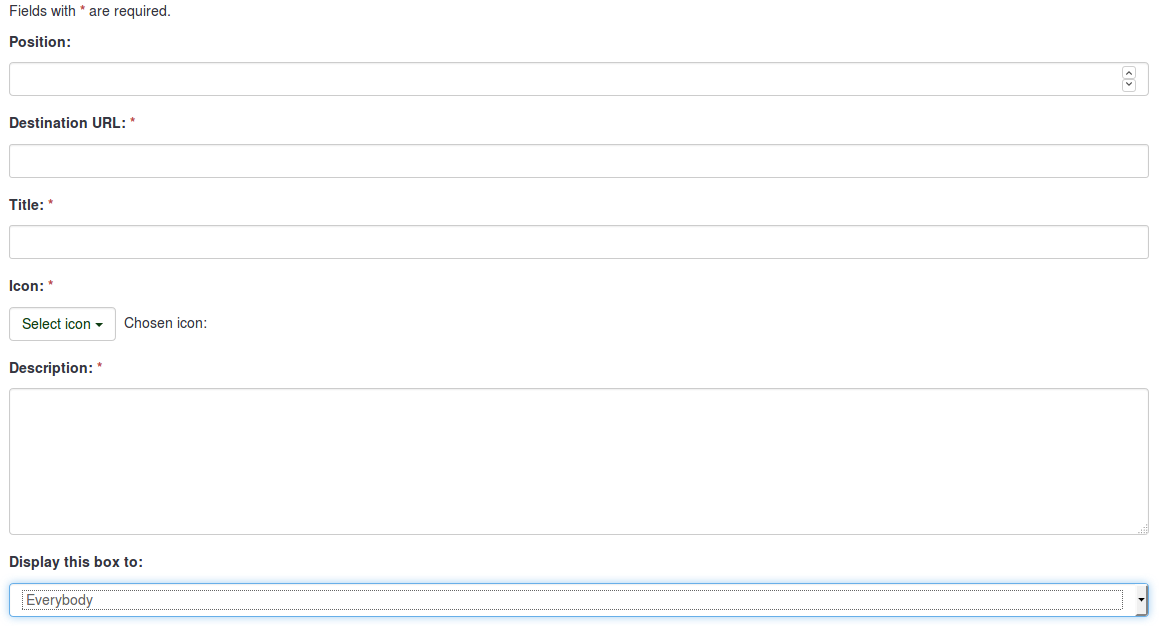
- Position: It shows the box position (it is a numerical value);
- Destination URL: It is the link via which the respective option/function is accessed. For example, the destination URL to backup the entire database is admin/dumpdb;
- Title: The name of the box;
- Icon: It allows the user to select one of the LimeSurvey predefined icons;
- Description: A small description of what the role of the box;
- Display this box to: It allows you to choose who can see the respective box:
- Only admin : Only the super administrator of the LimeSurvey installation can see those respective boxes;
- Everybody : Everyone who logs in the LimeSurvey installation can see those respective boxes;
- Nobody : Nobody can see those boxes. It can be used when you would like, for example, to hide those boxes to which a user group does not have access to.
- Other user groups : Certain user groups are allowed to see those boxes. To find out more about user groups, read our wiki on how to manage them.
Create a box
In order to add a new box into the Boxes table, click on Create a new box, located in the upper-part of the screen:
.
Different text boxes have to be filled in:
Once done, click on the Save button that is located in the upper-right part of the screen.
Reset to the default settings
If you did too many changes and you would like to restore the Boxes list to its default values, click on the Reset to default boxes button, located in the upper-right side of the window.
Examples
I want to create a new box
- Access Home page settings from the Configuration dialog.
- Click on Create new box, located in the upper right-part of the window.
- Enter the requested information:
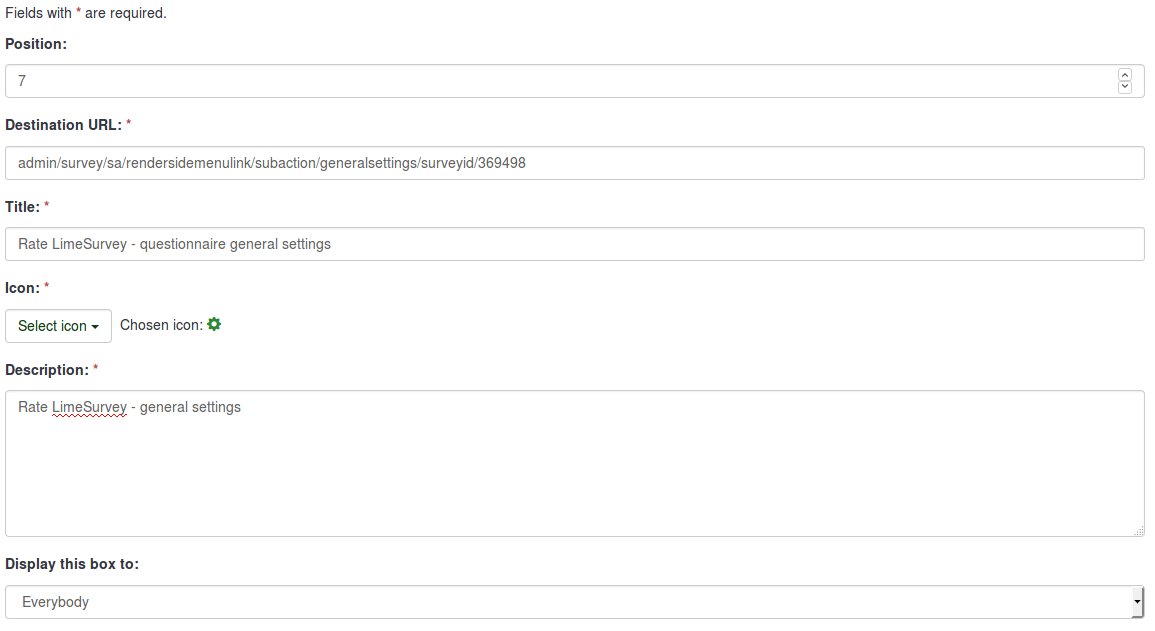
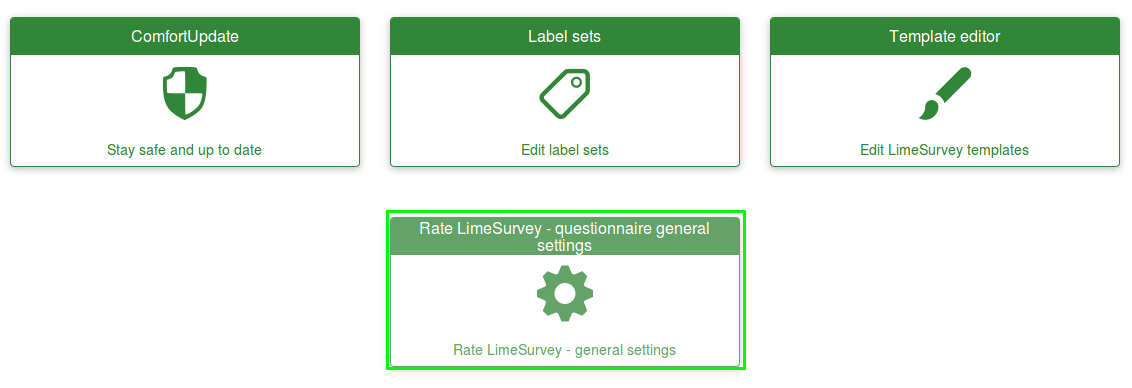
- Save the box and access the home page of your LimeSurvey installation.
- Click on the newly created box and check whether it is working or not (if not, check its destionation URL):
