よくある質問
From LimeSurvey Manual
はじめに
LimeSurveyでできることを感じるためにマニュアルの半分でも読みくない場合は、YouTubeビデオを見ることをお勧めします。
- How to set up an account and survey installation
- Question type - Array
- Assessments
- Placeholder fields
- Radio list
- Copy/import survey
- Import question
LimeSurveyについて簡単に知りたい
LimeSurveyの簡単な説明については、次の2つのリンクを確認してください。
アンケートのデザインとレイアウト
より短いURLにするためURLパスからindex.phpを削除するには
すっきりしたURL(URLに/index.phpを含めない)を使うには、/application/config/config.phpを編集して変更してください。
'showScriptName' => true,
を次のように変更します。
'showScriptName' => false,
これを正しく動作させるためには、mod_rewriteモジュールが正しくインストールされたApacheウェブサーバーを使用する必要があります。
Nginx http serverを使用し(PHPはFastCGIを経由して実行)、'urlFormat' => 'path'設定(config.php)を使用したい場合は、以下ようなnginxのウェブサイト設定を検討してください。
server {
    set $host_path "/PATH/TO/LIMESURVEY";
    server_name  YOUR.SERVER.FQDN;
    root /PATH/TO/LIMESURVEY;
    charset utf-8;
    try_files $uri $uri/ /index.php?r=$uri&$args;
    #Disallow reading inside php script directory, see issue with debug > 1 on note
    location ~ ^/(application|protected|framework|themes/\w+/views) {
        deny  all;
    }
    #Disallow direct read user upload files
    location ~ ^/upload/surveys/.*/fu_[a-z0-9]*$ {
        return 444;
    }
    #Disallow uploaded potential executable files in upload directory
    location ~* /upload/.*\.(pl|cgi|py|pyc|pyo|phtml|sh|lua|php|php3|php4|php5|php6|pcgi|pcgi3|pcgi4|pcgi5|pcgi6|icn)$
        return 444;
    }
    #avoid processing of calls to unexisting static files by yii
    location ~ \.(js|css|png|jpg|gif|swf|ico|pdf|mov|fla|zip|rar)$ {
        try_files $uri =404;
    }
    location ~ \.php$ {
        fastcgi_split_path_info  ^(.+\.php)(.*)$;
        try_files $uri index.php;
        fastcgi_pass   127.0.0.1:9000; # Change this to match your settings
        fastcgi_index index.php;
        include fastcgi_params;
        fastcgi_param  SCRIPT_FILENAME  $document_root$fastcgi_script_name;
        fastcgi_param  SCRIPT_NAME      $fastcgi_script_name;
    }
}
'use_asset_manager' => 1, in your config file (or remove application from the directory list).結果は次のようになります。

回答必須の質問の*(赤いアスタリスク)を取り除く方法
LimeSurvey 2でのやり方
LimeSurvey 2.xでは、必須であることを示す赤いアスタリスクはtemplate.cssファイル("asterisk"クラス)内に設定されています。それを隠すには、
- テンプレートエディタを開く
- 変更したいテンプレートのコピーを作成する
- "template.css"ファイルを選択して、asteriskクラスを検索する
- asteriskクラスの最後に次の設定を追加する: ".asterisk {display: none;}"
- template.cssを保存する
- 編集したtemplate.cssが再読み込みされ、キャッシュから取得されないように、ブラウザのキャッシュをクリアする
LimeSurvey 3でのやり方
やり方は上述のLimeSurvey 2のものと同様です。
- Access the desired theme. If it is a default theme, create a copy of it by clicking on the "extend" button.
- Access the list of themes and click on the theme editor that corresponds to the newly created theme.
- On the left side, you can visualise the corresponding CSS files of your theme.
- Click on custom.css and add the following line:
.asterisk {display: none;}
- Save the changes. The red asterisk that is usually displayed at the beginning of the question text is hidden.
Flashファイルを埋め込む方法
まず全体設定に行き、XSSフィルターを無効にします。また、そのフィルターを無効にすることどうなるかは理解しておいてください。フィルターが有効な場合、次の手順は機能しません。
- Flashファイルを挿入する場所に移動します。これは、質問、サブ質問、回答、アンケートのようこそ/終了のテキストなど、統合されたHTMLエディタを使用できる場所であればどこでもかまいません。
- エディターツールバーの'LimeFitWin'ボタンをクリックし、フルスクリーンエディタモードを開きます。
- フルスクリーンエディタのツールバーには、Flashシンボル付きの小さなボタンがあります。クリックすると、ダイアログボックスが開きます。
- このボックスでは、既存のFlashファイルのパスを指定するか、'サーバーを閲覧'ボタンをクリックします。
- 'サーバーを閲覧'ボタンをクリックすると、ファイルブラウザが表示され、下部にはファイルアップロードフィールドが表示されます。既存のファイルを選択するか、ファイルをアップロードしてください。
それでおしまいです。この説明が不完全な場合は、適宜更新してください。
一般に公開するアンケートを作成する方法
To create a survey that can be filled out by anyone, do not create a survey participants table! Share the survey link located on the overview panel.
参加登録 - 必須項目
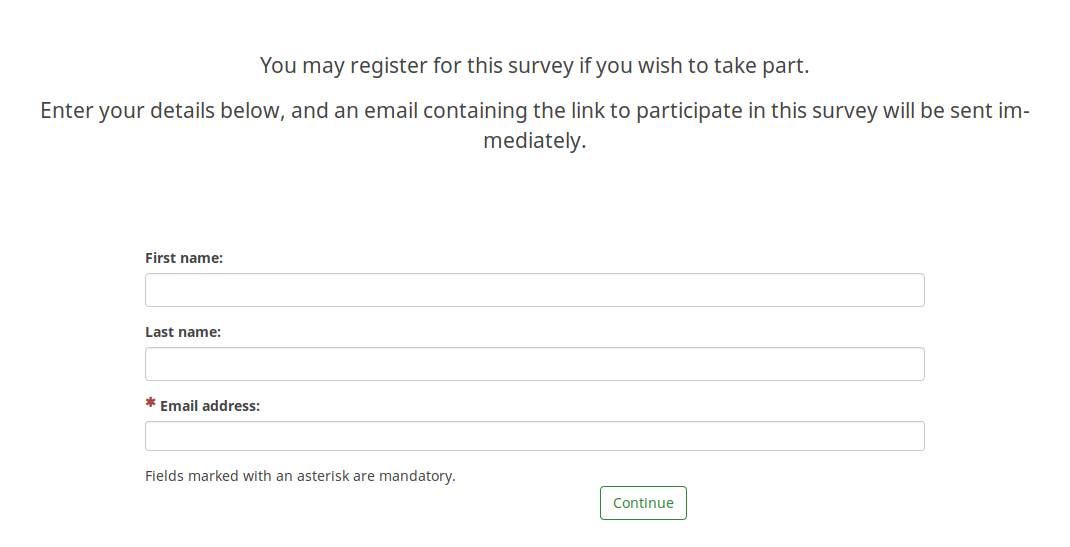
If you use a survey participants table and you also allow public registration, then users will be prompted by the following message:

As it can be observed above, only the email field is mandatory.
To have all three fields marked as being mandatory, please edit your survey theme accordingly. If you use Fruity, you have to go to the registration screen and see how the participants email field looks like:
        {# Participants email #}
        <div class='{{ aSurveyInfo.class.registerformcolrowc }} form-group row' {{ aSurveyInfo.attr.registerformcolrowc }}>
            <label {{ aSurveyInfo.attr.registerformcolrowclabel }} class='{{ aSurveyInfo.class.registerformcolrowclabel }}  control-label'> {{ gT("Email address:") }} {{ include('./subviews/registration/required.twig') }}</label>
            <div {{ aSurveyInfo.attr.registerformcolrowcdiv }}  >
                {{ C.Html.textField('register_email', aSurveyInfo.sEmail, ({'id' : 'register_email','class' : 'form-control input-sm','required' : true})) }}
            </div>
        </div>
After that, make sure to edit the first name and last name fields correspondingly by adding the label:
{{ include('./subviews/registration/required.twig') }}
and this line which makes the field mandatory to be filled out:
'required' : true
編集したファイルは次のようになります。
        {# Participants first name #}
        <div class='{{ aSurveyInfo.class.registerformcolrow }} form-group row' {{ aSurveyInfo.attr.registerformcolrow }}>
            <label for='register_firstname' class='{{ aSurveyInfo.class.registerformcolrowlabel }} control-label '>{{ gT("First name:") }} {{ include('./subviews/registration/required.twig') }}</label> {# extra label #}
            <div class="">
                {{ C.Html.textField('register_firstname', aSurveyInfo.sFirstName, ({'id' : 'register_firstname','class' : 'form-control', 'required' : true})) }} {# mandatory field #}
            </div>
        </div>

        {# Participants last name #}
        <div class='{{ aSurveyInfo.class.registerformcolrowb }} form-group row' {{ aSurveyInfo.attr.registerformcolrowb }}>
            <label {{ aSurveyInfo.attr.registerformcolrowblabel }}  class='{{ aSurveyInfo.class.registerformcolrowblabel }} control-label '>{{ gT("Last name:") }} {{ include('./subviews/registration/required.twig') }}</label> {# extra label #}
            <div {{ aSurveyInfo.attr.registerformcolrowbdiv }} >
                {{ C.Html.textField('register_lastname', aSurveyInfo.sLastName, ({'id' : 'register_lastname', 'class' : 'form-control', 'required' : true})) }} {# mandatory field #}
            </div>
        </div>
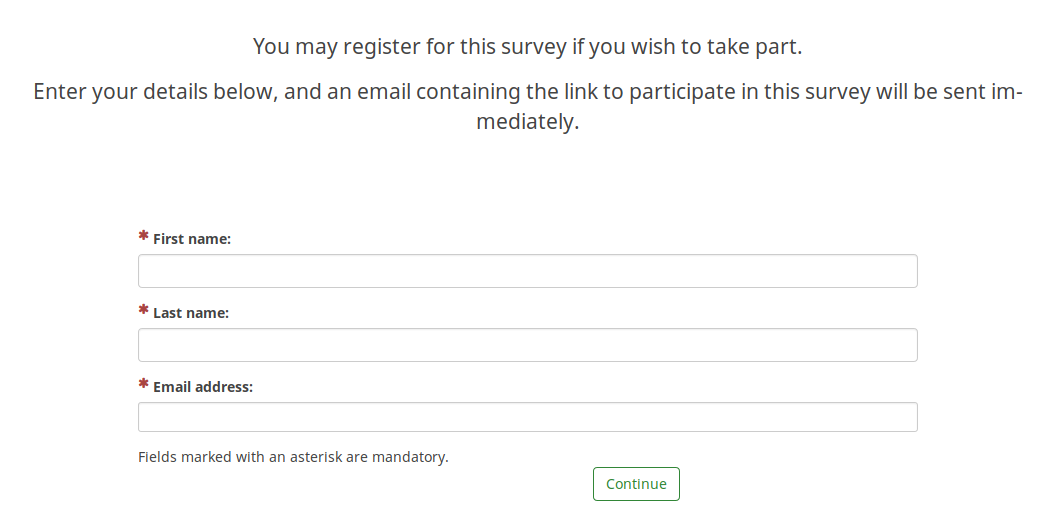
参加登録ページは次のようになります(すべてのフィールドは必須です)。

言語スイッチを隠す
The steps to hide both the language switchers (near the survey title and on the top-right side of the page) are described in our wiki section dedicated to multilingual surveys.
誤操作への対処
パスワードをリセットする方法
バージョン2.x
- コマンドラインでサーバーにアクセスします(例:SSH)
- PHPにコマンドラインでアクセスできるか確認します(see http://php.net/features.commandline.php)
- LimeSurveyディレクトリーに移動します
- 次のコマンドを入力します
php application/commands/starter.php resetpassword NEW_ADMIN_NAME NEW_ADMIN_PASSまたはphp application/commands/console.php resetpassword NEW_ADMIN_NAME NEW_ADMIN_PASS/usr/bin/phpなどphpへの完全なディレクトリーアクセス権が必要です
バージョン2.x.x以降でFTPアクセスのみの場合
ResetPasswordControllerを参照してください。
データベースのパスワードを直接変更する
Limesurveyのデータベースに直接アクセスできる場合、新しいパスワードをSHA256ハッシュに符号化して更新することで、古いパスワードを変更することが可能です。こちらでパスワードをSHA256ハッシュした値を生成できます。
たとえば、次のコマンドを使用してパスワードをpasswordに設定できます。
UPDATE lime_users SET password = 0x35653838343839386461323830343731353164306535366638646336323932373733363033643064366161626264643632613131656637323164313534326438 WHERE uid =1;
ここでは、接頭辞がlime_であり、データベースが選択されています。
無効にしたアンケートからデータを復元する方法
アンケートを無効にするのではなく、常に時間切れ扱いとすることをお勧めします。誤ってアンケートを終了した場合は、アンケートを何も変更しないでください。
そして、次のような手順を踏みましょう。
- アンケートを再度有効化する
- "アンケートの回答閲覧"画面に移動する
- "無効になったアンケートテーブルからのインポート"ボタンを選択する
- インポート元のテーブルを選択する
- "回答をインポートする"をクリックする
削除した質問/質問グループ/アンケートの復元方法
削除してしまうと、本当になくなってしまいます。ただし、バックアップしている場合は復元できます。
ハードウェア・ソフトウェアの要求条件
一般的な要件については、インストール手順を参照してください。
LimeSurveyの制約
処理速度について
LimeSurveyには処理速度に制限はありません。すべてはサーバーの処理速度とサーバーへの接続速度に依存します。短時間に多数のユーザーからの回答が予想され、サーバーが処理できるかどうかわからない場合は、フォーラムで類似のトピックを参照するか、LimeSurveyパートナーにコンタクトしてください(https://limesurvey.com)。
アンケートの規模について
注意: ここでいう'アンケートの規模'とは、アンケートの質問(と回答)の最大数のことであり、アンケートで受け付ける最大の回答数ではありません(こちらに制限はありません)。理論的には、LimeSurveyの質問/回答の最大数に制限はありません。しかし、使用しているデータベースエンジンにはいくつかの制限があります。最も重要なのは、結果テーブルのフィールド(列)数の制限です。
- MySQL ISAM: テーブル内のVARCHAR列とCHAR列の長さの合計は最大64KBです。
- MySQL InnoDB: 最大1000列
- MS SQL Server 2000: 最大1024列
- Postgres: 列の種類に応じ最大250〜1600列。既定のブロックサイズを32kに増やすと、列の最大数を4倍にすることができます。インストールのFAQおよびPostgreSQL FAQを参照してください。
注意: 実施する前に考えてください。10×10項目の配列は、すでに100列を要します。ルール:画面上で記入または選択が可能なアイテムはそれぞれ1列としてカウントされます。
mySQL ISAMエンジンは最も面倒です(詳細はmysqlのドキュメントを参照)。1行につき最大65,535バイトまで可能で、utf8文字は1文字につき最大3バイト必要なので、最大値は21,844文字となります(DBエンコーディングによって異なります)。
アンケートの規模は次のように見積もることができます。
- 複数の数値質問: 回答ごとに20文字
- 複数選択と配列質問タイプ: 回答ごとに5文字
- その他の質問タイプ: 5文字
- 余裕をみるため10%程度を追加
PostgreSQLの最大カラム数を増やす方法
アンケートの質問がとても多い場合、PostgreSQLで異なるブロックサイズを定義し、より多くの列を作成することができます。PostgreSQLを再コンパイルし、BLCKSZを16KBまたは32KBなどのより高い値に設定する必要があるため、扱いにくいかもしれません。設定オプション"--with-blocksize=BLOCKSIZE"を確認してください。詳細は、PostgreSQLメーリングリストのアーカイブを参照するか、そこで質問してください(pgsql-patches(at)postgresql(dot)org)。
Debianでの手順です。(Martin Pitt提供)
sudo apt-get build-dep postgresql-8.3
apt-get source postgresql-8.3
cd postgresql-8.3-*
debian/rules patch
sensible-editor build-tree/postgresql-8.3.5/src/include/pg_config_manual.h
dpkg-buildpackage -us -uc -b -nc
注意: 2014年8月、Ubuntu 14.04で上記を再現することはできませんでした。パッチが必要です(設定オプションでは不十分です)。参照(LinuxでPostgreSQL 9.3でテスト済み): Linux上でPostgreSQL の最大カラム数を増やす方法
Fatal error: Allowed memory size
サーバー構成によっては、メモリーに問題が発生し、次のようなレポートを受けることがあります。"Fatal error: Allowed memory size of 8388608 bytes exhausted (tried to allocate 233472 bytes) in /path/to/htdocs/limesurvey/filename.php on line 7296"
LimeSurveyの設定ファイルにオプションの設定を追加することで、制限を引き上げることができます。
このようなアプリケーションによるローカル設定は、グローバルサーバー設定によって常に無効になる可能性があることに注意してください。あなたのサーバー上でメモリ制限を直接128Mに増やすには、以下を追加してみてください。
- サーバのメインのphp.iniファイルで、memory_limit = 128Mとする(アクセス権がある場合はお勧めします)
- LimeSurveyルートのphp.iniファイルで、memory_limit = 128Mとする。
- LimeSurveyルートの.htaccessファイルで、php_value memory_limitを32Mとする。
- config.phpで、ini_set('memory_limit', '128M')とする。
特定の設定
特定の状況下では、application/config/config.phpでLimeSurveyの設定を更新する必要があります。
同じドメイン上に2つのLimeSurveyインスタンスがある場合
同じドメイン上に2つのLimeSurveyインスタンスが別のディレクトリーにある場合、セッション設定を更新する必要があります。
たとえば、example.org/ls1とexample.org/ls2がある場合は、ls1設定ファイルを更新します。
        'session' => array (
            'cookieParams' => array(
                    'path' => '/ls1',
                ),
            ),
        'request' => array(
            'csrfCookie' => array( 'path' => '/ls1' )
        ),