Export responses
From LimeSurvey Manual
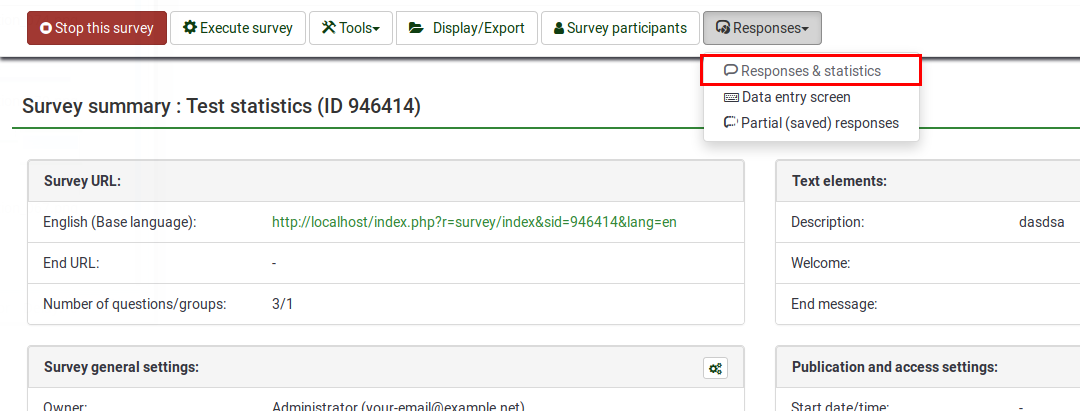
Once your survey is active, you can start browsing responses and export them for further analysis. To access the export function, click on Responses (displayed on any survey-related panel). From the drop-down menu click on Responses & statistics:
The default page that is loaded is Response summary. Now, look for the Export option located on the top toolbar:
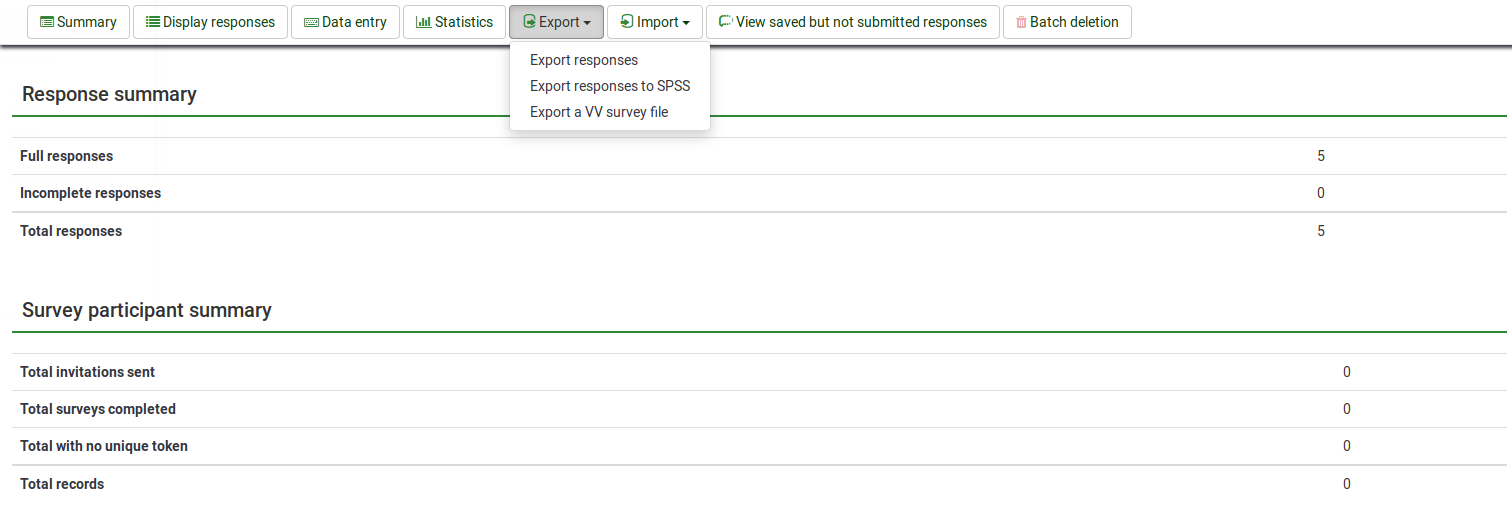
Several options are available:
Export responses
The following panel is displayed when the first export-related option is selected from the drop-down menu:
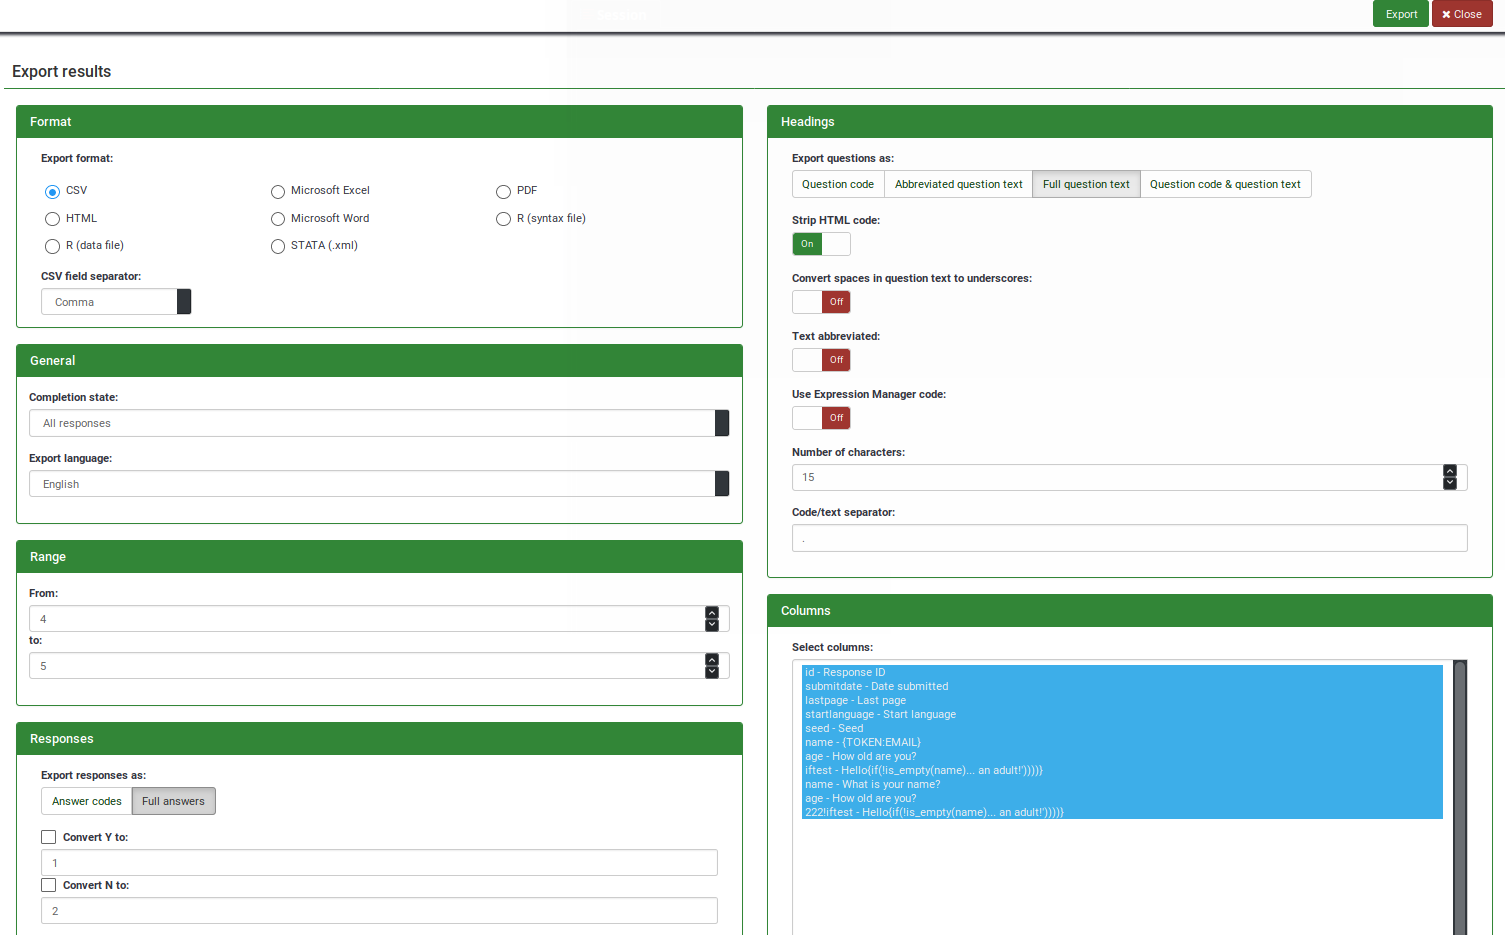
Several filter options are separated into:
- Format: it allows you to select the format in which you wish to export your results. The following formats are available:
- CSV File (all charsets): see also the CSV field separator option at the bottom of the Format tab. The default one is "comma". The other options are "semicolon" and "tab"
- HTML
- R (data file): if this option is chosen, please also export your survey into R (syntax file). To find out more details about how you can analyse your data in R, check this wiki subsection
- Microsoft Word (latin charset)
- Microsoft Excel (all charsets)
- STATA (.xml): for more details on how to analyse your data in STATA, read the following wiki subsection
- R (syntax file): if this option is chosen, please also export your survey into R (syntax file). To find out more details on how you can analyse your data in R, check this wiki subsection
- General
- Completion state: set to export all records OR completed records only OR incomplete records only. For more information on their meaning, check this wiki subsection
- Export language: the default option is the base language of your survey
- Range: refers to the id of the stored responses from the response table. In case the values you introduced are wrong (ie., no response id was found between the values you entered), a pop-up will be displayed when you will try to export the responses asking you to enter values that can be found in the table.
- Responses
- Export responses as: you can either export full answers or convert answer codes. If the later is selected, the answers submitted by your respondents will be replaced by the answer code of the respective answer. "Yes" and "No" answers will be converted to "Y" and "N" answers to any string of characters. If "Convert Y/N to" are enabled, then the answer codes that use Y and N as answers will be converted into the strings of characters from their corresponded boxes. By default, the values are 1 for Y and 2 for N.
- Headings
- Export question as: set how the heading should look like. The following options are available:
- Question code
- Abbreviated question text: the length of the question is decreased if this option is selected (useful if you work with long questions)
- Full question text (default)
- Question code & question text
- Strip HTML code: enabled by default in order not to export the HTML code of your question text
- Convert spaces in question text to underscores: disabled by default. If enabled, the spaces from the question text are converted to underscores.
- Text abbreviated: disabled by default. If enabled, the question text will be abbreviated. The length of the question text is given by the number put into the "Number of characters". Please note that this option is useful in the case in which you wish to abbreviate the question texts resulted from selecting either "Full question text" or "Question code & question text" as heading text.
- Use Expression Manager code: disabled by default. If enabled, the questions and subquestions will be exported as they are used within the ExpressionScript. Therefore, the heading would resemble the qcode variable naming. Please note that one of the following question heading options has to be chosen: "Question code" or "Question code & question text".
- Number of characters: set up a maximum number of characters to be displayed in the headings. This option works if you wish to export your question as abbreviated question text. The default number is 15.
- Code/text separator: select the option you wish to use to separate the question code from the text of the question. By default, it is a "dot" followed by an empty string (<SPACE>).
- Export question as: set how the heading should look like. The following options are available:
- Column Control: set which answers should be exported. All answers in this list are represented by their question code and question text. By default, all responses are to be exported. To select multiple columns, use CTRL and/or SHIFT keys.
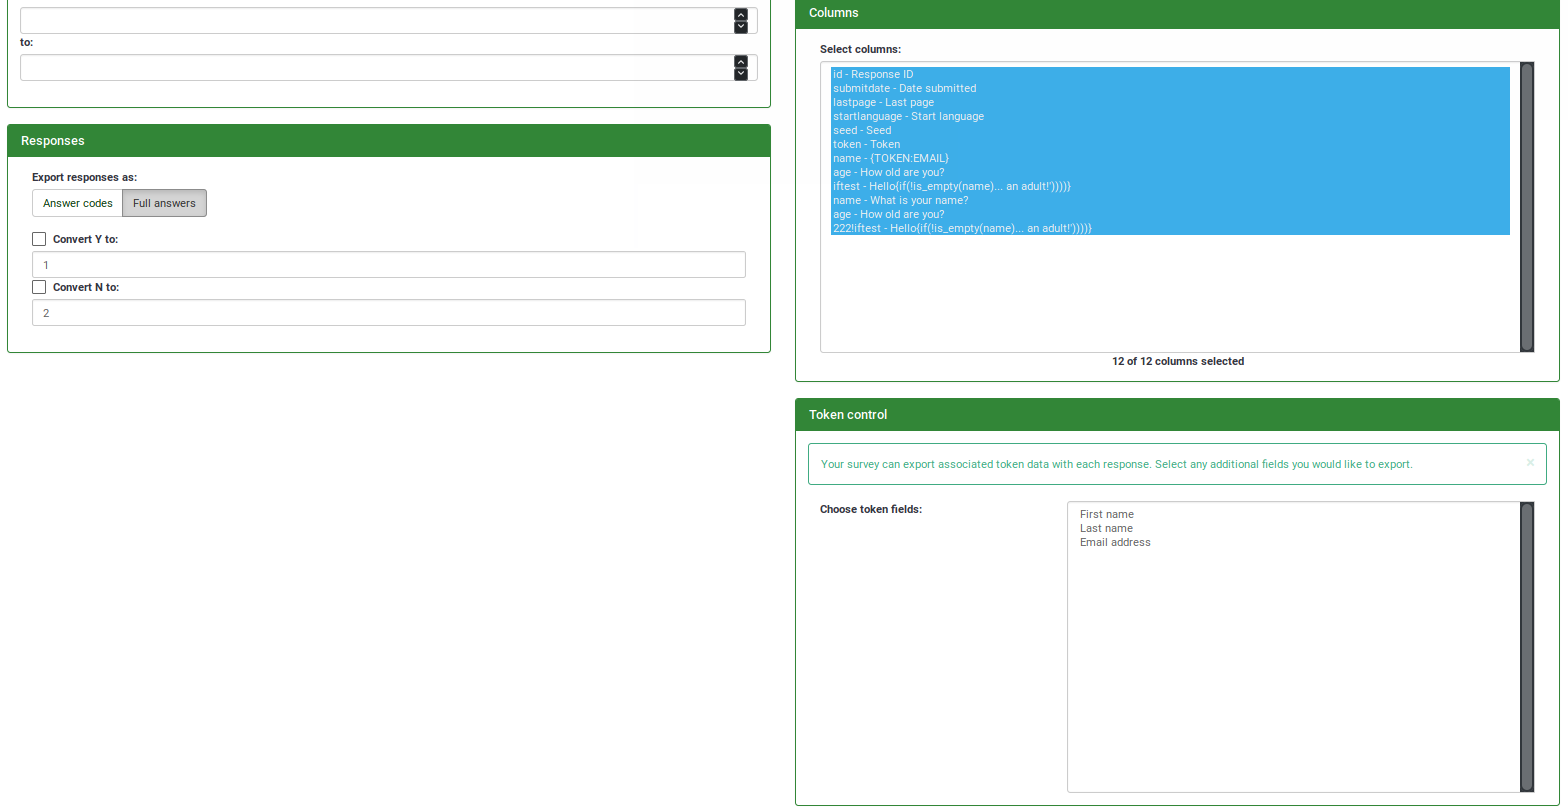
- Token control - set which survey participant data should be exported. This option is only available if your survey is not anonymous! Click here for more information on what a survey participant table is and how you can use it in LimeSurvey.
Export R
The free software environment R is an alternative for SPSS used for statistical computing and graphics.
Follow these steps to import your dataset in R:
- Download both the syntax file and the data file
- Store both files in your R working directory (use getwd() and setwd() in a R command window to get and set)
- Enter
source("File_name_syntax.R")in the R command window. It will import the data in the correct format to a data frame called "data".
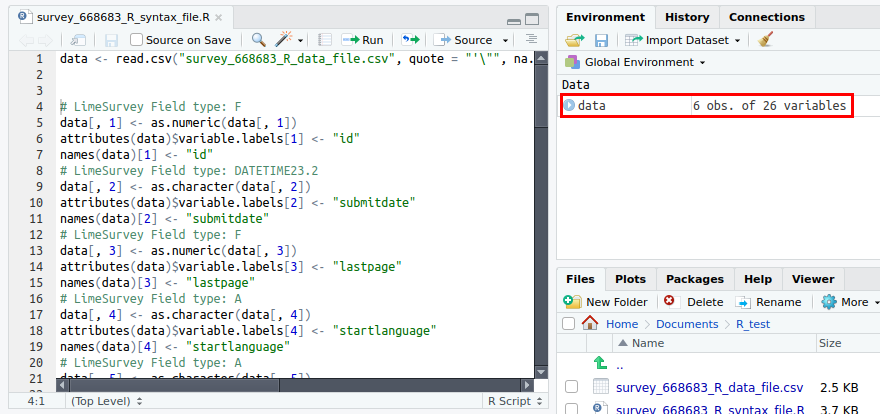

Responses with limited options will be factored with the levels matching the code of the question and the labels matching the options.
Questions with "other" as an option will have the question field with _Other appended as a new column for the other data.

Export STATA-xml
STATA is a commercial data analysis and statistical software package.
This export routine was created to facilitate rapid analysis of data collected with LimeSurvey. It creates an XML-file in STATAs proprietary format. This format offers several advantages over importing plain CSV files:
- Data sets are fully labelled including variable labels (question, subquestion) and value labels (answers, if applicable).
- Dates are already transformed to STATAs internal date format and thus can directly be used to calculate differences between days etc.
- Variable names are, if necessary, converted to a STATA compatible format.
- Data formats of variables (string, integer, float, etc.) are already set according to the underlying data (no more numbers encoded as strings!).
How to load the file in STATA:
- In STATA's menu, click on File, Import, xml-data
- Choose browse to navigate to your exported file and click 'OK'.
- Due to a limitation in STATA's data format, the length of string (text) variables have a maximum of 244 characters (Stata versions 8-12) and 2045 characters (Stata version 13 and above). Please indicate your Stata version in the settings of the export plugin.


- STATA only supports attaching value labels to numerical values. So, to achieve short answers (usually one or two digits) and have these properly labelled, one should use numerical answer-codes in LimeSurvey (1=Totally agree). If non-numerical answer codes are used (A=Totally agree), then the complete answer text will be used as answer (eg., 'Totally agree').
Export responses to SPSS
SPSS Statistics is a software package used for logical batched and non-batched statistical analysis. You can use the official SPSS package or GNU PSPP replacement for the proprietary program SPSS.
To export your response data to SPSS, go to Responses & statistics section and select the SPSS-corresponding option located under the Export menu:

The following page is displayed:

The following options are displayed in the panel:
- Data selection: You can select which data should be selected: all responses OR only complete responses OR only incomplete responses
- SPSS version: check your SPSS installation version. Two different export options can be chosen: prior to version 16 and 16 or up
- Language: it acts like a filter that allows you to filter the exported responses based on the language used to fill out the survey
- Limit: Type in any numerical value to get exported only the first "n" entries from your response table
- Offset: Type in any numerical value to get exported your response table without the first "n" entries from your response table
- No answer: if left empty, an empty string is stored as answer for the questions that have not been answered by respondents. Type in this box any string of characters to replace the empty string. The set of characters will be displayed in the exported .dat file
SPSS export includes two files:
- a syntax file (survey_xxxx_SPSS_syntax_file.sps)
- and a data file (survey_xxxx_SPSS_data_file.dat).
After having downloaded these files you can open them using a raw text editor like notepad to take a look how the exported data looks like. The syntax file holds the commands that should be run to import the data. It is like a programming language inside SPSS. The data file contains a comma separated file with all data. We recommend you not to import your data as csv because there is the risk of loosing information about questions, label sets, and so on.
Import LimeSurvey responses to SPSS
To import your data to SPSS, pursue these steps:
- Download the data and the syntax file.
- Open the syntax file in SPSS in Unicode mode.
- Edit the 'FILE=' line and complete the filename with a full path to the downloaded data file.
- Choose 'Run/All' from the menu to run the import.
- Done
VVExport
Once you've begun collecting responses, there may be occasions where you need to be able to directly edit and modify large quantities of data from your responses table, where a spreadsheet tool may be more useful.
VVExport (the "VV" stands for vertical verification) allows you to export your responses table into a .csv file. So long as the general structure of the file remains intact, you can then edit values within it, and then import the file again into your responses table using the "VVImport" feature.
It is often used in two scenarios:
- In the first one, it is used to combine large amounts of data in one LimeSurvey installation. Imagine that you run two similar surveys on two different machines. In order to combine the two response tables, you will have to use VVExport and VVImport to combine your data and put it on one LimeSurvey installation.
- In the second case, it is used to edit an active survey. This method was recommended a lot in the past versions of LimeSurvey since there was no possibility to edit the survey without deactivating it and losing all the collected responses. But, the latest versions of LimeSurvey brought new features. Now, if you deactivate a survey to do some quick edits (e.g., changing the question type), a response table will be stored into your database that can be lately imported back into your survey. Of course, some users still prefer the old method since they do not want their collected responses corrupted or lost. The community also emphasizes to have as many backups as possible - better to be safe than sorry.
As a result, VVExport and VVImport is mainly used only in the first scenario at the moment.
To export your data via VVExport, go to Responses & statistics section and select the VV-corresponding option located under the Export menu:

The following page will be loaded:

- Survey ID:: The survey ID to be exported
- Export: The completion state of the responses to be exported:
- 'Completed responses only: if a respondent reaches the last page of a survey and clicks the Submit button, then the his or her response is marked as being complete
- 'Incomplete responses only: if a respondent does not click on that Submit button located before the end page, then the response is marked as being incomplete
- 'All responses: export both completed and incomplete responses
- File extension: The file extension. The file is a TSV (tab-separated values) file. For easy opening in MS-Excel set the extension to .txt. If you use LibreOffice, OpenOffice or any other spreadsheet program, you can leave it to .csv (default format).
- VV export version: The 1.0 version (Old VV version uses database column headers, version 2.0 (Last VV version) uses Qcode Variable Naming. Version 2.0 is selected by default if all of your question code are unique.
Things you should be aware of:
- If you want to import responses using "VVImport" make sure to check whether the responses should be added to the existing responses or all responses should be overwritten.
- If you are trying to import responses from a different yet identical (e.g., identical questions/answers from another survey), make sure you are using the correct vv file and that the first two lines of the .csv file are correct.
- If you import a survey to your LimeSurvey installation the SID will not change (if possible). The group id and question id however might change. So you might have to adjust the first two heading lines to match the new group id/question id.
Exporting a VV survey file
When you choose to export responses using VVExport you will be given the option to choose whether you want to export all responses or complete responses only or incomplete responses only. The file extension allows you to choose which extension the exported file will have. For easy use .csv, should be chosen.
A 'vv survey file' allows you to import the responses to a survey when the question/answer combinations have changed. Effectively, this allows you to add or remove questions in an active survey.
The first two rows of the spreadsheet/tab-delimited file are the column labels. The first row is a "human readable" column heading that details the name of the question/answer field. The second row is the internal PHP/database column name for that response.
You should not modify the first two rows of this spreadsheet if you want to be able to "import" the data back into LimeSurvey at a later point.
Editing a VV survey file
When a .vv file has been successfully exported you can use a spreadsheet tool to open and edit the file. If you have to choose a column separator when opening the file please use the "Tab" character. If you are using non-ASCII characters make sure you set "UTF-8" as character set.
By default, the first two rows of the .vv file are headers. If needed you can remove the first line to have a real TSV file. There are different use cases for importing a .vv file so we will differentiate between adding new responses to a survey and overwriting all responses of the survey.
VV files structure - example
VV version 1 TSV file
Response ID	Date submitted	Last page	Start language	Token	please vote from 1 to 6 (1 - super, 6 - worst)
id	submitdate	lastpage	startlanguage	token	46492X40X1991
183	09.11.11 11:44	3	de	jsfhusdgqfygqsy	4
184	09.11.11 11:53	3	de	sdfhsifgsyergze	2
190	09.11.11 11:44	3	de	qsdqshkfhkdsjhj	1
VV version 2 TSV file
Response ID	Date submitted	Last page	Start language	Token	please vote from 1 to 6 (1 - super, 6 - worst)
id	submitdate	lastpage	startlanguage	token	QCODE
183	09.11.11 11:44	3	de	jsfhusdgqfygqsy	4
184	09.11.11 11:53	3	de	sdfhsifgsyergze	2
190	09.11.11 11:44	3	de	qsdqshkfhkdsjhj	1
In this example, the SQGA identifier are not used - instead, the Qcode variable naming QCODE is used in the second line.
We generally recommend our users to use question codes since they are much easier to be used (it represents an addition to the "old" SGQA system used in the earlier versions of LimeSurvey.
Reserved names
.VV file uses left and right brackets for reserved names. When importing, this string is replaced by:
{question_not_shown}: NULL value in database. LimeSurvey uses [empty string] for not answered question, and NULL value for questions not shown.{quote}: " (a double quote){cr}: Carriage return{newline}: A new line{lbrace}: Left bracket (for example, if you want to have {cr} in response : use{lbrace}cr})
VV Version 1 editing
Adding new responses to the existing responses of a survey
This is not supported for version 1 of the format as it easily can lead to various problems including data being imported into the wrong columns. The version 1 of the .vv file was always meant for vertical verification of data in an external tool like Excel, not as a mean to pull together data from different source (like the same survey running on another server).
Modify all responses of a survey
If you want to modify responses of survey you can just edit the file.
Example:
Step 1: Open the file
Response ID	Date submitted	Last page	Start language	please vote from 1 to 6 (1 - super, 6 - worst)
id	submitdate	lastpage	startlanguage		46492X40X1991
183	09.11.11 11:44	3	de	4
184	09.11.11 11:53	3	de	2
190	09.11.11 11:44	3	de	1
Step 2: Modify responses
Response ID	Date submitted	Last page	Start language	please vote from 1 to 6 (1 - super, 6 - worst)
id	 submitdate	lastpage	startlanguage		46492X40X1991
1000	09.11.11 11:44	3	de	3
1001	09.11.11 11:53	3	de	3
1002	09.11.11 11:44	3	de	3
You can then import the survey. Make sure to override the existing responses (see Importing a VV survey file).
Other export options
In the case you do not need to export the whole survey, you can also export:
Export a single response
If you want to export an individual response, you can do it in two ways:
1. Login to LimeSurvey, choose your survey, click on Notifications & data tab and make sure you receive basic email notifications:
Every time someone has completed a survey, you will receive an email with a link: "Click the following link to see the individual response"
This will take you to a page with a button above the data saying "Export this response":
Select how the single response with ID X should be exported:
2. Login to your LimeSurvey installation/instance, choose your survey. Select tab Responses located under the general settings tab:
See the first column and hover the mouse over each option and see which one allows you to see the response details (the first button):
The same page as the one from the first method will be loaded from where you can select how the exported file should look like:
Export a group of responses
This option is useful in the case in which you wish to export a certain group of filtered responses.
To do it, access your [Responses] table:
You can either order the responses according to the value from each column by clicking on the column label or you can type in the empty boxes located below the column labels a string of characters according to which you wish your data to be filtered to.
Once done, your table should look like the one below. Now, tick all the filtered responses, click on the Selected response(s)... button located in the bottom left side of the response table, and select the Export button:
The export responses pages will be loaded:
The Range column is not displayed since you have already selected the entries you wish to export. To check those IDs, check Selection (see the above screenshot). You can click on the reset button if you wish to export all your data: