Email templates/de: Difference between revisions
From LimeSurvey Manual
Markusfluer (talk | contribs) (Created page with "E-Mail Vorlagen") |
(Updating to match new version of source page) |
||
| (16 intermediate revisions by 3 users not shown) | |||
| Line 2: | Line 2: | ||
= | =Einleitung= | ||
Die E-Mail Vorlagen werden verwendet um Teilnehmern personalisierte Einladungen, Bestätigungen und Erinnerungen per E-Mail zu schicken. Dies ist von der Umfrageteilnehmerverwaltung aus möglich. Sie können hier auch die Basis und die ausführliche Admin-Benachrichtigung an den Umfrageadministrator anpassen. | |||
Um zur Einstellungsansicht zu kommen, öffnen Sie den Reiter '''Einstellungen''' und klicken Sie auf den '''E-Mail Vorlagen''' Menüpunkt. | |||
| Line 13: | Line 13: | ||
<div class="simplebox">[[File:help.png]] | <div class="simplebox">[[File:help.png]] Wenn Sie Superadministratorprivilegien haben (wenn Sie Zugriff auf die [[Globale Einstellungen| globalen Einstellungen Ihrer LimeSurvey Installation]]), können Sie den Standard HTML-Editor für all Ihre LimeSurvey Nutzer einstellen. Weitere Informationen hierzu bekommen Sie [[Global_settings#General|in diesem Artikel]].</div> | ||
{{Alert|title=Attention|text= | {{Alert|title=Attention|text=WEnn Sie den HTML editor nutzen möchten, vergessen Sie nicht '''Benutze HTML-Format für Einladungs-E-Mails''' zu aktivieren. Diese Einstellung finden Sie im Reiter '''Einstellungen''' in Ihrer Umfrage, unter dem Punkt [[Teilnehmereinstellungen]].}} | ||
= | =E-mail Vorlagen Ansicht= | ||
Die E-Mail Vorlagen Ansicht sieht so aus: | |||
| Line 28: | Line 28: | ||
Wie in dem Screenshot zu sehen ist, wird der "HTML Quellcode" Editormodus genutzt. Diesen können Sie in Ihren [[First_login_-_your_user_preferences#HTML_editor_mode| persönlichen Einstellungen]] ändern. | |||
{{Note| | {{Note|Um möglichst einfach mit den Textfeldern zu arbeiten, gehen Sie in Ihre Profileinstellungen und ändern den HTML Editor Modus zu ''inline HTML Editor''.}} | ||
Wie Sie sehen können gibt es fünf Typen von E-Mails deren Vorlagen Sie bearbeiten können: | |||
*[[Email templates#Invitation| | *[[Email templates#Invitation|Einladung]] | ||
*[[Email templates#Reminder| | *[[Email templates#Reminder|Erinnerung]] | ||
*[[Email templates#Confirmation| | *[[Email templates#Confirmation|Bestätigung]] | ||
*[[Email templates#Registration| | *[[Email templates#Registration|Registierung]] | ||
*[[Email templates#Basic & detailed admin notifications| | *[[Email templates#Basic & detailed admin notifications|Basis & Ausführliche Admin Benachrichtigung]] | ||
== | ==Einladung== | ||
The invitation system is useful when you wish to send emails in bulk to all the respondents from your [[Survey participants#Send email invitation|survey participants table]] who have not yet received an invitation to complete your survey. | The invitation system is useful when you wish to send emails in bulk to all the respondents from your [[Survey participants#Send email invitation|survey participants table]] who have not yet received an invitation to complete your survey. | ||
From the email templates panel, you can edit the message that reaches out those survey participants. To check which email placeholders can be used, continue reading the following [[Email templates#Email placeholders|wiki subsection]]. You can also use the [[ | From the email templates panel, you can edit the message that reaches out those survey participants. To check which email placeholders can be used, continue reading the following [[Email templates#Email placeholders|wiki subsection]]. You can also use the [[ExpressionScript - Presentation|ExpressionScript]] to enhance the customization of your invitation email template. | ||
==Reminder== | ==Reminder== | ||
| Line 55: | Line 54: | ||
The reminder system helps survey administrators remind their [[Survey_participants#Send_email_reminder|respondents from the survey participants table]] to answer to the survey. | The reminder system helps survey administrators remind their [[Survey_participants#Send_email_reminder|respondents from the survey participants table]] to answer to the survey. | ||
You can edit the default format of the reminder email from the email templates panel. To check which email placeholders can be used, continue reading the following [[Email templates#Email placeholders|wiki subsection]]. The [[ | You can edit the default format of the reminder email from the email templates panel. To check which email placeholders can be used, continue reading the following [[Email templates#Email placeholders|wiki subsection]]. The [[ExpressionScript - Presentation|ExpressionScript]] can help you better customize the text body of this email template. | ||
<div class="simplebox">[[File:help.png]] '''Note:''' A reminder will be sent only to those participants where the "Completed" field is turned off (this means the respondent has either not taken or completed the survey) in the [[Survey participants|survey participants table]].</div> | <div class="simplebox">[[File:help.png]] '''Note:''' A reminder will be sent only to those participants where the "Completed" field is turned off (this means the respondent has either not taken or completed the survey) in the [[Survey participants|survey participants table]].</div> | ||
| Line 65: | Line 64: | ||
If tokens are used and a participant fills out the survey, a confirmation email will be sent to his/her email address. You can deactivate this functionality from the [[Participant settings]] panel. | If tokens are used and a participant fills out the survey, a confirmation email will be sent to his/her email address. You can deactivate this functionality from the [[Participant settings]] panel. | ||
Click on the '''Confirmation''' tab if you wish to edit the email template. Check the [[Email templates#Email placeholders|email placeholders]] to see which ones can be used in this type of email. You may also use the [[ | Click on the '''Confirmation''' tab if you wish to edit the email template. Check the [[Email templates#Email placeholders|email placeholders]] to see which ones can be used in this type of email. You may also use the [[ExpressionScript - Presentation|ExpressionScript]] to enhance your email customization. | ||
| Line 73: | Line 72: | ||
If the '''closed-access mode''' is enabled (there is a [[Survey participants|survey participants table]], which means that only those participants who have an allocated entry and a unique token code associated to it can complete the respective survey. If you allow participants [[Participant settings|to publicly register to your survey]], a new entry in your survey participants table will be created once the respondent has submitted his or her name and email address. A script that runs in the background will automatically send the respective respondent a '''registration email'''. It contains the URL with the token that needs to be accessed by the newly registered user. | If the '''closed-access mode''' is enabled (there is a [[Survey participants|survey participants table]], which means that only those participants who have an allocated entry and a unique token code associated to it can complete the respective survey. If you allow participants [[Participant settings|to publicly register to your survey]], a new entry in your survey participants table will be created once the respondent has submitted his or her name and email address. A script that runs in the background will automatically send the respective respondent a '''registration email'''. It contains the URL with the token that needs to be accessed by the newly registered user. | ||
Click on the '''registration''' tab to edit the format of this email. Don't forget to take a look first at which [[Email templates#Email placeholders|email placeholders]] can be used within the text body. The [[ | Click on the '''registration''' tab to edit the format of this email. Don't forget to take a look first at which [[Email templates#Email placeholders|email placeholders]] can be used within the text body. The [[ExpressionScript - Presentation|ExpressionScript]] can provide further customization to the body text you wish to use. | ||
| Line 83: | Line 82: | ||
By default, the only difference between the two is related to the extra placeholder {ANSWERTABLE} that is included in the detailed admin notification email template. This allows the user who receives these kind of emails to also check the submitted answers without being needed to access the LimeSurvey installation. | By default, the only difference between the two is related to the extra placeholder {ANSWERTABLE} that is included in the detailed admin notification email template. This allows the user who receives these kind of emails to also check the submitted answers without being needed to access the LimeSurvey installation. | ||
However, by using the [[ | However, by using the [[ExpressionScript - Presentation|ExpressionScript]] and the [[Email templates#Email placeholders|email placeholders]] you can customize these two email templates however you want. | ||
| Line 93: | Line 92: | ||
*'''The subject of the email:''' The title of the email/batch of emails you want to send; | *'''The subject of the email:''' The title of the email/batch of emails you want to send; | ||
*'''The email body:''' It is a text box that contains the text message you wish to send to the users. It may contain text, images, and [[Email templates#Email placeholders|email placeholders]]. Moreover, the [[ | *'''The email body:''' It is a text box that contains the text message you wish to send to the users. It may contain text, images, and [[Email templates#Email placeholders|email placeholders]]. Moreover, the [[ExpressionScript - Presentation|ExpressionScript]] can be used to further enhance the message you wish to deliver; | ||
<div class="simplebox">[[File:help.png]] '''Note:''' You may have observed that another tab is displayed above the tab with the email templates tab if your survey uses [[General settings|additional languages]]. If you click on another language tab other than the default language one, the email templates will load the corresponding texts in the respective language. Now, access each email template in order to start editing them. Do not forget to click on the '''Save''' button located in the upper-right part of the screen to get all your changes saved.</div> | <div class="simplebox">[[File:help.png]] '''Note:''' You may have observed that another tab is displayed above the tab with the email templates tab if your survey uses [[General settings|additional languages]]. If you click on another language tab other than the default language one, the email templates will load the corresponding texts in the respective language. Now, access each email template in order to start editing them. Do not forget to click on the '''Save''' button located in the upper-right part of the screen to get all your changes saved.</div> | ||
| Line 104: | Line 103: | ||
<center>[[File:Validate email - email templates.png]]</center> | <center>[[File:Validate email - email templates.png]]</center> | ||
=Email placeholders= | =Email placeholders= | ||
| Line 147: | Line 113: | ||
You can find below the email placeholders that are allowed to be used within the body message of your invitation and reminder [[Email templates|email templates]]. When sending out the emails, these email placeholders will be already replaced in the preview of your invitation/reminder email with data from your survey and [[Survey participants|survey participants table]]. | You can find below the email placeholders that are allowed to be used within the body message of your invitation and reminder [[Email templates|email templates]]. When sending out the emails, these email placeholders will be already replaced in the preview of your invitation/reminder email with data from your survey and [[Survey participants|survey participants table]]. | ||
{| | {|class="wikitable" | ||
|{ADMINEMAIL}||Email of the Survey admin | |{ADMINEMAIL}||Email of the Survey admin | ||
|- | |- | ||
| Line 159: | Line 125: | ||
The following placeholders are allowed in invitation/reminder email templates (subject '''and/or''' body fields) and they will be replaced while sending out the emails: | The following placeholders are allowed in invitation/reminder email templates (subject '''and/or''' body fields) and they will be replaced while sending out the emails: | ||
{| | {|class="wikitable" | ||
|{EMAIL}||Email of the recipient | |{EMAIL}||Email of the recipient | ||
|- | |- | ||
| Line 175: | Line 141: | ||
|- | |- | ||
|{TOKEN}||The token to access the survey | |{TOKEN}||The token to access the survey | ||
|- | |||
|{USESLEFT}|| The number of uses left for the token. | |||
|- | |||
|{VALIDFROM}|| The date the token is valid from. | |||
|- | |||
|{VALIDUNTIL}|| The date the token is valid until. | |||
|- | |- | ||
|{ATTRIBUTE_1}||Attribute 1 | |{ATTRIBUTE_1}||Attribute 1 | ||
| Line 183: | Line 155: | ||
If your survey is '''not''' anonymous, the email placeholders can be used in order to add specific entry/participant data into the [[text elements|Survey text elements]] panel (e.g., survey description, welcome message, end message). | If your survey is '''not''' anonymous, the email placeholders can be used in order to add specific entry/participant data into the [[text elements|Survey text elements]] panel (e.g., survey description, welcome message, end message). | ||
{| | {|class="wikitable" | ||
|{TOKEN:EMAIL}||It displays the email of the respondent from the survey participants table | |{TOKEN:EMAIL}||It displays the email of the respondent from the survey participants table | ||
|- | |- | ||
| Line 205: | Line 177: | ||
Some of the placeholders that can be used only in the admin notification panels are mentioned below: | Some of the placeholders that can be used only in the admin notification panels are mentioned below: | ||
{| | {|class="wikitable" | ||
|{VIEWRESPONSEURL}||Displays an URL that, once click, redirects you to the respondent's submitted answer. | |{VIEWRESPONSEURL}||Displays an URL that, once click, redirects you to the respondent's submitted answer. | ||
|- | |- | ||
| Line 217: | Line 189: | ||
<div class="simplebox">[[File:help.png]] '''Hints:''' | <div class="simplebox">[[File:help.png]] '''Hints:''' | ||
* If your survey is using anonymized responses, then token-related placeholders will not work in the notification email template. | * If your survey is using anonymized responses, then token-related placeholders will not work in the notification email template. | ||
* You can use [[ | * You can use [[ExpressionScript - Presentation|ExpressionScript]] to use expressions for tailoring an email{{NewIn|1.92}}. Please have a look at the [[ExpressionScript How-tos|ExpressionScript how-tos]] for an example. | ||
* Also have a look at the examples on using [[Questions - introduction#Information from survey participants table|Information from survey participants table]].</div> | * Also have a look at the examples on using [[Questions - introduction#Information from survey participants table|Information from survey participants table]].</div> | ||
| Line 247: | Line 219: | ||
Now, when you send out your invitation emails, the link to start the survey will be something shorter and not a long url. | Now, when you send out your invitation emails, the link to start the survey will be something shorter and not a long url. | ||
= Email attachments = | |||
== File actions == | |||
When clicking on '''Add file''' the following window will pop up asking you to choose which document from the files folder you wish to send via email: | |||
[[File:Upload_files_-_email_templates.png]] | |||
Attachments can be added at the bottom of the email template editing interface. Please note that email attachments are uploaded on a per survey basis. | |||
You can also upload on the spot a file from the desktop to your LimeSurvey installation by clicking on the '''upload''' button and then selecting the file you wish to attach to the respective email template. | |||
Once selected, double click on it and the file will be immediately displayed in the '''Files''' table, below the '''Add File''' button: | |||
[[File:Files_table_-_email_templates.png]] | |||
To have it permanently attached to the respective email template, do not forget to click on '''Save''' button located in the upper-right part of the window. | |||
To decide if an attachment should be sent on an individual basis, it is possible to add a relevance equation to each attachment. | |||
All functions supported by the [[ExpressionScript - Presentation|ExpressionScript]] can be used, as well as token attributes if the survey uses tokens. | |||
In case of a notification or confirmation template it is also possible to use [[ExpressionScript - Presentation#Access_to_Variables|question codes]] used in the survey. | |||
If you wish to delete a file, click on the red trash button located under the Action column and save the changes. | |||
{{Alert|title=Attention|text=* When a file can not be found on the file system, the email will be sent without attachment. | |||
*Exporting/importing a survey does not export/import the attached uploaded files. However, the settings for attachments will be maintained, as well as the relevance equations.}} | |||
== Image attachment == | |||
You can attach an image/images if you send HTML emails. To do this, you need to update the URL source of the image by settings its path to your public directory of your LimeSurvey instance. | |||
<center>[[File:Image-email-embed.png]]</center> | |||
{{Alert|The source must be relative to your public directory on the server. If you LimeSurvey instance is installed in a subdirectory, the image will not be shown in your HTML editor.}} | |||
Revision as of 16:50, 19 May 2020
Einleitung
Die E-Mail Vorlagen werden verwendet um Teilnehmern personalisierte Einladungen, Bestätigungen und Erinnerungen per E-Mail zu schicken. Dies ist von der Umfrageteilnehmerverwaltung aus möglich. Sie können hier auch die Basis und die ausführliche Admin-Benachrichtigung an den Umfrageadministrator anpassen.
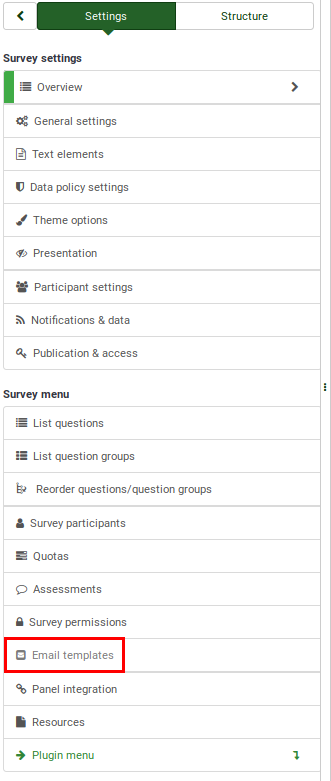
Um zur Einstellungsansicht zu kommen, öffnen Sie den Reiter Einstellungen und klicken Sie auf den E-Mail Vorlagen Menüpunkt.
E-mail Vorlagen Ansicht
Die E-Mail Vorlagen Ansicht sieht so aus:
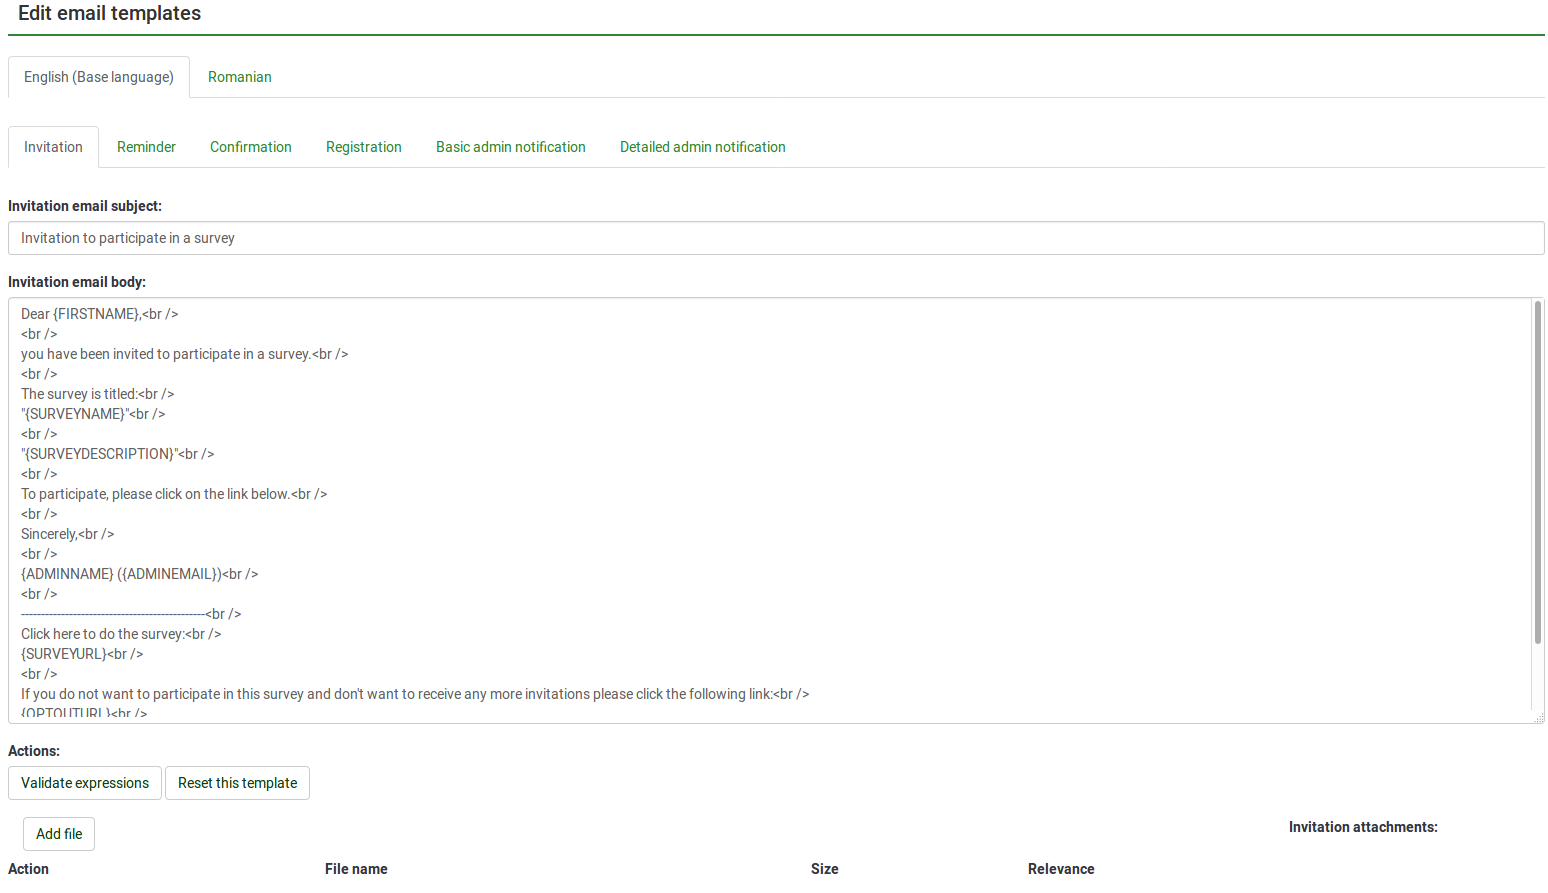
Wie in dem Screenshot zu sehen ist, wird der "HTML Quellcode" Editormodus genutzt. Diesen können Sie in Ihren persönlichen Einstellungen ändern.
Wie Sie sehen können gibt es fünf Typen von E-Mails deren Vorlagen Sie bearbeiten können:
Einladung
The invitation system is useful when you wish to send emails in bulk to all the respondents from your survey participants table who have not yet received an invitation to complete your survey.
From the email templates panel, you can edit the message that reaches out those survey participants. To check which email placeholders can be used, continue reading the following wiki subsection. You can also use the ExpressionScript to enhance the customization of your invitation email template.
Reminder
The reminder system helps survey administrators remind their respondents from the survey participants table to answer to the survey.
You can edit the default format of the reminder email from the email templates panel. To check which email placeholders can be used, continue reading the following wiki subsection. The ExpressionScript can help you better customize the text body of this email template.
Confirmation
If tokens are used and a participant fills out the survey, a confirmation email will be sent to his/her email address. You can deactivate this functionality from the Participant settings panel.
Click on the Confirmation tab if you wish to edit the email template. Check the email placeholders to see which ones can be used in this type of email. You may also use the ExpressionScript to enhance your email customization.
Registration
If the closed-access mode is enabled (there is a survey participants table, which means that only those participants who have an allocated entry and a unique token code associated to it can complete the respective survey. If you allow participants to publicly register to your survey, a new entry in your survey participants table will be created once the respondent has submitted his or her name and email address. A script that runs in the background will automatically send the respective respondent a registration email. It contains the URL with the token that needs to be accessed by the newly registered user.
Click on the registration tab to edit the format of this email. Don't forget to take a look first at which email placeholders can be used within the text body. The ExpressionScript can provide further customization to the body text you wish to use.
Basic & detailed admin notifications
To get admin notifications, click on the Data management tab and type in an email address in the "Send basic admin notification email to" and another one (or the same) in the "Send detailed admin notification email to" field.
By default, the only difference between the two is related to the extra placeholder {ANSWERTABLE} that is included in the detailed admin notification email template. This allows the user who receives these kind of emails to also check the submitted answers without being needed to access the LimeSurvey installation.
However, by using the ExpressionScript and the email placeholders you can customize these two email templates however you want.
Email templates fields
Each email template contains:
- The subject of the email: The title of the email/batch of emails you want to send;
- The email body: It is a text box that contains the text message you wish to send to the users. It may contain text, images, and email placeholders. Moreover, the ExpressionScript can be used to further enhance the message you wish to deliver;
- Email actions: Two actions are available:
- Reset this template: Once clicked, the HTML code gets reset. No text is deleted;
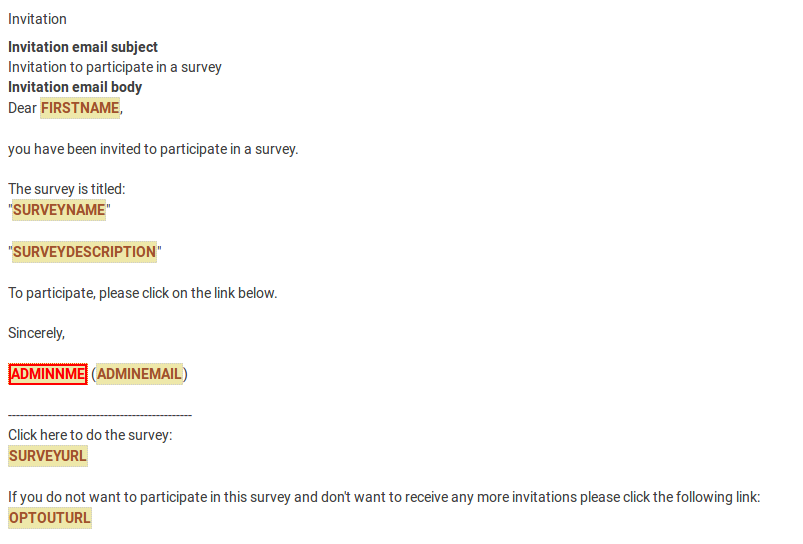
- Validate expressions: It checks the logic of the email - whether the placeholders are correctly used or not. It is highly recommended to use it before sending a batch of emails. You can see in this way whether the placeholders are correctly defined or not. In the below example, a small typo exists - it is emphasized in the red colour:
Email placeholders
As you can see in the default email templates, different email placeholders are used either in the body and/or the subject of the email. Their role is to connect the email you wish to send to each respondent entry from your survey participants list. The data from the survey participants table (e.g., email, first name, last name, token, etc.) is automatically taken and put into different unique emails before being sent to each respondent from your survey participants list.
You can find below the email placeholders that are allowed to be used within the body message of your invitation and reminder email templates. When sending out the emails, these email placeholders will be already replaced in the preview of your invitation/reminder email with data from your survey and survey participants table.
| {ADMINEMAIL} | Email of the Survey admin |
| {ADMINNAME} | Name of Survey Admin |
| {SURVEYNAME} | Title of your survey |
| {SURVEYDESCRIPTION} | Description of your survey |
The following placeholders are allowed in invitation/reminder email templates (subject and/or body fields) and they will be replaced while sending out the emails:
| {EMAIL} | Email of the recipient |
| {FIRSTNAME} | First Name |
| {LASTNAME} | Last Name |
| {SURVEYURL} | The URL pointing to the survey start - if you are sending HTML emails, a full URL will be displayed to the survey participant |
| @@SURVEYURL@@ | The URL pointing to the survey start - this is the barebone link. Use this if you want to integrate the link in your custom HTML elements somewhere (available in v1.90 and later) |
| {OPTOUTURL} | The URL to deactivate sending of email for the respective survey - a full link will be displayed in the HTML version of the email template |
| {OPTINURL} | If a user is blacklisted and he wants to participate in the respective survey, he has to click on the opt-in URL to receive again survey invitations/reminders. |
| {TOKEN} | The token to access the survey |
| {USESLEFT} | The number of uses left for the token. |
| {VALIDFROM} | The date the token is valid from. |
| {VALIDUNTIL} | The date the token is valid until. |
| {ATTRIBUTE_1} | Attribute 1 |
| {ATTRIBUTE_2} | Attribute 2 (...and so on for more attribute fields) |
If your survey is not anonymous, the email placeholders can be used in order to add specific entry/participant data into the Survey text elements panel (e.g., survey description, welcome message, end message).
| {TOKEN:EMAIL} | It displays the email of the respondent from the survey participants table |
| {TOKEN:FIRSTNAME} | It displays the first name of the respondent from the survey participants table |
| {TOKEN:LASTNAME} | It displays the last name of the respondent from the survey participants table |
| {TOKEN} | It displays the token code of the respondent from the survey participants table |
| {TOKEN:ATTRIBUTE_1} | It displays "Attribute 1" of the respondent from the survey participants table |
| {TOKEN:ATTRIBUTE_2} | It displays "Attribute 2" of the respondent from the survey participants table (and so on for more attribute fields) |
These email placeholders can also be used in the confirmation and admin notification email templates.
Certain placeholders can be used only within the the admin notification templates. Please note that one email per response will be sent to the email address of the administrator!
Some of the placeholders that can be used only in the admin notification panels are mentioned below:
| {VIEWRESPONSEURL} | Displays an URL that, once click, redirects you to the respondent's submitted answer. |
| {EDITRESPONSEURL} | Displays an URL that, once click, redirects you to a LimeSurvey page from where you can edit the responses submitted by the respective survey participant |
| {STATISTICSURL} | Click on this URL in order to access the statistics of the survey |
| {ANSWERTABLE} | If you wish to display the submitted answers of the respondent in the admin notification email, use this email placeholder. In this way, you do not need anymore to access your LimeSurvey installation in order to check the submitted answers of the respective respondent (as the {VIEWRESPONSEURL} placeholder does). |
- If your survey is using anonymized responses, then token-related placeholders will not work in the notification email template.
- You can use ExpressionScript to use expressions for tailoring an email (New in 1.92 ). Please have a look at the ExpressionScript how-tos for an example.
- Also have a look at the examples on using Information from survey participants table.
Participant opt-out
When you use the {OPTOUTURL} tag in your invitation/reminder email, your participants have the possibility to opt out of this particular survey by just clicking on the related URL in the email - so you don't harass them with reminder emails. A participant that opted out of your survey will have the email status 'OptOut' set in the survey participants list.
Using replacement function
Some specific keywords can be used within your email templates. For example, certain keywords can be used in order to replaces the token URL address.
The below example uses a plain link to the survey instead of a long url:
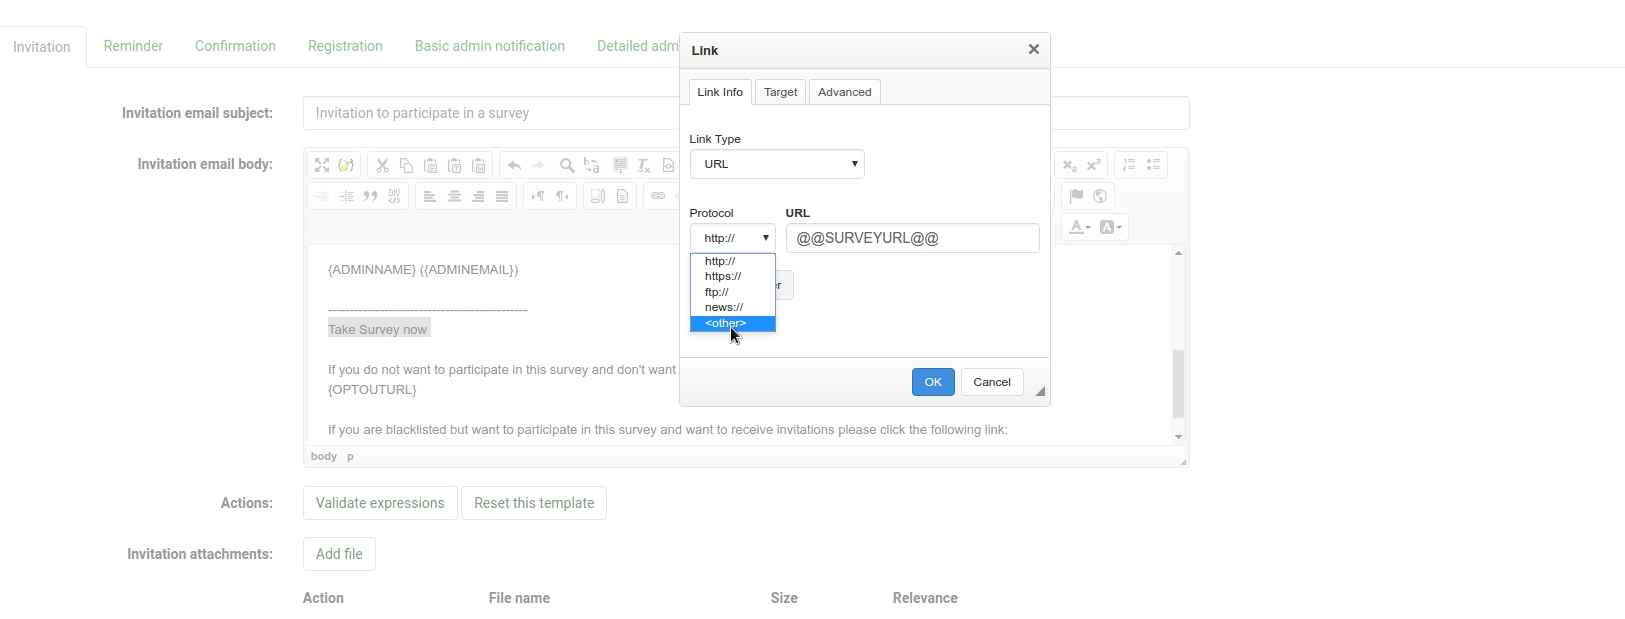
1) First, access the email templates panel and choose Invitation.
2) Write the text you want to appear as link to start the survey.
3) Then select that text.
4) Add the placeholder for the plain link @@SURVEYURL@@ and choose other from the protocol-select-box.
Now, when you send out your invitation emails, the link to start the survey will be something shorter and not a long url.
Email attachments
File actions
When clicking on Add file the following window will pop up asking you to choose which document from the files folder you wish to send via email:
Attachments can be added at the bottom of the email template editing interface. Please note that email attachments are uploaded on a per survey basis.
You can also upload on the spot a file from the desktop to your LimeSurvey installation by clicking on the upload button and then selecting the file you wish to attach to the respective email template.
Once selected, double click on it and the file will be immediately displayed in the Files table, below the Add File button:
To have it permanently attached to the respective email template, do not forget to click on Save button located in the upper-right part of the window.
To decide if an attachment should be sent on an individual basis, it is possible to add a relevance equation to each attachment.
All functions supported by the ExpressionScript can be used, as well as token attributes if the survey uses tokens.
In case of a notification or confirmation template it is also possible to use question codes used in the survey.
If you wish to delete a file, click on the red trash button located under the Action column and save the changes.
- When a file can not be found on the file system, the email will be sent without attachment.
- Exporting/importing a survey does not export/import the attached uploaded files. However, the settings for attachments will be maintained, as well as the relevance equations.
Image attachment
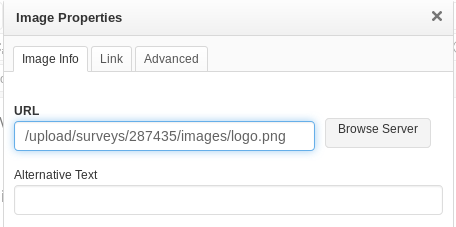
You can attach an image/images if you send HTML emails. To do this, you need to update the URL source of the image by settings its path to your public directory of your LimeSurvey instance.
