Email bounce tracking system/nl: Difference between revisions
From LimeSurvey Manual
(Created page with "===Bij gebruik van LimeSurvey PRO e-mailserver===") |
(Created page with "Als je de LimeSurvey Professionele e-mailserver gebruikt, dan hebben alle e-mails als afzender "noreply@limesurvey.org". Deze e-mails hebben echter een Reply-to header met je...") |
||
| Line 78: | Line 78: | ||
===Bij gebruik van LimeSurvey PRO e-mailserver=== | ===Bij gebruik van LimeSurvey PRO e-mailserver=== | ||
Als je de LimeSurvey Professionele e-mailserver gebruikt, dan hebben alle e-mails als afzender "noreply@limesurvey.org". Deze e-mails hebben echter een Reply-to header met je e-mailadres. Dus je krijgt een reactie als de ontvanger de e-mail beantwoordt. | |||
Even though this system can be easily set up (by leaving the bounce settings fields empty), it has one downside: if an email cannot be transmitted to the email receiver and bounces back, then you won't get any notifications whatsoever. | Even though this system can be easily set up (by leaving the bounce settings fields empty), it has one downside: if an email cannot be transmitted to the email receiver and bounces back, then you won't get any notifications whatsoever. | ||
Revision as of 22:11, 4 February 2018
Inleiding
Het systeem voor het controleren van niet verzonden e-mail (beschikbaar vanaf versie v1.91) ziet welke e-mails niet goed verzonden zijn naar de ontvangers (deelnemers aan de enquêtes). Dit gaat via het "mail delivery notification failure report". Er is een e-mailadres nodig om deze bounces door te sturen. Ook de credentials en de connectie-details van dit account zijn benodigd.
Vereisten
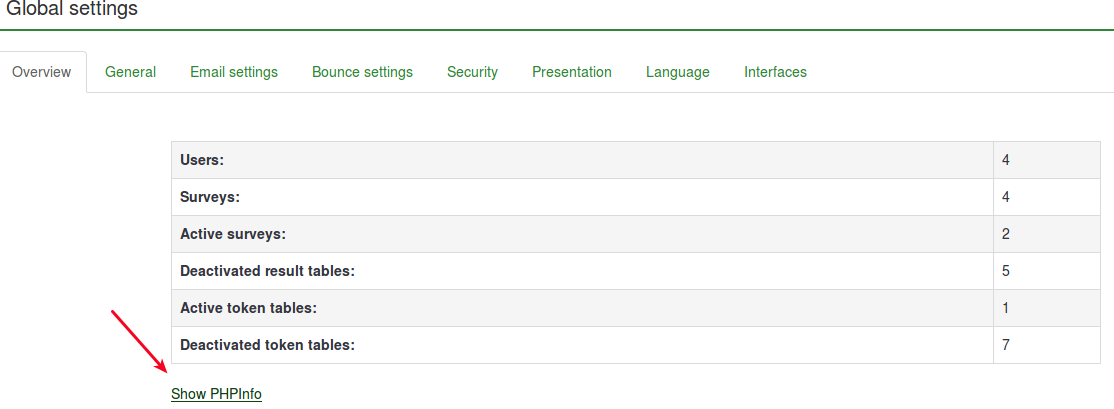
De php5-imap module moet op de server zijn geïnstalleerd. Dit kun je controleren, door te klikken op de knop "PHPInfo" op de pagina met de Instellingen op de tab Overzicht .
Zoek vervolgens (eventueel met control-f) naar de imap-sectie, het ziet er ongeveer als volgt uit:

Als er geen php5-imap geïnstalleerd is, en je mag ook niet naar de root van de server, dan kun je via de voor jouw geldende procedure proberen te installeren. In geval van gebruik van Debian: [1] . Je moet dan wel je webserver opnieuw starten, bijvoorbeeld met "apache/usr/sbin/apache2ctl restart".
Werking
De redenen voor het ontwikkelen van dit bounce-systeem is het verminderen van het handwerk waarbij er natuurlijk kans is op fouten omdat er dan velden afzonderlijk moeten worden bijgewerkt.
Als er een e-mail verzonden wordt, dan wordt er door dit systeem automatisch een survey-id en token-id aan de e-mailheader toegevoegd zonder melding aan de beheerder.

Deze headers (ook wel "custom headers") worden toegevoegd aan elke uitnodiging die naar een deelnemer wordt verzonden.
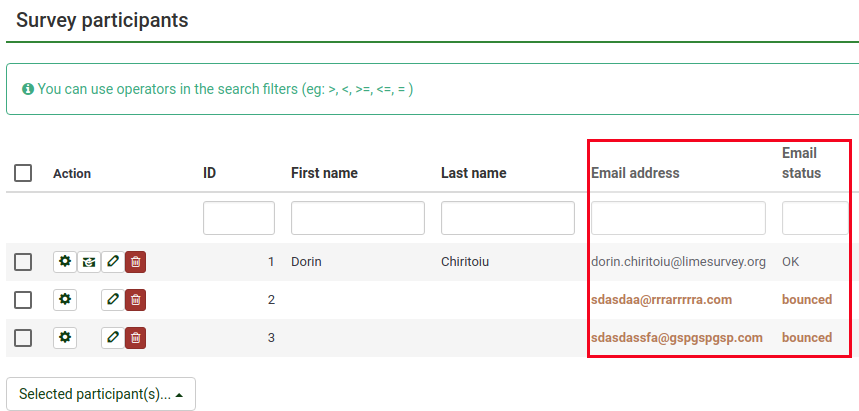
Wanneer de e-mail bounced, dus niet verzonden is, wordt de originele header ontvangen met de header van de "Delivery notification". Het systeem kijkt in de e-mails die ontvangen worden of er een aangepaste header in staat. De kleur van het foutieve e-mailadres wordt gewijzigd in rood in de deelnemerstabel.
Installatie
Het systeem kan op algemeen (alle enquêtes) of op enquête niveau werken. Op algemeen niveau kunnen de instellingen worden ingesteld bij Instellingen -> Bounce instellingen. De volgende instellingen worden getoond:
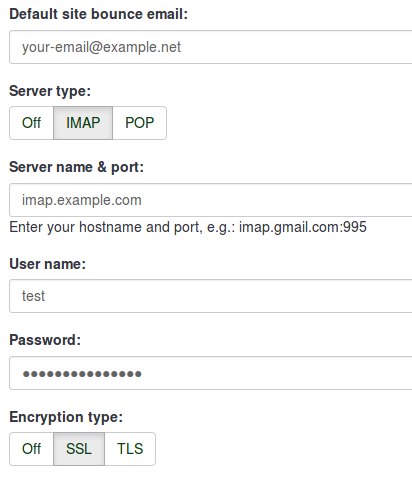
- Standaard site bounce e-mail: Het e-mailadres waar niet verzonden e-mails heen worden verzonden. Wij bevelen aan dat je een e-mailadres gebruikt dat je alleen hiervoor gebruikt.
- Servertype: Door "Off" te kiezen kun je instellen dat je de functie niet wilt gebruiken. Je gebruikt de functie wel met de waarden "POP" en "IMAP".
- Servernaam en poort: Naam van de server en optioneel de poort (gebruik een dubbele punt als scheidingsteken voor de poort). Je hoeft de poort alleen op te geven als het niet de standaardpoort is voor e-mail.
- Gebruikersnaam: De gebruikersnaam van het POP/IMAP account.
- Wachtwoord: Het wachtwoord van het POP/IMAP account.
- Encryptiemethode: Als er encryptie wordt gebruikt, geef hier dan op welke (SSL of TLS).
Als je voor één enquête bounce-instelling wilt gebruiken, ga dan naar die enquête en klik op de tab Deelnemers -> klik op de optie Uitnodigen en herinneringen -> klik op Bounce instellingen. Je krijgt dan de volgende pagina:
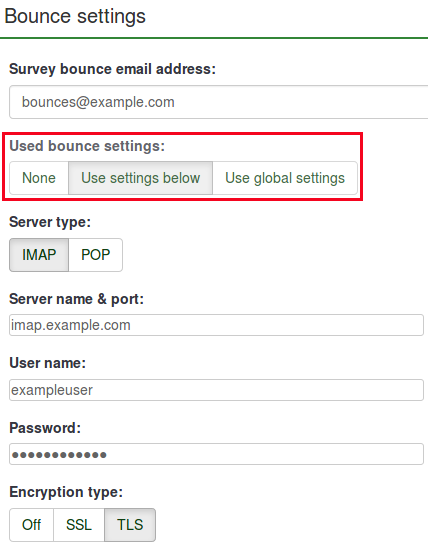
De extra optie is de Gebruikte bounce-instellingen. De keuzes zijn:
- Geen
- Gebruik de lokale instellingen
- Gebruik algemene instellingen van je LimeSurvey-installatie
Bij gebruik van LimeSurvey PRO e-mailserver
Als je de LimeSurvey Professionele e-mailserver gebruikt, dan hebben alle e-mails als afzender "noreply@limesurvey.org". Deze e-mails hebben echter een Reply-to header met je e-mailadres. Dus je krijgt een reactie als de ontvanger de e-mail beantwoordt.
Even though this system can be easily set up (by leaving the bounce settings fields empty), it has one downside: if an email cannot be transmitted to the email receiver and bounces back, then you won't get any notifications whatsoever.
Starting Bounce Processing in v3.0
Before starting the bounce processing, do not forget to first send the email invitations to your survey participants.
In version 3.0+, once the email bounce tracking system has been set up, you can start bounce processing by accessing the survey home page -> click on the Survey participants tab from the survey menu -> click on Invitations & reminders (located on the toolbar) -> Start bounce processing.

After selecting this option, a progress indicator will be displayed during the process, followed by a final processing status summary.
The sent email invitations will start to be examined. The scan results will be shown on the Survey participants table (you may have to manually refresh the page to actualize it). All the entries whose invitations were bounced will have their email addresses marked in red font. Also, their Email status is changed from "OK" to "bounced".

Starten bounce-verwerking in v2.5
Indien de bounce-verwerking is ingeschakeld kun je de verwerking van geweigerde e-mails starten vanaf de startpagina van de enquête : "Uitnodigingen en herinneringen" -> Start verwerken bounce.

Na het selecteren van deze optie wordt er een voortgangsbalk weergegeven met na het afronden een verslag van de verwerking.
The sent email invitations will start to be examined. The scan results will be shown on the Survey participants table (you may have to manually refresh the page to actualize it). All the entries whose invitations were bounced will have their email addresses marked in red font. Also, their Email status is changed from "OK" to "bounced".
"
"
Voorbeeld
To better understand how the LimeSurvey email bounce tracking system is working, check the below example:
1. Introduce your respondents to the survey participants table. Make sure that each of them has an assigned token and email address.
2. Select the respondents to whom you wish to send the survey invitation:

Click on the Selected participant(s)... button, and choose the send email invitations option.
3. Wait for some moments in order to make sure that the emails were sent to the survey respondents.
4. Now, you can make use of LimeSurvey email bounce tracking system. Click on Invitations & reminders and fill in the bounce email settings fields with the connection and account details of your personal email account:

You could also leave the fields empty. The bounce processing will still work, only that you will not get any bounce-processing-related email. However, the email status of the entries from the survey participants table will get updated.
As you may observe below, we use the email bounce tracking system with the help of a free Gmail account. To find out about the Gmail-related connection settings, access the following link. Also, do not forget to enable IMAP/POP from the settings of your Gmail account.
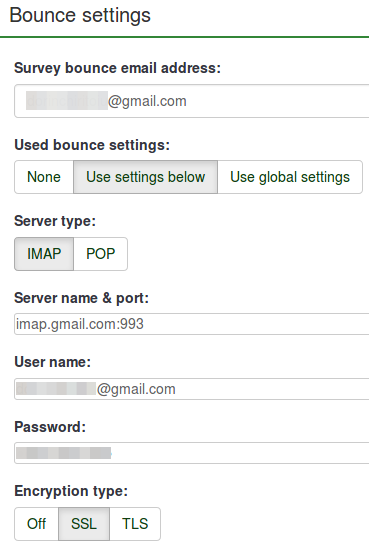
Fill in the fields. Select the desired server and encryption settings. Once done, click on the Save button located on the upper-right part of the screen.
5. Now, you can click on start bounce processing button:

The email bounce tracking system will start to look for the survey-id, token-id, and delivery notification that are attached to the email header of each bounced email. If these custom headers exist, the system will change the font color of the wrong email addresses from the survey participants table in red. Also, the email status of the respective entries will be switched from OK to bounced.
