Creating, editing and translating LimeSurvey Wiki pages: Difference between revisions
From LimeSurvey Manual
Actxcellence (talk | contribs) No edit summary |
No edit summary |
||
| (27 intermediate revisions by 3 users not shown) | |||
| Line 2: | Line 2: | ||
<!--T:1--> | <!--T:1--> | ||
__TOC__ | <div style="float:right;">__TOC__</div> | ||
= LimeSurvey Wiki= <!--T:2--> | = LimeSurvey Wiki= <!--T:2--> | ||
| Line 15: | Line 15: | ||
<!--T:6--> | <!--T:6--> | ||
LimeSurvey uses an open source wiki system (called [http://www.mediawiki.org/ MediaWiki]) to manage the [[LimeSurvey_Manual| LimeSurvey manual]] along with other project related pages, such as [[LimeSurvey 2.x development documentation| | LimeSurvey uses an open source wiki system (called [http://www.mediawiki.org/ MediaWiki]) to manage the [[LimeSurvey_Manual| LimeSurvey manual]] along with other project related pages, such as the [[LimeSurvey 2.x development documentation|development documentation]]. And if you haven't noticed yet, this page itself is a wiki page. | ||
<!--T:51--> | |||
Like videos? After watching this, you like Wiki too. [http://youtu.be/-dnL00TdmLY Wiki in plain english] | |||
== How it works== <!--T:7--> | == How it works== <!--T:7--> | ||
| Line 33: | Line 36: | ||
---- | ---- | ||
= Use the function bar= | = Use the function bar= <!--T:52--> | ||
<!--T:53--> | |||
[[File:wiki_functions_EN_actXcellence.png]] | [[File:wiki_functions_EN_actXcellence.png]] | ||
<!--T:54--> | |||
# Page: return to the page itself in view mode | # Page: return to the page itself in view mode | ||
# Discussion: Talk about the page with others. (Don't forget to sing your posts) | # Discussion: Talk about the page with others. (Don't forget to sing your posts) | ||
# View: the 'normal' mode to view the page | # View: the 'normal' mode to view the page | ||
# Edit: click here, if you want to add or change the whole page. Use the edit link close to a headline, to get a smaller part for editing | # Edit: click here, if you want to add or change the whole page.(needs self-registration) Use the edit link close to a headline, to get a smaller part for editing | ||
# History: see older versions of the page and the authors | |||
# Search: enter the search phrase here | # Search: enter the search phrase here | ||
# Go: searches for pages containing the search phrase | # Go: searches for pages containing the search phrase | ||
| Line 74: | Line 80: | ||
<!--T:23--> | <!--T:23--> | ||
It is important to notice that most wiki systems have some syntax rules to help you formatting your page and to make things look nicer. But there is no need to worry memorizing weird code rules because you can always use the formatting toolbar. There is also a reference guide of those rules under the editing page. | It is important to notice that most wiki systems have some syntax rules to help you formatting your page and to make things look nicer. But there is no need to worry memorizing weird code rules because you can always use the formatting toolbar. There is also a reference guide of those rules under the editing page. | ||
<!--T:55--> | |||
The complete manual for the syntax can be found in the MediaWiki User Manual: http://www.mediawiki.org/wiki/Help:Contents | |||
== Style syntax== <!--T:24--> | == Style syntax== <!--T:24--> | ||
<!--T:25--> | <!--T:25--> | ||
() | |||
== Structure syntax== <!--T:26--> | == Structure syntax== <!--T:26--> | ||
<!--T:27--> | <!--T:27--> | ||
It is also a very good idea to structure your page using headings to separate different sections on your page. That can be done using exclamation marks (<nowiki>!</nowiki>). Nested headings are also possible with the use of more than one exclamation mark in a row. You can use the tag <nowiki>__TOC__</nowiki> in the beginning of your page to ''automagically'' create a "table of content" | It is also a very good idea to structure your page using headings to separate different sections on your page. That can be done using exclamation marks (<nowiki>!</nowiki>). Nested headings are also possible with the use of more than one exclamation mark in a row. You can use the tag <nowiki>__TOC__</nowiki> in the beginning of your page to ''automagically'' create a "table of content". <nowiki>__NOTOC__</nowiki> will switch it of, in the case it was created beacause of too many headlines. | ||
<!--T:28--> | <!--T:28--> | ||
[[File: | [[File:mediawiki_example_of_TOC.jpg]] | ||
<!--T:29--> | <!--T:29--> | ||
| Line 107: | Line 106: | ||
<!--T:32--> | <!--T:32--> | ||
[[File: | [[File:MediaWiki_needs_new_editing_picture.png]] | ||
<!--T:33--> | <!--T:33--> | ||
| Line 120: | Line 119: | ||
{{Example|Text=In a normal page the square brackets arround <span style="color:red;"><nowiki>[[any_word]]</nowiki></span> creating a page link.}} | {{Example|Text=In a normal page the square brackets arround <span style="color:red;"><nowiki>[[any_word]]</nowiki></span> creating a page link.}} | ||
<!--T:56--> | |||
Click on the red link, and you open the new page in an editor page, if you are a registered user. | Click on the red link, and you open the new page in an editor page, if you are a registered user. | ||
| Line 137: | Line 137: | ||
<!--T:40--> | <!--T:40--> | ||
---- | ---- | ||
== Templates == <!--T:57--> | |||
In MediaWiki, it is possible to provide authors with templates. [http://www.mediawiki.org/wiki/Help:Templates] | |||
We have a number of templates defined. | |||
<noinclude> | |||
=== Example=== <!--T:58--> | |||
If you want to add an example, type: | |||
<!--T:72--> | |||
<nowiki>{{FeatureStarting|v=1.92}}</nowiki> | |||
<!--T:73--> | |||
{{FeatureStarting|v=1.92}} | |||
<!--T:74--> | |||
Can be updated with [[Template:FeatureStarting]] | |||
<!--T:59--> | |||
<nowiki>{{Example|Text=this is the Example}}</nowiki> | |||
<!--T:60--> | |||
and this will be displayed as: | |||
<!--T:61--> | |||
{{Example|Text=this is the Example}} | |||
</noinclude> | |||
<noinclude> | |||
=== Hint=== <!--T:62--> | |||
<nowiki>{{Hint|Text=this is the text for the hint}}</nowiki> | |||
<!--T:63--> | |||
{{Hint|Text=this is the text for the hint}} | |||
</noinclude> | |||
=== Quote=== <!--T:64--> | |||
<!--T:65--> | |||
<noinclude> | |||
If you want to add a Quote, type: | |||
<!--T:66--> | |||
<nowiki>{{QUOTE|Text=this is the quote}}</nowiki> | |||
<!--T:67--> | |||
and this will be displayed as: | |||
<!--T:68--> | |||
{{QUOTE|Text=this is the quote}} | |||
</noinclude> | |||
<!--T:69--> | |||
To find all templates, search for "Template:" (with colon) | |||
<!--T:70--> | |||
[[File:Template_search.png]] | |||
= Translating pages= <!--T:41--> | = Translating pages= <!--T:41--> | ||
<!--T:42--> | <!--T:42--> | ||
LimeSurvey | LimeSurvey is growing continuously and it has gathered users and developers from all over the world. And for that reason translators are needed more than ever! | ||
<!--T:43--> | <!--T:43--> | ||
A language bar on top of every page lists the available languages. | |||
Clicking on a language opens the translation. | |||
<!--T:44--> | <!--T:44--> | ||
If you | If you feel like you can contribute translating a page into a new language '''you are more then welcome to do it'''! | ||
<!--T:75--> | |||
Here it is how it works: | |||
==== Wiki Translation Step 1 ==== <!--T:71--> | |||
[[File:translate_walk_though1.png]] | |||
<!--T:76--> | |||
{{Arrow|1|Make sure that you are logged in}} | |||
{{Arrow|2|Go to the page that you would like to translate}} | |||
{{Arrow|3|click on "translate this page"}} | |||
==== Wiki Translation Step 2 ==== <!--T:77--> | |||
<!--T:46--> | <!--T:46--> | ||
[[File: | [[File:translate_walk_2.png]] | ||
<!--T:78--> | |||
{{Arrow|4|Select the language menu}} | |||
{{Arrow|5|Select the language you want to translate to}} | |||
==== Wiki Translation Step 3 ==== <!--T:79--> | |||
[[File:translation_walk_3.png]] | |||
<!--T:80--> | |||
{{Arrow|6|Select a filter mode}} | |||
<!--T:81--> | |||
[http://www.mediawiki.org/wiki/Help:Extension:Translate/Translation_example Link to the full manual for the translation tool] | |||
<!--T:47--> | <!--T:47--> | ||
Latest revision as of 13:42, 20 October 2013
LimeSurvey Wiki
What it is?
You may already be familiar with the wiki concept, made known worldwide by Wikipedia, but just to make sure, here it is a short definition based on the WikiPedia article about the subject:
LimeSurvey uses an open source wiki system (called MediaWiki) to manage the LimeSurvey manual along with other project related pages, such as the development documentation. And if you haven't noticed yet, this page itself is a wiki page.
Like videos? After watching this, you like Wiki too. Wiki in plain english
How it works
As mentioned before, everyone is able to create, edit and translate almost every page hosted on this wiki. The following guide will help you with those tasks.
What can I do?
You can start helping the LimeSurvey wiki with small actions, like fixing typos or misspellings that you may find here. On the other hand, it is also possible to start big, writing entire guides, translating pages and sharing any information that you find relevant.
If writing is not your thing, check out Help_us:_Tasks page and learn other ways to contribute. It is all up to you.
Use the function bar
- Page: return to the page itself in view mode
- Discussion: Talk about the page with others. (Don't forget to sing your posts)
- View: the 'normal' mode to view the page
- Edit: click here, if you want to add or change the whole page.(needs self-registration) Use the edit link close to a headline, to get a smaller part for editing
- History: see older versions of the page and the authors
- Search: enter the search phrase here
- Go: searches for pages containing the search phrase
- Search: searches in all texts in the wiki
Searching
Before you start writing your own articles it is always nice to spend some time using the search tool. After all, creating duplicated information will confuse other users and may be a waste of time.
(See function bar above)
Creating a user
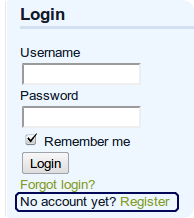
Although everyone has the permission to edit and create pages on this wiki, you have to create an user before doing such actions. A link to the registration page can be found on the menu located on the right side of the LimeSurvey webpage (or you can click here).
The registration form is very short and the whole process takes less than a minute. Follow the instructions there and don't forget to check your mailbox to confirm your account. Logging in is also possible here inside the wiki system (see form on the top).
Markup language
It is important to notice that most wiki systems have some syntax rules to help you formatting your page and to make things look nicer. But there is no need to worry memorizing weird code rules because you can always use the formatting toolbar. There is also a reference guide of those rules under the editing page.
The complete manual for the syntax can be found in the MediaWiki User Manual: http://www.mediawiki.org/wiki/Help:Contents
Style syntax
()
Structure syntax
It is also a very good idea to structure your page using headings to separate different sections on your page. That can be done using exclamation marks (!). Nested headings are also possible with the use of more than one exclamation mark in a row. You can use the tag __TOC__ in the beginning of your page to automagically create a "table of content". __NOTOC__ will switch it of, in the case it was created beacause of too many headlines.
File:Mediawiki example of TOC.jpg
Editing pages
There are several ways of reaching the edit form from a page. You can press either the ![]() icon on top right of a page, the "Edit" button on bottom left or the
icon on top right of a page, the "Edit" button on bottom left or the ![]() icon, located on the right side of each page section. This last option is particularly interesting when you want to edit just something on a really big page.
icon, located on the right side of each page section. This last option is particularly interesting when you want to edit just something on a really big page.
File:MediaWiki needs new editing picture.png
Creating pages
Creating a page is very easy and everything you need to get started is a title. Every word in a page surrounded with square brackets becomes a page.
Example:
In a normal page the square brackets arround [[any_word]] creating a page link.
Creates a page link with the name any_word. After you have saved the new page name inside an existing page, it will become a red coloured link.
Example:
In a normal page the square brackets arround [[any_word]] creating a page link.
Click on the red link, and you open the new page in an editor page, if you are a registered user.

If you have ever edited some page you will find this interface very familiar. That's because creating a page is nothing more than editing a blank page.
Don't be afraid to use existing page names. They will not be shown as red links, but as normal links to the existing page.
Please avoid redundant pages. Before you start to create a new page please search for your topic. There are chances, that some one else wrote a similar page already, but it is not linked in an optimal way. You could add the link where you expected it.
Templates
In MediaWiki, it is possible to provide authors with templates. [1]
We have a number of templates defined.
Example
If you want to add an example, type:
{{FeatureStarting|v=1.92}}
Can be updated with Template:FeatureStarting
{{Example|Text=this is the Example}}
and this will be displayed as:
Example:
this is the Example
Hint
{{Hint|Text=this is the text for the hint}}
Quote
If you want to add a Quote, type:
{{QUOTE|Text=this is the quote}}
and this will be displayed as:
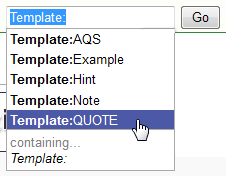
To find all templates, search for "Template:" (with colon)
Translating pages
LimeSurvey is growing continuously and it has gathered users and developers from all over the world. And for that reason translators are needed more than ever!
A language bar on top of every page lists the available languages. Clicking on a language opens the translation.
If you feel like you can contribute translating a page into a new language you are more then welcome to do it!
Here it is how it works:
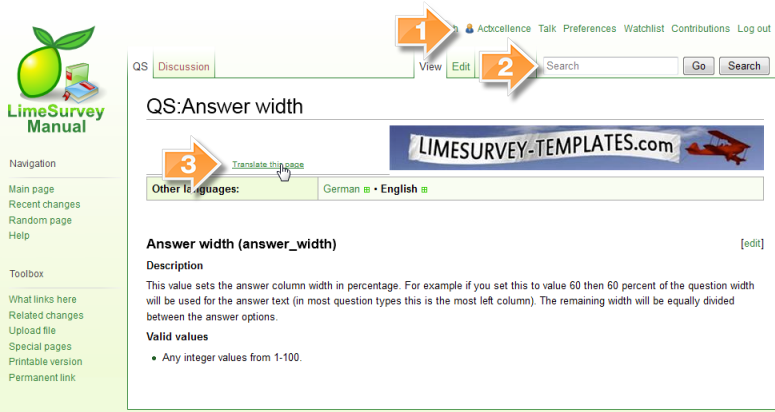
Wiki Translation Step 1
![]() Make sure that you are logged in
Make sure that you are logged in
![]() Go to the page that you would like to translate
Go to the page that you would like to translate
![]() click on "translate this page"
click on "translate this page"
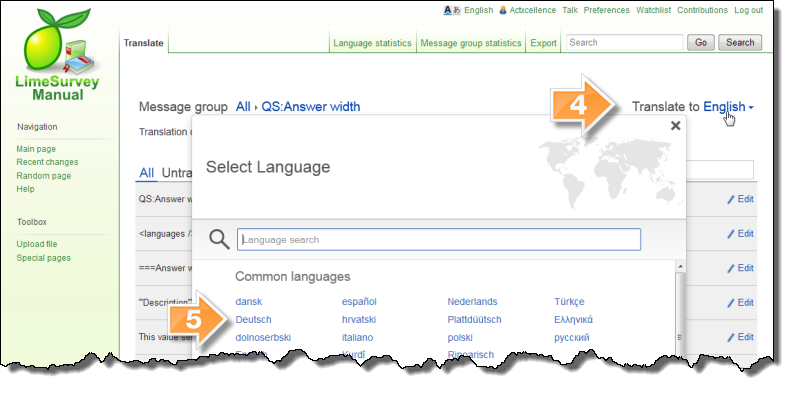
Wiki Translation Step 2
![]() Select the language menu
Select the language menu
![]() Select the language you want to translate to
Select the language you want to translate to
Wiki Translation Step 3
Link to the full manual for the translation tool
Please note that you don't need to translate word-by-word, but please try to keep as close as possible to the original text.
History
Every action made by every person on a wiki (like creating and editing pages) is logged - along with the information of who done it and when - and can be reverted back at any time. So, if you spent the whole week working on a page and then you came home drunk on Saturday and erased all the content of that page, don't worry because the ![]() button will always be there for you.
button will always be there for you.


