Central Participant Database: Difference between revisions
From LimeSurvey Manual
mNo edit summary |
mNo edit summary |
||
| Line 35: | Line 35: | ||
<!--T:165--> | <!--T:165--> | ||
*[[Central | *[[Central Participant Database#Display CPDB participants|Display CPDB (Central Participant Database) participants]] | ||
*[[Central | *[[Central Participant Database#Info|Info]] | ||
*[[Central participant database#Import|Import]] | *[[Central participant database#Import|Import]] | ||
*[[Central participant database#Export|Export]] | *[[Central participant database#Export|Export]] | ||
Revision as of 13:07, 8 May 2018
Introduction
To access this option: Configuration -> Central participant database:

This feature allows the administrator to store the participant information into a central table that is independent of any survey participants table. Its major advantages are:
- The central table acts as a backup. In the case in which a user creates a new survey, he does not have to go through the trouble of exporting its participants to a CSV file and then importing them back into a new survey.
- Users need only to add the participants to the central table. Then, the same participants can be added to as many surveys as the user wants.
- In case multiple users have access to a LimeSurvey installation, its owner(s) can choose to share his participants with other users and also set access rights for the shared users.
You may also find in your LimeSurvey installation an advanced attribute control and several other features.
The participants panel management tools
The following options are available:
- Display CPDB (Central Participant Database) participants
- Info
- Import
- Export
- Settings
- Attributes
- Share panel
- Export all participants
Display CPDB participants
This is the main component of this panel. The great majority of options can be accessed from here, such as adding, deleting, exporting, adding participants to surveys, and so on.
Five options are available in the Action column for every participant listed in the table:

- Edit this participant
- Delete this participant
- Share this participant
- List active surveys
- Add participant to survey
Add participant
Click on the Add new participant button located in the upper-right part of the window: ![]() .
.
A dialog box with the following basic attributes will then appear:
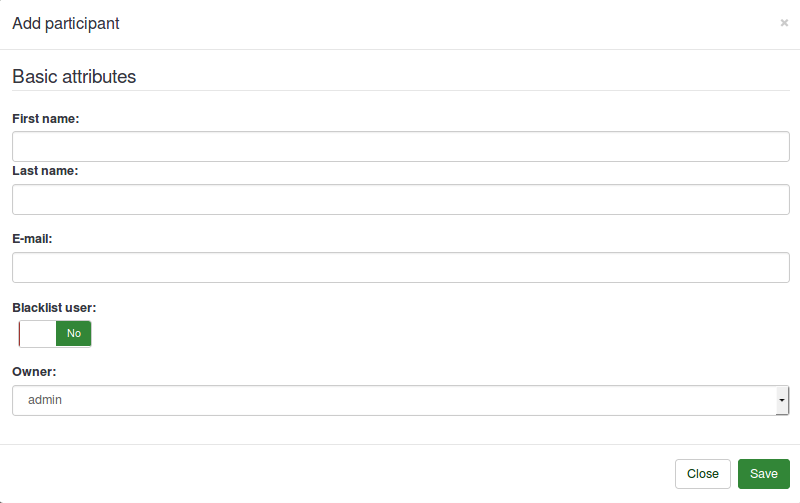
- First name
- Last name
- Blacklist user
- Owner: Any user of LimeSurvey defined in the user control management page can be an owner.
Edit participant
To edit the basic and/or custom attributes of a participant, click on the first button (from left to right) located in the Action column (![]() ). A window with all the available attributes will be displayed.
). A window with all the available attributes will be displayed.
Delete participant
You can easily delete one or multiple participants to be deteled:
- If you want to delete one participant, go to the row where the respective participant is located and click on the red bin button:
 .
. - If you want to delete two or more participants, click on the Selected participant(s)... button (under the last row, below the Action column) after you selected the corresponding entries:
 . Then, click on the delete option.
When you delete the participant(s), three options are available to you:

1) Delete only from the central panel: The first option deletes the participant from the central participant database only. If the participant is in any token table, he/she will not be removed.
2) Delete from the central panel and associated surveys: The second option deletes the participant from central panel and from the surveys where he has been added to, but his responses are not deleted.
3) Delete from central panel, associated surveys and all associated responses: The third option deletes all traces of that participant from the system, including his responses.
This is another important feature of the Central Participant Database. You can share your participants with other users. You just have to select the participant(s) you want to share and click either on the green right-arrow icon (![]() ) or on the Selected participant(s)... button situated in the bottom left part of the participants table. A modal box will open up which will allow you to select the user with whom you want to share the respective participant(s). You can also set whether the user who shares your participant can edit those participants. If you set it to No, they will get an access denied error when trying to edit the entries of the shared participant.
) or on the Selected participant(s)... button situated in the bottom left part of the participants table. A modal box will open up which will allow you to select the user with whom you want to share the respective participant(s). You can also set whether the user who shares your participant can edit those participants. If you set it to No, they will get an access denied error when trying to edit the entries of the shared participant.

List active surveys
If you click on the next icon (![]() ), all the active surveys where the respective participant has been added to will be listed.
), all the active surveys where the respective participant has been added to will be listed.
Add participant to survey
Adding a participant to a survey can be done by clicking on the last icon (![]() ) from the Action column. If you wish to add more than one participant to a survey, mark them and select the Share option from the Selected participant(s)... dialog box (located in the bottom-left part of the participants table).
) from the Action column. If you wish to add more than one participant to a survey, mark them and select the Share option from the Selected participant(s)... dialog box (located in the bottom-left part of the participants table).

The title of the dialog box will show you the number of participants that are going to be added to the respective survey. Besides that, there is also a checkbox, that if checked, it will take you to the survey participants/tokens table of the survey to which you are adding the participants to.
After clicking 'Next', you will be taken to the attribute map page.
The attribute map page contains four tables and uses an advanced drag-and-drop functionality:
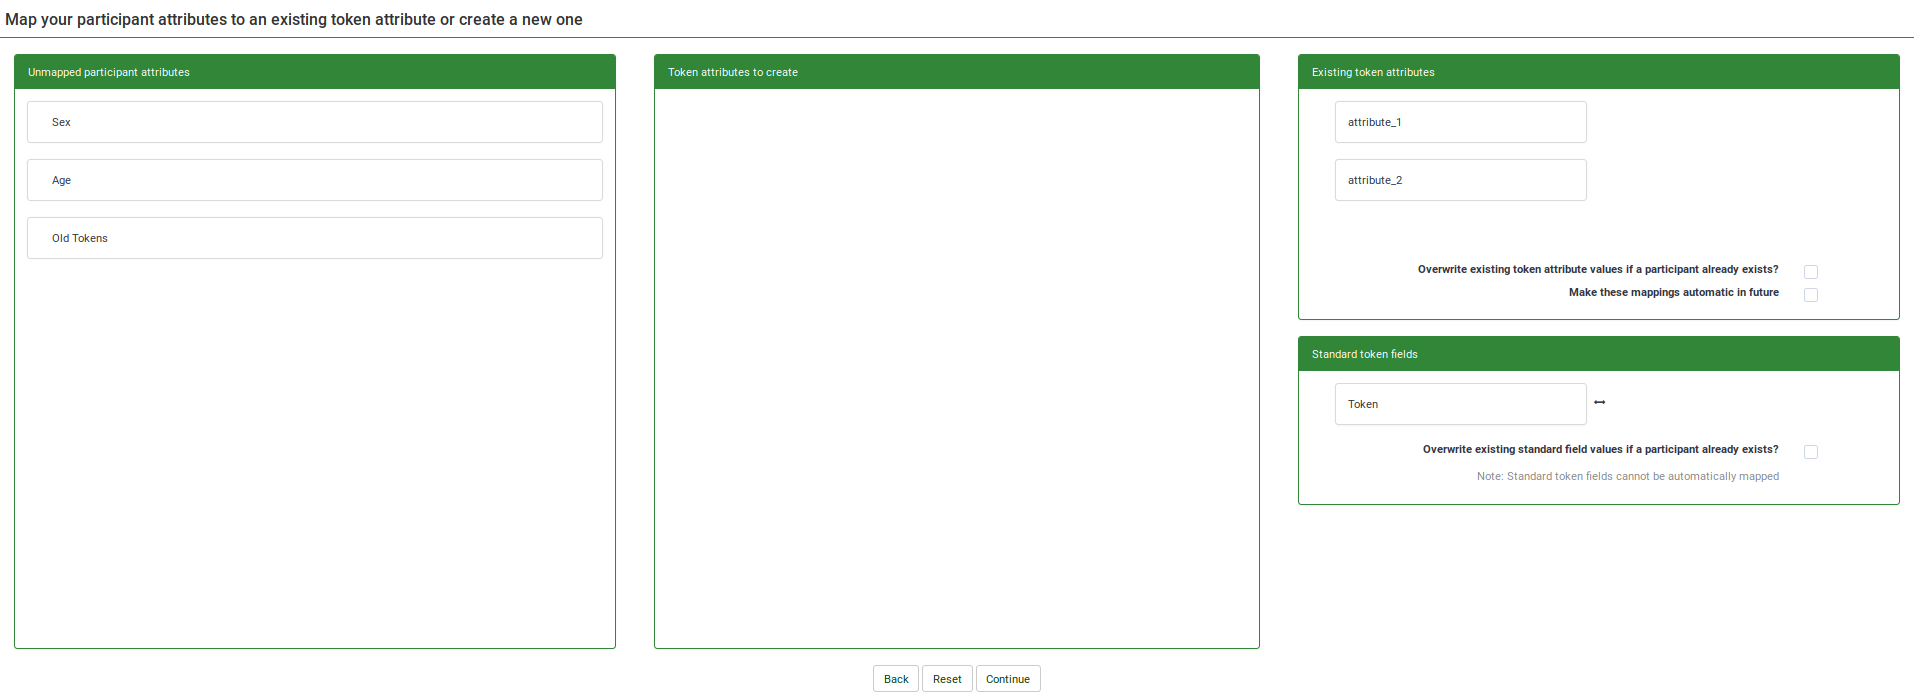
- The first table, Unmapped participant attributes, shows all the attributes that are present in the central participant database. They are currently unmapped - not present in the survey participants table. These unmapped attributes can either be moved into the Token attributes to create table to add new attributes to the survey's participants table or be merged with existing token attributes by dragging the unmapped attributes into the Existing token attributes table, besides the existing token attribute you wish to be merged with.
- The second table, Token attributes to create, helps you copy unmapped participant attributes into the survey participants table, creating new columns. Drag the attribute(s) you wish to add to the survey participants table and drop them into the second table. In this way, new columns/attributes will be added to the survey participants table.
- The third table, Existing token attributes, displays the current attributes existing in the survey participants table. Drop the unmapped attributes here if you wish to copy the data from the unmapped attributes into the one of the existing token attributes (see screenshot below)
- The fourth table, the Standard token fields , displays the standard token fields that can be merged with unmapped participant attributes. The only standard token field from a survey participants table that can be edited is the Token one. This is important when you wish, for example, to easily copy token codes across different LimeSurvey installations.
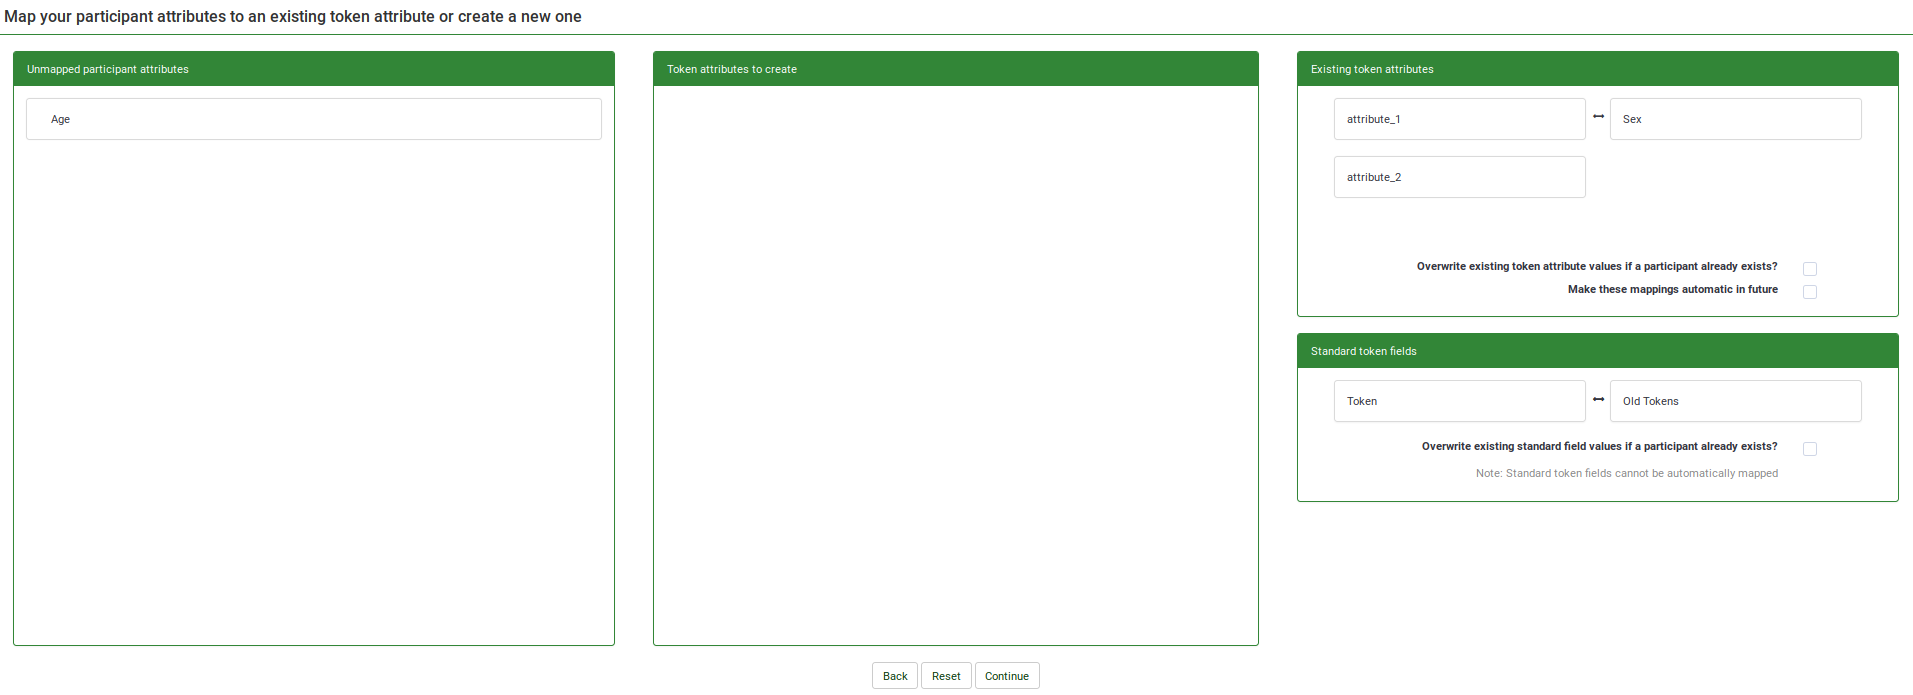
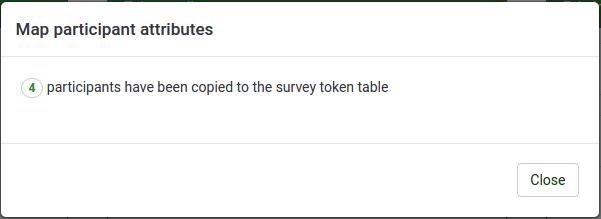
After you have mapped all the attributes, you can click on continue. After processing the participants, a summary page will show up, telling you how many participants were successfully copied. If you have previously asked for redirection, you will be redirected to the survey participants table table or else you will be redirected to the CPDB main page.
Info
It displays some CPDB stats:

1) Total participants in central table : The total number of participants located in the central participant database.
2) Participants owned by you : It shows the total number of participants that have you as a owner. By default, the new participants entered into the central participant database have as owner the user that firstly added them to it.
3) Participants shared with you : The number of participants that were shared with you by other users.
4) Participants you have shared : The number of participants you shared with other users.
5) Blacklisted participants : The number of blacklisted participants.
6) Total attributes in the central table : The total number of attributes that can be found in the central table.
Import
If you wish to add participants via the import function, click on the Import button that is located on the main toolbar of the Central participant database page: ![]()
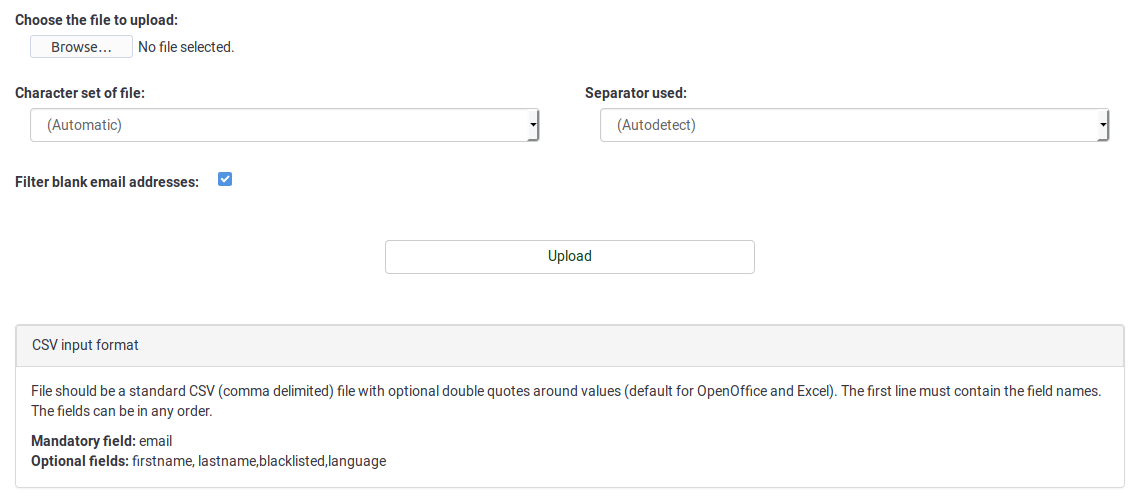
The following options are available:
Please note the text from the box on CSV input format:
Mandatory field: email
Optional fields: firstname, lastname, blacklisted, language
Steps to import
1) Select a file to import and specify the settings associated to it.
2) Map the attributes from the CSV file. Import the attribute data either into an existing attribute from the central participant database or into a new column by creating a new attribute. The newly created attribute will be of text box type - the format can be changed later.

In the screenshot from above, a new attribute called "New Age" will be created. The data from attribute "Sex" was mapped and copied into the existent "Sex" attribute from the central participant database.
3) Click continue, and wait for the process to be done. At the end of it, a short summary will be displayed.
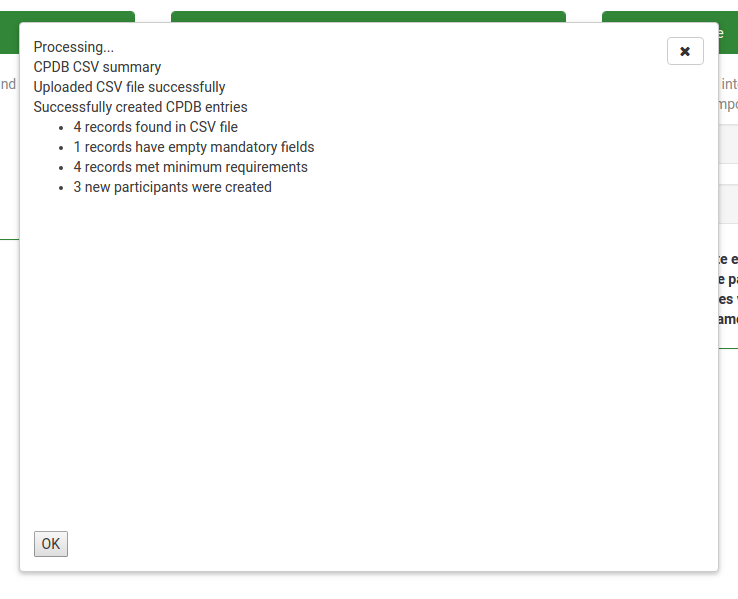
Clicking ok will redirect you to the participants screen, showing you the newly imported participants.
Export
The export function is located on the main toolbar of the Central participant database: ![]()
When exporting to CSV, you are presented with a dialog box that asks you to mark the additional attributes you want to export. There is also an option for filtering the attributes. It will display all the attributes located in the central table (visible and non-visible).
The export option works under either of the two conditions :
1) Export filtered
2) Export All
It will export all or selected participants depending on your filtering criteria.
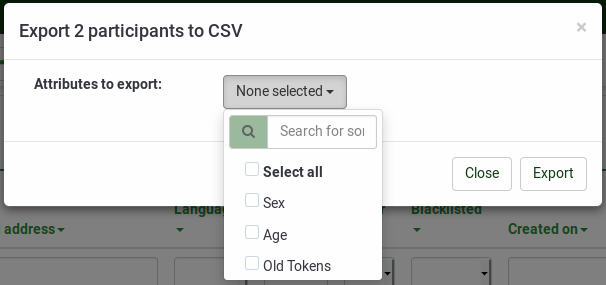
It will export the file as central_'the current time stamp'.csv.
Settings
The Settings button available on the main toolbar of the Central participant database page refers to blacklist settings: ![]() .
.
The following Yes/No options are available:
- Blacklist all current surveys for participant once the global field is set: If set to Yes, the participant cannot be added to any survey.
- Blacklist participant for any new added survey once the global field is set: If new surveys are created, the respective participant cannot be added anymore to them (if Yes is picked up). However, he can still be added to those surveys created earlier.
- Allow blacklisted participants to be added to a survey: Even if a participant is blacklisted, he can still be added to a survey.
- Hide blacklisted participants: Useful function when you would like to hide participant for a specific amount of time and then make them available for the rest of users with whom those blacklisted participants have been shared with.
- Delete globally blacklisted participants from the database: If Yes, the blacklisted participants will be deleted from the database.
- Allow participant to un-blacklist himself/herself: If Yes, a participant can un-blacklist himself without the help of a LimeSurvey user.
Attributes
To access the Attributes management panel, click on the Attributes button located on the main toolbar of CPDB main page: ![]()

The attribute management facilitates the addition of three types of attributes: text box, date, and drop-down list. To add a new attribute, click on the Add new attribute located in the upper-right part of the window:
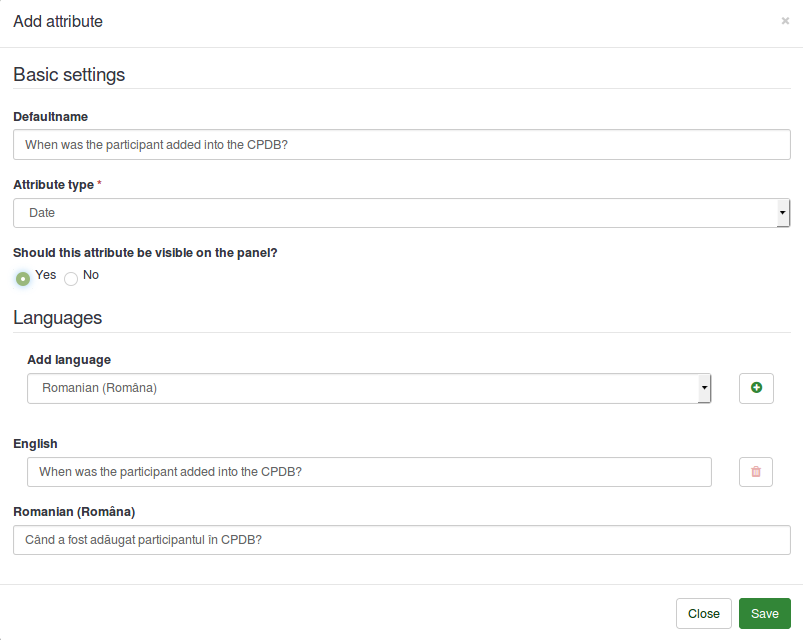
When adding a new attribute, the following options are available:
- Defaultname: It will be used by LimeSurvey to name the attribute in case no other English name is provided.
- Attribute type: You can choose either of the attribute types and the associated user interface will be presented to you while editing.
- Should this attribute be visible on the panel?: It can be Yes or No. This function determines whether the attribute is visible in the CPDB table or not. This can be later edited from the Visible column that is located in the main attributes table.
- Languages: If you would like LimeSurvey not to use the defaultname as the name of the attribute, type here the desired name. Please note that the attribute management has multilingual support. Click on the plus sign after you have selected the language. A new field will appear below the English/default language.
Once the changes are done, click on the Save button.
In the attributes table, two actions are available (see the Action column):

If you click on the first icon, a dialog box will show up. It includes the basic settings of the selected attribute that can be edited according to your needs.
To delete an attribute from the table, click on the red trash button, located next to the edit button. Clicking the delete button will not only delete the attribute, but also the associated values from the CPDB.
The share panel shows all the information related to the shared participant. Please note that this panel shows only the shared participants owned by that particular user.

This panel shows values like:
1) Last name
2) First name
3) Email address
4) Shared by
5) Owner
6) Date added
7) Can edit?
All this information is for viewing/sorting purposes. Only the Can Edit field is editable for the user. The Can edit field determines whether to allow the respective participant to be editable by the user with whom that participant was shared with or not. Just clicking on the check box will make an AJAX call and save the changes on the server.
Export all participants
under construction
Search filters
under construction
Additional information
Additional (technical) information is available in the Central participants database (User panel) Development wiki.
