Evaluations
From LimeSurvey Manual
Introduction
{BOX(title="Ce contenu n'est pas à jour")}Ce contenu n'est pas à jour, si vous souhaitez des informations concernant les évaluations, merci de visiter la page en Anglais{TRANSLATED(lang="EN")}Assessments{TRANSLATED}
In order to use LimeSurvey's assessment feature, from the Survey menu click the Assessments tab.
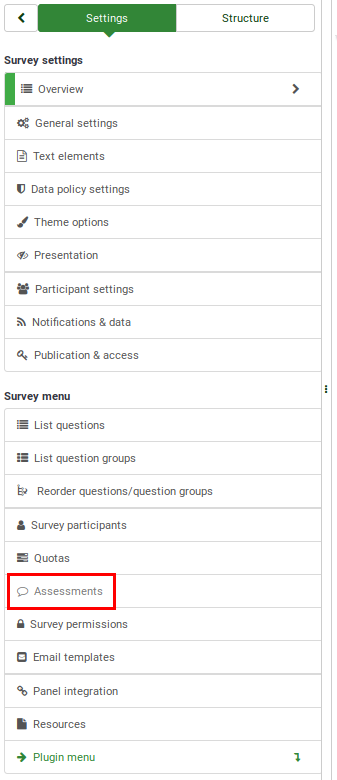
You can then activate the assessment mode.

How Do Assessments Work?
The following is an example that will hopefully help you better understand how assessment mode is designed to work.
Prenons l'exemple suivant. Vous avez deux questions dans votre questionnaire, la première question demande si l'utilisateur fume : "Fumez-vous ?". La question offre trois réponses possibles, "Oui plus de 10 cigarettes par jours" avec un code de réponse de "10", "Oui mais moins que 10 par jour", avec un code de réponse de "5" et "Non je ne fume pas du tout " avec un code de réponse de "1".
La seconde question "Faites vous de l'exercice physique" offre trois réponses possibles ; " Oui, je fais au moins une demi-heure d'exercice, trois fois par semaine" avec une valeur de "1", "Oui, je fais des exercices de temps à autre" avec une valeur de "5" et "Non, Je ne pratique jamais un quelconque exercice" avec un code réponse de "10".
Ainsi, si nous additionnons le poids, la valeur, de chaque code de réponse obtenue à la fin du questionnaire, le total nous donne un bon indicateur de l'état général de santé du répondant. Ainsi, une personne qui fume et ne pratique aucun exercice avec un score de 10 à chaque réponse obtient un score de 20 en final. A contrario, quelqu'un qui ne fume pas et pratique régulièrement un sport avec un score de "1" à chaque réponse a un score final de "2" quand nous additionnons les réponses.
LimeSurvey offre la possibilité de créer des évaluations de votre questionnaire. Les évaluations sont des règles qui évaluent , immédiatement, la réponse à une enquête aussitôt qu'elle est soumise, permettant ainsi d'afficher un texte basé sur ces réponses.
Comment l'utiliser
Assessments page:
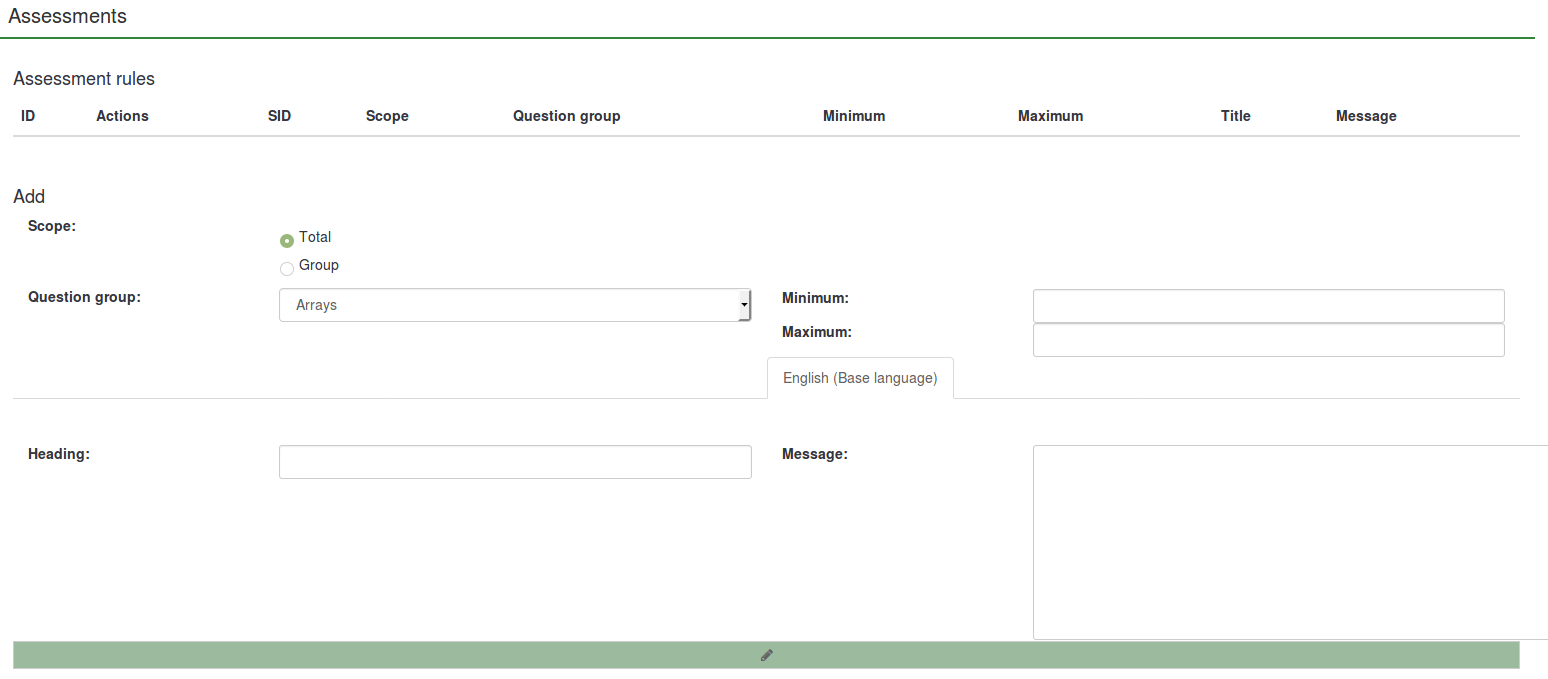
To create new assessments rules complete the fields located below the Assessment rules table. The following options are available:
Les outils d'évaluation, vous permettent de créer des règles basées sur la somme des pondérations des réponses aux questions, soit pour la totalité du questionnaire, soit pour chaque groupe de questions au sein du questionnaire.
(*) Utilisez le code "Champ" dans le tableau de réponse pour affecter une pondération à chaque réponse de votre questionnaire.
Si nous accédons aux outils d'évaluation, depuis la barre d'outil d'administration du questionnaire, nous avons la possibilité de créer des évaluations pour ce questionnaire. Depuis l'écran, nous pouvons visualiser, éditer, ou effacer des évaluations existantes ou créer de nouvelles évaluations.
Depuis la commande "Ajout / Edition" vous pouvez effectuer les choix suivants :
Etendue: L'étendue de l'évaluation. Choisissez soit "Total" qui créera une évaluation basée sur la somme de toutes les réponses du questionnaire complet, soit "Groupe" qui créera une évaluation basée sur la somme des réponses dans le groupe (Sa sélection est faite dans la ligne qui suit).
Groupe: Si l'étendue de l'évaluation est pour le groupe courant, ceci vous permet de choisir le groupe que vous voulez évaluer.
Minimum: La somme minimale nécessaire pour laquelle cette évaluation s'appliquera.
Maximum: La somme maximale jusqu'à laquelle cette évaluation s'appliquera.
Titre: L'en-tête de l'évaluation qui sera affichée quand les résultats de l'évaluation seront présentés.
Message: Le message associé à cette évaluation (Il peut contenir du code HTML).
url: Un lien URL qui sera affiché avec cette évaluation.
- Minimum: The minimum score to which this assessment will apply.
- Maximum: The maximum score of answers to which this assessment will apply;
- Heading: The heading of the assessment that will appear if the assessment is going to be displayed;
- Message: The text message of the assessment - displayed at the end of the survey to the participants. You can use placeholders such as {PERC} and/or {TOTAL} to emphasize the scores of each survey question group or the total survey score. Click the green pencil button to access the HTML-editor and enhance the final message of the assessment by adding colours, tables, images, etc.
Vous pouvez créer autant d'évaluations que vous le souhaitez, vous pouvez également afficher plus d'une évaluation pour un score donné.
Il est important de noter, que si vous utilisez les évaluations, vous devez vous assurez que vous n'avez pas choisi le chargement automatique de l'url à l'issue des réponses au questionnaire. Ceci se fait dans la configuration initiale et générale du questionnaire. En effet, les évaluations sont simplement affichées à la fin des réponses au questionnaire, lorsque l'utilisateur, les soumet au serveur.
Jusqu'à la version 1.7 il n'était pas possible de présenter le score dans le texte, tel que cela est fait à la fin du questionnaire. La seule solution est d'écrire une règle d'évaluation pour chaque score et coder en dur la réponse.
Du fait de modification dans le code source, il n'est plus possible de mettre une valeur "0" à une réponse (Mais un travail est effectué sur ce point).
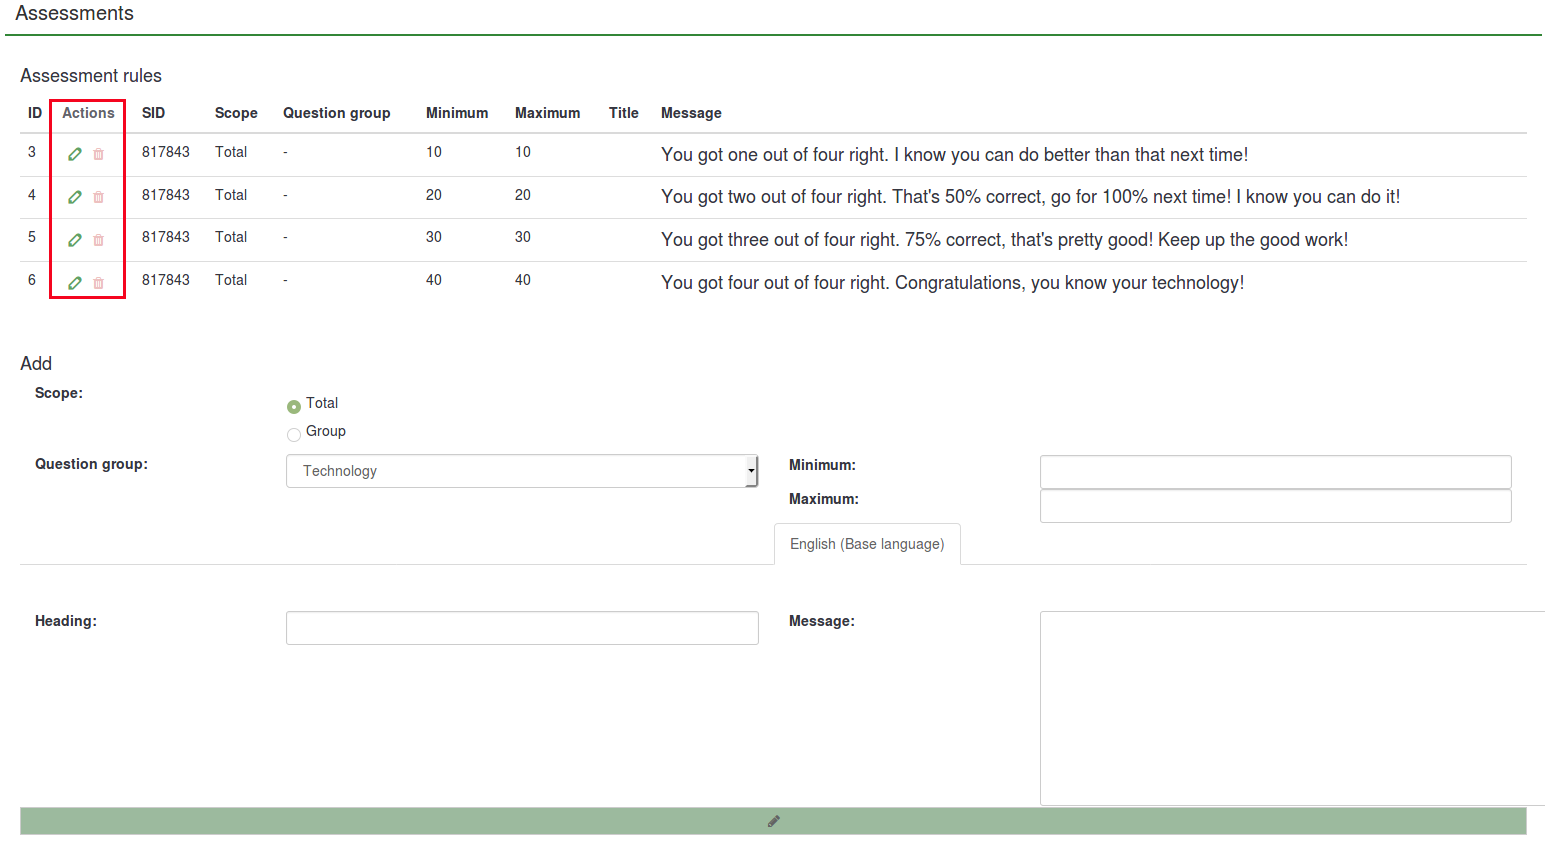
After adding some assessments, the possible assessments actions will be displayed under the Actions column in the Assessments rules table. From there, you can either edit or delete an assessment rule:
How Question types Are Evaluated
There are certain question types which can not be assessed or have to be assessed in a special way. Some of the questions cannot be used with the assessment feature. However, they can be replaced with question types that can be used with this feature. For example, a 5-point choice question can be replaced with a simple list (radio) question type.
The following question types can always be assessed:
- Array dual scale
- Array
- Array by column
- List (Dropdown)
- List (Radio)
- List with comment
- Multiple options
- Multiple options with comments
The following list contains question types that cannot be assessed:
- 5 point choice
- Array (5 point choice)
- Array (10 point choice)
- Array (Increase, Same, Decrease)
- Array (Text)
- Array (Yes/No/Uncertain)
- Array (Numbers)
- Text display
- Date
- Gender
- Huge free text
- Language switch
- Long free text
- Multiple numerical input
- Numerical input
- Ranking
- Short free text
- Yes/No
Set Assessment Values For Each Answer/Label
If enabled, the assessment mode will add an additional field between the answer code and answer option name for all the questions to be assessed.

You can also use label sets as answers options for your set of questions. Just click the Predefined label sets... button located under the answers matrix and select your predefined label set.
If you decide to use label sets, assessment values can be added to all your labels from the moment they are first created. This allows the survey administrator to quickly use predefined label sets with assessment values as answers for multiple sets of questions.

This process is less time-consuming and more practical. You can create a plan in the early stages of your survey to use only one set of label sets with predefined assessment values for multiple questions. This way, you will not have to manually add assessment values to all the answers of the questions used in your survey to be assessed.
Assessment Placeholders
When using assessments the following placeholders are available:
- {PERC}: Displays the score of a question group. It can be used only in the message field of the assessment rule!
- {TOTAL}: Displays the total score. It can be used only in the message field of the assessment rule!
- {ASSESSMENT_CURRENT_TOTAL}: This placeholder can be used within a survey to display the current total score. Keep in mind that the score is only updated when the respondent clicks the "Next" button. Therefore, it is useless in an all-in-one survey. Also, its use requires the existence of at least one assessment rule. Otherwise, the placeholder will not display any value.
If your survey is not anonymous, the following placeholders are available.
- {TOKEN:EMAIL}: Displays the email of the respondent from the survey participants table
- {TOKEN:FIRSTNAME}: Displays the first name of the respondent from the survey participants table
- {TOKEN:LASTNAME}: Displays the last name of the respondent from the survey participants table
- {TOKEN}: Displays the token code of the respondent from the survey participants table
Tips & Tricks
Save Assessment Value in Data
To save assessment value in data and have it in an export : you can create a Question_type_-_Equation and put {ASSESSMENT_CURRENT_TOTAL} in the equation setting.
Use {ASSESSMENT_CURRENT_TOTAL} Without Assessment Message
If you choose not to add an assessment message, then no assessment message is shown.
How to Disable the Assessment Mode
To deactivate assessment mode, go to the Survey menu and click the Data management tab. The Notification and data management panel will be displayed. Click the Enable assessment mode option and disabled it for the respective survey.

Examples
How To Use the Assessment Mode
Let's recreate the example presented above to better understand the steps you have to pursue in order to correctly use the assessment feature.
2) Activate the assessments. Go to the settings menu of the survey and click the Assessments tab. Once there, activate the feature:

3) Create a question group and start adding the questions. Your survey structure should look like this:
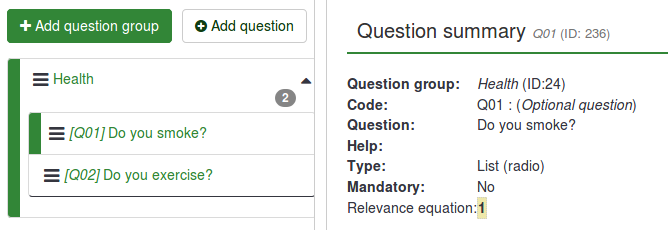
4) Add answers for each question created above. While adding/editing the answers, complete also the assessment value field for each answer:

5) Now that you know the assessment values, access the Assessments panel and start adding assessment rules. Two rules were created for this example:

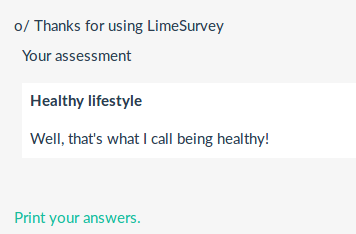
The text message of the first assessment rule (You should start exercising!) will be displayed if the respondent scores between 1 and 10 points. The text message of the second assessment rule (Well, that's what I call being healthy!) will be shown if the respondent scores between 11 and 21 points.
6) Now, preview the survey and see if the assessment mode is active. At the end of the survey, a text message will be displayed based on the score obtained by the respondent.
How To Use the Assessment Placeholders
As mentioned in the previous subsection, three assessment-related placeholders can be used: {PERC}, {TOTAL}, and {ASSESSMENT_CURRENT_TOTAL}.
In the previous example, the following result was obtained: "Well, that's what I call being healthy!". However, no score was displayed.
There are different ways to have the score displayed. You can either create 6 assessment rules to emphasize each possible score/result or use assessment placeholders. The below example explains the latter option.
As mentioned above, {PERC} and {TOTAL} can be used in the message text box of the assessment rule to emphasize the score of the current group and the total score, respectively. Let's take a look at the following two screenshots to understand their usage.
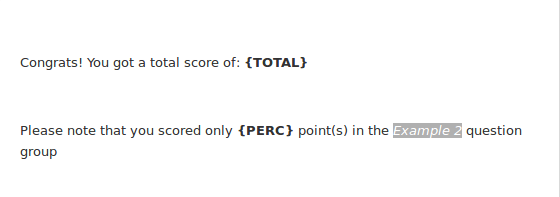
In the first screenshot, {PERC} and {TOTAL} were added into the message text box of the assessment rule.

In the second screenshot, you can see how the assessment rule looks to correctly use both placeholders. Because {PERC} is used, the scope of the assessment rule must be switched from Total to Group to correctly display the score of the question group selected from the Question group dropdown list:

After completing the survey and depending on their answers, the participants should receive the following assessment message at the end:
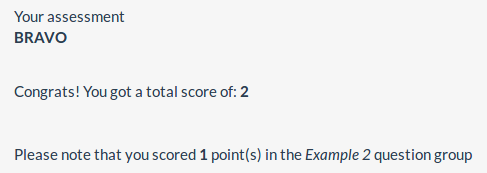
{ASSESSMENT_CURRENT_TOTAL} can be used only inside a survey. You can use it after each question or question group from a quiz. This way you could show each participant his or her current quiz/survey score. To use it, you could add, for example, at the beginning of every question or question group a message like: "You have accumulated till now {ASSESSMENT_CURRENT_TOTAL} points".
Video tutorial
To understand the basics of the LimeSurvey assessments feature, watch the following video.