Assessments: Difference between revisions
From LimeSurvey Manual
No edit summary |
m (Text replacement - "Expression Manager" to "ExpressionScript") |
||
| (44 intermediate revisions by 5 users not shown) | |||
| Line 4: | Line 4: | ||
<!--T:2--> | <!--T:2--> | ||
<div class="simplebox">[[File:help.png]] '''Hint:''' You can create more sophisticated assessments and reports using the [[ | <div class="simplebox">[[File:help.png]] '''Hint:''' You can create more sophisticated assessments and reports using the [[ExpressionScript|ExpressionScript]]. It lets you access all variable types and easily generate tailored reports at any point in the survey (not only at the end). Using the new ''Equation'' question type, LimeSurvey can automatically save your assessment calculations and/or report to the database.</div> | ||
=Introduction= | =Introduction= <!--T:32--> | ||
<!--T:4--> | <!--T:4--> | ||
LimeSurvey contains a | LimeSurvey contains a feature that allows survey administrators to create survey "assessments" for his or her respondents - even for multilingual surveys. Assessments are rules which evaluate the responses to a survey immediately after it is submitted, displaying text blocks to the survey participant (based on that evaluation). | ||
<!--T:33--> | |||
In order to use LimeSurvey's assessment feature, access the '''survey menu''' and click on the '''Assessments''' tab: | In order to use LimeSurvey's assessment feature, access the '''survey menu''' and click on the '''Assessments''' tab: | ||
<!--T:34--> | |||
<center>[[File:Assessments - location.png]]</center> | <center>[[File:Assessments - location.png]]</center> | ||
Once there, enable the assessment mode. | <!--T:35--> | ||
Once there, enable the assessment mode: | |||
<!--T:36--> | |||
<center>[[File:LS3 - enable assessments.png]]</center> | |||
<!--T:11--> | <!--T:11--> | ||
<div class="simplebox">[[File:help.png]] To be able to create and edit assessments in the older versions of LimeSurvey (e.g., 2.x), visit the survey settings and enable the assessment mode from the '''Notification & data management''' tab. Once done, additional fields where you can introduce assessment values will show up when editing answers.</div> | |||
=How do assessments work= <!--T:37--> | |||
<!--T:38--> | |||
Let's construct a simple example that can help you better understand the way in which the '''assessment mode''' is supposed to work. | |||
<!--T:6--> | <!--T:6--> | ||
Imagine you have two questions in your survey, the first question asks if the user smokes: "Do you smoke?". The question has 3 possible answers, "Yes, more than 10 per day" with a value of "10", "Yes, but less than 10 per day" with a value of "5", and "No, I don't smoke at all" with an assessment value of "1". | |||
<!--T:7--> | <!--T:7--> | ||
The second question "Do you exercise?" has three possible answers | The second question "Do you exercise?" has three possible answers: "Yes, I exercise for at least half an hour three times a week" with a value of "1", "Yes, I exercise every now and then" with a value of "5" and "No, I don't ever do any exercise" with an answer code/value of "10". | ||
<!--T:8--> | <!--T:8--> | ||
If we were to add the totals of the values for each possible answer at the end of the survey, we'd | If we were to add the totals of the values for each possible answer at the end of the survey, we'd get a good indication of the general health of the respondent. Someone who smokes and doesn't ever do any exercises will score 10 points for each answer, getting a total score of 20 when we add the two values. Someone who doesn't smoke and exercise will score 1 for each answer, obtaining, in the end, a total score of 2. | ||
<!--T:5--> | <!--T:5--> | ||
{{Box| | {{Box|A sample survey demonstrating the use of assessments is available for download. You can import this survey into your own LimeSurvey installation via the [[Surveys_-_introduction#Import_a_survey|import function]]: [[File:Limesurvey_sample_survey_Assessment.lss]].}} | ||
=Assessments= <!--T:9--> | =Assessments= <!--T:9--> | ||
<!--T:39--> | |||
Once enabled, the following page will load up: | Once enabled, the following page will load up: | ||
<center>[[File: | <!--T:40--> | ||
<center>[[File:Assessments panel 1.png]]</center> | |||
<!--T:41--> | |||
To start creating new assessments rules complete the fields located below the '''Assessment rules''' table. The following options are available: | |||
<!--T:24--> | |||
*'''Scope:''' You can choose either ''Total'' or ''Group''. The first will create an assessment based on the sum of all the submitted answers in the entire survey. The latter will create an assessment based on the sum of all the submitted answers from a question group; | |||
*'''Group:''' The dropdown list allows you to choose the question group you wish to assess. | |||
<!--T:42--> | |||
{{Box|If you selected ''Total'' before, then the '''Group''' field will not influence the assessment of the survey answers - important when the '''{PERC}''' placeholder is used.}} | |||
*'''Minimum:''' The minimum score to which this assessment will apply. | |||
*'''Maximum:''' The maximum score of answers to which this assessment will apply; | |||
<!--T:43--> | |||
{{Box|Let's take again the example presented [[Assessments#How do assessments work|above]]. If a respondent scored between 1 (minimum) and 10 (maximum), then the assessment feature would display a message telling the respondent that he or she has a good health condition. If he or she scored between 11 (minimum) and 20 (maximum), then the assessment feature would display on the last page a message related to the not-so-good health condition of the respondent.}} | |||
*'''Heading:''' The heading of the assessment which will be displayed if the assessment is going to be displayed; | |||
*'''Message:''' It represents the text message of the assessment - what is displayed at the end of the survey to the respondents. You can use the placeholders such as '''{PERC}''' and/or '''{TOTAL}''' to emphasize the scores of each survey question group or the total survey score. Click on the green pencil button to access the HTML-editor and enhance the final message of the assessment by adding colours, tables, images, and so on. | |||
<!--T:25--> | |||
You can create as many assessments as you like, and you can create more than one assessment to display for a given score. | |||
<!--T:44--> | |||
After adding some assessments, the possible assessments actions will be displayed under the '''Actions''' column in the '''Assessments rules''' table. From there, you can either edit or delete an assessment rule: | |||
<!--T:45--> | |||
<center>[[File:Assessments panel 2.png]]</center> | |||
<!--T:26--> | |||
<!--T: | <div class="simplebox">[[File:help.png]] It is important to note that if you use assessments, you must ensure that you have not enabled the '''autoload the URL''' option. If it is enabled, no end page with the text of the assessment rule will be displayed anymore and LimeSurvey will automatically load the URL field from the [[Presentation]]. You can disable it from the same tab.</div> | ||
< | |||
==How question types are evaluated== <!--T:16--> | ==How question types are evaluated== <!--T:16--> | ||
<!--T:17--> | <!--T:17--> | ||
There are certain [[question types]] which will not be assessed or will be assessed in a special way. | There are certain [[question types]] which will not be assessed or will be assessed in a special way. Some of the questions cannot be used with the assessment feature. However, they can be replaced with assessable question types. For example, a 5 point choice can always be replaced with a simple list (radio) question type. | ||
<!--T:18--> | <!--T:18--> | ||
The following question types '''can always be assessed''': | |||
*Array (Flexible labels) dual scale | *Array (Flexible labels) dual scale | ||
*Array (Flexible labels) | *Array (Flexible labels) | ||
| Line 74: | Line 113: | ||
*List (Radio) | *List (Radio) | ||
*List with comment | *List with comment | ||
*Multiple options | * Multiple options | ||
*Multiple options with comments | * Multiple options with comments | ||
<!--T:46--> | |||
<hr width="50%" style="margin:auto"> | <hr width="50%" style="margin:auto"> | ||
The following list contains question types that cannot be assessed: | <!--T:21--> | ||
The following list contains question types that '''cannot be assessed''': | |||
* 5 point choice | * 5 point choice | ||
* Array (5 point choice) | * Array (5 point choice) | ||
| Line 94: | Line 128: | ||
* Array (Multi flexible) (Text) | * Array (Multi flexible) (Text) | ||
* Array (Yes/No/Uncertain) | * Array (Yes/No/Uncertain) | ||
* | * Array (Multi Flexible) (Numbers) | ||
* Text display | |||
* Date | * Date | ||
* Gender | * Gender | ||
| Line 107: | Line 142: | ||
== | ==Set assessment values for each answer/label== <!--T:13--> | ||
<!--T:47--> | |||
If enabled, the assessment mode will add an additional field between the answer code and answer option name for all the assessable questions: | |||
<!--T:31--> | |||
<center>[[File:Assesment_value_set.png]]</center> | |||
<!--T:48--> | |||
You can also use label sets as answers for your set of questions. Just click on the '''Predefined label sets...''' button located under the answers matrix and select your predefined label set. | |||
<!--T:49--> | |||
If you decide to use label sets, assessment values can be added to all your labels from the moment in which they are first created. This allows the survey administrator to quickly use few assessed predefined label sets as answers for multiple sets of questions. | |||
<!--T:50--> | |||
<center>[[File:Labels table.png]]</center> | |||
<!--T: | <!--T:51--> | ||
This process is less time-consuming and more practical. You can create a plan in the early stages of your survey in order to use only one set of label sets with predefined assessment values for multiple questions. In this way, you will not have to manually add assessment values to all the answers of the assessable questions used in your survey. | |||
<!--T: | <!--T:52--> | ||
{{Note|To find out more about the label sets and their usage, read the following [[Label sets|wiki section]].}} | |||
==Assessment placeholders== <!--T:27--> | ==Assessment placeholders== <!--T:27--> | ||
<!--T:28--> | <!--T:28--> | ||
When using assessments the following placeholders are available: | When using assessments the following placeholders are available: | ||
* {PERC}: | * '''{PERC}''': It displays the scoreof a question group. '''It can be used only in the message field of the assessment rule!''' | ||
* {TOTAL}: | * '''{TOTAL}''': It displays the total score. '''It can be used only in the message field of the assessment rule!''' | ||
* {ASSESSMENT_CURRENT_TOTAL}: This placeholder can be used within a survey to display the current total score. Keep in mind that the score is only updated when | * '''{ASSESSMENT_CURRENT_TOTAL}''': This placeholder can be used within a survey to display the current total score. Keep in mind that the score is only updated when the respondent clicks on the "Next" button. Therefore, it is useless in an ''all-in-one'' survey. Also, its use requires the existence of at least one assessment rule. Otherwise, the placeholder will not display any value. | ||
<!--T:92--> | |||
If your survey is '''not''' anonymous, the following placeholders are available. | |||
* '''{TOKEN:EMAIL}''': It displays the email of the respondent from the survey participants table | |||
* '''{TOKEN:FIRSTNAME}''': It displays the first name of the respondent from the survey participants table | |||
* '''{TOKEN:LASTNAME}''': It displays the last name of the respondent from the survey participants table | |||
* '''{TOKEN}''': It displays the token code of the respondent from the survey participants table | |||
=Tips & tricks= <!--T:29--> | =Tips & tricks= <!--T:29--> | ||
=Examples= | |||
<!--T:53--> | |||
* If you only want to use the '''{ASSESSMENT_CURRENT_TOTAL}''' placeholder within a survey without showing an assessment message at the end of the survey: | |||
#Access the [[Text elements|Survey text elements]] panel and type in a URL field and | |||
#Enable the autoload URL located in the [[Presentation]] panel. | |||
=How to disable the assessment mode= <!--T:54--> | |||
<!--T:55--> | |||
To deactivate it, go to the '''survey menu''' and look for the '''Data management''' tab. Click on it and the '''Notification and data management panel''' will be displayed. Look for the '''Enable assessment mode''' option and click on it to have it disabled for the respective survey. | |||
<!--T:56--> | |||
<center>[[File:Disable assessment mode - picture.png]]</center> | |||
=Examples= <!--T:57--> | |||
==How to use the assessment mode== <!--T:58--> | |||
<!--T:59--> | |||
Let's recreate the [[Assessments#How do assessments work|example presented above]] in order to better understand the steps you have to pursue in order to correctly use the assessment feature. | |||
<!--T:60--> | |||
{{Note|If you are unsure how to create a survey, use the following [[Quick start guide - LimeSurvey 2.50+#Create a survey|quick start guide.]]}} | |||
<!--T:61--> | |||
1) [[Surveys_-_introduction#Create_a_new_survey|Create the survey]] | |||
<!--T:62--> | |||
2) [[Assessments#Introduction|Activate the assessments]]. Go to the settings menu of the survey and click on the '''Assessments''' tab. Once there, activate the feature: | |||
<!--T:63--> | |||
<center>[[File:LS3 - enable assessments.png]]</center> | |||
<!--T:64--> | |||
3) [[Question_groups_-_introduction|Create a question group]] and [[Questions - introduction|start adding the questions]]. Your survey structure should look like this: | |||
<!--T:65--> | |||
<center>[[File:Example assessment - question group.png]]</center> | |||
<!--T:66--> | |||
{{Alert|title=Attention|text=Do not forget to check the whether the questions are assessable or not! Otherwise, no assessment value field will be displayed in the edit answer options panel.}} | |||
<!--T:67--> | |||
4) [[Adding_answers_or_subquestions|Add answers]] for each question created above. While adding/editing the answers, complete also the assessment value field for each answer: | |||
<!--T:68--> | |||
<center>[[File:Example assessment - edit answers.png]]</center> | |||
<!--T:69--> | |||
5) Now that you know the assessment values, access the '''Assessments''' panel and start [[Assessments#Assessments|adding assessment rules]]. Two rules were created for this example: | |||
<!--T:70--> | |||
<center>[[File:Assessments_example_-_assessment_rules.png]]</center> | |||
<!--T:71--> | |||
The text message of the first assessment rule (''You should start exercising!'') will be displayed if the respondent scores between 1 and 10 points. The text message of the second assessment rule (''Well, that's what I call being healthy!'') will be shown if the respondent scores between 11 and 21 points. | |||
<!--T:72--> | |||
6) Now, preview the survey and see if the assessment mode is active. At the end of the survey, a text message will be displayed based on the score obtained by the respondent. | |||
<!--T:73--> | |||
<div class="simplebox">[[File:help.png]] '''Note:''' The score is not displayed in this example! If you would like to have it displayed in your assessment, create more assessment rules (for each possible scenario) or use assessment placeholders.</div> | |||
<!--T:74--> | |||
<center>[[File:Assessment results.png]]</center> | |||
==How to use the assessment placeholders== <!--T:75--> | |||
<!--T:76--> | |||
As mentioned in [[Assessments#Assessment placeholders|the previous subsection]], three assessment-related placeholders can be used: '''{PERC}''', '''{TOTAL}''', and '''{ASSESSMENT_CURRENT_TOTAL}'''. | |||
<!--T:77--> | |||
In the previous example, the following result was obtained: ''"Well, that's what I call being healthy!"''. However, no score was displayed. | |||
<!--T:78--> | |||
There are many ways through which you can have it displayed. You can either create 6 assessment rules in order to emphasize each possible score/result or use assessment placeholders. The below example explains the latter option. | |||
<!--T:79--> | |||
[[Assessments#Assessment placeholders|As mentioned above]], '''{PERC}''' and '''{TOTAL}''' can be used in the message text box of the assessment rule in order to emphasize the score of the current group and the total score, respectively. Let's take a look at the following two screenshots to understand their usage. | |||
<!--T:80--> | |||
<center>[[File:Example perc - assessments - part 1.png]]</center> | |||
<!--T:81--> | |||
In the first screenshot, {PERC} and {TOTAL} were added into the message text box of the assessment rule. | |||
<!--T:82--> | |||
<center>[[File:Example perc - assessments - part 2.png]]</center> | |||
<!--T:83--> | |||
In the second screenshot, you can see how the assessment rule looks like in order to correctly use both placeholders. Because '''{PERC}''' is used, the '''scope''' of the assessment rule must be switched from ''Total'' to ''Group'' in order to correctly display the score of the question group selected from the '''Question group''' dropdown list: | |||
<!--T:84--> | |||
<center>[[File:Example assessment - right question group.png]]</center> | |||
<!--T:85--> | |||
After completing the survey and depending on their answers, the respondents should get the following assessment message at the end: | |||
<!--T:86--> | |||
<center>[[File:Assessment results - perc and total.png]]</center> | |||
<!--T:87--> | |||
<hr width="50%" style="margin:auto"> | |||
<!--T:88--> | |||
'''{ASSESSMENT_CURRENT_TOTAL}''' can be used only inside a survey. You can use it after each question or question group from a quiz. You could show in this way to each respondent his or her current quiz/survey score. To use it, you could add for example at the beginning of every question or question group a message like: "You have accumulated till now '''{ASSESSMENT_CURRENT_TOTAL}''' points". | |||
<!--T:89--> | |||
<div class="simplebox">[[File:help.png]] '''Hint:''' Check the [https://www.youtube.com/watch?v=s5OOzDoPjIU following YouTube video] to see in which other situations you can use placeholders.</div> | |||
=Video tutorial= <!--T:90--> | |||
<!--T:91--> | |||
To understand the basics of the LimeSurvey assessments feature, check the following [https://www.youtube.com/watch?v=aeb93vAe7R4 video]. | |||
</translate> | </translate> | ||
Revision as of 15:45, 11 February 2020
Introduction
LimeSurvey contains a feature that allows survey administrators to create survey "assessments" for his or her respondents - even for multilingual surveys. Assessments are rules which evaluate the responses to a survey immediately after it is submitted, displaying text blocks to the survey participant (based on that evaluation).
In order to use LimeSurvey's assessment feature, access the survey menu and click on the Assessments tab:
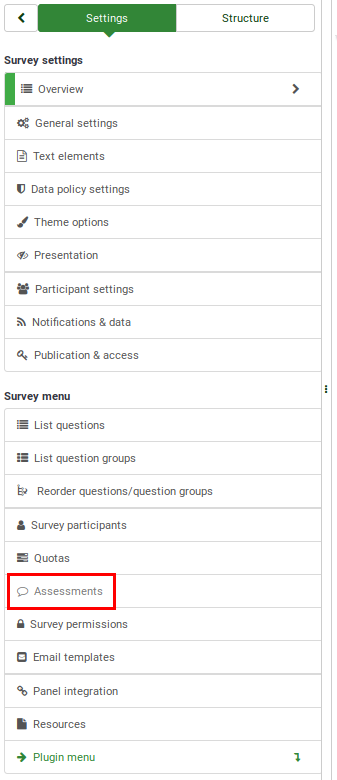
Once there, enable the assessment mode:

How do assessments work
Let's construct a simple example that can help you better understand the way in which the assessment mode is supposed to work.
Imagine you have two questions in your survey, the first question asks if the user smokes: "Do you smoke?". The question has 3 possible answers, "Yes, more than 10 per day" with a value of "10", "Yes, but less than 10 per day" with a value of "5", and "No, I don't smoke at all" with an assessment value of "1".
The second question "Do you exercise?" has three possible answers: "Yes, I exercise for at least half an hour three times a week" with a value of "1", "Yes, I exercise every now and then" with a value of "5" and "No, I don't ever do any exercise" with an answer code/value of "10".
If we were to add the totals of the values for each possible answer at the end of the survey, we'd get a good indication of the general health of the respondent. Someone who smokes and doesn't ever do any exercises will score 10 points for each answer, getting a total score of 20 when we add the two values. Someone who doesn't smoke and exercise will score 1 for each answer, obtaining, in the end, a total score of 2.
Assessments
Once enabled, the following page will load up:
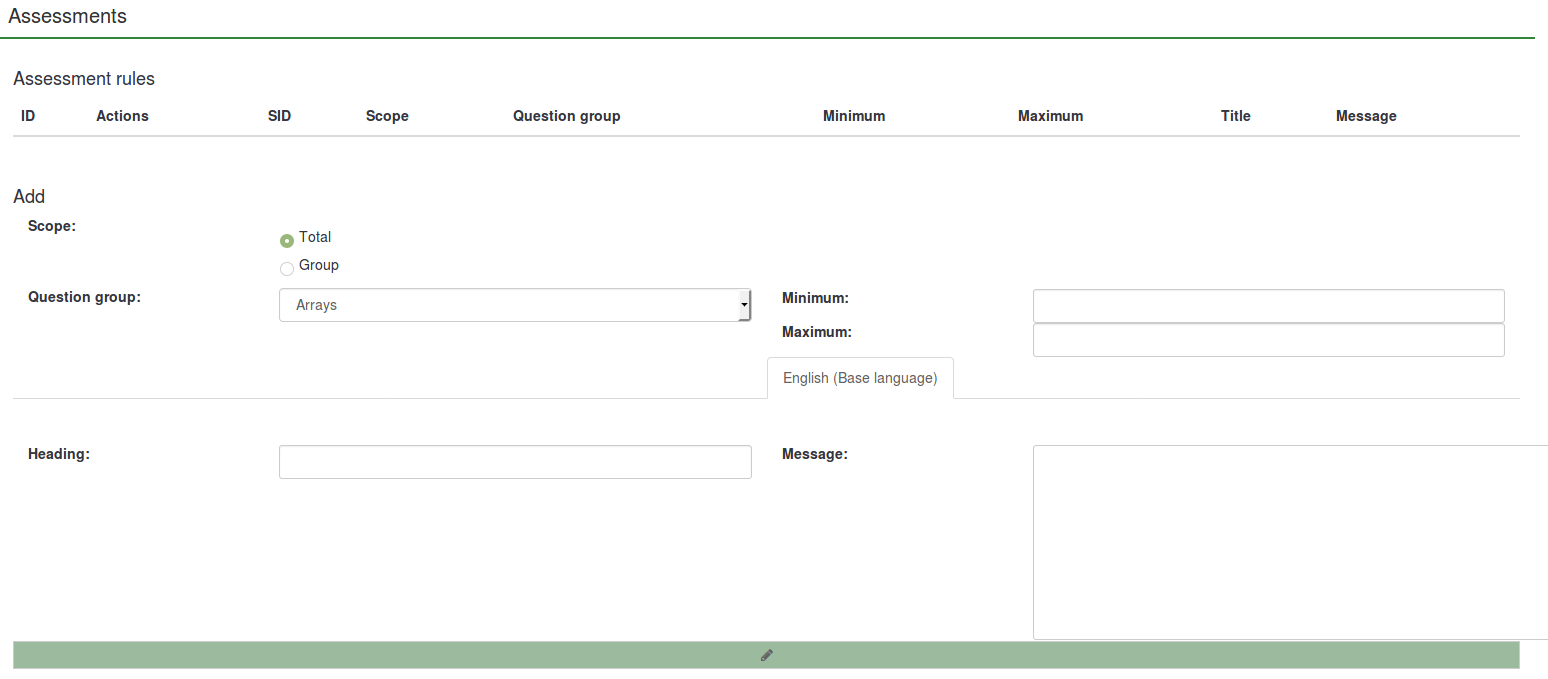
To start creating new assessments rules complete the fields located below the Assessment rules table. The following options are available:
- Scope: You can choose either Total or Group. The first will create an assessment based on the sum of all the submitted answers in the entire survey. The latter will create an assessment based on the sum of all the submitted answers from a question group;
- Group: The dropdown list allows you to choose the question group you wish to assess.
- Minimum: The minimum score to which this assessment will apply.
- Maximum: The maximum score of answers to which this assessment will apply;
- Heading: The heading of the assessment which will be displayed if the assessment is going to be displayed;
- Message: It represents the text message of the assessment - what is displayed at the end of the survey to the respondents. You can use the placeholders such as {PERC} and/or {TOTAL} to emphasize the scores of each survey question group or the total survey score. Click on the green pencil button to access the HTML-editor and enhance the final message of the assessment by adding colours, tables, images, and so on.
You can create as many assessments as you like, and you can create more than one assessment to display for a given score.
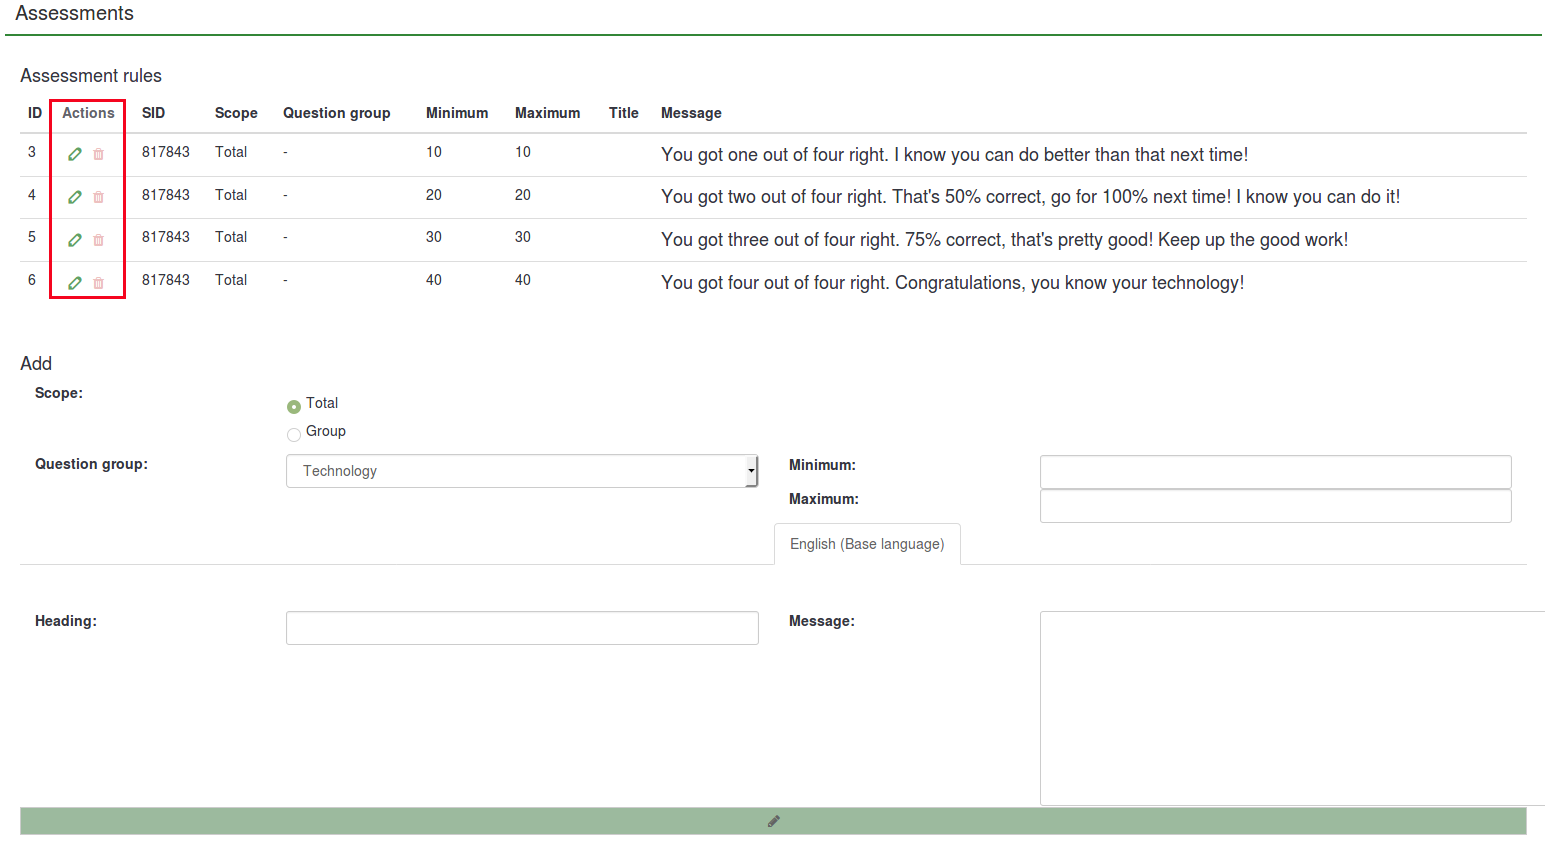
After adding some assessments, the possible assessments actions will be displayed under the Actions column in the Assessments rules table. From there, you can either edit or delete an assessment rule:
How question types are evaluated
There are certain question types which will not be assessed or will be assessed in a special way. Some of the questions cannot be used with the assessment feature. However, they can be replaced with assessable question types. For example, a 5 point choice can always be replaced with a simple list (radio) question type.
The following question types can always be assessed:
- Array (Flexible labels) dual scale
- Array (Flexible labels)
- Array (Flexible labels) by column
- List (Flexible labels) (Dropdown)
- List (Flexible labels) (Radio)
- List (Dropdown)
- List (Radio)
- List with comment
- Multiple options
- Multiple options with comments
The following list contains question types that cannot be assessed:
- 5 point choice
- Array (5 point choice)
- Array (10 point choice)
- Array (Increase, Same, Decrease)
- Array (Multi flexible) (Text)
- Array (Yes/No/Uncertain)
- Array (Multi Flexible) (Numbers)
- Text display
- Date
- Gender
- Huge free text
- Language switch
- Long free text
- Multiple numerical input
- Numerical input
- Ranking
- Short free text
- Yes/No
Set assessment values for each answer/label
If enabled, the assessment mode will add an additional field between the answer code and answer option name for all the assessable questions:

You can also use label sets as answers for your set of questions. Just click on the Predefined label sets... button located under the answers matrix and select your predefined label set.
If you decide to use label sets, assessment values can be added to all your labels from the moment in which they are first created. This allows the survey administrator to quickly use few assessed predefined label sets as answers for multiple sets of questions.

This process is less time-consuming and more practical. You can create a plan in the early stages of your survey in order to use only one set of label sets with predefined assessment values for multiple questions. In this way, you will not have to manually add assessment values to all the answers of the assessable questions used in your survey.
Assessment placeholders
When using assessments the following placeholders are available:
- {PERC}: It displays the scoreof a question group. It can be used only in the message field of the assessment rule!
- {TOTAL}: It displays the total score. It can be used only in the message field of the assessment rule!
- {ASSESSMENT_CURRENT_TOTAL}: This placeholder can be used within a survey to display the current total score. Keep in mind that the score is only updated when the respondent clicks on the "Next" button. Therefore, it is useless in an all-in-one survey. Also, its use requires the existence of at least one assessment rule. Otherwise, the placeholder will not display any value.
If your survey is not anonymous, the following placeholders are available.
- {TOKEN:EMAIL}: It displays the email of the respondent from the survey participants table
- {TOKEN:FIRSTNAME}: It displays the first name of the respondent from the survey participants table
- {TOKEN:LASTNAME}: It displays the last name of the respondent from the survey participants table
- {TOKEN}: It displays the token code of the respondent from the survey participants table
Tips & tricks
- If you only want to use the {ASSESSMENT_CURRENT_TOTAL} placeholder within a survey without showing an assessment message at the end of the survey:
- Access the Survey text elements panel and type in a URL field and
- Enable the autoload URL located in the Presentation panel.
How to disable the assessment mode
To deactivate it, go to the survey menu and look for the Data management tab. Click on it and the Notification and data management panel will be displayed. Look for the Enable assessment mode option and click on it to have it disabled for the respective survey.

Examples
How to use the assessment mode
Let's recreate the example presented above in order to better understand the steps you have to pursue in order to correctly use the assessment feature.
2) Activate the assessments. Go to the settings menu of the survey and click on the Assessments tab. Once there, activate the feature:

3) Create a question group and start adding the questions. Your survey structure should look like this:
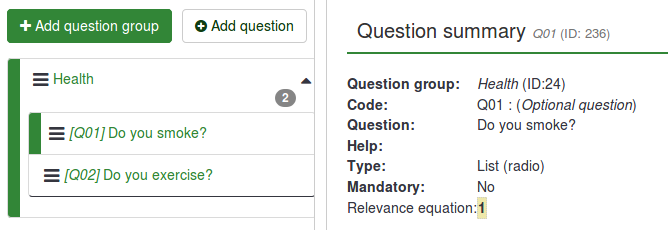
4) Add answers for each question created above. While adding/editing the answers, complete also the assessment value field for each answer:

5) Now that you know the assessment values, access the Assessments panel and start adding assessment rules. Two rules were created for this example:

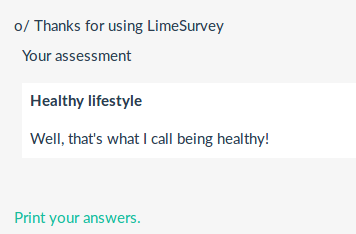
The text message of the first assessment rule (You should start exercising!) will be displayed if the respondent scores between 1 and 10 points. The text message of the second assessment rule (Well, that's what I call being healthy!) will be shown if the respondent scores between 11 and 21 points.
6) Now, preview the survey and see if the assessment mode is active. At the end of the survey, a text message will be displayed based on the score obtained by the respondent.
How to use the assessment placeholders
As mentioned in the previous subsection, three assessment-related placeholders can be used: {PERC}, {TOTAL}, and {ASSESSMENT_CURRENT_TOTAL}.
In the previous example, the following result was obtained: "Well, that's what I call being healthy!". However, no score was displayed.
There are many ways through which you can have it displayed. You can either create 6 assessment rules in order to emphasize each possible score/result or use assessment placeholders. The below example explains the latter option.
As mentioned above, {PERC} and {TOTAL} can be used in the message text box of the assessment rule in order to emphasize the score of the current group and the total score, respectively. Let's take a look at the following two screenshots to understand their usage.
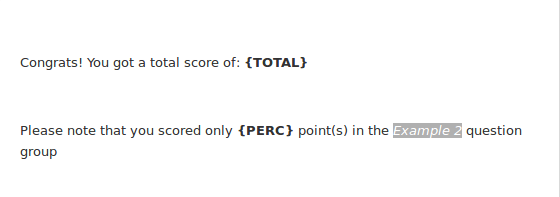
In the first screenshot, {PERC} and {TOTAL} were added into the message text box of the assessment rule.

In the second screenshot, you can see how the assessment rule looks like in order to correctly use both placeholders. Because {PERC} is used, the scope of the assessment rule must be switched from Total to Group in order to correctly display the score of the question group selected from the Question group dropdown list:

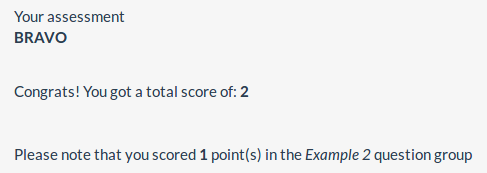
After completing the survey and depending on their answers, the respondents should get the following assessment message at the end:
{ASSESSMENT_CURRENT_TOTAL} can be used only inside a survey. You can use it after each question or question group from a quiz. You could show in this way to each respondent his or her current quiz/survey score. To use it, you could add for example at the beginning of every question or question group a message like: "You have accumulated till now {ASSESSMENT_CURRENT_TOTAL} points".
Video tutorial
To understand the basics of the LimeSurvey assessments feature, check the following video.