Ajouter des réponses
From LimeSurvey Manual
General
De nombreux types de questions nécessitent de définir une liste de "réponses" possibles parmi lesquelles le participant devra faire son choix ou qui serviront à fabriquer des entêtes de colonnes pour les réponses. Pour ajouter des réponses aux questions de ce type cliquez sur l'icône "Editer/Ajouter des réponses pour cette question" (![]() ) présent dans la barre d'outil des questions.
) présent dans la barre d'outil des questions.
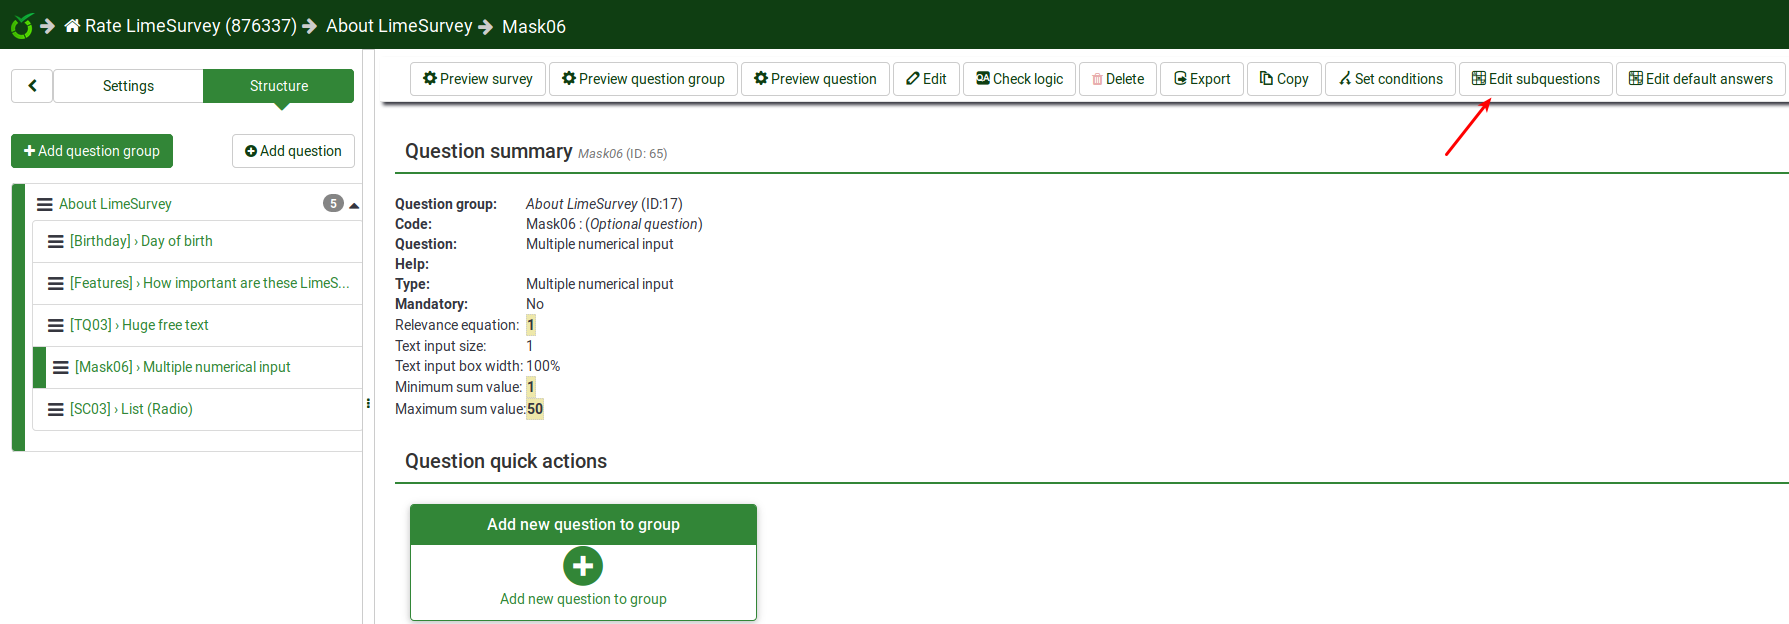
To start adding answers and subquestions, click on the question you wish to edit and look for the edit answer (or subquestion) button:

Quand vous ajoutez des réponses, vous devrez fournir un code et un libellé pour chaque réponse et dire si une des réponses de votre liste est celle par défaut ou non.
- Code : C'est l'information qui sera généralement exportée dans le fichier tableur des résultats de votre questionnaire. Vous pouvez choisir le code que vous voulez (5 caractères au maximum). Le code ne doit contenir que des caractères alphanumériques standards.
- Réponse : La réponse qui sera affichée. Depuis la version 1.49RC, une nouvelle fonctionnalité permet de créer des réponses qui seront affichées à droite et à gauche d'une colonne (cela ne fonctionne qu'avec les questions de type "Ligne de boutons radio avec étiquettes personnalisées"). Pour cela, il faut utiliser la barre oblique "|" (pipe en anglais) pour partager la réponse. Par exemple, si vous voulez avoir "Bon" à gauche et "Mauvais" à droite d'une colonne, indiquez "Bon|Mauvais" dans ce champ.
- Trier : Cela détermine l'ordre de présentation des différentes réponses possibles. Vous pouvez utiliser les boutons "Haut" et "Bas" pour modifier l'emplacement d'une réponse dans la liste.
- Défaut : pour mettre cette réponse comme choix par défaut. C'est cette réponse qui sera enregistrée tant que le participant ne fera pas d'autre choix. Quand vous cliquez sur le bouton "Défaut", ce terme apparaît en rouge juste à gauche du code de la réponse et permet de voir si il y a une réponse par défaut pour cette question. Pour ne plus avoir de réponse par défaut, cliquez de nouveau sur le bouton "Défaut" sur la ligne correpondante. L'inscription en rouge disparaît.
- Position: Click the "three-lines" symbol and drag it up and down to reorder the fields.
- Code: This is the data that will usually be exported to your spreadsheet when compiling results. You may choose whatever code you want (5 character maximum). The code can only contain standard alpha-numeric characters and has to be unique among the answer options for this question.
- Assessment value: Only for answers This field will only show if the assessments mode is activated in the survey settings. It can be set to a positive or negative integer value. For more information, please check out the assessments wiki section.
- Text answer/subquestion: The answer/subquestion text that will be displayed to your survey respondents.
- HTML Editor: Click on the green pencil button to increase the complexity of your answer/subquestion text (e.g., you can add images, videos, and so on).
- Relevance equation: Only for subquestion (Y-axis) This field allow you to set a relevance using ExpressionScript
- Actions: Two actions are available:
- Add new field: Click on the green "plus" button to introduce a new answer/subquestion;
- Delete this field: Click on the red "trash" button to delete the respective field.
Specific for Answers
If the assessment mode is enabled, you can - for certain question types - also enter an assessment value for each answer.

Specific for subquestions
The relevance equation is available only for the subquestions located on the X axis . It is the default axis if there is only one list of subquestions (except array by columns):

Hints & Tips
- You can adjust the layout as well as include pictures or other media elements in your individual answers. This is possible by clicking on the pencil icon at the end of the answer text-box and using the WYSIWYG editor to create, edit or design your answer layout as well as upload images and media.
- There is a special feature to create an answer that is showing up left and right of an array row (this works only with the question type Array). This can be done by using a pipe char '|' to part the answer. For example, if you want to have 'Good' and 'Evil' on the left and right side of the row, just write 'Good|Evil' into this field. This is essentially useful if you want to create a Semantic Differential Question.
- Relevance: You can enter relevance equations for each subquestion (available for question types using subquestions such as multiple choice or array questions). In this way, you can conditionally show/hide certain items of your question. The default value of "1" means that the item is always shown.

- You can import/export label sets, too. For example, if you have a list of countries and you want to use them as answers in a dropdown list, you can use the export/import functionalities to get the existing data into your LimeSurvey installation.