Database centrale dei partecipanti
From LimeSurvey Manual
Introduzione
Per accedere a questa funzione: Configurazione -> Database centrale dei partecipanti:
Questa funzione consente all'amministratore di memorizzare le informazioni sui partecipanti in una tabella centrale indipendente da qualsiasi tabella dei partecipanti al sondaggio. I suoi principali vantaggi sono:
- Il tavolo centrale funge da backup. Se un utente crea un nuovo sondaggio, non dovrà esportare i suoi partecipanti in un file CSV e quindi reimportarli in un nuovo sondaggio.
- Gli utenti devono solo aggiungere i partecipanti al tavolo centrale. Quindi, gli stessi partecipanti possono essere aggiunti a tutti i sondaggi desiderati dall'utente.
- Nel caso in cui più utenti abbiano accesso a un'installazione di LimeSurvey, i suoi proprietari possono scegliere di condividere i loro partecipanti con altri utenti e anche impostare l'accesso diritti per gli utenti condivisi.
Potresti anche trovare nella tua installazione di LimeSurvey un controllo degli attributi avanzato e molte altre funzionalità.
Gli strumenti di gestione del panel dei partecipanti
Sono disponibili le seguenti opzioni:
- Visualizza partecipanti CPDB (database centrale dei partecipanti)
- Info
- [[Database centrale dei partecipanti#Importa|Importa] ]
- Impostazioni blacklist
- Attributi
- Pannello di condivisione
- Esporta tutti i partecipanti
Visualizza partecipanti CPDB
Questo è il componente principale di questo pannello. Da qui è possibile accedere alla maggior parte delle opzioni, come l'aggiunta, l'eliminazione, l'esportazione, l'aggiunta di partecipanti ai sondaggi, ecc.
Nella colonna Azione sono disponibili cinque opzioni per ogni partecipante elencato nella tabella:

- Modifica questo partecipante
- Elimina questo partecipante
- [[Database centrale dei partecipanti#Condividi partecipante|Condividi questo partecipante] ]
- Elenca sondaggi attivi
- Aggiungi partecipante al sondaggio
Aggiungi partecipante
Fai clic sul pulsante Aggiungi nuovo partecipante situato nella parte in alto a destra della finestra: ![]() .
.
Apparirà quindi una finestra di dialogo con i seguenti attributi di base:
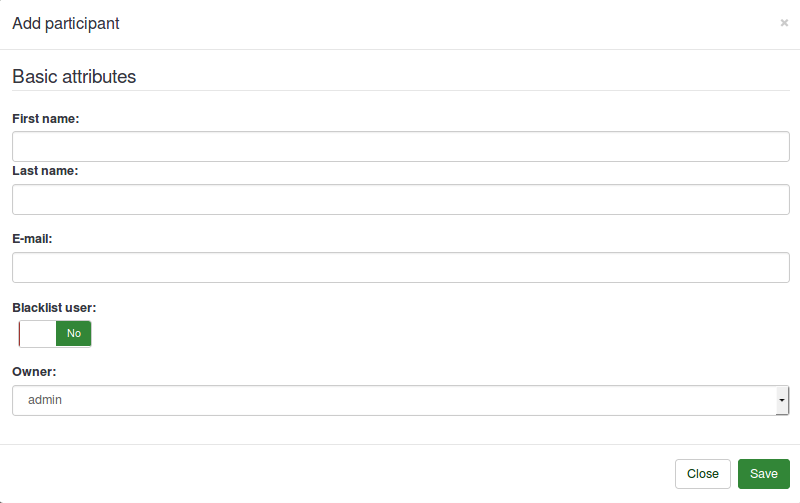
- Nome
- Cognome
- Utente Blacklist
- Proprietario: qualsiasi utente di LimeSurvey definito nella pagina di gestione del controllo utente può essere un proprietario.
Modifica partecipante
Per modificare gli attributi di base e/o personalizzati di un partecipante, fai clic sul primo pulsante (da sinistra a destra) che si trova nella colonna Azione (File:Modifica partecipante CPDB.png). Verrà visualizzata una finestra con tutti gli attributi disponibili.
Elimina partecipante
Puoi eliminare facilmente uno o più partecipanti:
- Se desideri eliminare un partecipante, vai alla riga in cui si trova il rispettivo partecipante e fai clic sul pulsante rosso del cestino: File:Delete partecipante CPDB.png.
- Se si desidera eliminare due o più partecipanti, fare clic sul pulsante Partecipanti selezionati... (sotto l'ultima riga, sotto la colonna Azione) dopo aver selezionato le voci corrispondenti: File:Seleziona partecipanti CPDB.png. Quindi, fai clic sull'opzione di eliminazione.
Quando si eliminano i partecipanti, sono disponibili tre opzioni:

1) Elimina solo dal pannello centrale: La prima opzione elimina il partecipante solo dal database centrale dei partecipanti. Se il partecipante si trova in una qualsiasi tabella dei partecipanti al sondaggio, non verrà rimosso.
2) Elimina dal pannello centrale e dai sondaggi associati: La seconda opzione elimina il partecipante dal pannello centrale e dai sondaggi a cui è stato aggiunto, ma le sue risposte non vengono cancellate.
3) Cancella dal pannello centrale, i sondaggi associati e tutte le risposte associate: La terza opzione cancella dal sistema tutte le tracce di quel partecipante, comprese le sue risposte.
Condividi partecipante
Questa è un'altra caratteristica importante del Database centrale dei partecipanti'. Puoi condividere i tuoi partecipanti con altri utenti. Devi solo selezionare i partecipanti che desideri condividere e fare clic sull'icona verde con la freccia a destra (File:Share partecipa CPDB.png) o su Partecipanti selezionati...' situato nella parte in basso a sinistra del tavolo dei partecipanti. Si aprirà una finestra modale che ti permetterà di selezionare l'utente con il quale vuoi condividere il/i rispettivo/i partecipante/i. Puoi anche impostare se l'utente che condivide il tuo partecipante può modificare tali partecipanti. Se lo imposti su No, riceveranno un errore di accesso negato quando tenteranno di modificare le voci del partecipante condiviso.

Elenca sondaggi attivi
Se fai clic sull'icona successiva (File:Elenco sondaggi attivi CPDB.png), verranno elencati tutti i sondaggi attivi a cui è stato aggiunto il rispettivo partecipante.
Aggiungi partecipante al sondaggio
L'aggiunta di un partecipante a un sondaggio può essere effettuata facendo clic sull'ultima icona (![]() ) dalla colonna Azione. Se desideri aggiungere più di un partecipante a un sondaggio, contrassegnali e seleziona l'opzione Condividi dalla finestra di dialogo Partecipanti selezionati... (situata in basso- parte sinistra del tavolo centrale).
) dalla colonna Azione. Se desideri aggiungere più di un partecipante a un sondaggio, contrassegnali e seleziona l'opzione Condividi dalla finestra di dialogo Partecipanti selezionati... (situata in basso- parte sinistra del tavolo centrale).

Il titolo della finestra di dialogo ti mostrerà il numero di partecipanti che verranno aggiunti al rispettivo sondaggio. Oltre a ciò, c'è anche una casella di controllo che, se selezionata, ti porterà alla tabella dei partecipanti al sondaggio del sondaggio a cui stai aggiungendo i partecipanti.
Dopo aver fatto clic su "Avanti", verrai indirizzato alla pagina della mappa degli attributi.
La pagina della mappa degli attributi contiene quattro tabelle e utilizza una funzionalità avanzata di trascinamento della selezione:
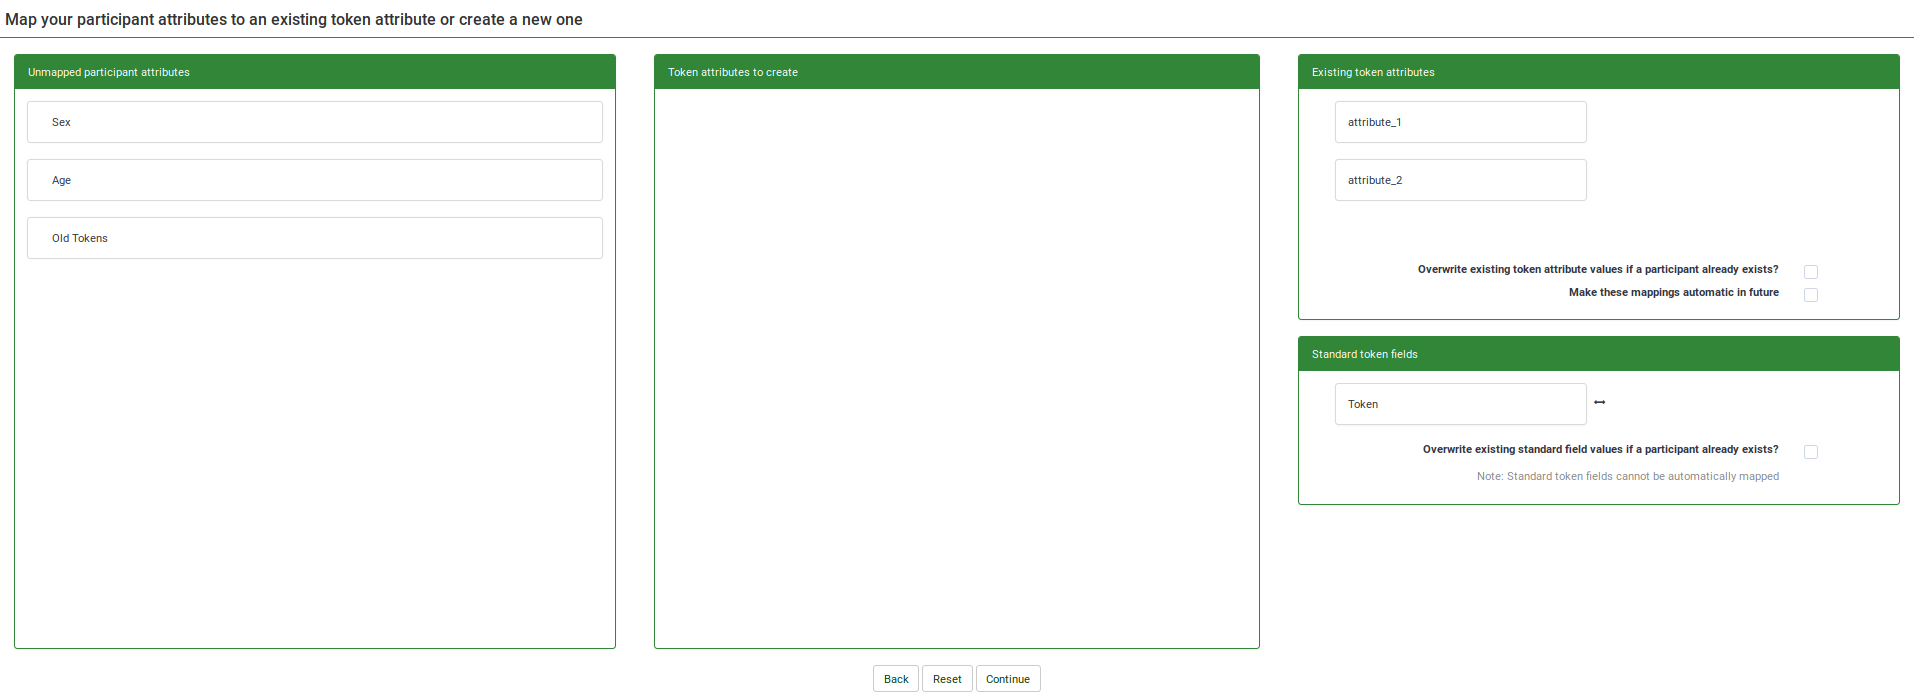
- La prima tabella, Attributi partecipanti non mappati, mostra tutti gli attributi presenti nel database centrale dei partecipanti. Al momento non sono mappati, non sono presenti nella tabella dei partecipanti al sondaggio. Questi attributi non mappati possono essere spostati nella tabella Attributi token da creare che crea nuovi attributi nella tabella dei partecipanti al sondaggio oppure possono essere uniti agli attributi token esistenti trascinando gli attributi non mappati nella tabella Attributi token esistenti ' table, oltre all'attributo token esistente con cui desideri essere unito.
- La seconda tabella, Attributi token da creare, ti aiuta a copiare gli attributi dei partecipanti non mappati nella tabella dei partecipanti al sondaggio, creando nuove colonne. Trascina gli attributi che desideri aggiungere alla tabella dei partecipanti al sondaggio e rilasciali nella seconda tabella. In questo modo verranno aggiunte nuove colonne/attributi alla tabella dei partecipanti al sondaggio.
- La terza tabella, Attributi token esistenti, mostra gli attributi attuali esistenti nella tabella dei partecipanti al sondaggio. Trascina qui gli attributi non mappati se desideri copiare i dati dagli attributi non mappati in uno degli attributi token esistenti (vedi screenshot sotto)
- La quarta tabella, Campi token standard, mostra i campi token standard che possono essere uniti con gli attributi dei partecipanti non mappati. L'unico campo token standard di una tabella dei partecipanti al sondaggio che può essere modificato è Token. Questo è importante quando desideri, ad esempio, copiare facilmente i codici dei token su diverse installazioni di LimeSurvey.
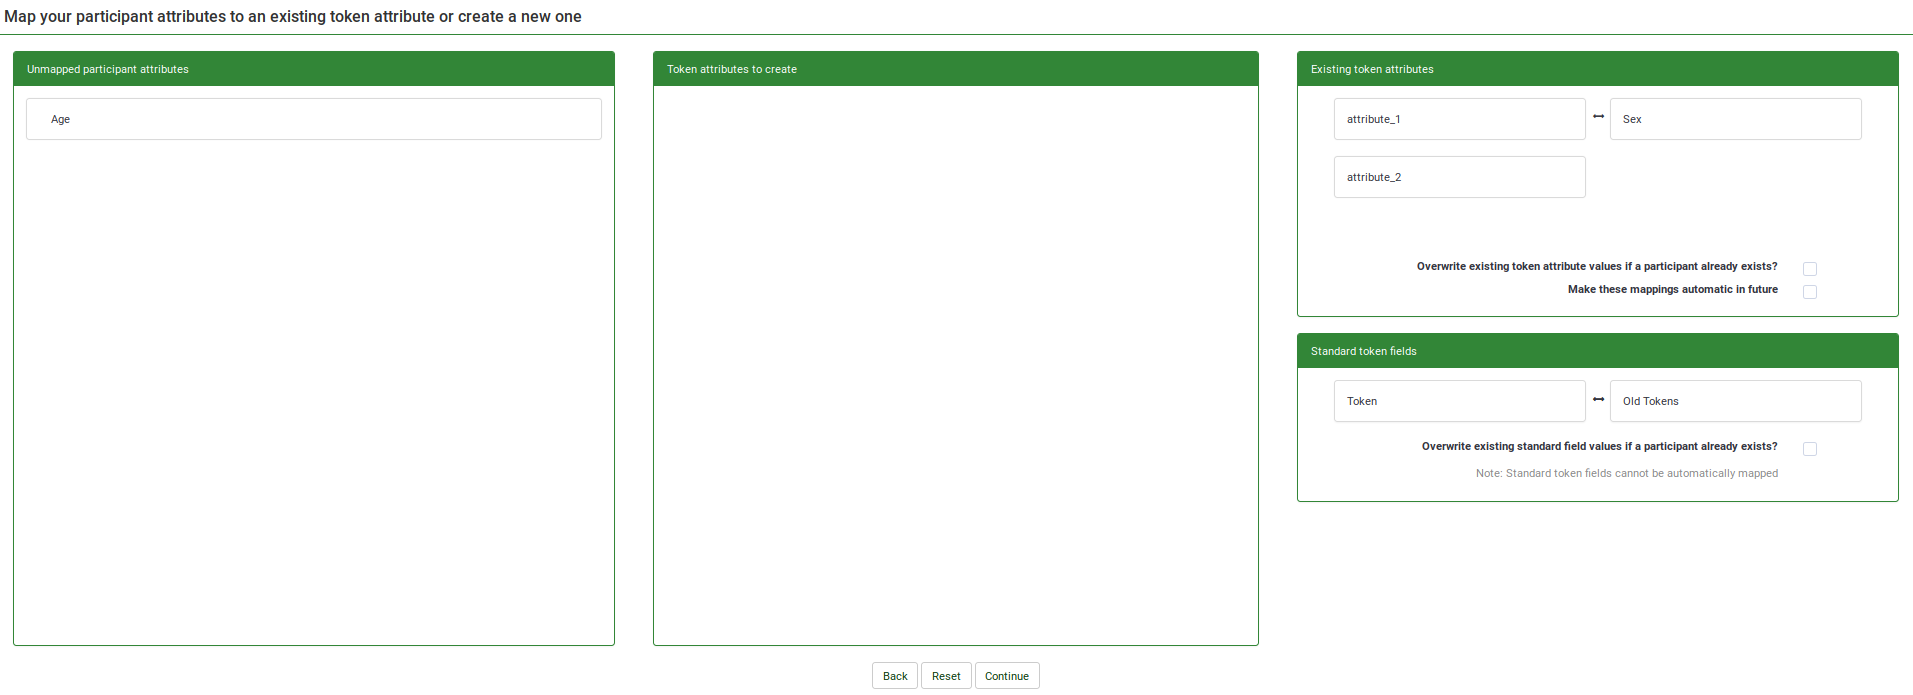
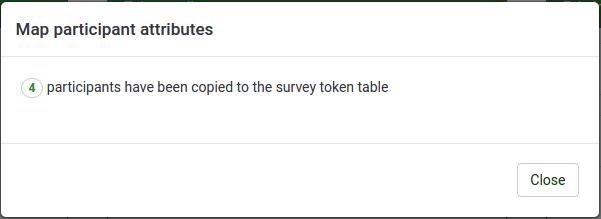
Dopo aver mappato tutti gli attributi, puoi fare clic su Continua. Dopo aver elaborato i partecipanti, verrà visualizzata una pagina di riepilogo, che indica quanti partecipanti sono stati copiati correttamente. Se in precedenza hai chiesto il reindirizzamento, verrai reindirizzato alla tabella dei partecipanti al sondaggio, altrimenti verrai reindirizzato alla pagina principale del CPDB.
Informazioni
Visualizza le statistiche CPDB:

1) Partecipanti totali nel tavolo centrale: il numero totale di partecipanti presenti nel database centrale dei partecipanti.
2) Partecipanti di tua proprietà : Mostra il numero totale di partecipanti che ti hanno come proprietario. Per impostazione predefinita, i nuovi partecipanti inseriti nel database centrale dei partecipanti hanno come proprietario l'utente che per primo li ha aggiunti ad esso .
3) Partecipanti condivisi con te: il numero di partecipanti che sono stati condivisi con te da altri utenti.
4) Partecipanti che hai condiviso : Il numero di partecipanti che hai condiviso con altri utenti.
5) Partecipanti in lista nera: il numero di partecipanti in lista nera.
6) Totale attributi nella tabella centrale : Il numero totale di attributi che possono essere trovati nella tabella centrale.
Import
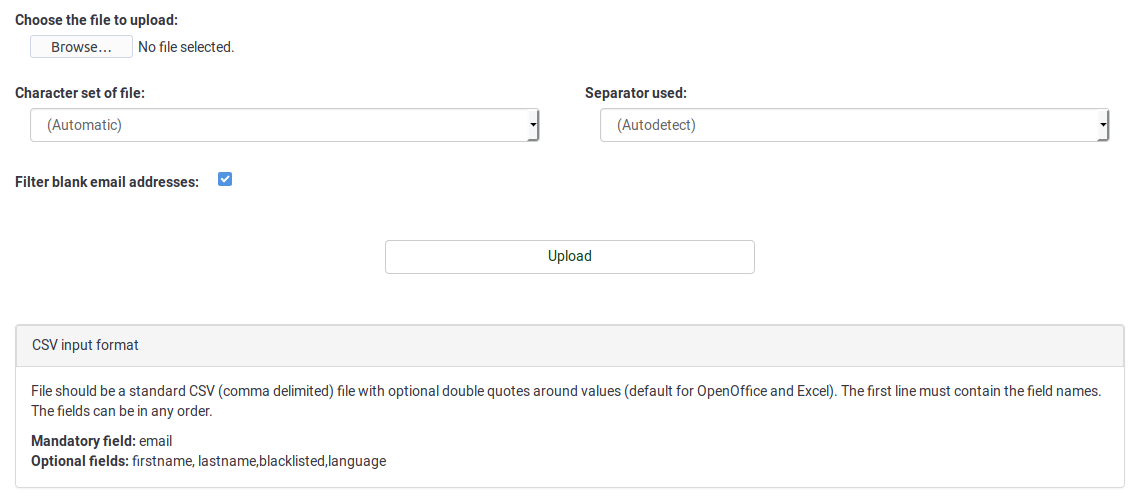
If you wish to add participants via the import function, click the Import button that is located on the main toolbar of the Central participant database page: ![]()
The following options are available:
Please note the text from the box on CSV input format:
Mandatory field: email
Optional fields: firstname, lastname, blacklisted, language
Steps to import
1) Select a file to import and specify the settings associated with it.
2) Map the attributes from the CSV file. Import the attribute data either into an existing attribute from the central participant database or into a new column by creating a new attribute. The newly created attribute will be of text box type - the format can be changed later.

In the screenshot from above, a new attribute called "New Age" will be created. The data from attribute "Sex" was mapped and copied into the existent "Sex" attribute from the central participant database.
3) Click continue, and wait for the process to be done. At the end, a short summary will be displayed.
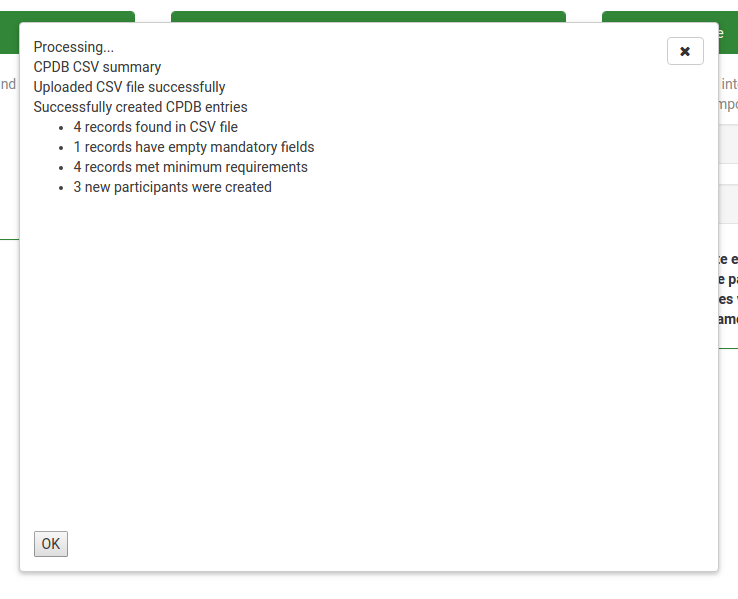
Clicking OK will redirect you to the participants screen, showing you the newly imported participants.
Blacklist settings
The Blacklist settings button is available on the main toolbar of the Central participant database page. Once you click it, the following page will be displayed.
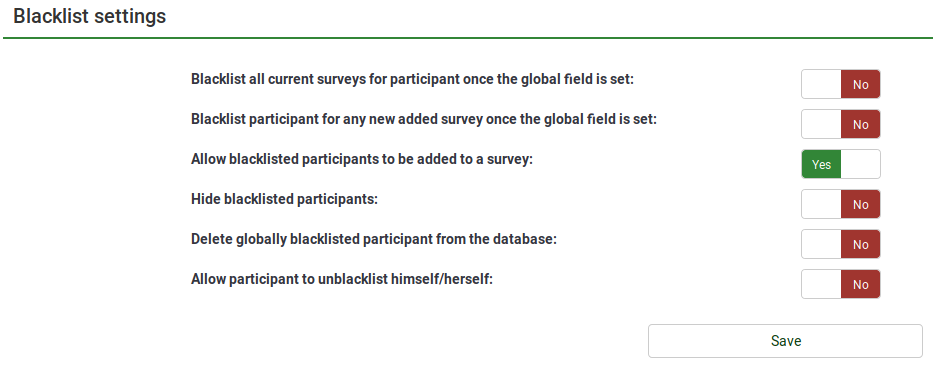
The following Yes/No options are available:
- Blacklist all current surveys for participant once the global field is set: If set to Yes, the blacklisted participant(s) cannot be added to any survey.
- Blacklist participant for any new added survey once the global field is set: If new surveys are created, the respective participant(s) cannot be added to them (if Yes is picked up). However, they can still be added to those surveys created earlier.
- Allow blacklisted participants to be added to a survey: Even if a participant is blacklisted, they can still be added to a survey.
- Hide blacklisted participants: Useful function when you would like to hide participant for a specific amount of time and then make them available for the rest of users with whom those blacklisted participants have been shared with.
- Delete globally blacklisted participants from the database: If Yes, the blacklisted participants will be deleted from the database.
- Allow participant to un-blacklist himself/herself: If Yes, participants can un-blacklist themselves without the help of a LimeSurvey user.
Attributes
To access the Attributes management panel, click the Attributes button located on the main toolbar of CPDB main page: ![]()

The attribute management facilitates the addition of three types of attributes: text box, date, and drop-down list. To add a new attribute, click tAdd new attribute located in the upper-right part of the window:
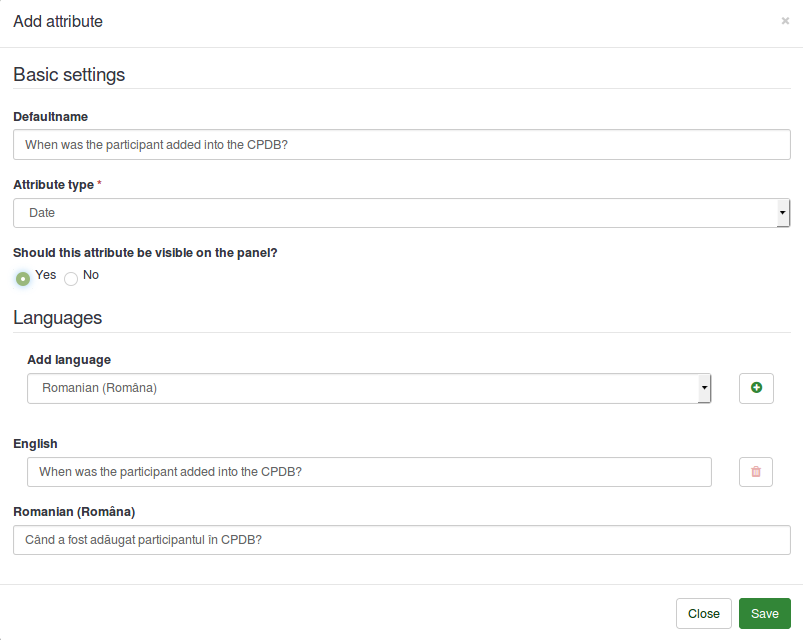
When adding a new attribute, the following options are available:
- Defaultname: It will be used by LimeSurvey to name the attribute in case no other English name is provided.
- Attribute type: You can choose either of the attribute types and the associated user interface will be presented to you while editing.
- Should this attribute be visible on the panel?: It can be Yes or No. This function determines whether the attribute is visible in the CPDB table or not. This can be later edited from the Visible column that is located in the main attributes table.
- Languages: If you would like LimeSurvey not to use the defaultname as the name of the attribute, type here the desired name. Please note that the attribute management has multilingual support. Click on the plus sign after you have selected the language. A new field will appear below the English/default language.
Once the changes are done, click Save.
In the attributes table, two actions are available (see the Action column):

If you click the first icon, a dialog box will be displayed. It includes the basic settings of the selected attribute that can be edited according to your needs.
To delete an attribute from the table, click on the red trash button, located next to the edit button. Clicking the delete button will not only delete the attribute, but also the associated values from the CPDB.
The share panel shows all the information related to the shared participants. Please note that this panel shows only the shared participants owned by that particular user.

This panel shows values like:
1) Last name
2) First name
3) Email address
4) Shared by
5) Owner
6) Date added
7) Can edit?
This information is for viewing/sorting purposes. Only the Can Edit field is editable for the user. The Can edit field allows you to determine whether to allow the respective participant to be editable by the user with whom that participant was shared with or not. Clicking on the check box will make an AJAX call and save the changes on the server.
Export participants
The export function is located on the main toolbar of the Central participant database page: ![]()
When exporting to CSV, you are presented with a dialog box that asks you to mark the attributes you wish to export.
You can export:
- None of the additional attributes
- All the additional attributes
- Certain additional attributes
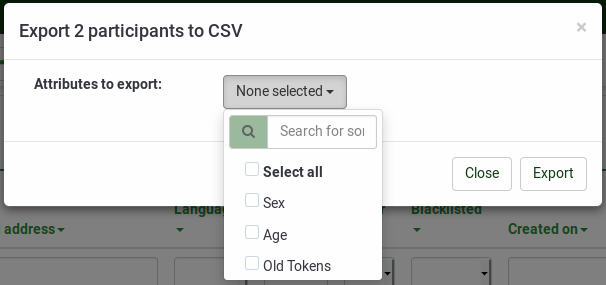
The format of the exported file will be CSV.
Export filtered participants
To export filtered participants, use first the search filters. Then. click the checkbox located on the left side of the Action column (to select all the filtered participants). Then, click the Selected participant(s)... button located at the bottom-right side of the table and select the export function. In this way, only the filtered participants will be exported.
Search filters
If you wish to filter the users from your database, use the search/dropdown boxes located below each column title:

Enter information in the search fields or select from the dropdown lists (when possible) the participants you want to be listed after the filtering process.
Additional information
Additional (technical) information is available in the Central participants database (User panel) Development wiki.
